Creation of Column Schedule and Drawing Template using AutoCad
CHALLENGE 05
AIM:
To create the column schedule using the necessary commands in Autocad.
Introduction:
Structural columns are identified in a column schedule by intersecting grid lines and by their top and bottom constraints and offsets. They are placed into the column schedules according to these identifications. Video: Create Graphical Column Schedules.
Page setup:
- Open new page.
- Select Units > Architectural
- Precision as 0-0 1/256 and apply.
- Set limits 100',30'
Procedure:
Steps for Creating Table by using Line and Offset command:
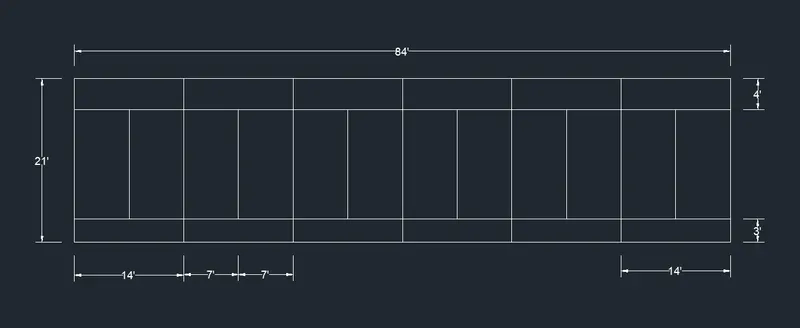
- Select line command and draw a line of 84’ in X direction and a line of 21’ in Y-direction and complete bigger rectangle.
- Then select the offset command and enter offset as 7’ in X direction. Give offsets 11 time in the X direction as 7’
- Again, select the offset command and from top line give offset of 4’ in the Y Direction, and again offsets of 3’ from the bottom line of the table.
Steps for Creating Text BY using Mtext:
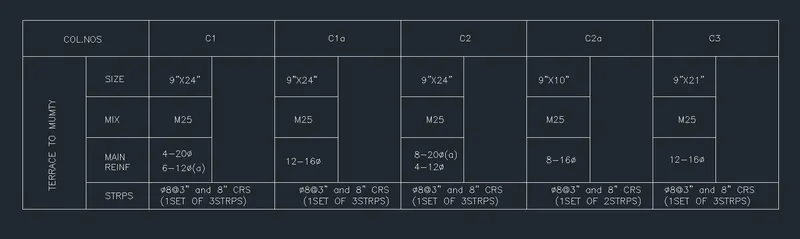
- Select the text command from the ribbon and select single line test, specify the text height as 8’’ and angle o test as 90 degrees and enter the text as terrace to mumty. The text will appear in the desired angle.
- Again, select the text command DT select multiline text drag the cursor in each of the row and column. And enter all the text in the table.
Steps for Drawing the Columns:
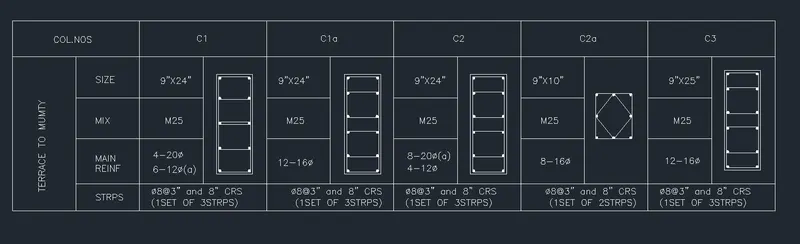
- The size of column is C1 is 9’’X24’’, create a rectangle of size 9’’ X 24’’ that is 2’.
- Select offset command and enter the value of offset as 0.5 a smaller rectangle in the original rectangle will be drawn.
- Now divide the line in 4 parts by divide tool by entering DIV in the command box and divide the line.
- Draw the lines of division in the inside rectangle.
- Now select the circle command and in that select tan tan radius and by selecting both corner lines enter the value of radius as 0.2.
- Draw all the circles in the 4 corners of the inner rectangle.
- Now select the fillet command an fillet the edges as radius and enter the radius as 0.2.
- Now again select the circle command and select the two-point circle and draw the circle where the geometry is divided in parts.
- Select the hatch command from the ribbon and select solid and color white, fill the circles with white color that is the reinforcement bar.
- Draw the columns C1a, C2, C2a, C3 in the same manner.
RESULT:
The Given Column Schedule is Drawn by using Autocad.
2) CREATE THE WINDOW SCHEDULE AS SHOWN IN FIG:
AIM:
To create the Window Schedule by using Autocad.
Introduction:
A tabulation, usually on a blueprint or in specifications, which lists all windows required on a construction job, indicating the sizes, number of lights, types, locations, and special requirements.
To Create this schedule table and Text commands are used.
Page setup:
- Open new page.
- Select Units > Architectural
- Precision as 0-0 1/256 and apply.
Procedure:
- Using Table command draw table with 5 columns and 6 Rows with Title bar.
- Give 5 columns 6rows and column width 3” and Height 1
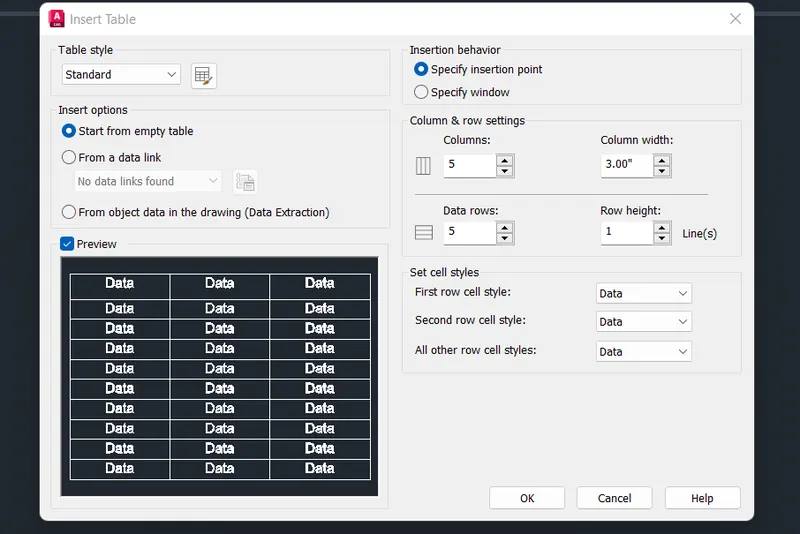
- Using the ST command open the settings and give font as romans and height 9”.
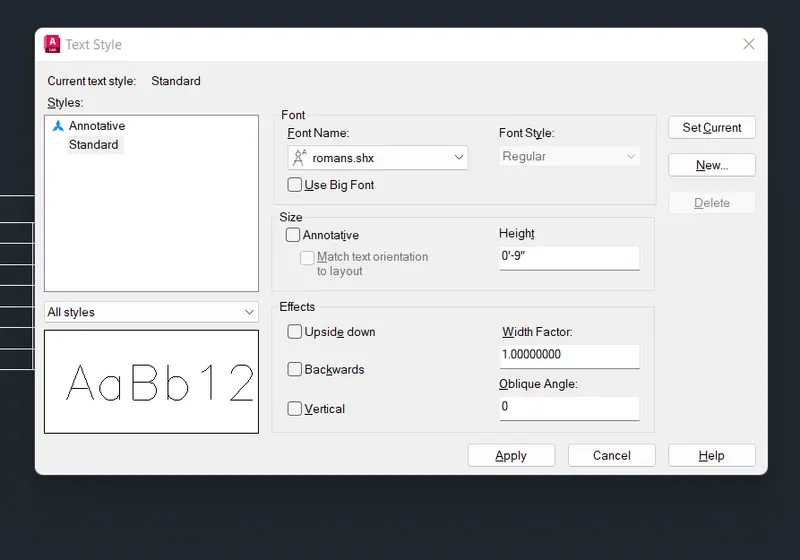
- Using the mouse pointer select each box and give the values or text as per requirement
RESULT:
The given window schedule is drawn by using the Autocad.
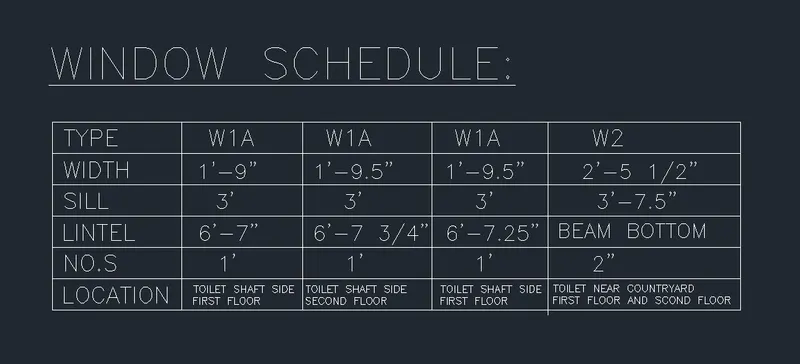
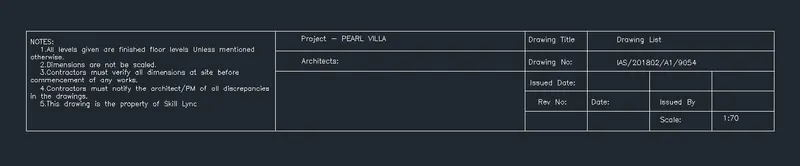
3) CREATE THE DRAWING TEMPLATE AS SHOWN IN FIG:
AIM:
To create a line template for given figure by using Autocad.
Introduction:
- Templates are stencils that allows you to draw specific symbols and shapes that you use repeatedly in a design.
- To create this template Line, Trim, Text , Multitext commands are used.
Page setup:
- Open new page.
- Select Units > Engineering
- Precision as 0'-000" and apply.
- Set limits 150',50'.
Procedure:
- Select line command and draw a line of 150’ in X direction and a line of 20’ in Y-direction and complete bigger rectangle.
- Then select the offset command and enter offset as 50’ in X direction. Give offsets 2 time in he X direction as 50’.
- Again, select the offset command and from line give offset of 4’ in the Y Direction, give such 4 offsets in the Y Direction.
- Ener the offset command and in the right most art of the table enter an offset of 12’-6’’. Give such 3 offsets.
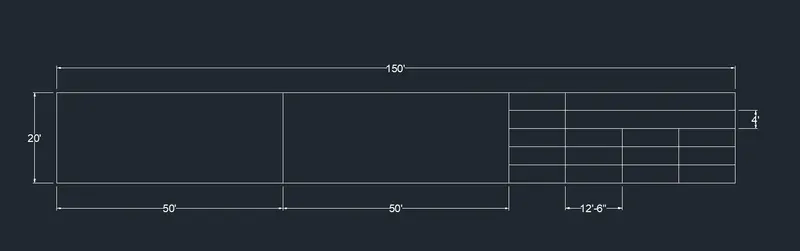
- Now select the Text command and in the text select the option as multiline text and drag it in each of the row and column and enter the text.
- Keep the size of text in between 8.5’’ to 11.5’’ that is the height of the text.
- In this way fill the entire table by using Multiline text option.
RESULT:
The given Line Template is made by using Autocad.
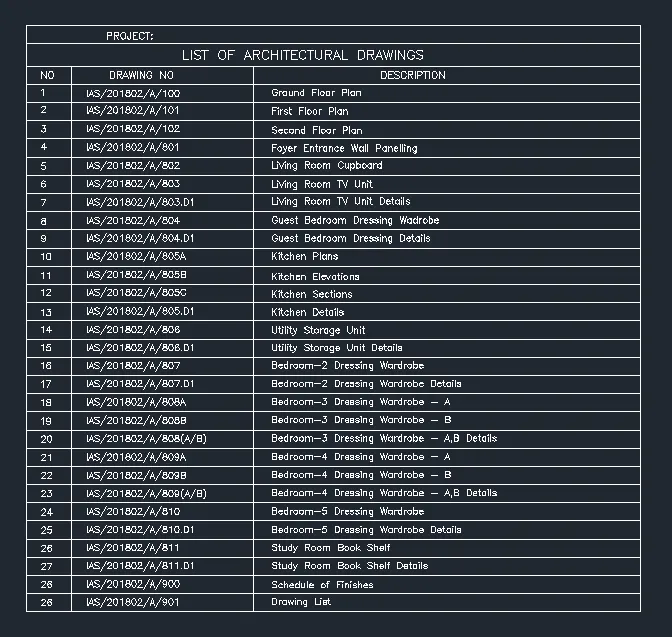
4) CREATE THE LIST OF DRAWING SCHEDULE AS SHOWN IN FIG:
AIM:
To create a drawing schedule by using Autocad.
Page setup:
- Open new page.
- Select Units > Engineering
- Precision as 0'-000" and apply.
- Set limits 150',50'.
Procedure:
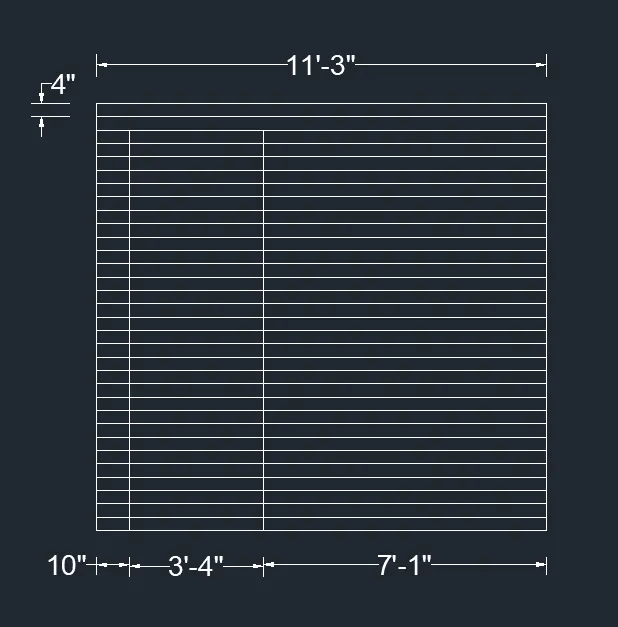
- Select line command and draw a line of 135’’(11’3’’) in X direction and draw x line of in Y-direction.
- Then select the offset command and enter offset as 10’’ , then 40’’(3’4’’) , then 85’’(7’-1’’) in X direction.
- Again, select the offset command and from line give offset of 4’’ , 5’’ , 4’’ in the Y Direction, give such 28 offsets in the Y Direction.
- Trim the unwanted lines and draw the table as required.
- Now select the Text command and in the text select the option as multiline text and drag it in each of the row and column and enter the text.
- Keep the size of text in between 1.5’’ to 2.5’’ that is the height of the text.
- In this way fill the entire table by using Multiline text option.
RESULT:
The given Drawing Schedule is finally made by using Autocad.
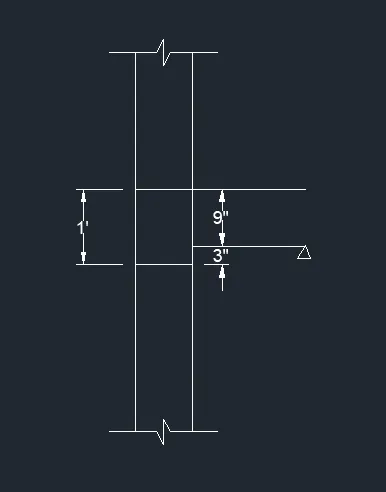
5) CREATE THE BEAM DETAILS AS SHOWN IN FIG:
AIM:
To create a beam details by using Autocad.
Introduction:
Creating this template using line, text, hatch, trim, offset, ortho and dimension commands.
Page setup:
- Open new page.
- Select Units > Engineering
- Precision as 0'-0" and apply.
- Set limits 5',15'.
Procedure:
- Select line command and draw a line of 9’’ in X direction and a line of 5’ in Y-direction.
- Then select the offset command and enter offset as 2’-2.4’’ in X direction from bottom line of the beam cross section.
- Again enter an offset of 12’’ from the below line in the upward direction.
- Enter hatch in command box and go to settings in that select pattern and choose pattern as ANSI32.
- Choose the scale of hatch as 4 and hatch the upper and lower part of beam cross section.
- Again by selecting hatch command and choose as type ISO and choose air conc type and hatch the middle part of the beam as concrete and give scale 0.5.
- By using the dimension tool give the dimensions to the beam section.
- Select text and multiline text and drag the text where required to the desired scale according to the size of the drawing required.
RESULT:
The given Beam Details is drawn by using Autocad.