Creation of geometries by Coordinate system methods using AutoCad
CHALLENGE 01
P01
AIM:
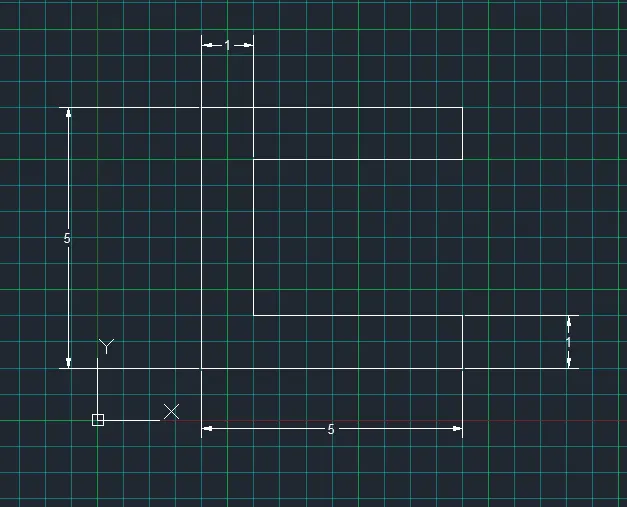
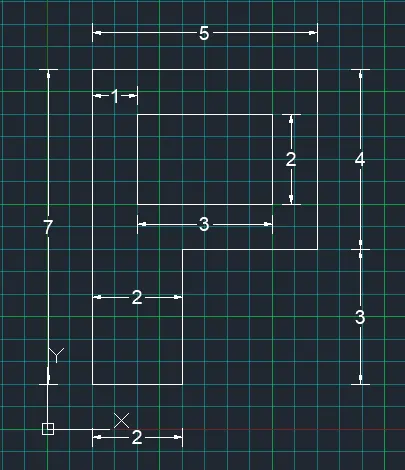
To create the geometric coordinates from given drawings by using the coorindate system methods. In the P1 and P2 drawings by using all the coordinate system methods such as Absolute coordinate system, Relative coordinate system, Direct distance entry system. Line and circle command is used wherever required. Imperial templates and decimal units are used for drafting.
Procedure:
1) Absolute Coordinate system:
- Select the line command in command tool bar.
- Specify the first point given in drawing, origin point is given (2,1) and type it after select line command, then specify first point (2,1) and click enter
- Then specify the second point (2,6) and click enter
- Then specify third point (7,6) and click enter
- Then specify fourth point (7,5) and click enter
- Then specify fifth point (3,5) and click enter
- Then specify sixth point (3,2) and click enter
- Then specify seventh point (7,2) and click enter
- Then specify eigth point (7,1) and click enter
- Using C or Close command to close the last coordinates or last point of drawing.
- This is the procedure for Absolute coordinate system.
2) Relative Rectangular Coordinate system:
- Choose the Line tool.
- Line specify first point: 2,1 (start point)
- Then specify next point: @0,5 (second point DX = 0, DY = 5)
- Then specify next point: @5,0 (third point DX = 5, DY =0)
- Then specify next point: @0,-1 (fourth point DX = 0, DY =-1)
- Then specify next point: @-4,0 (fifth point DX = -4, DY =0)
- Then specify next point: @0,-3 (sixth point DX = 0, DY =-3)
- Then specify next point: @4,0 (seventh point DX = 4, DY =0)
- Then specify next point: @0,-1 (eigth point DX = 0, DY =-1)
- Using C or Close command to close the last coordinates or last point of drawing.
- This is the procedure for Relative Rectangular coordinate system.
3) Relative Polar Coordinate system:
- Choose the Line tool.
- Line specify first point: 2,1 (start point)
- Then specify second point: @5<90
- Then specify third point: @5<0
- Then specify fourth point: @1<270
- Then specify fifth point: @4<0
- Then specify sixth point: @3<270
- Then specify seventh point: @4<0
- Then specify eigth point: @1<270
- Using C or Close command to close the last coordinates or last point of drawing.
- This is the procedure for Relative Polar coordinate system.
4) Direct distance Entry method:
- Choose the Line tool.
- Line specify the first point and move the cursor towards Y direction, type the length 5' and click enter
- Then move the cursor towards right side of X direction and type length 5' click enter
- Continually move towards downward Y direction and type length 1', click enter
- Then move the cursor towards left side of X direction and type length 4', click enter
- Repeat the line command, move cursor towards downward Y direction and type length 3', click enter
- Then move the cursor towards right side of X direction and type length 4', click enter
- Then move the cursor towasrd downward Y direction and type length 1', click enter
- Finally connecting the last point to first point and click enter or Esc.
- This is the procedure for Direct distance entry method.
Result for P01:
P02
Aim:
To create the geometric coordinates for the given drawing by using all the coordinate system.
Procedure:
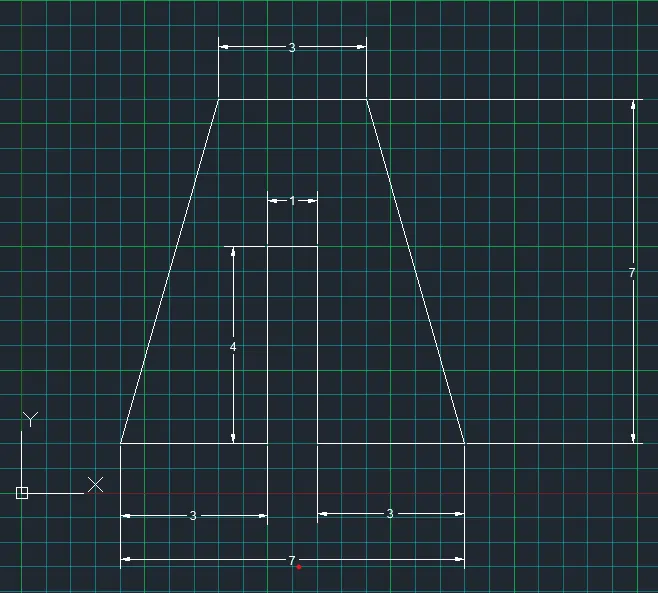
1) Absolute Coordinate system:
- Select the line command in command tool bar.
- Specify the first point given in drawing, origin point is given (2,1) and type it after select line command, then specify first point (2,1) and click enter
- Then specify the second point (5,1) and click enter
- Then specify third point (5,5) and click enter
- Then specify fourth point (6,5) and click enter
- Then specify fifth point (6,1) and click enter
- Then specify sixth point (9,1) and click enter
- Then specify seventh point (7,8) and click enter
- Then specify eigth point (4,8) and click enter
- Using C or Close command to close the last coordinates or last point of drawing.
2) Relative Rectangular Coordinate system:
- Choose the Line tool.
- Line specify first point: 2,1 (start point)
- Then specify next point: @3,0 (second point DX = 3, DY = 0)
- Then specify next point: @0,4 (third point DX = 0, DY =4)
- Then specify next point: @1,0 (fourth point DX = 1, DY =0)
- Then specify next point: @0,-4 (fifth point DX = 0, DY =-4)
- Then specify next point: @3,0 (sixth point DX = 3, DY =0)
- Then specify next point: @-2,7 (seventh point DX = -2, DY =7)
- Then specify next point: @-3,0 (eigth point DX = -3, DY =0)
- Using C or Close command to close the last coordinates or last point of drawing.
3) Relative Polar Coordinate system:
- Choose the Line tool.
- Line specify first point: 2,1 (start point)
- Then specify second point: @3<0
- Then specify third point: @4<90
- Then specify fourth point: @1<0
- Then specify fifth point: @4<270
- Then specify sixth point: @3<0
- Then specify seventh point: @7<105
- Then specify eigth point: @3<180
- Using C or Close command to close the last coordinates or last point of drawing.
4) Direct distance Entry method:
- Choose the Line tool.
- Line specify the first point and move the cursor towards X direction, type the length 3' and click enter
- Then move the cursor towards upward of Y direction and type length 4' click enter
- Continually move towards right of X direction and type length 1', click enter
- Then move the cursor towards downward of Y direction and type length 4', click enter
- Repeat the line command, move cursor towards right of X direction and type length 3', click enter
- Then move the cursor towards upward of 75degree incline of Y direction and type length 7', click enter
- Then move the cursor towards left of X direction and type length 3', click enter
- Finally connecting the last point to first point and click enter or Esc.
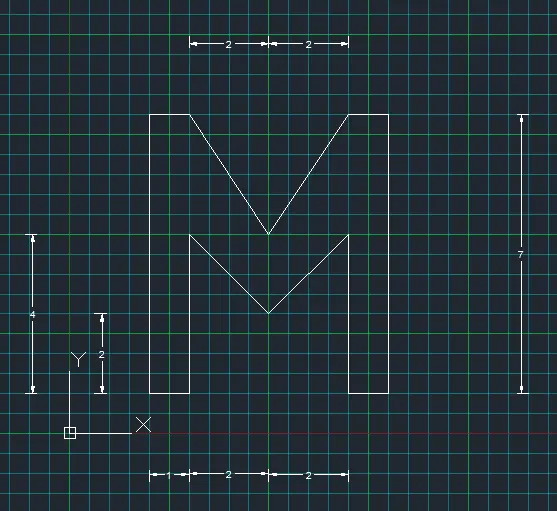
P04
Aim:
To create the geometric coordinates for the given P04 drawing by using Relative Rectangular Coordinate system.
Procedure:
- Choose the Line tool.
- Line specify first point: 2,1 (start point)
- Then specify next point: @1,0 (second point DX = 1, DY = 0)
- Then specify next point: @0,4 (third point DX = 0, DY =4)
- Then specify next point: @0,2 (fourth point DX = 0, DY =2)
- Then specify next point: @2,-2 (fifth point DX = 2, DY =-2)
- Then specify next point: @2,2 (sixth point DX = 2, DY =2)
- Then specify next point: @0,-4 (seventh point DX = 0, DY =-4)
- Then specify next point: @1,0 (eigth point DX = 1, DY =0)
- Then specify next point: @0,7 (ninth point DX = 0, DY =7)
- Then specify next point: @-1,0 (tenth point DX = -1, DY =0)
- Then specify next point: @-2,-3 (eleventh point DX = -2, DY =-3)
- Then specify next point: @-2,3 (twelth point DX = -2, DY =3)
- Then specify next point: @-1,0 (thirteenth point DX = -1, DY =0)
- Using C or Close command to close the last coordinates or last point of drawing.
Result:
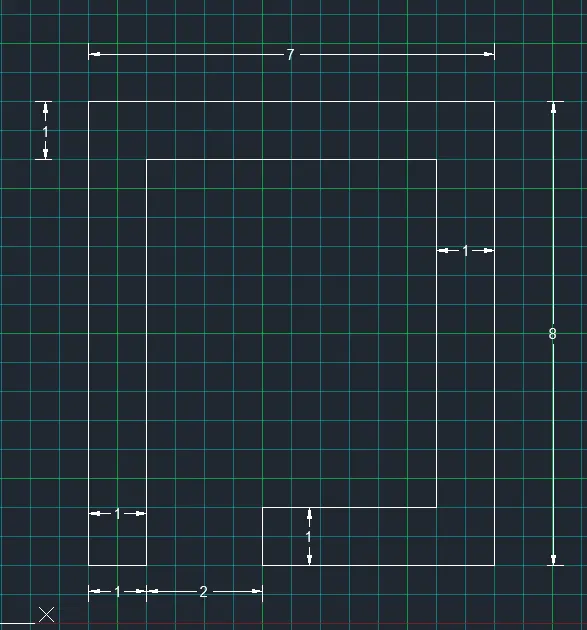
P04
Aim:
To create the geometric coordinates for the given P04 drawing by using Relative Rectangular Coordinate system.
Procedure:
- Choose the Line tool.
- Line specify first point: 2,1 (start point)
- Then specify next point: @1,0 (second point DX = 1, DY = 0)
- Then specify next point: @0,7 (third point DX = 0, DY =7)
- Then specify next point: @5,0 (fourth point DX = 5, DY =0)
- Then specify next point: @0,-6 (fifth point DX = 0, DY =-6)
- Then specify next point: @-3,0 (sixth point DX = -3, DY =0)
- Then specify next point: @0,-1 (seventh point DX = 0, DY =-1)
- Then specify next point: @4,0 (eigth point DX = 4, DY =0)
- Then specify next point: @0,8 (ninth point DX = 0, DY =7)
- Then specify next point: @-7,0 (tenth point DX = -1, DY =0)
- Using C or Close command to close the last coordinates or last point of drawing.
Result:
P07
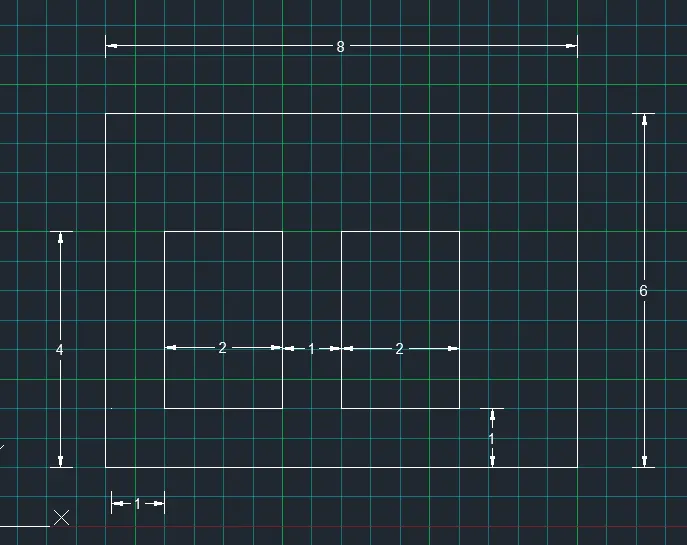
Aim:
To create the geometric coordinates for the given P07 drawings by using Absolute Coordinate system.
Procedure:
- Choose the line tool.
- Specify the first point given in drawing, origin point is given (2,1) and type it after select line command, then specify first point (2,1) and click enter
- Then specify the second point (10,1) and click enter
- Then specify third point (10,7) and click enter
- Then specify fourth point (2,7) and click enter
- Using C or Close command to close the last coordinates or last point of drawing.
- Then specify fifth point (3,2) and click enter
- Then specify sixth point (5,2) and click enter
- Then specify seventh point (5,5) and click enter
- Then specify eigth point (3,5) and click enter
- Using C or Close command to close the last coordinates or last point of drawing.
- Then specify ninth point (6,2) and click enter
- Then specify tenth point (8,2) and click enter
- Then specify eleventh point (8,5) and click enter
- Then specify twelth point (6,5) and click enter
- Using C or Close command to close the last coordinates or last point of drawing.
Result:
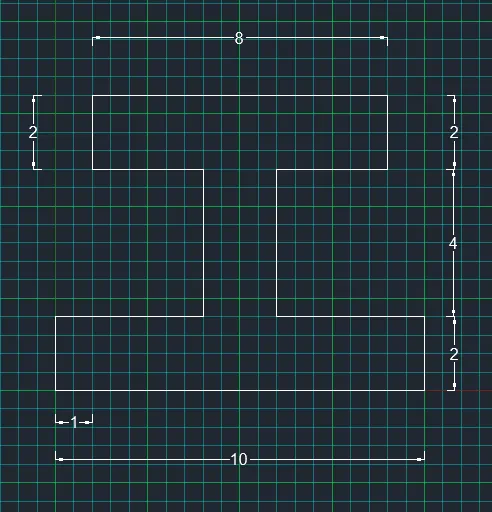
P08
Aim:
To create the geometric coordinates for the given P07 drawings by using Absolute Coordinate system.
Procedure:
- Choose the line tool.
- Specify the first point given in drawing, origin point is given (0,0) and type it after select line command, then specify first point (0,0) and click enter
- Then specify the second point (10,0) and click enter
- Then specify third point (10,2) and click enter
- Then specify fourth point (6,2) and click enter
- Then specify fifth point (6,6) and click enter
- Then specify sixth point (9,6) and click enter
- Then specify seventh point (9,8) and click enter
- Then specify eigth point (1,8) and click enter
- Then specify ninth point (1,6) and click enter
- Then specify tenth point (4,6) and click enter
- Then specify eleventh point (4,2) and click enter
- Then specify twelth point (0,2) and click enter
- Using C or Close command to close the last coordinates or last point of drawing.
Result:
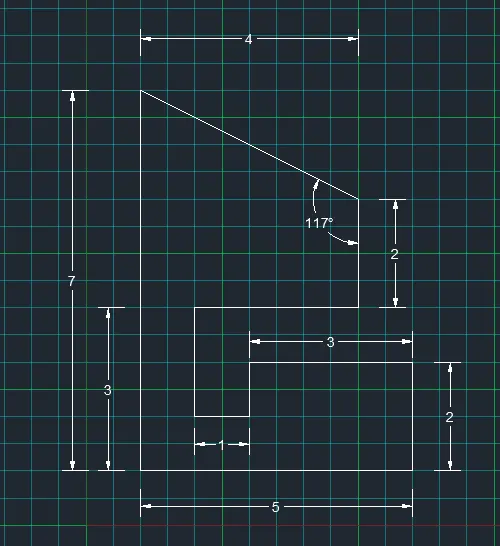
CP09
Aim:
To create the geometric coordinates for the given P09 drawing by using Relative Polar Coordinate system.
Procedure:
- Choose the Line tool.
- Line specify first point: 1,1 (start point)
- Then specify second point: @5<0
- Then specify third point: @2<90
- Then specify fourth point: @3<180
- Then specify fifth point: @1<270
- Then specify sixth point: @1<180
- Then specify seventh point: @2<90
- Then specify eigth point: @3<0
- Then specify ninth point: @2<90
- Then specify tenth point: @4<117
- Using C or Close command to close the last coordinates or last point of drawing.
Result:
P10
Aim:
To create the geometric coordinates for the given P07 drawings by using Absolute Coordinate system.
Procedure:
- Choose the line tool.
- Specify the first point given in drawing, origin point is given (1,1) and type it after select line command, then specify first point (1,1) and click enter
- Then specify the second point (3,1) and click enter
- Then specify third point (3,4) and click enter
- Then specify fourth point (6,4) and click enter
- Then specify fifth point (6,8) and click enter
- Then specify sixth point (1,8) and click enter
- Using C or Close command to close the last coordinates or last point of drawing.
- Then specify seventh point (2,5) and click enter
- Then specify eigth point (5,5) and click enter
- Then specify ninth point (5,7) and click enter
- Then specify tenth point (2,7) and click enter
- Using C or Close command to close the last coordinates or last point of drawing.
Result:
CIVIL RELATED PROBLEMS
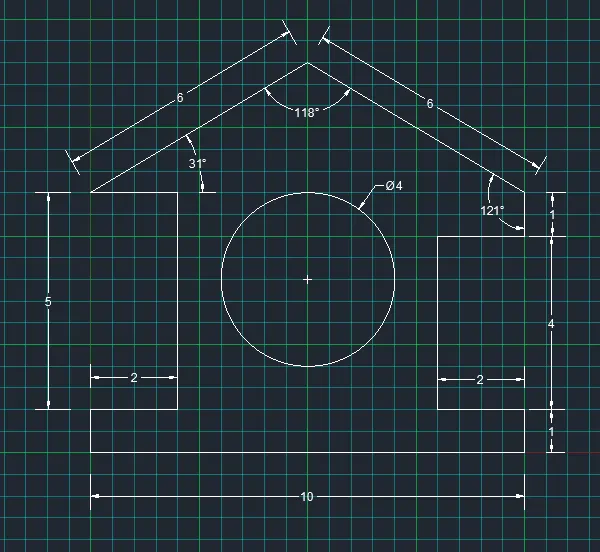
Profile - wood
Aim:
To draw the profile wood by using the Absolute Coordinate system.
Procedure:
- Choose the line tool.
- Specify the first point given in drawing, origin point is given (0,0) and type it after select line command, then specify first point (0,0) and click enter
- Then specify the second point (10,0) and click enter
- Then specify third point (10,1) and click enter
- Then specify fourth point (8,1) and click enter
- Then specify fifth point (8,5) and click enter
- Then specify sixth point (10,5) and click enter
- Then specify seventh point (10,6) and click enter
- Then specify eigth point (5,9) and click enter
- Then specify ninth point (0,6) and click enter
- Then specify tenth point (2,6) and click enter
- Then specify eleventh point (2,1) and click enter
- Then specify twelfth point (0,1) and click enter
- Using C or Close command to close the last coordinates or last point of drawing.
- Then using the circle tool and draw the circle by using given point (5,4)
- Specify the radius of circle 2 and click enter.
- This is the procedure to draw the wood profile by using Absolute coordinate system.
Result:
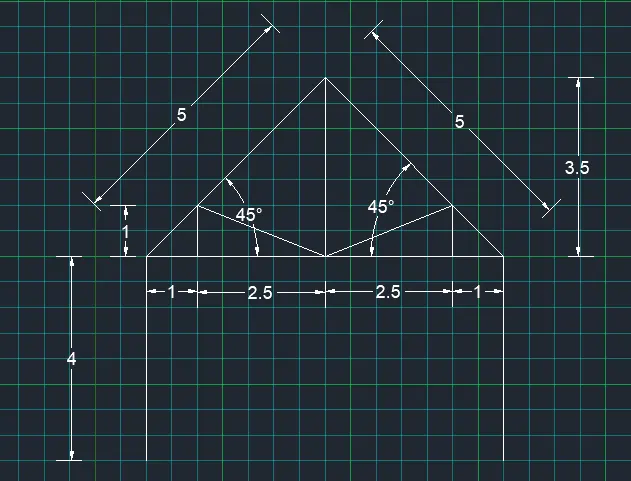
OUEEN POST TRUSS
Aim:
To draw the Queen post truss drawing by using Relative Rectangular Coordinate system.
Procedure:
- Choose the Line tool.
- Line specify first point: 1,1 (start point)
- Then specify next point: @0,4 (second point DX =0 , DY = 4)
- Then specify next point: @7,0(third point DX = 7, DY =0)
- Then specify next point: @0,-4 (fourth point DX = 0, DY =-4)
- Then specify next point: @-3.5,3.5 (fifth point DX = -3.5, DY =3.5)
- Then specify next point: @-3.5,-3.5 (sixth point DX = -3.5, DY =-3.5)
- Then specify next point: @1,0 (seventh point DX = 1, DY =0)
- Then specify next point: @0,1 (eigth point DX = 0, DY = 1)
- Then specify next point: @-2.5,-1 (ninth point DX = -2.5, DY =-1)
- Then specify next point: @0,3.5 (tenth point DX = 0, DY =3.5)
- Then specify next point: @2.5,1 (eleventh point DX = 2.5, DY =1)
- Then specify next point: @0,-1 (tenth point DX = 0, DY =-1)
- Using C or Close command to close the last coordinates or last point of drawing.
Result:
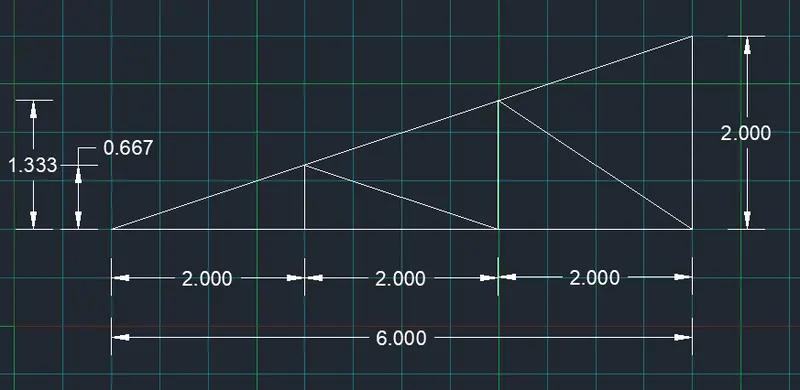
MONO PITCH
Aim:
To draw the Mono pitch drawing by using Relative Rectangular Coordinate system.
Procedure:
- Choose the Line tool.
- Line specify first point: 1,1 (start point)
- Then specify next point: @6,0 (second point DX =6 , DY = 0)
- Then specify next point: @0,2(third point DX = 0, DY =2)
- Use close command for connecting the coordinates.
- Then specify next point: @2,0(fourth point DX = 2 DY = 0)
- Then specify next point: @0,0.333(fifth point DX = 0, DY = 0.333)
- Then specify next point: @-2,0 (sixth point DX = -2, DY =0)
- Then specify next point: @0, 1.667(seventh point DX = 0, DY =1.667)
- Then specify next point: @-2,0 (eigth point DX = -2, DY =0)
- Using C or Close command to close the last coordinates or last point of drawing.
Result: