Creation of Column Schedule and Drawing Template using AutoCad
1.
Aim:- Create a column schedule with the help of lines. Also, insert text with the help of Dtext command or Single Line text.
Procedure:-
- Creating the columns of the given size.
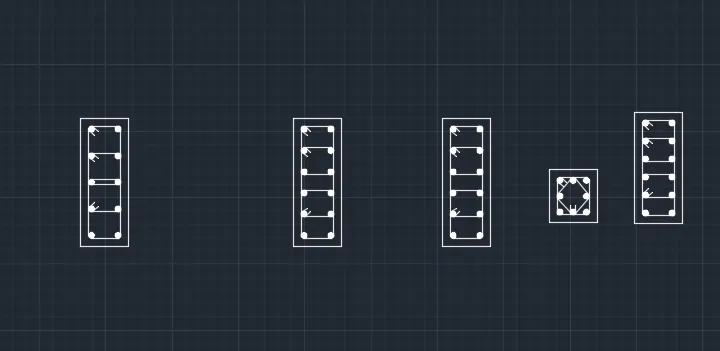
- For 1st type of column draw a rectangle of 9"X24" by using "REC" command.
- Now give offset of 1.5" (assuming the size of cover provided to reinforcement)to the rectangle inside the rectangle by using command "O"
- Now explode the inner rectangle by using "X" command
- Now give the fillet of the 0.5" to the inner rectangle by using command "F" and then select the fillet radius as 0.5"
- Now draw a circle of 0.5" on both the corners of the inner rectangle in such a way that the boundary of the circle and fillet arc overlaps each other.
- Now select both the circle then enter the command copy "CO" and then select the side quardent point of the circle and then select "array" and then enter the no. of copies as "5" and then select "Fit" and then select upper end of the fillet arc located on the bottom of the rectangle.
- Now add hatch to the circles by using the "Hatch" command and then selecting the type of hatch as solid.
- Now provide the horizontal lines connecting the circles at the quardent point where need.
- Now add lines at 45 degree angle to show the bended strips where needed by using start point as the tangent of the circle.
- For 2nd type of column draw a rectangle of 9"X24" by using "REC" command.
- Now give offset of 1.5" (assuming the size of cover provided to reinforcement)to the rectangle inside the rectangle by using command "O"
- Now explode the inner rectangle by using "X" command
- Now give the fillet of the 0.5" to the inner rectangle by using command "F" and then select the fillet radius as 0.5"
- Now draw a circle of 0.5" on both the corners of the inner rectangle in such a way that the boundary of the circle and fillet arc overlaps each other.
- Now select both the circle then enter the command copy "CO" and then select the side quardent point of the circle and then select "array" and then enter the no. of copies as "6" and then select "Fit" and then select upper end of the fillet arc located on the bottom of the rectangle.
- Now add hatch to the circles by using the "Hatch" command and then selecting the type of hatch as solid.
- Now provide the horizontal lines connecting the circles at the quardent point where need.
- Now add lines at 45 degree angle to show the bended strips where needed by using start point as the tangent of the circle.
- For 3rd type of column draw a rectangle of 9"X24" by using "REC" command.
- Now give offset of 1.5" (assuming the size of cover provided to reinforcement)to the rectangle inside the rectangle by using command "O"
- Now explode the inner rectangle by using "X" command
- Now give the fillet of the 0.5" to the inner rectangle by using command "F" and then select the fillet radius as 0.5"
- Now draw a circle of 0.5" on both the corners of the inner rectangle in such a way that the boundary of the circle and fillet arc overlaps each other.
- Now select both the circle then enter the command copy "CO" and then select the side quardent point of the circle and then select "array" and then enter the no. of copies as "6" and then select "Fit" and then select upper end of the fillet arc located on the bottom of the rectangle.
- Now add hatch to the circles by using the "Hatch" command and then selecting the type of hatch as solid.
- Now provide the horizontal lines connecting the circles at the quardent point where need.
- Now add lines at 45 degree angle to show the bended strips where needed by using start point as the tangent of the circle.
- For 4th type of column draw a rectangle of 9"X10" by using "REC" command.
- Now give offset of 1.5" (assuming the size of cover provided to reinforcement)to the rectangle inside the rectangle by using command "O"
- Now explode the inner rectangle by using "X" command
- Now give the fillet of the 0.5" to the inner rectangle by using command "F" and then select the fillet radius as 0.5"
- Now draw a circle of 0.5" on both the corners of the inner rectangle in such a way that the boundary of the circle and fillet arc overlaps each other.
- Now select both the circle then enter the command copy "CO" and then select the side quardent point of the circle and then select "array" and then enter the no. of copies as "3" and then select "Fit" and then select upper end of the fillet arc located on the bottom of the rectangle.
- Now add hatch to the circles by using the "Hatch" command and then selecting the type of hatch as solid.
- Now provide the horizontal lines connecting the circles at the quardent point where need.
- Now add lines at 45 degree angle to show the bended strips where needed by using start point as the tangent of the circle.
- For 5th type of column draw a rectangle of 9"X21" by using "REC" command.
- Now give offset of 1.5" (assuming the size of cover provided to reinforcement)to the rectangle inside the rectangle by using command "O"
- Now explode the inner rectangle by using "X" command
- Now give the fillet of the 0.5" to the inner rectangle by using command "F" and then select the fillet radius as 0.5"
- Now draw a circle of 0.5" on both the corners of the inner rectangle in such a way that the boundary of the circle and fillet arc overlaps each other.
- Now select both the circle then enter the command copy "CO" and then select the side quardent point of the circle and then select "array" and then enter the no. of copies as "6" and then select "Fit" and then select upper end of the fillet arc located on the bottom of the rectangle.
- Now add hatch to the circles by using the "Hatch" command and then selecting the type of hatch as solid.
- Now provide the horizontal lines connecting the circles at the quardent point where need.
- Now add lines at 45 degree angle to show the bended strips where needed by using start point as the tangent of the circle.
- Thus, Drawing of columns is completed
- Now Draw a table which can contain this columns and and their descriptions.
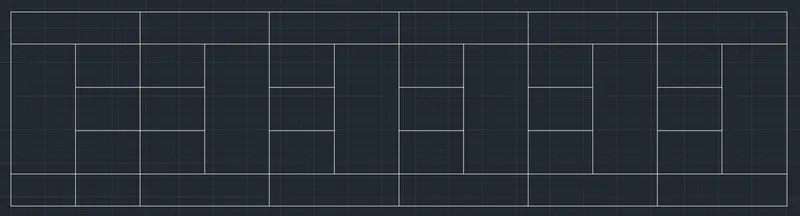
- Now draw a rectangle with the help of "LINE" command of size of 24'X6'.
- Now give the horizontal line the offset of the 1' & 4' respectively to create the three rows.
- Now Give the offset of 2' to the vertical line until it reaches the end of the horizontal line creating 12 columns.
- Now trim The Verticle lines alternatly and the trim the middle horizontal lines in the alternate columns to create a table for the Scheduling for the column
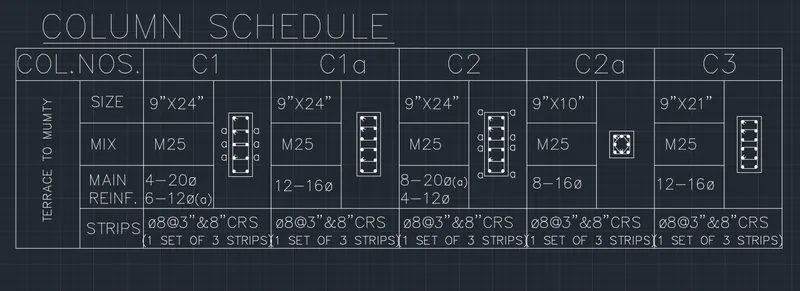
- Now enter the required data in the boxes using Single line text by "DTEXT" command.
- And move the drawn columns in the respected boxes.
------------------------------------------------------------------------------------------------------------------------------------------
2.
Aim:- To Create a window schedule with the help of "TABLE" command.
Procedure:-
- For creating the table enter "TABLE" command.
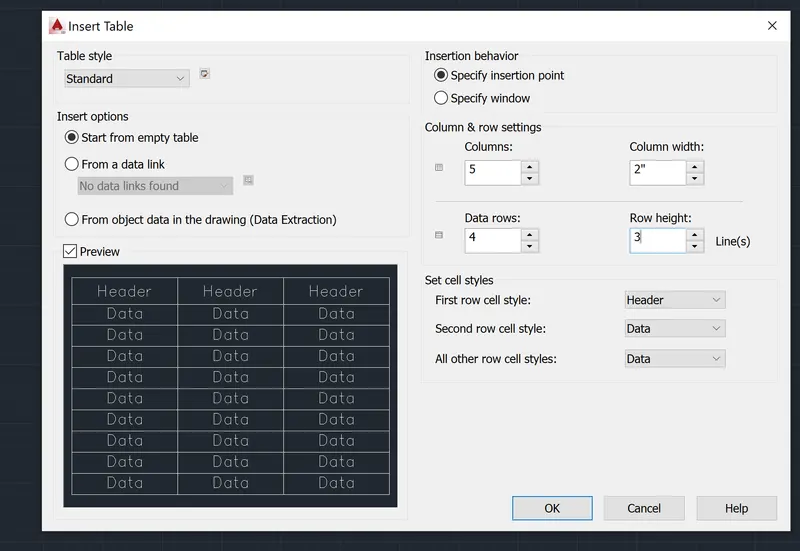
- Now Fill No. of columns as "5"
- Now Fill No. of rows as "4"
- Change first row cell type to Header from Title as there is no need for title here.
- Change Second row cell type to data
- Then click on OK button and following table will apper.
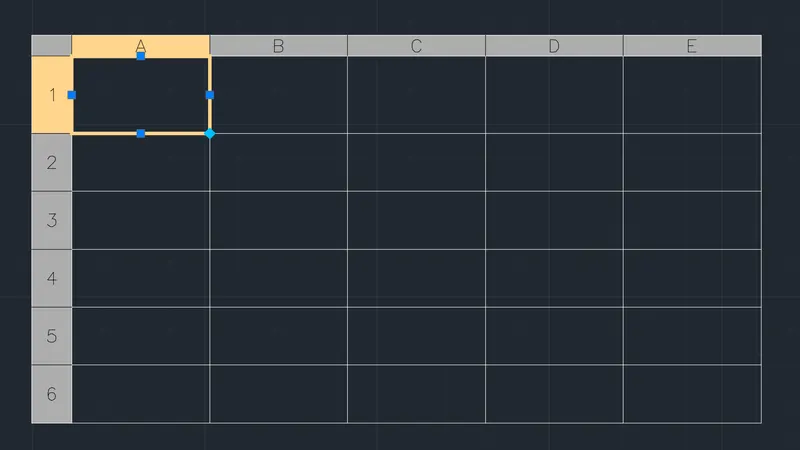
- Now select all the boxes in each column by draging the right-bottom point and the set it to the middle-centre.
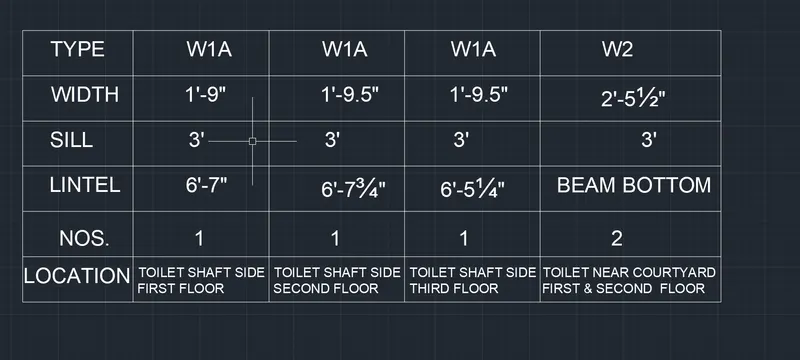
- Now enter the given data to complete the given window schedule and adjust the size of the columns as needed.
---------------------------------------------------------------------------------------------------------------------------------------
3.
Aim:- To create a title box for the drawing page with important notes and all the information about drawing using lines.
Procedure:-
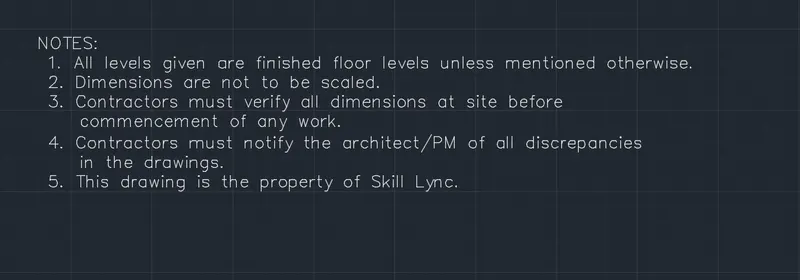
- Write down the note as shown in the figure using "MTEXT".
- Now, Draw a rectangle around the the text using "REC" command.
- Now, Explode the Drawn rectangle by using "X" command.
- Now, copy the second vertical line using the reference point from first vertical line 2 times.
- Now, Extend the horizontal lines by using command "EX" upto the last vertical line.
- Now, select the above horizontal line and enter the command "CO" and the select the point of copy and then select "array" and then enter the no. of copies "6" and then select "fit" and select the end point as the bottom horizontal line.
- Now trim the excess lines and add lines where needed.

- Now, enter the data which is to be entered.

--------------------------------------------------------------------------------------------------------------------------------------
4.
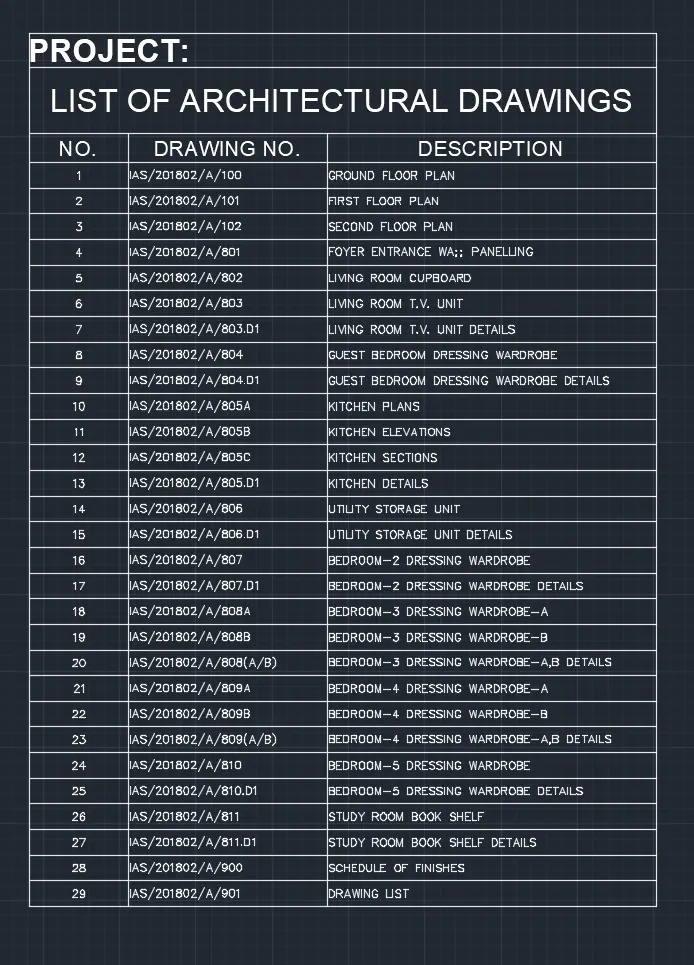
Aim:- Create the list of drawing schedule given in the drawing using "TABLE" command.
Procedure:-
- To create a table enter command "TABLE" then the following dialogue box will appear.
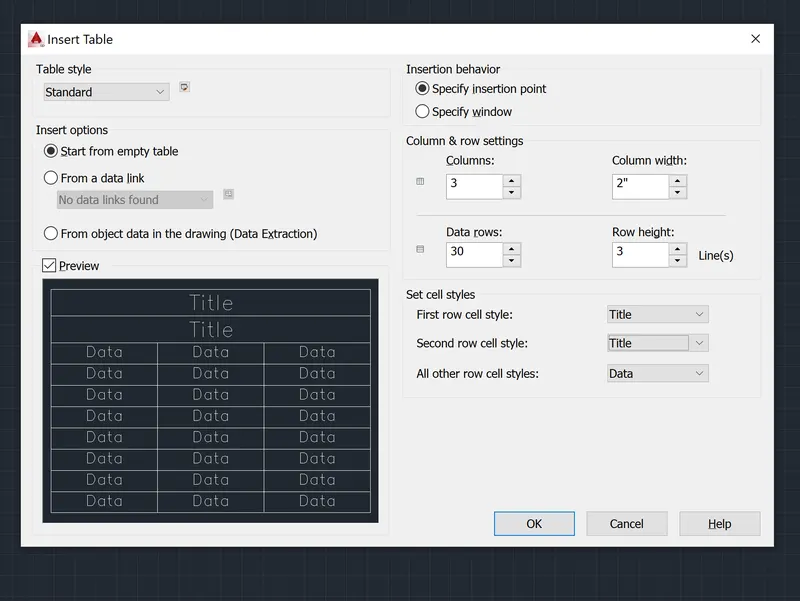
- Now enter the no. of colums as "3" and the no. of data rows as "30".
- Now select first row cell style "Title", Second row cell style "Title", All other row cell style "Data".
- After entering the above data the following table will appear.
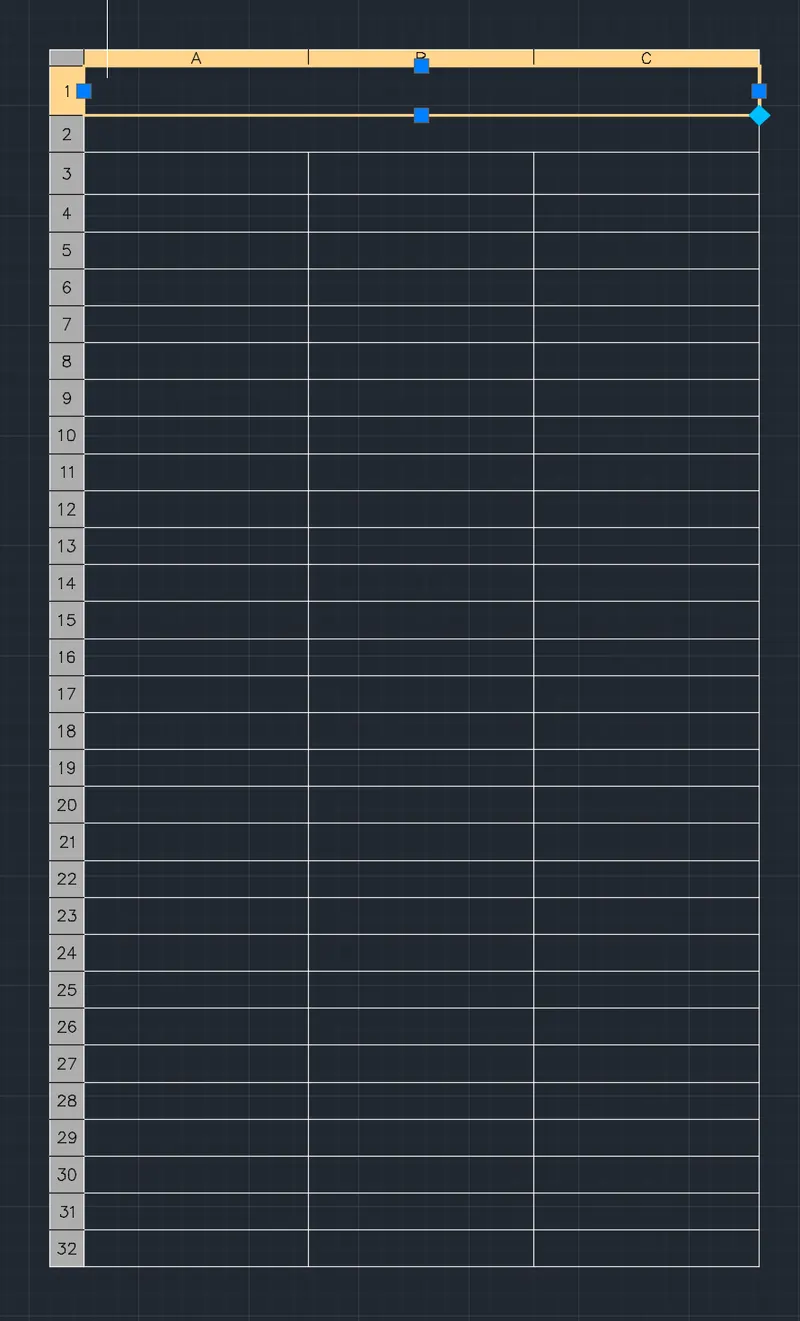
- Now adjust the first title to "Middle-Left" and enter the given data in it.
- Now Adjust the second title to "Middle-Center" and enter the given data.
- Now adjust the first column to "Middle-center" and enter the given data.
- Now adjust second and third column to "Middle-left" and enter the given data.
- And then adjust the size of the columns by stretching it as needed.
------------------------------------------------------------------------------------------------------------------------------------
5.
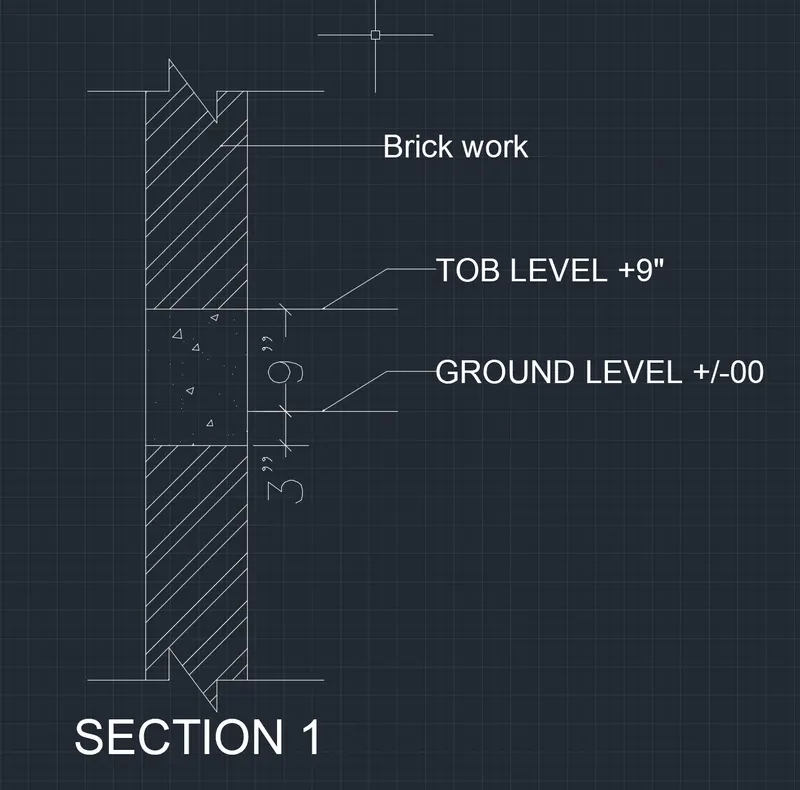
Aim:- To create a beam detail as shown in figure and also give text whereever needed by using leader command.
Procedure:-
- Draw a vertical line of length more than 3' by using "Line" command.
- Now give offset of 9" to the vertical line by using "O" command.
- Now join both vertical lines with the help of a horizontal line .
- Now give that horizontal line offset of 1' by using "O" command.
- Now close the top and bottom by using line command and with one zig-zag pattern in the middle which shows continuiety of the drawing/beam.
- Now use "Leader" and give the text where needed.
- Now use the dimensions to show the dimensions where needed.
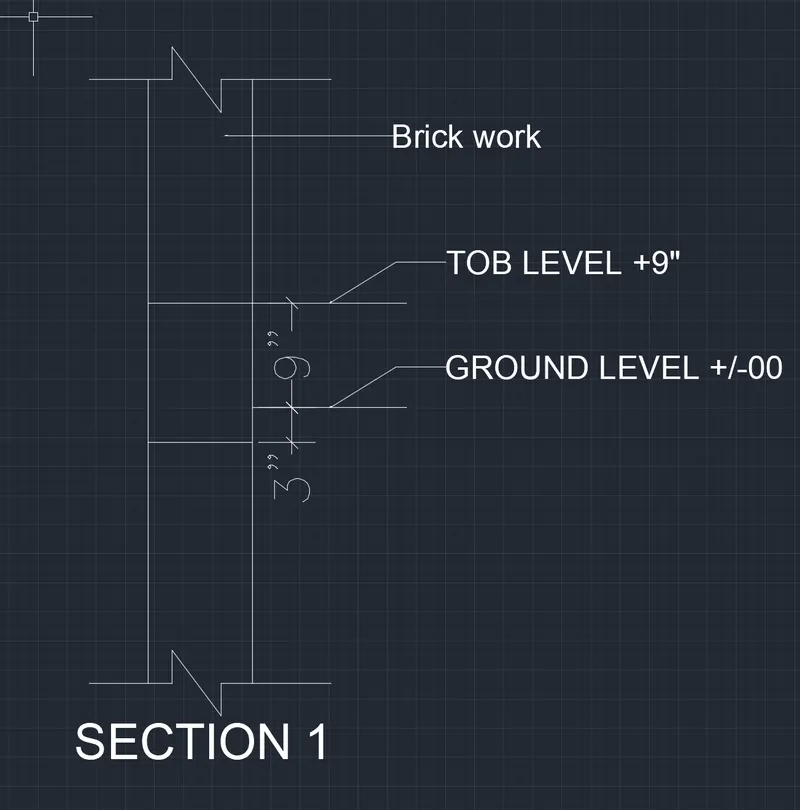
- Now use the "Hatch" command and provide hatch as required.
- At top and bottom provide hatch "ANSI32"
- At the middle portion provide hatch "AR-CONC" as it shows the part with concrete.