Creation of Column Schedule and Drawing Template using AutoCad
1.
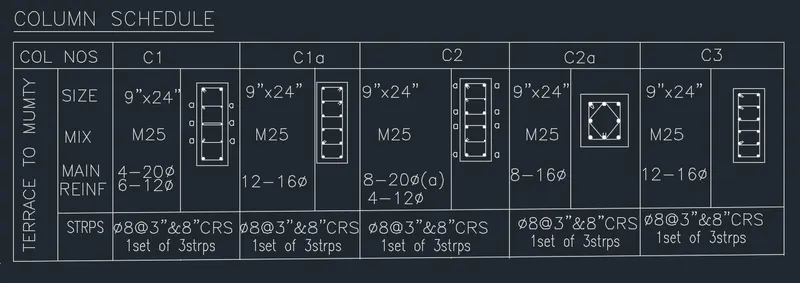
AIM: Create a column schedule with the help of lines.
PROCEDURE:
STEP1
Command: L //For making the outlines of table
LINE
Specify first point:
Specify next point or [Undo]:
STEP2
Command: O
OFFSET
Current settings: Erase source=No Layer=Source OFFSETGAPTYPE=0 //For making the columns of the table
Specify offset distance or [Through/Erase/Layer] <Through>:
Select object to offset or [Exit/Undo] <Exit>:
Specify through point or [Exit/Multiple/Undo] <Exit>:
Select object to offset or [Exit/Undo] <Exit>: *Cancel*
STEP3
Command: TR
TRIM
Current settings: Projection=UCS, Edge=None //Trimming the extra edges
Select cutting edges ...
Select objects or <select all>:
Select object to trim or shift-select to extend or
[Fence/Crossing/Project/Edge/eRase/Undo]:
//Using all the above commands to make the box of required size
STEP4
Command: _text //Single line text
Current text style: "Standard" Text height: 0'-2.50" Annotative: No Justify: Left //Justify LEFT
Specify start point of text or [Justify/Style]: *Cancel*
Command:
Command: _STYLE //Style romans.shx and Height 8"
//Type the Texts required in the spaces of the table
RESULT:
2.
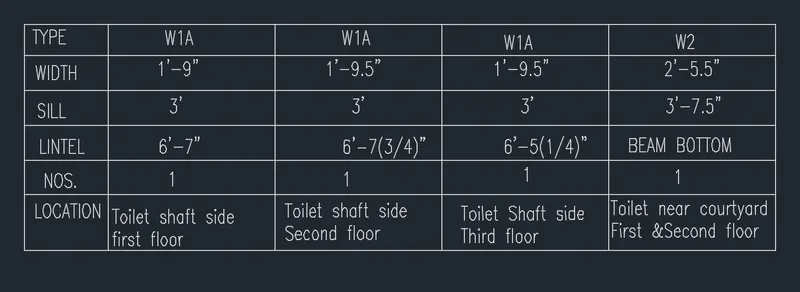
AIM: Create a window schedule
PROCEDURE:
STEP1
Command: L //For making the outlines of table
LINE
Specify first point:
Specify next point or [Undo]:
STEP2
Command: O
OFFSET
Current settings: Erase source=No Layer=Source OFFSETGAPTYPE=0 //For making the columns of the table
Specify offset distance or [Through/Erase/Layer] <Through>:
Select object to offset or [Exit/Undo] <Exit>:
Specify through point or [Exit/Multiple/Undo] <Exit>:
Select object to offset or [Exit/Undo] <Exit>: *Cancel*
STEP3
Command: TR
TRIM
Current settings: Projection=UCS, Edge=None //Trimming the extra edges
Select cutting edges ...
Select objects or <select all>:
Select object to trim or shift-select to extend or
[Fence/Crossing/Project/Edge/eRase/Undo]:
STEP4
Command: _text //Single line text
Current text style: "Standard" Text height: 0'-2.50" Annotative: No Justify: Left //Justify LEFT
Specify start point of text or [Justify/Style]: *Cancel*
Command:
Command: _STYLE //Style romans.shx and Height 8"
//Type the Texts required in the spaces of the table
RESULT:
3.
AIM: Create the drawing template as shown in the figure
PROCEDURE:
STEP1
Command: L //For making the outlines of table
LINE
Specify first point:
Specify next point or [Undo]:
STEP2
Command: O
OFFSET
Current settings: Erase source=No Layer=Source OFFSETGAPTYPE=0 //For making the columns and rows of the table
Specify offset distance or [Through/Erase/Layer] <Through>:
Select object to offset or [Exit/Undo] <Exit>:
Specify through point or [Exit/Multiple/Undo] <Exit>:
Select object to offset or [Exit/Undo] <Exit>: *Cancel*
STEP3
Command: TR
TRIM
Current settings: Projection=UCS, Edge=None //Trimming the extra edges
Select cutting edges ...
Select objects or <select all>:
Select object to trim or shift-select to extend or
[Fence/Crossing/Project/Edge/eRase/Undo]:
STEP4
Command: _text //Single line text
Current text style: "Standard" Text height: 0'-2.50" Annotative: No Justify: Left //Justify LEFT
Specify start point of text or [Justify/Style]: *Cancel*
Command:
Command: _STYLE //Style romans.shx and Height 8"
//Type the Texts required in the spaces of the table
RESULT:
4.
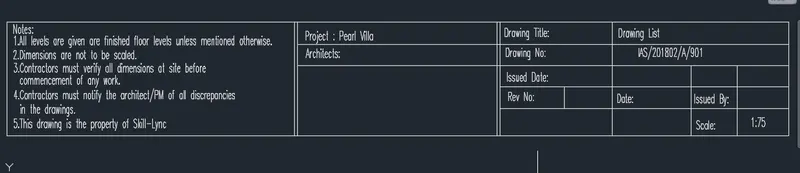
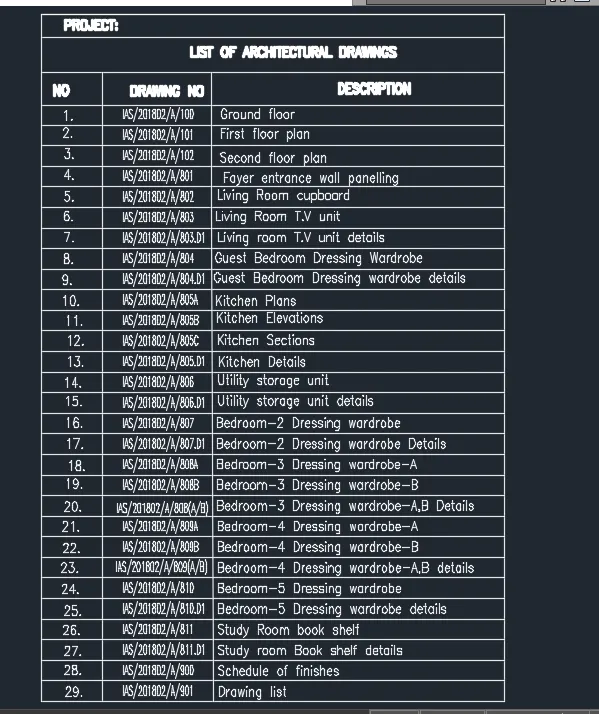
AIM: Create the list of drawing schedule as shown
PROCEDURE:
STEP1
Command: L //For making the outlines of table
LINE
Specify first point:
Specify next point or [Undo]:
STEP2
Command: O
OFFSET
Current settings: Erase source=No Layer=Source OFFSETGAPTYPE=0 //For making the columns of the table
Specify offset distance or [Through/Erase/Layer] <Through>:
Select object to offset or [Exit/Undo] <Exit>:
Specify through point or [Exit/Multiple/Undo] <Exit>:
Select object to offset or [Exit/Undo] <Exit>: *Cancel*
STEP3
Command: TR
TRIM
Current settings: Projection=UCS, Edge=None //Trimming the extra edges
Select cutting edges ...
Select objects or <select all>:
Select object to trim or shift-select to extend or
[Fence/Crossing/Project/Edge/eRase/Undo]:
STEP4
Command: _text //Single line text
Current text style: "Standard" Text height: 0'-2.50" Annotative: No Justify: Left //Justify LEFT
Specify start point of text or [Justify/Style]: *Cancel*
Command:
Command: _STYLE //Style romans.shx and Height 8"
//Type the Texts required in the spaces of the table
RESULT:
5.
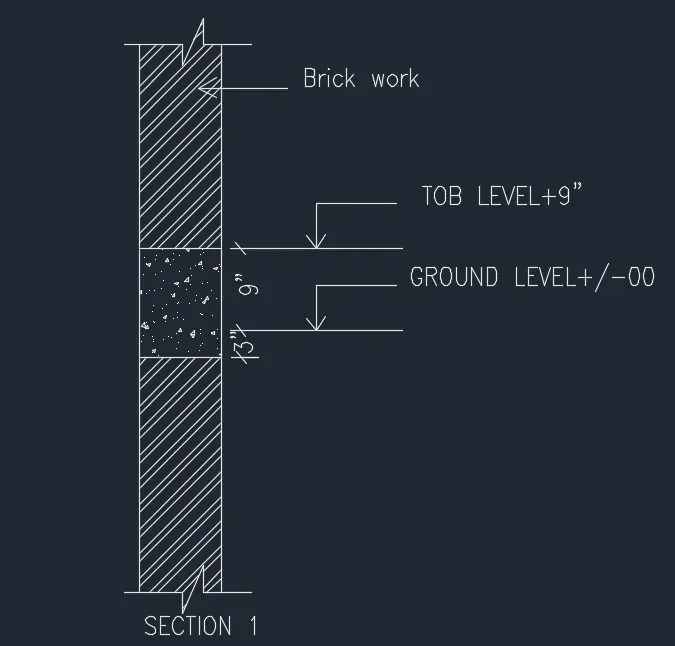
AIM: Create the Beam detail as shown in the figure and provide text wherever given
PROCEDURE:
STEP1
Command: L
LINE
Specify first point: //To draw the beam line
Specify next point or [Undo]: 5'
Command: O
OFFSET
Current settings: Erase source=No Layer=Source OFFSETGAPTYPE=0
Specify offset distance or [Through/Erase/Layer] <1'-3.00">: 9 //Offset for the width of the column
STEP2
Command: XL
XLINE
Specify a point or [Hor/Ver/Ang/Bisect/Offset]: //To make the horizontal line for concrete
Specify through point:
Specify through point: *Cancel*
Command: O
OFFSET
Current settings: Erase source=No Layer=Source OFFSETGAPTYPE=0
Specify offset distance or [Through/Erase/Layer] <0'-9.00">: 12 //Offsset for the middle portion of concrete
Select object to offset or [Exit/Undo] <Exit>:
STEP3
Command: TR
TRIM
Current settings: Projection=UCS, Edge=None //Trim the extra lines
Select cutting edges ...
Select objects or <select all>:
STEP4
Command: L
LINE
Specify first point: //To make the extend line of column
Specify next point or [Undo]:
STEP5
Command: _hatch
Pick internal point or [Select objects/Undo/seTtings]: Selecting everything...
Selecting everything visible... //To hatch the brick and concrete area
Analyzing the selected data...
STEP6
Command: _mtext
Current text style: "Standard" Text height: 2" Annotative: No //To enter the text into the drawing at 2" height
Specify first corner:
Specify opposite corner or [Height/Justify/Line spacing/Rotation/Style/Width/Columns]: *Cancel*
RESULT: