Creation of Column Schedule and Drawing Template using AutoCad
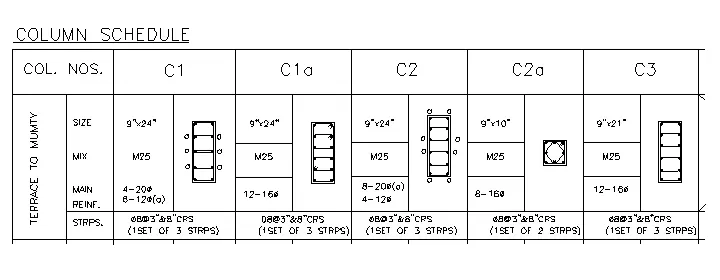
1. Create a column schedule as shown in the figure.
Note: Create a column schedule with the help of lines. Also, insert text with the help of Dtext command or Single Line text.
Hint: Use font name: romans.shx; Height: 8”, Justify: Left
Aim:
To create a column schedule as shown in the Question using AutoCAD software
Introduction:
The column schedule is creating as given notes and hints.
Note: Create a column schedule with the help of lines. Also, insert text with the help of Dtext command or Single Line text.
Hint: Use font name: romans.shx; Height: 8”, Justify: Left
Procedure:
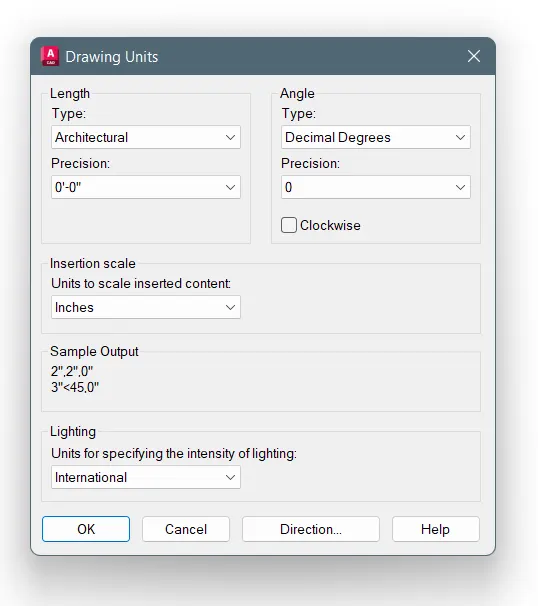
Step-01: Open the software and set units
- First open the software and set the units as the line length type is Architecture
- Precision is 0'-0"
- Insertion scale is Inches
- The Limit is give the lower point is 0,0 and the top corner point is 5000,5000
Step-02: Creating column schedule
- First draw the column as given in the question
- The dimensions are taken from the table
- Assume the table size as i want
- Using the Line command
- Use the Circle command for draw the rod
- Take the hint of this drawing is the type of text is romans.shx; Height: 8”, Justify: Left
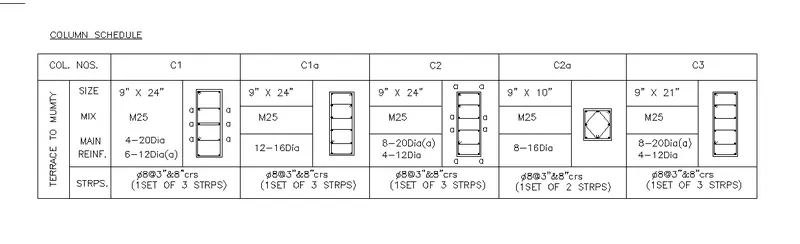
- Type MText command and then, type the text as given in the schedule
- Type DIMSTYLE and select the modify
- Select Text and give the text height and type of text is given in the question
- Take the screen snip using snipping tool Windows key+Shift+S
- Upload the figure
Result:
The column schedule is created by using the AutoCAD 2023 software as given in the question
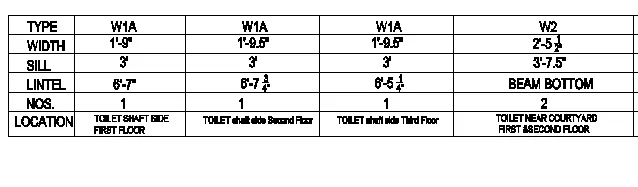
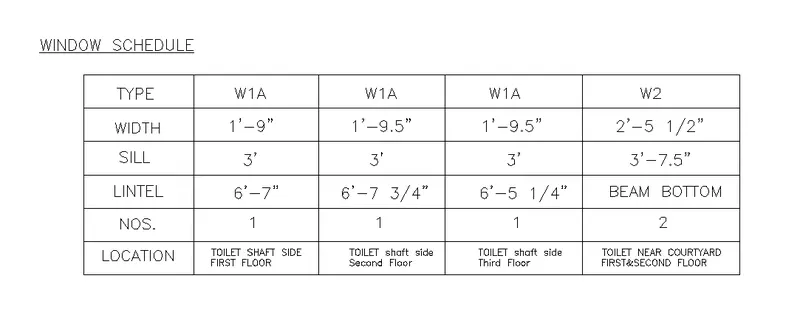
2. Create a window schedule as shown in the figures:
Window Schedule:
Aim:
To create a window schedule as shown in the question using the AutoCAD software
Introduction:
The window schedule is create as in the question to given details
Procedure:
To craeating Window schedule:
- This schedule is creating using the same drawing sheet as used in column schedule
- Assume the table size as i want
- First draw the column as given in the question
- The dimensions are taken from the table
- Using the Line command
- Take the hint of this drawing is the type of text is romans.shx; Height: 8”, Justify: Left
- Type MText command and then, type the text as given in the schedule
- Type DIMSTYLE and select the modify
- Select Text and give the text height and type of text is given in the question
- Take the screen snip using snipping tool Windows key+Shift+S
- Upload the figure
Result:
The window schedule is created using the AutoCAD 2023 software and above given commands are used to create this schedule
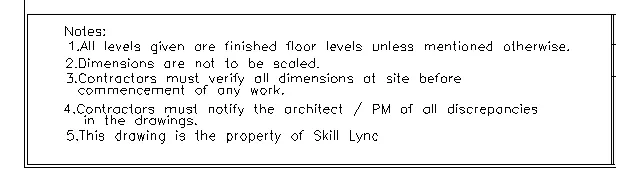
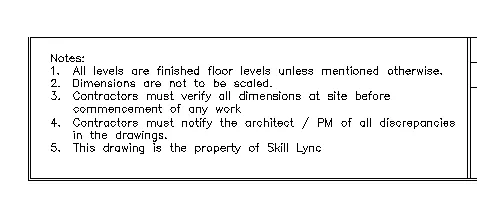
3. Create the drawing template as shown in the figure:< Use the Notes as in the figure>

Aim:
To create the drawing template as shown in the question using the AutoCAD software
Introduction:
The drawing template is creating as used the given figure in question and use the notes as in the figure
Procedure:
To craeating drawing template:
- This schedule is creating using the same drawing sheet as used in column schedule
- First draw the column as given in the question
- Assume the table size as i want
- The dimensions are taken from the table
- Using the Line command
- Take the hint of this drawing is the type of text is romans.shx; Height: 8”, Justify: Left

- Type MText command and then, type the text as given in the schedule
- Type DIMSTYLE and select the modify
- Select Text and give the text height and type of text is given in the question
- Take the screen snip using snipping tool Windows key+Shift+S
- Upload the figure
Result:
The drawing template is created using the AutoCAD 2023 software and above given commands are used to create this schedule
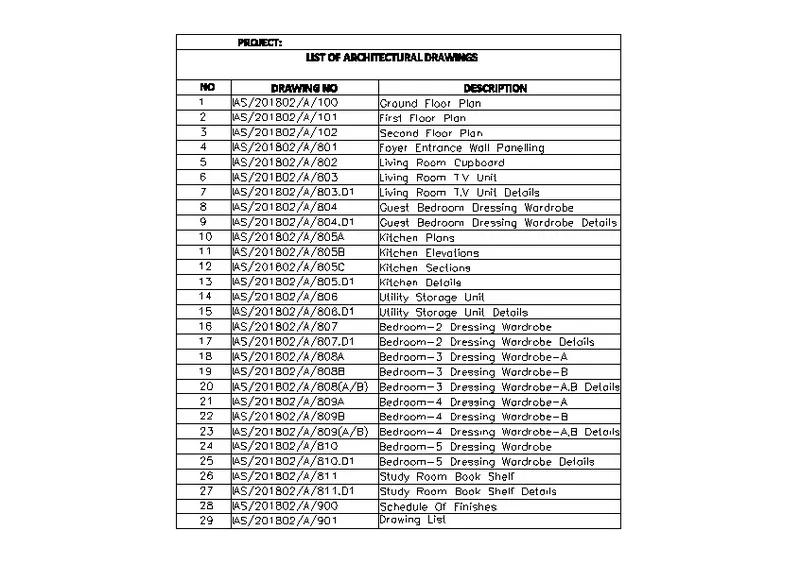
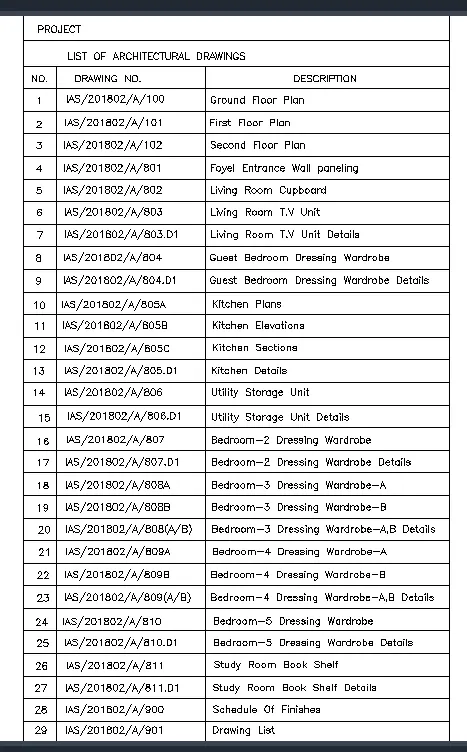
4. Create the list of drawing schedule as shown in the figure:
Aim:
To create the list of drawing schedule as shown in the figure using the AutoCAD software
Introduction:
The list of drawing schedule is create using the software and the table is create as in the figure
Procedure:
To create list of drawing schedule
- This schedule is creating using the same drawing sheet as used in column schedule
- First draw the column as given in the question
- The spacing of the horizontal line is used the Offset command 2'-3"
- The dimensions are taken from the table
- Using the Line command
- Take the hint of this drawing is the type of text is romans.shx; Height: 8”, Justify: Left
- Type MText command and then, type the text as given in the schedule
- Type DIMSTYLE and select the modify
- Select Text and give the text height and type of text is given in the question
- Take the screen snip using snipping tool Windows key+Shift+S
- Upload the figure
Result:
The list of drawing schedule is created using the AutoCAD 2023 software and above given commands are used to create this schedule
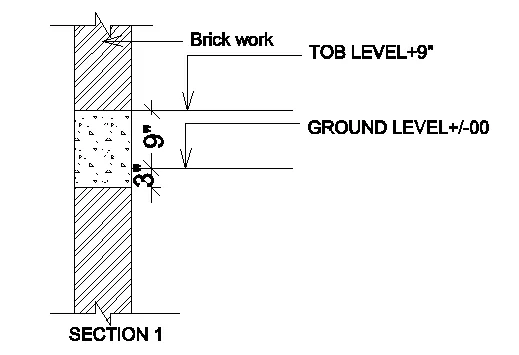
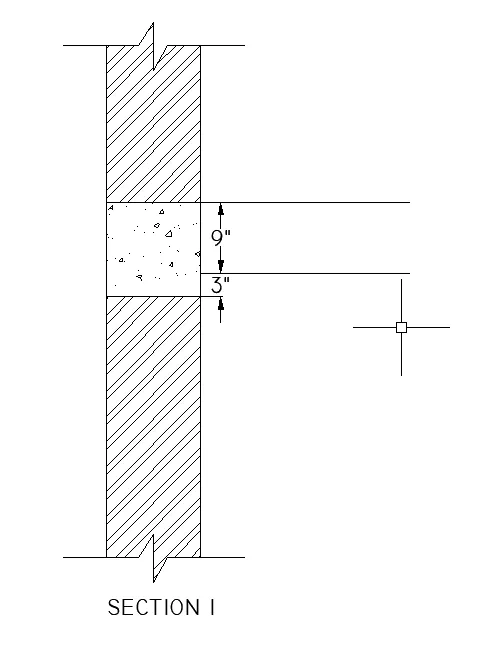
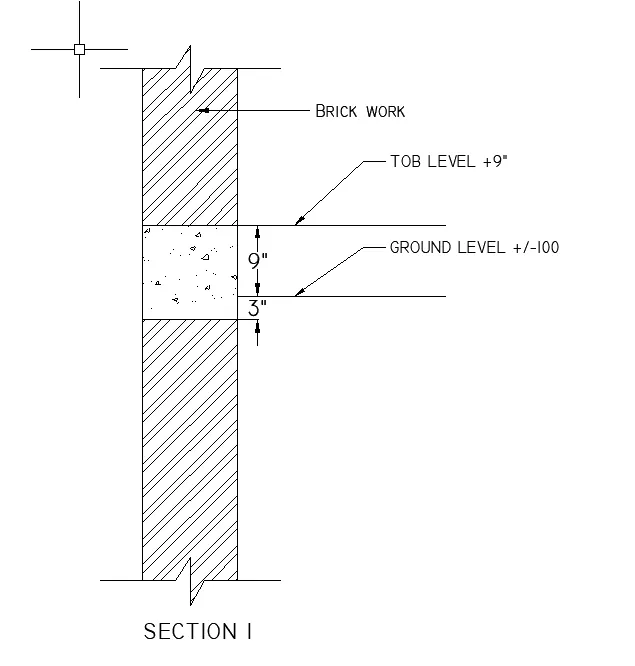
5. Create the Beam detail as shown in the figure and provide text wherever given.
Aim:
To create the beam details as shown in the figure and using the AutoCAD software
Introduction:
The beam detail is creating as shown in the given figure
Procedure:
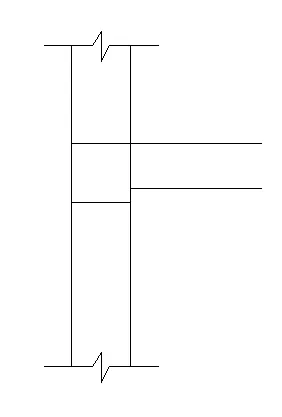
Step-01: Draw the sketch
- The sketch is drawn as given in the figure
- Using the Line command
Step-02: To set dimension style
- Type DIMSTYLE in command box
- Select modify button
- And edit the text, line, symbols and arrows and the primary units
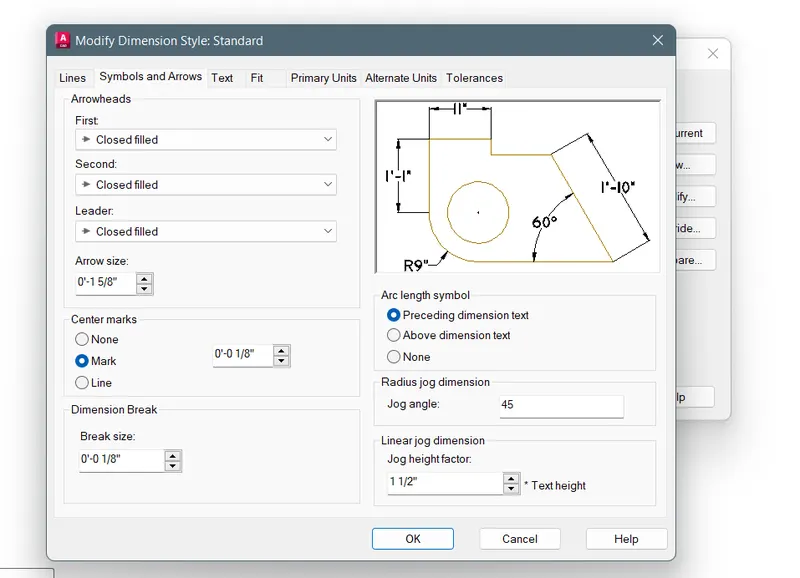
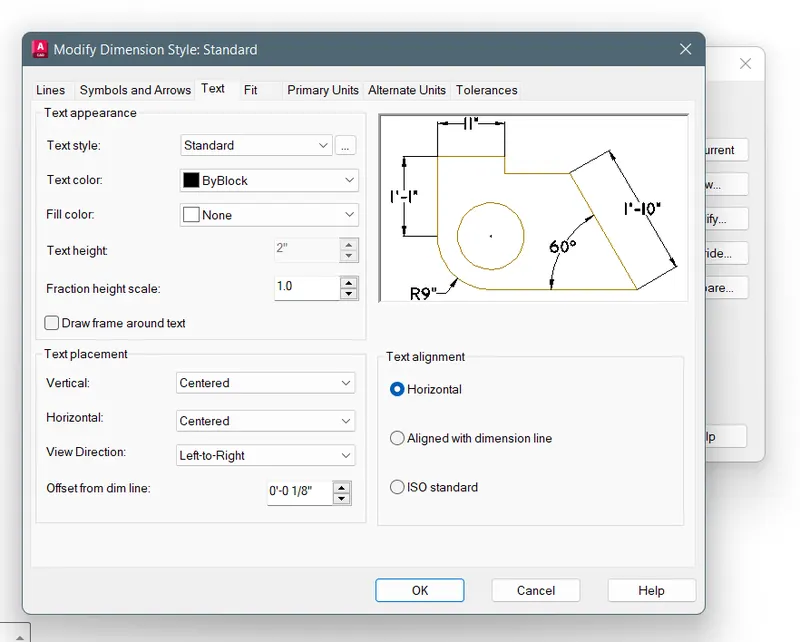
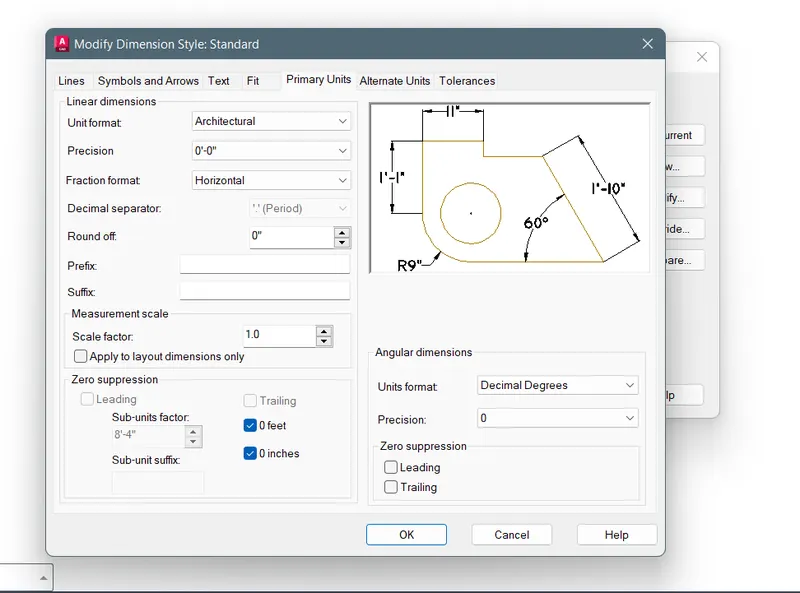
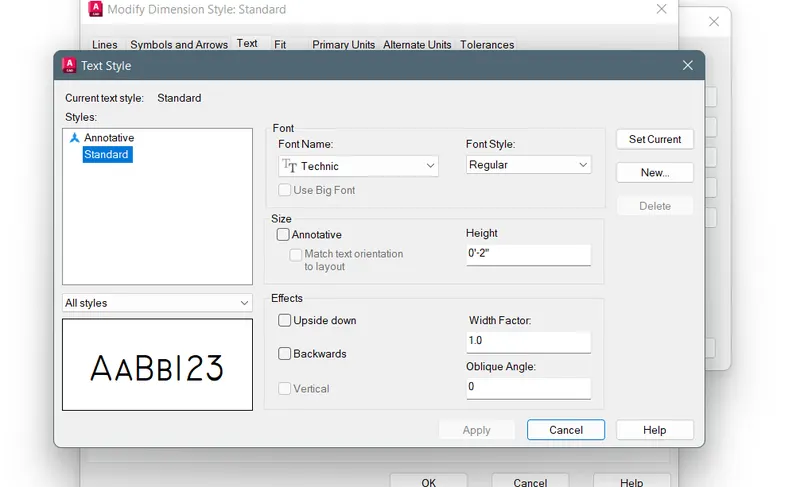
- The font name is Technic
- The text height is 0'-2"
- Increase the Arrow size with clicking upward arrow button
- The primary units select the Unit format is Architectural, Precision is 0'-0"
Step-03: Finish the drawing
- Type MText command and then, type the text as given in the schedule
- Type Hatch and select the ARCONC & ANS132 and then, give the hatch to the wall and beam
- The Overall scale is 6.0
- Select the dimension in Annotation tab. The dimesions are 9",3"
- Select the point where i want the dimensions in the sketch
- Use the Multileader command or select from the Annotation tab
- And then, select the line and give the name as given in the question
- Take the screen snip using snipping tool Windows key+Shift+S
- Upload the figure
Result:
The beam details is drawn using the AutoCAD 2023 software and above given commands are used to create this sketch