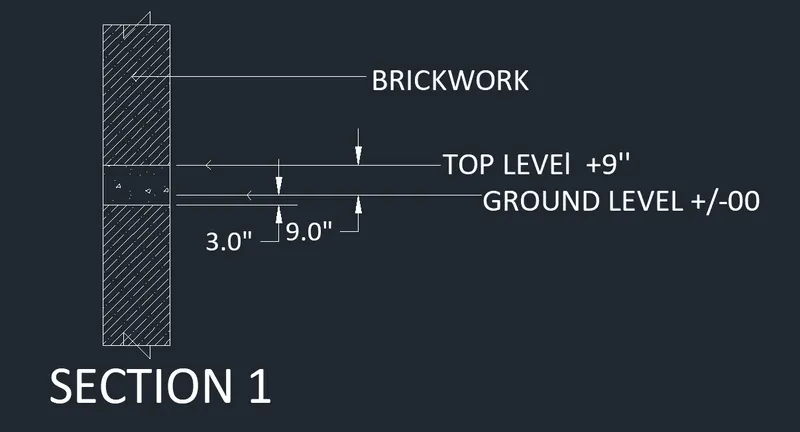
Creation of Column Schedule and Drawing Template using AutoCad
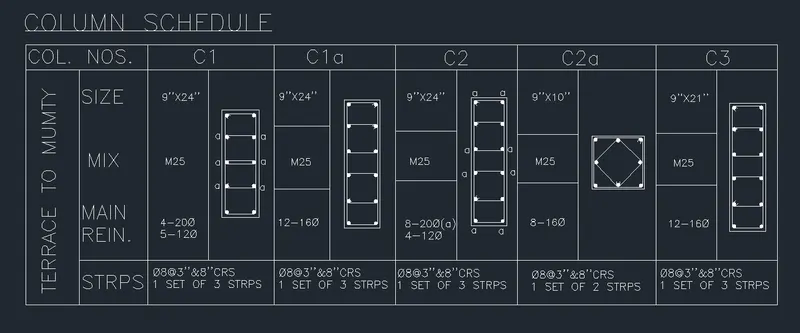
1. Create a column schedule as shown in the figure.
Aim:- To create a column schedule as given in the figue.
Introduction:-
Column schedule-Basically it is table containing the details of the column which is going to be erected at the site. The table may contains the details of the reinforcement,size of reinforcement and stirrups, dia of bars etc. It is provided by the designer or Architect firm for the ease of construction at the site.
Procedure:- Using line tool create a table as given in the figure of column schedule. After creating similar table fill the text in the table as given in the fig.
for placing texts use DTEXT and annotate it as
Text height=8'' (in some heading columns while 2'' and 4'' also used in several columns)
font name=roman.shx
justify=left
Result:-
The resultant figure of the procedure followed above are as follows
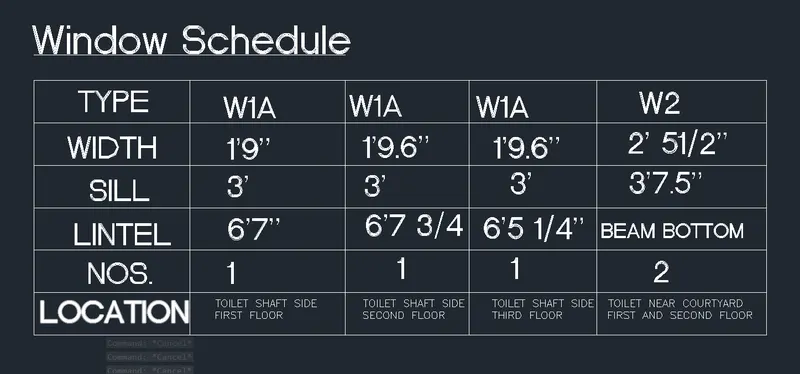
2. Create a window schedule as shown in the figures:
Aim:- To create a window schedule as given in the figue.
Introduction:-
window schedule-Basically it is table containing the details of the windows which is going to be erected at the site. The table may contains the details of the window as its length and width its depth,glazing height etc. It is provided by the designer or Architect firm for the ease of construction at the site.
Procedure:- Using line tool create a table as given in the figure of column schedule. After creating similar table fill the text in the table as given in the fig.
for placing texts use DTEXT and annotate it as
Text height=8'' (in some heading columns while 2'' and 4'' also used in several columns)
font name=roman.shx
justification=left
font style=bold
Result:-
The resultant figure of the procedure followed above are as follows
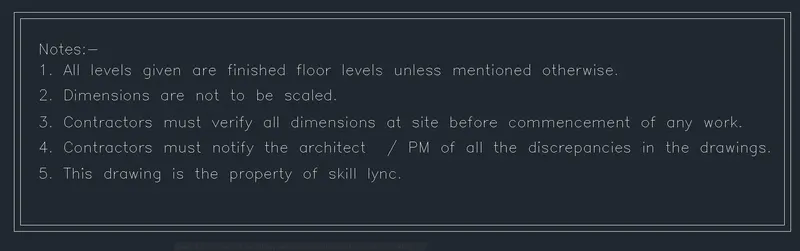
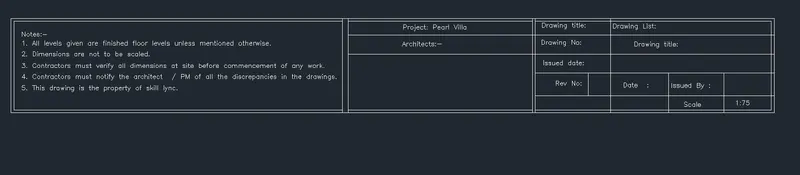
3. Create the drawing template as shown in the figure:< Use the Notes as in the figure>
Aim:- To create the drawing template as given in the figue.
Introduction:-
Drawing template- Basically it is a kind of notes containing the informations and directions on how to use the drawings and if some some error occured whom to concern and other things are given. It is provided by the designer or Architect firm for the ease of construction at the site.
Procedure:- Using line tool create a table as given in the figure of drawing template. After creating similar table fill the text in the table as given in the fig.
for placing texts use DTEXT and annotate it as
Text height=8'' (in some heading columns while 2'' and 4'' also used in several columns)
font name=calibri
justification=left
width factor=1.5
Result:-
The resultant figures of the procedure followed above are as follows
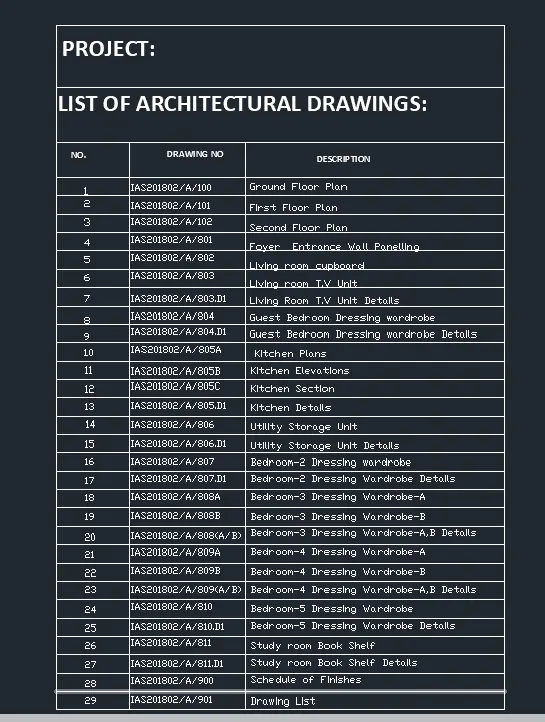
4. Create the list of drawing schedule as shown in the figure:
AIM:- To create a table containg the drawing schedules.
Procedure:-
Using line tool create a table as given in the figure of drawing template. After creating similar table fill the text in the table as given in the fig.
for placing texts use DTEXT and annotate it as
Text height=2'' (in some heading columns while 0.5'' and 1'' also used in several columns)
font name=calibri
justification=left
width factor=0
Result:-
The resultant figures of the procedure followed above are as follows
5. Create the Beam detail as shown in the figure and provide text wherever given
Aim:- To create the beam detail as given in the figure.
Introduction:- Beam detail is the sectional drawing here shows the different components of building at different levels. The drawing is used to understand the various levels of the structural components of the building. It is provided by the designer or Architect firm for the ease of construction at the site.
Procedure:- Using line tool create the section as given in the figure. After creating similar figure hatch the structural components of the building.
For Hatching, brickwork is hatched with ANSI135 with the hatch pattern scale as 15.0
while for concrete section hatched with Ar CONC with the hatch pattern scale=2.0
for placing texts use DTEXT and annotate it as
Text height=8'' (in some texts 6'' is also used suitably)
font name=calibri
justification=left
width factor=0
Result:-
The resultant figures of the procedure followed above are as follows