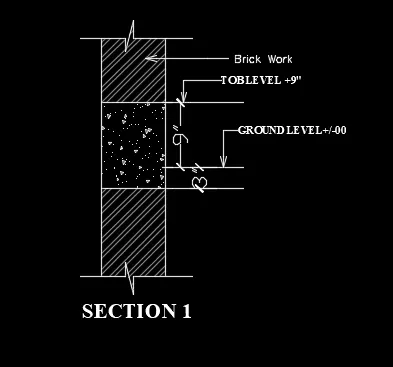
Creation of Column Schedule and Drawing Template using AutoCad
AIM
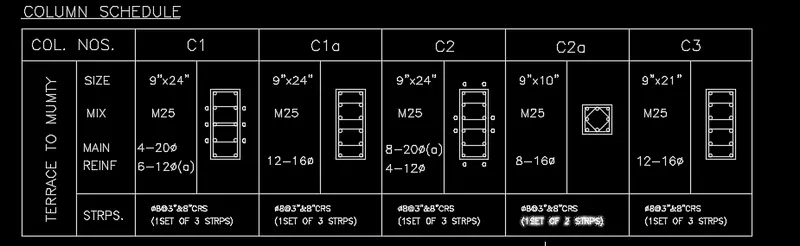
Create a column schedule as shown in the figure.
Note: Create a column schedule with the help of lines. Also, insert text with the help of Dtext command or Single Line text.
Hint: Use font name: romans.shx; Height: 8”, Justify: Left
PROCEDURE:
Go to “Annotate” tab > Text Style > Manage Text Style
Create New style
Use font romans.shx
Specify height as 8”
Set current
Enter TEXT command: DT
TEXT specify start point of text or [Justify Style]: J
Enter an option: L (for left alignment of text)
Specify start point of text: left click to mention the text place
Specify rotation angle of text <0>: 0
TEXT: “type the desired text”
For vertical text enter the rotation of angle as 90.
After typing all the data, draw the table around it using LINE and OFFSET command
Create the column using LINE and CIRCLE command
RESULT
AIM
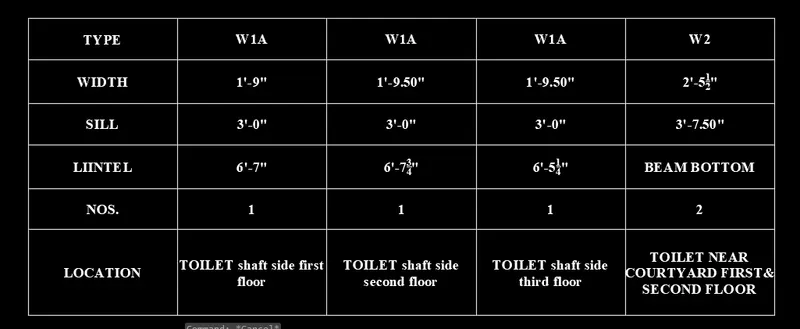
Create a window schedule as shown in the figures.
PROCEDURE:
Go to “Annotate” tab > Text Style > Manage Text Style
Create New style
Use font Times New Roman
Specify Font style as BOLD
Specify width factor as 0.9
Specify height as 8”
Set current
Enter TABLE command: TB
Specify number of column = 5
Specify number of rows = 6
OK
Specify the insertion point
“Type the desired text”
RESULT:
AIM
Create the drawing template as shown in the figure:< Use the Notes as in the figure>
PROCEDURE:
Go to “Annotate” tab > Text Style > Manage Text Style
Create New style
Use font romans.shx
Specify height as 0”
Set current
Enter TEXT command: DT
TEXT specify start point of text or [Justify Style]: J
Enter an option: L (for left alignment of text)
Specify start point of text: left click to mention the text place
Specify Height: “use varying height for different cells”
Specify rotation angle of text <0>: 0
TEXT: “type the desired text”
After typing all the data, draw the table around it using LINE and OFFSET command
RESULT:

AIM
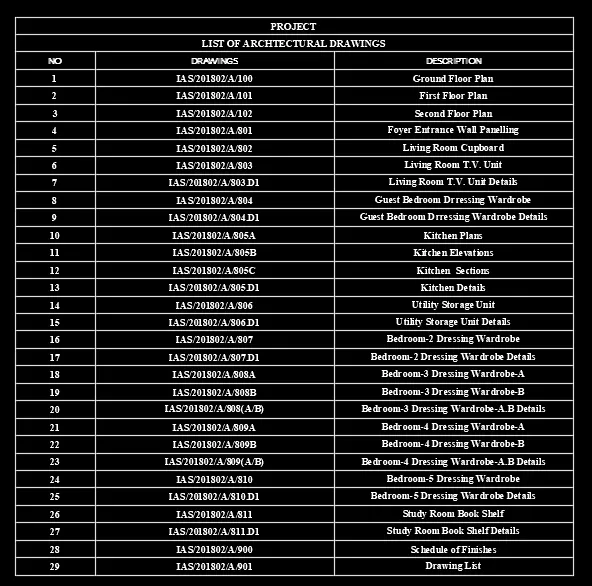
Create the list of drawing schedule as shown in the figure:
PROCEDURE:
Go to “Annotate” tab > Text Style > Manage Text Style
Create New style
Use font Calibri Light
Specify Font style as regular
Specify width factor as 1
Specify height as 8”
Set current
Enter TABLE command: TB
Specify number of column = 3
Specify number of rows = 32
OK
Specify the insertion point
“Type the desired text”
RESULT:
AIM
Create the Beam detail as shown in the figure and provide text wherever given.
PROCEDURE:
Enter line command: L
Draw the section of column
Enter text command: DT
TEXT specify start point of text or [Justify Style]: J
Enter an option: L (for left alignment of text)
Specify start point of text: left click to mention the text place
Specify rotation angle of text <0>: 0
TEXT: “type the desired text”
Enter multileader style command: MLEADERSTYLE
Specify arrowhead symbol as open 30
Specify size as 1.5”
SET CURRENT
Enter multileader command: MLD
Place the multileader at desired positions and type their names
RESULT: