Creation of Column Schedule and Drawing Template using AutoCad
AIM & INTRODUCTION :
AIM :
To create a shown figure and providing text wherever given with the help of "Dtext command or Single Line text" and "Mtext command or Multi Line text".
INTRODUCTION :
- The creation of the shown figure and schedules is done by inserting tables from the table command or selecting insert table button.
- The texts which are given in a figures are needs to be mentions and it is provided by using the Dtext command or Single Line text.
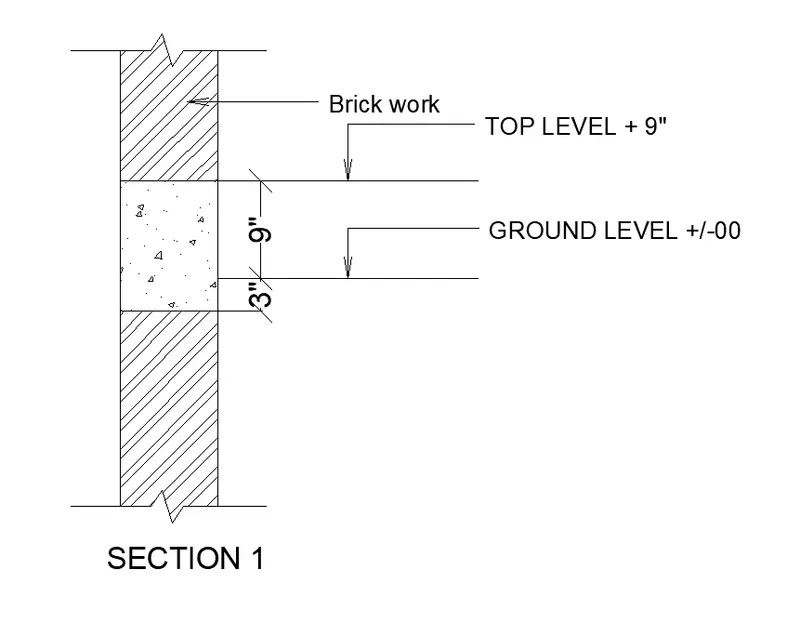
- The last shown figure is a beam detail with texts provided and it has to figured and drawn as per shown.
PROCEDURE :
1. PROCEDURES TO CREATE THE COLUMN SCHEDULE :
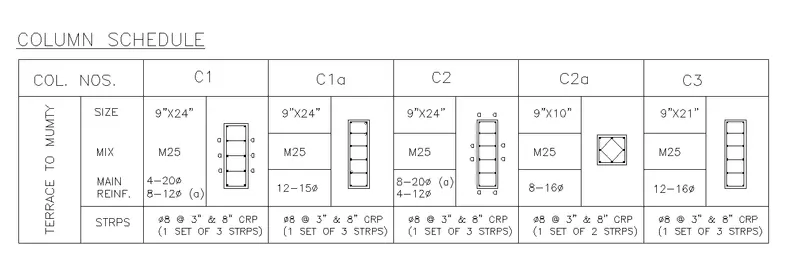
- To create a table for the COLUMN SCHEDULE, we should insert table from the "insert menu" or by using the command "table".
- To provide table with recommended rows and columns, we should provide the required numbers of colums, rows along with title, header and data cell.
- Importantly the required size of the cell size can be adjusted by the "trim tool" whethere to increase or to decrease the cell size.
- Then to add texts inside the cells, we should use "Dtext command or Single Line text" and "Mtext command or Multi Line text".
- We should draw the required column drawing by using line tool or rectangle tool.
- The shown or given figure should be created by the following hint which was mentioned in the question "Hint: Use font name: romans.shx; Height: 8”, Justify: Left "
2. PROCEDURES TO CREATE THE WINDOW SCHEDULE :
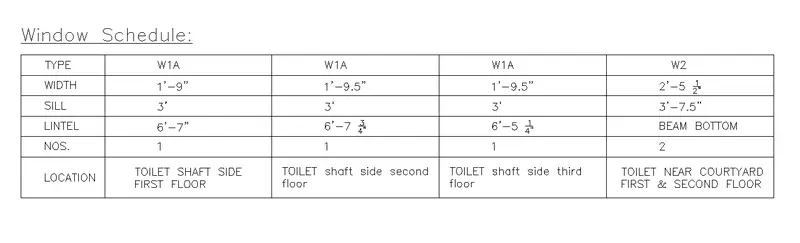
- To create a table for the WINDOW SCHEDULE, we should insert table from the "insert menu" or by using the command "table".
- To provide table with recommended rows and columns, here in this window schedule we didn't required any header or title cell.
- Importantly the required size of the cell size can be adjusted by the "trim tool" whethere to increase or to decrease the cell size.
- The only requird cell is a data cell.
- Then to add texts inside the cells, we should use "Dtext command or Single Line text" and "Mtext command or Multi Line text".
3. PROCEDURES TO CREATE THE DRAWING TEMPLATE :
- To create a table for the DRAWING TEMPLATE, we should insert table from the "insert menu" or by using the command "table".
- To provide table with recommended rows and columns, we should provide the required numbers of colums, rows along with title, header and data cell.
- Then to add texts inside the cells, we should use "Dtext command or Single Line text" and "Mtext command or Multi Line text".
- Importantly the required size of the cell size can be adjusted by the "trim tool" whethere to increase or to decrease the cell size.
- The notes should be typed separately in a cell with the "Mtext" command.
4. PROCEDURES TO CREATE THE LIST OF DRAWING SCHEDULE :
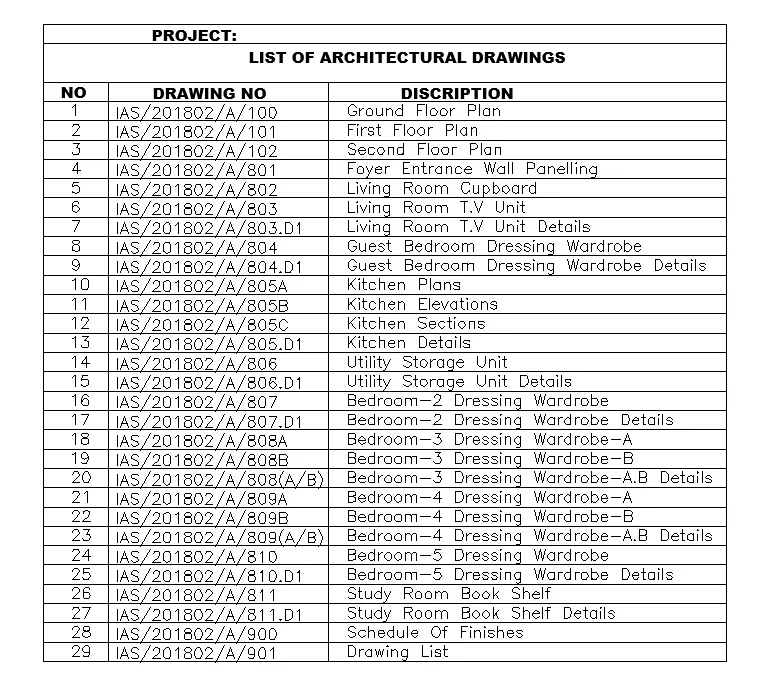
- To create a table for THE LIST OF DRAWING SCHEDULE, we should insert table from the "insert menu" or by using the command "table".
- To provide table with recommended rows and columns, we should provide the required numbers of colums, rows along with title, header and data cell.
- Importantly the required size of the cell size can be adjusted by the "trim tool" whethere to increase or to decrease the cell size.
- Then to add texts inside the cells, we should use "Dtext command or Single Line text" and "Mtext command or Multi Line text".
- The texts which are typed in the title and header cell should be in "BOLT" as per the shown figure.
5. PROCEDURES TO CREATE THE BEAM DETAIL :
- To create the figure of THE BEAM DETAIL, the height of the Brick wall is assumed and drawn by the "Line Tool".
- Then the thickness of the brick wall and beam should be drawn by inserting the values in the "Offset tool".
- And the top level and the ground level of the beam should be figured and selected as per the given dimensions by using the "Dimlinear tool".
- At Last the jogged line at the top and bottom of the figure is drawn by clicking the jogged line button and selecting the required line which has to be jogged.
RESULT :
1. COLUMN SCHEDULE :
2. WINDOW SCHEDULE :
3. DRAWING TEMPLATE :

4. THE LIST OF DRAWING SCHEDULE :
5. THE BEAM DETAIL :