Creating Levels, Grids, Layout and model elements for a residential unit using REVIT
1.
AIM: To understand the concept, Features and benefits of BIM.
INTRODUCTION: This challenge covers the points as follows
- Concept of BIM, Features and benefits of BIM.
- Drawing of levels and grid
- Drawing layout of residential building, annoatate it and inserting furniture to the model.
BUILDING INFORMATION MODELING:
BIM is a process for creating and managing information on a construction project throughout its whole life cycle. As part of this process, a coordinated digital description of every aspect of the built asset is developed, using a set of appropriate technology. It is likely that this digital description includes a combination of information-rich 3D models and associated structured data such as product, execution and handover information.
In the early stages of a BIM project, a collaborative team is assembled. It agrees the process and information structures to ensure that the design information developed is coordinated, and will be of maximum benefit to those involved in the construction and operation stages. Involvement of those that will be involved at a later stage of the project can greatly help with this initiation.
As the project enters the construction stage, the information developed can be used to plan and build more efficiently. Where revisions to the design are required, any changes can follow the agreed process in a transparent and recorded way.
Finally, as the construction project is completed and the in-use stage commences, the information that has been modelled can be used to operate the built asset. Real-time information about the asset’s performance is modelled so that certain aspects of the built asset have a ‘digital twin’ equivalent.
FEATURES OF BIM:
- Centralize document management
- Design and visualize a 3D model
- Create automated reports on all workflows
- Manage and track resources
- Monitor and manage construction costs
- Detect and resolve clashes
BENIFITS OF USING BIM OVER 2D CAD
Using BIM concept we can completely represent ideas of archetech, structure engineer infront of site engineer.
BIM provide us instant updates.
BIM works in time frame that means it is time constraint.
BIM provide all the information about resource and it store all the information regarding the project.
RESULT: I understand the concept of BIM, benefits and features of BIM.
2.
AIM: To understand the concepts categories, families, elements and instances in revit software.
INTRODUCTION: This challenge covers the points as follows
- Concept of BIM, Features and benefits of BIM.
- Concepts of categories, family, elements and instances.
- Drawing of levels and grid
- Drawing layout of residential building, annoatate it and inserting furniture to the model.
We select the catagories, families, elements, instances by selecting the load family in the insert toolbar.
Category: A Category controls the organization,visibility, graphical representations, and scheduling options of families within the project.
Families are grouped and sorted by catagory in the content libraries and in the project browser.
For example: Libraries is the category.
Family: A Family is a grouping of 2D and/or 3D information that serves to represent a discrete building or documentation element in the project. It defines parametric, graphical, and documentation requirements.
For example: Door, Window, Furniture etc.
Elements: Everything in Revit is an Element.Elements are classified into a Model, Datum, or View-Specific class. Model elements are further classified into Hosts & Components and, View-Specific are further classified into Annotations & Detail Items.
Model Elements: These are the three-dimensional elements in Revit that are visible in all 2D and 3D model views.
• Hosts: These are the model elements that typically represent building elements which are
constructed onsite. They can host Component elements.
• Components: These are the model elements that typically manufactured building elements
which are installed onsite. They can be hosted by Host elements.
For EXample: Single flush door, Double flush door.
Annotation Elements: These are the two-dimensional elements in Revit that are specific to the 2D view in which they are placed. Some can appear in 3D model views.
• Annotations: These are documentation elements that enhance a view with construction
information.
• Detail Items: These are documentation elements that can overlay the Model elements or standalone to describe the finite constructions.
Instance: An Instance is an individual representation of a type in the Project defined by unique parametric, graphical, anddocumentation characteristics which makes it unique from other Instances in the project.
For example: Door with specific dimension, window with specific dimension, desk, table, chair.
3. AIM:
Setting up a project in the revit software.
INTRODUCTION:
For settting a project we need to select the architectural template for modelling the architecture plan.
When we save the file with appropriate name,the name will be saved in a particular folder.
The project units toolbar is used to set the project unit that applies to the whole project.
The project information option is used to save the information of the project by entering the project name,prroject issue date, project status , project status, project address etc.
PROCEDURE
STEP 1:
First select the file toolbar,then the new tab appears and select the new option and then select the project or at the of starting the revit we can choose the project as new architectural, structural etc.
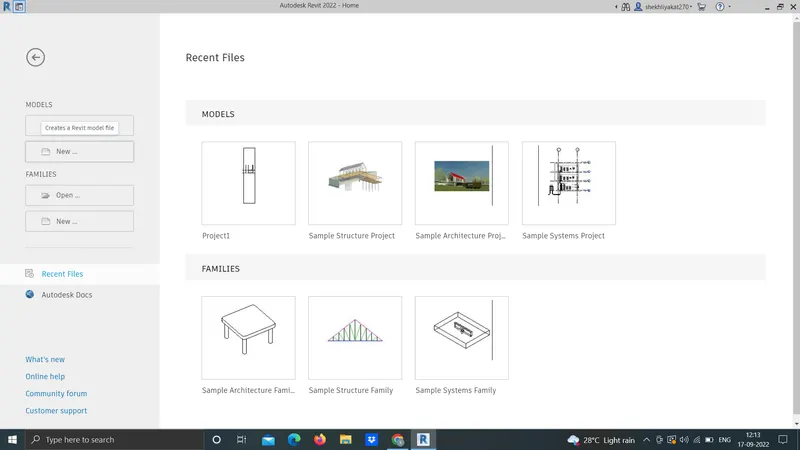
STEP 2:
Next select the architectural template in the new project tab.
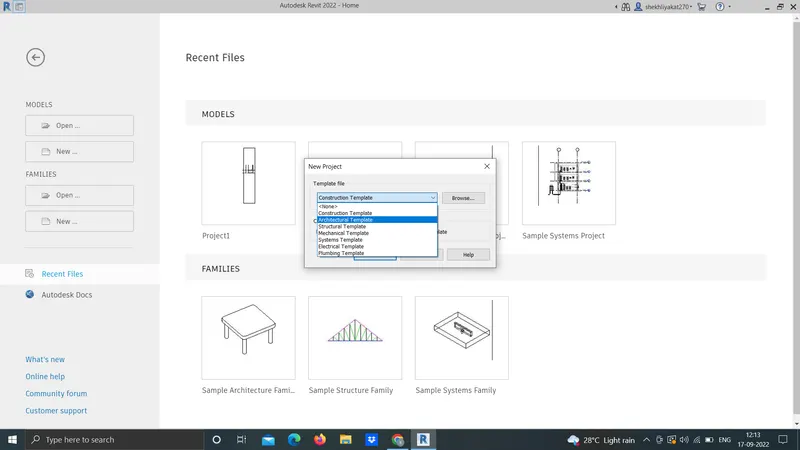
Click ok.
STEP 3:
After the project is done open the file toolbar and select the save option.
After selecting the save option the new tab will be visible
Enter the new name and before saving the name of the project
Click on the options at right corner of the save as tab as shown in the screenshot below.
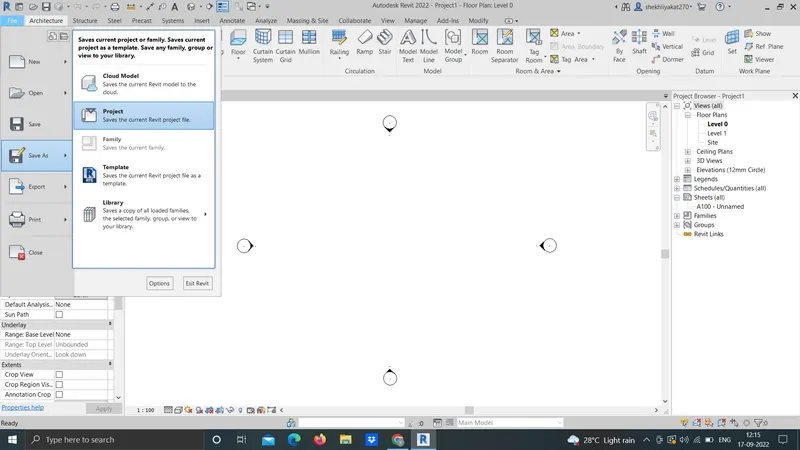
STEP 4:
Next we open the manage toolbar and the select the project information
After selecting the project information,the new tab will be visible then enter the project dtails in the project informatio tab as shown below in the screenshot.
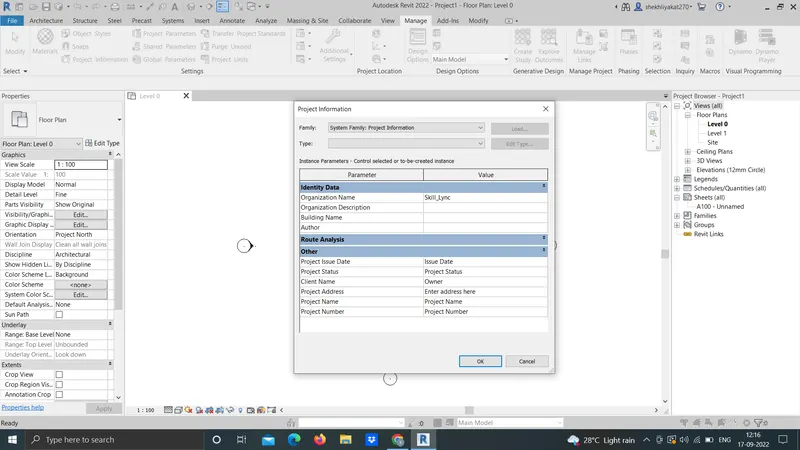
RESULT: I understood how to set up new project into revit software.
4. AIM:
To create the gris and levels using the given details.
INTRODUCTION: This challenge covers the points as follows
- Concept of BIM, Features and benefits of BIM.
- Concepts of categories, family, elements and instances.
- Drawing of levels and grid
- Drawing layout of residential building, annoatate it and inserting furniture to the model.
We select the catagories, families, elements, instances by selecting the load family in the insert toolbar
PROCEDURE:
STEP 1:
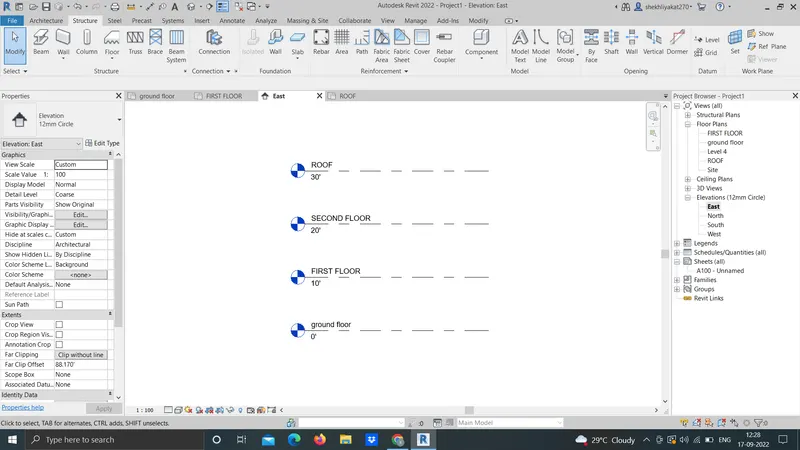
For creating the levels first we select the levels in the project browser.
STEP 2:
Next the levels will be displayed on the screen as shown below.
STEP 3:
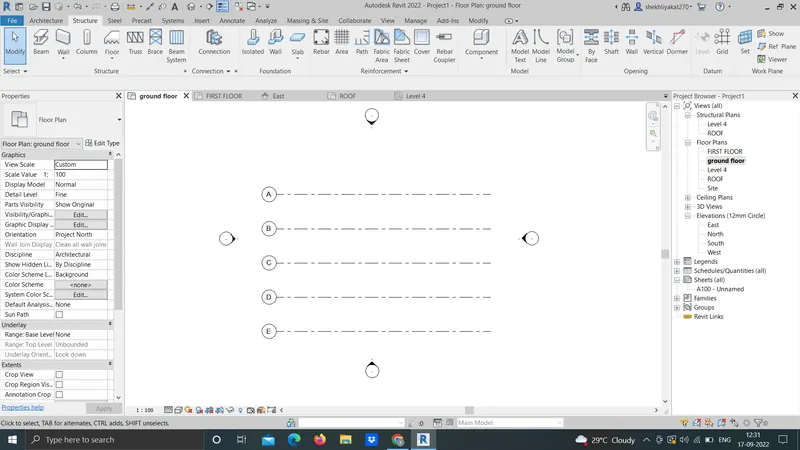
Next we draw the grid lines horizontaly indicating the grids with A,B,C,D,E.
STEP 4:
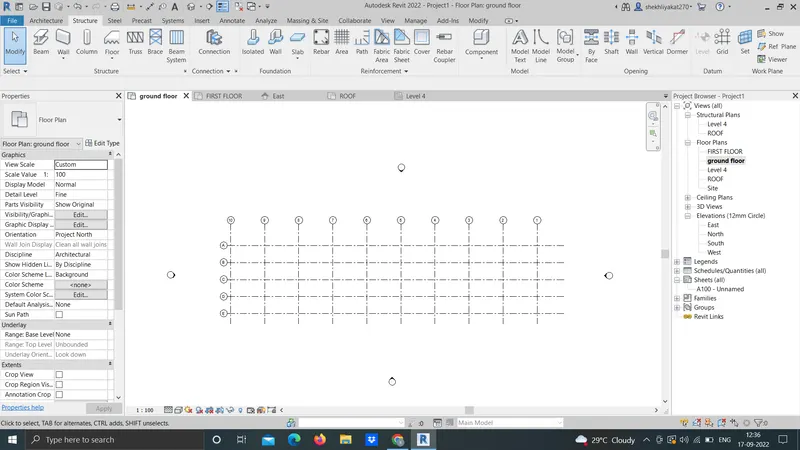
Next we draw the vertical grid lines on the horizontal grids,indicating the grids with numbers from 1 to 10.
RESULT
I understood how to draw grids and levels in revit software.
5. AIM:
To create a conceptual layout of the residential unit in the revit.
INTRODUCTION: This challenge covers the points as follows
- Concept of BIM, Features and benefits of BIM.
- Concepts of categories, family, elements and instances.
- Drawing of levels and grid
- Drawing layout of residential building, annoatate it and inserting furniture to the model.
We select the catagories, families, elements, instances by selecting the load family in the insert toolbar
PROCEDURE:
STEP 1:
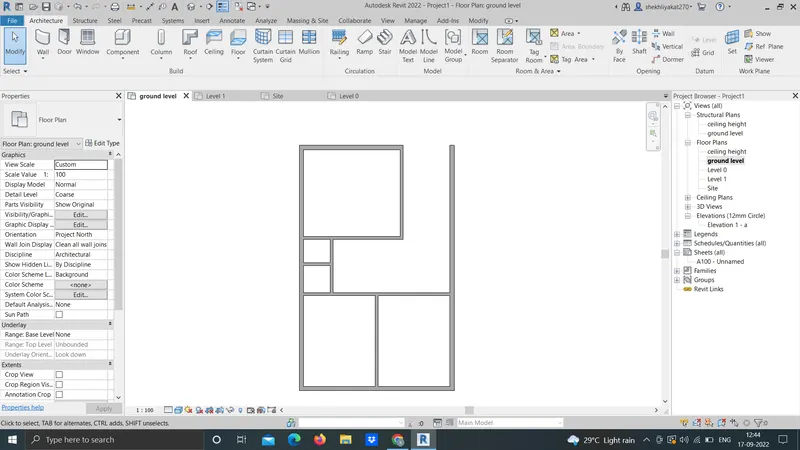
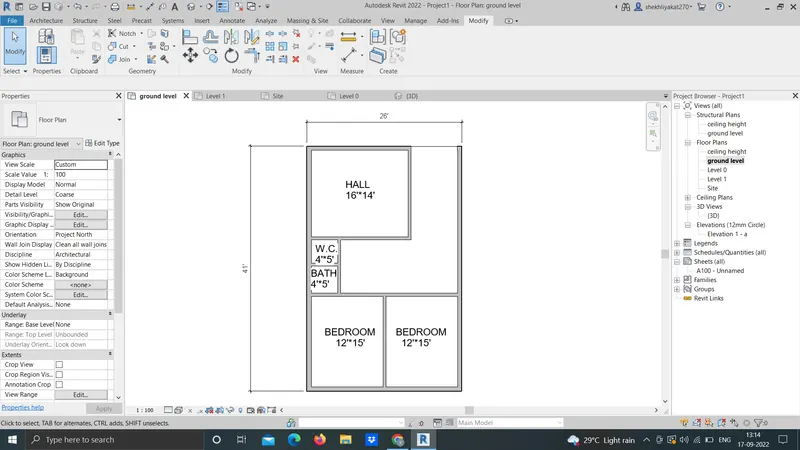
First we draw the residential layout with the standard dimensions as shown in the below figure.
STEP 2:
Next we change the visibility of layout as shaded as shown in the figure
Next add dimensions to the layout plan, shown below.
RESULT:
I understood how to draw layout and annoated it in revit software.
6) AIM:
To draft the level of details you are planning including dimensions of room, components to add in the residential unit.
INTRODUCTION:
Dimensioning on a floor plan usually requires two or three continous dimensional lines to locate exterior walls, wall jogs, interior walls , windows , doors and other elements
Exterior walls of a building are dimensioned outside the floor plan .
The outermost dimensional line is the overall building dimension
The next dimension line, moving towards the plan , indicates wall locations and centerlines to doors and windows
Other miscellanious details in the plan are located on a third dimension line
PROCEDURE:
STEP 1
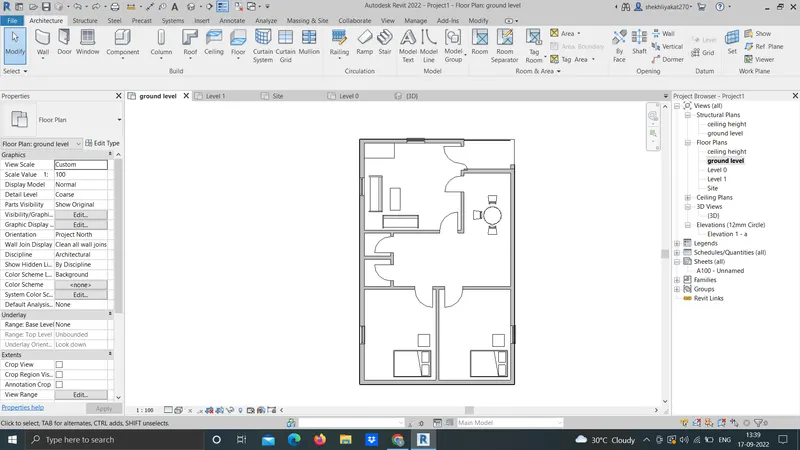
From the previous drawn residential unit, we put the dimensions for the rooms as shown below.
STEP 2:
Next we need to add the doors to the layout using the door option in the architecture toolbar
STEP 3:
Next we need to add the windows to the layout using the window option in the architecture toolbar.
STEP 4:
Next we use the floor option to provide the floor for the resdential unit as shown below.
The floor option will be there in the architecture toolbar.
STEP 6:
Next the residential unit is changed to the 3d view as shown below.
RESULT:
I unerstood how to add components to residential building in revit software.
7.
AIM:
To insert the residential model elements such as Door, Windows, Tables, Chair, Couch, Bed, Lamps from the library and insert them to the model
INTRODUCTION:
The residential model elements are Door, Windows, Tables, Chair, Couch, Bed, Lamps
These elements are very important in the building model for construction
Coming to the 3d modelling in the revit,these elements are present in the library and we need to insert them into the model
PROCEDURE :
STEP 1:
We need to add the doors to the layout using the door option in the architecture toolbar
STEP 2:
Next we need to add the windows to the layout using the window option in the architecture toolbar
STEP 3:
Next we need to insert the dining table, kitchen table, kitcen sink and counter as shown in the figure
STEP 4:
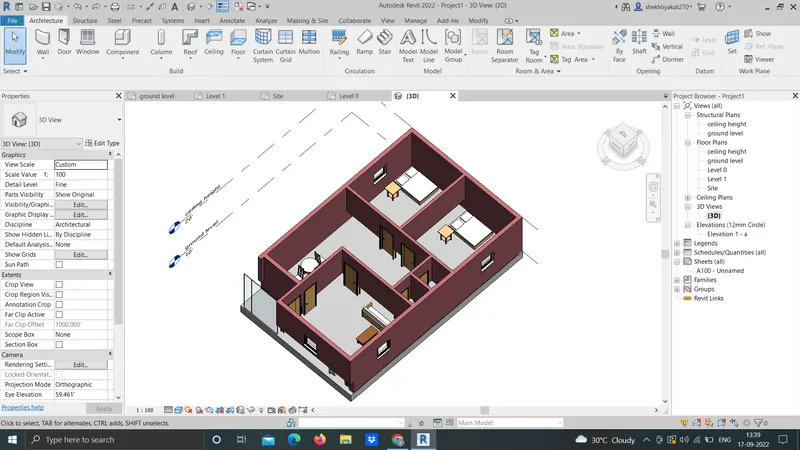
Coming to the bedroom we insert the beds, chairs, and tables from the library as shown below
STEP 5:
Next coming to the toilet room, we Insert the W/C from the library as shown in the screenshot
STEP 6:
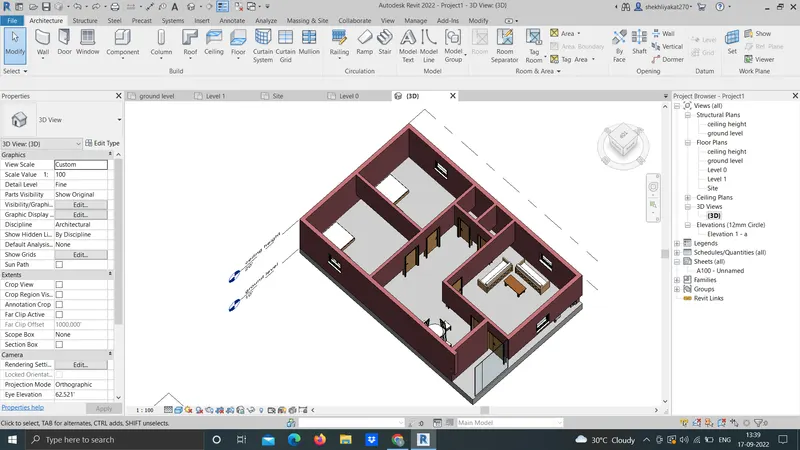
Next we insert the furniture things in the hall from the library as shown in the picture below
STEP 7:
The residential model elements are inserted from the library as shown below in the picture
STEP 8:
The model elements are inserted in the model sucessfully and different views are shown
RESULT:
I understood how to add builiding elements such as table chair bed etc in revit software.