Creating Kitchen layout, Hatching of Architectural elements and sectional view of an Industrial Building in AutoCad
AIM & INTRODUCTION:
AIM:
- To Create the layouts of the Kitchen and provide hatches pattern, the elevation of the plan created in the Challenges 7 and apply proper hatch in the walls, doors, windows, and other architectural elements and the section view of an industrial building.
INTRODUCTION:
1. Creating the layouts of the Kitchen and providing hatches pattern and use blocks wherever required by Providing appropriate dimensions in the plan also assuming the size of doors, appliances and others as per the standards.
2. Creating the elevation of the plan created in the Challenges 7 and applying proper hatch in the walls, doors, windows, and other architectural elements by refering to the dimensions in Plans and sections in Challenges 7.
3. Creating the section view of an industrial building by Providing appropriate hatches and dimensions wherever required and also provide annotations to the drawing.
PROCEDURE:
1. The layouts of the Kitchen :
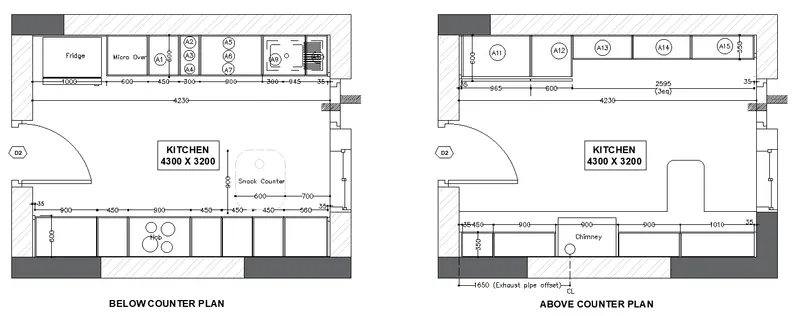
- To create the kitchen layout , the rectangle has to be drawn with the rectangle command with area 4300 x 3200 mm.
- Then the wall of 225mm has to be separated form the rectangular area by offset tool.
- The utilities and the other items inside the kitchen layout are to be drafted with the help of "line" and "rectangle" tool.
- The required parts between the walls should be hatched wherever required with the help of the "HATCH" command.
- The door has to be created in the distance of 1000mm with the "line" and "Circle" tools and the windows are created in the required position as a distance of 1000mm.
- After creating the layout,the dimensions are to be mentioned with 'DIM LINEAR' tool and texts with the use of 'DTEXT' OR 'MTEXT' command.
- The text styles and dimensions scales can be changed in the Dimension style manager by the command called "DST".
- The dimensions can be assumed, wherever Requires and the layouts can be convert in the block with the "BLOCK" command.
- After the completion of the layout, it should be saved by the shortkey "crtl+s" or by the command "qsave".
2. The elevation of the plan created in the Challenges 7 :
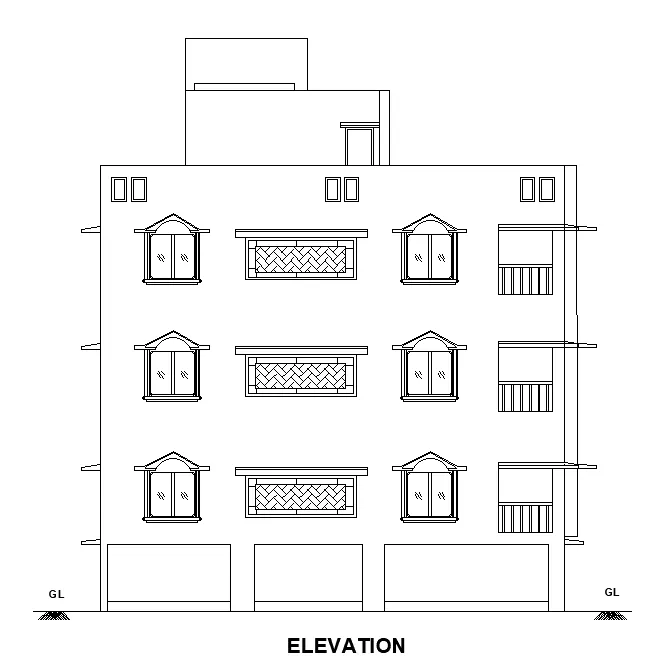
- To create a Elevation fom the floor plan, the construction line was used with tool name "xline" to extrat a exact size of the building walls, doors and the window size.
- The other structures such as O.H.T , Head room and the entrance are drafted by the rectangle tool with the assumed dimensions.
- The windows, sunshades and the balcony are can be drawn for the ground floor and the same can be coppied to the above roof level.
- The O.H.T can be seen as a height of 6' from the top the head room.
- Before that the G.L , Plinth level, lintel level and the roof level has to be predefined as required height using the "offset" tool.
- Then the excess lines needs to be trimmed using the "trim" tool.
- After the completion of the Elevation, it should be saved by the shortkey "crtl+s" or by the command "qsave".
3. The section view of an industrial building :
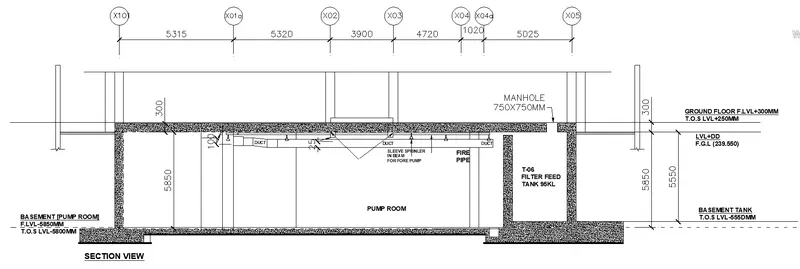
- To create a section or cross sectional view of the industrial building, the rectangular tool has been used with the assumed dimensions with the reference as per the shown figure.
- The sections of the columns and the footings are drawn by the "PLINE" tool with the assumed units.
- If any then the excess lines are needs to be trimmed using the "trim" tool.
- All the other structures are also be created with the reference of given figure.
- The column and beams are then hatched with suitable pattern with the help of the "HATCH" command.
- After creating the sections,the dimensions are to be mentioned with 'DIM LINEAR' tool and texts by the use of 'DTEXT' OR 'MTEXT' command.
- The text styles and dimensions scales can be changed in the Dimension style manager by the command called "DST".
- The dimensions can be assumed, wherever Requires and the layouts can be convert in the block with the "BLOCK" command.
- After the completion of the layout, it should be saved by the shortkey "crtl+s" or by the command "qsave".
RESULT:
1. The layouts of the Kitchen :
- The kitchen layout can be seen with two layouts with the same area of 4300 x 3200 mm.
- The first layout of the BELOW COUNTER PLAN has the provision of the snack counter and other utilities such as sink, fridge, Stove etc.
- The second layout of the ABOVE COUNTER PLAN has different provision such as chimney and cupboards etc.
- The doors and windows can be seen with the distance of 1000mm.
- The hatches can be seen in the various parts of the outer walls.
- it is drafted and converted as a block by the block tool.
2. The elevation of the plan created in the Challenges 7 :
- The Elevation drawing from the floor plan has the exact size and positions of the building walls, doors and the windows.
- In the elevation view the O.H.T can be seen as a height of 6' from the top the head room and the sunshades are can be seen at the height of 7' from the plinth level or floor level.
- From the G.L to Plinth level it has a height of 3' , from plinth level to the lintel level its has a height of 7' and form the lintel level to the the roof level it has a height of 10'.
- The windows, sunshades and the balcony are can be drawn for the ground floor and the same can be coppied to the above roof level.
3. The section view of an industrial building :
- In section view of the industrial building drafting we can see the cross section part of the PUMP ROOM, FIRE PIPE, FILTER FEED TANK along with other sectional structures.
- In this sectional view drawing all the structures inside the industrial buiding can be seen separately by hatching the column and footing sections.
- It show the cross sectional view of the beams and columns of the buiding from the G.L to the parapet wall.