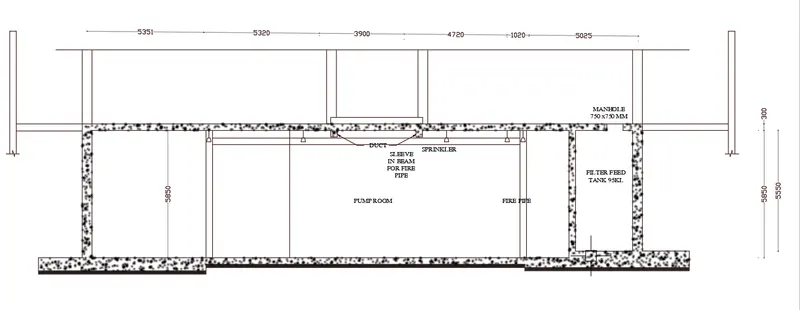
Creating Kitchen layout, Hatching of Architectural elements and sectional view of an Industrial Building in AutoCad
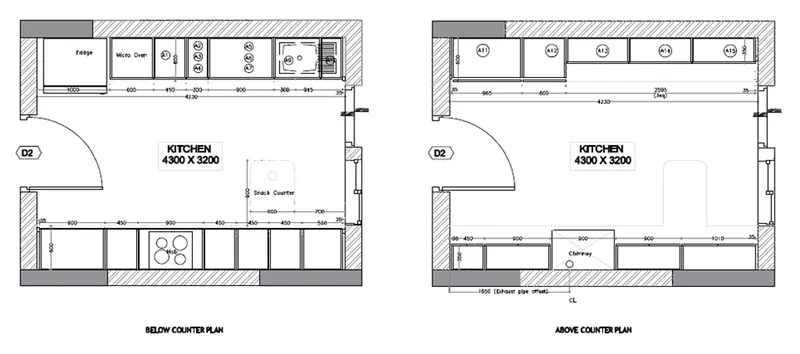
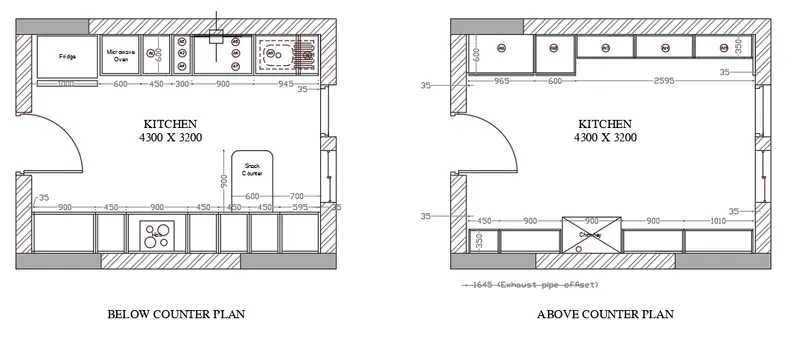
1. Create the layouts of the Kitchen and provide hatches pattern as shown. Also, use blocks wherever required. Provide appropriate dimensions in the plan. Assume the size of doors, appliances and others as per the standards.
AIM
To create the layouts of the Kitchen and provide hatches pattern as shown. Also, use blocks wherever required. Provide appropriate dimensions in the plan. Assume the size of doors, appliances and others as per the standards.
PROCEDURE
Set the unit using the UNIT command to decimal.
Using the LINE command to create a line of 4300 units and a line of 3200 units perpendicular to it.
OFFSET the kitchen slab by 600 units.
Draw the boundaries around all the lines by using the OFFSET command equal to 20 units.
By using the FILLET command, fillet the internal boundaries.
For creating the partitions, offset the horizontal lines at the distance of 35 units, 900 units, 450 units, 900 units, 450 units, 450 units, 450 units, 560 units, and 35 units using the OFFSET command.
Draw the boundaries around all the lines by using the OFFSET command equal to 20 units.
Using TRIM command, trim the extending lines.
OFFSET the kitchen slab by 600 units.
Draw the boundaries around all the lines by using the OFFSET command equal to 20 units.
By using the FILLET command, fillet the internal boundaries.
For creating the partitions, offset the horizontal lines at the distance of 1000 units, 600 units, 450 units, 300 units, 900 units, 945 units, and 35 units using the OFFSET command.
Draw the boundaries around all the lines by using the OFFSET command equal to 20 units.
Using TRIM command, trim the extending lines.
Using RECTANGLE command, create the fridge.
Specify dimension of rectangle as 800 X 620
Enter TEXT command: MTEXT
Specify first corner: click to type the name of appliances.
Type the name of appliances
Enter DIMENSION LINEAR command: DIMLIN
Specify first extension line origin:
Specify second extension line origin:
Left-click to exit the command.
Mention all the dimensions of the created footings
Using TRIM command, trim the door opening of 920 units.
TRIM the window openings on opposite side of 760 units.
Enter COPY command: CP
COPY select the objects to copy: Select the entire kitchen
Copy to create above counter plan.
OFFSET the kitchen slab by 600 units.
Draw the boundaries around all the lines by using the OFFSET command equal to 20 units.
By using the FILLET command, fillet the internal boundaries.
For creating the partitions, offset the horizontal lines at the distance of 35 units, 965units, 600 units using the OFFSET command.
Draw the boundaries around all the lines by using the OFFSET command equal to 20 units.
Using TRIM command, trim the extending lines.
OFFSET the kitchen slab by 350 units.
Enter DIVIDE command: DIV
Select the object to divide:
Enter number of segments: 3
Draw the partition using LIN command.
Draw the boundaries around all the lines by using the OFFSET command equal to 20 units.
Using TRIM command, trim the extending lines.
OFFSET the kitchen slab by 350 units.
Draw the boundaries around all the lines by using the OFFSET command equal to 20 units.
By using the FILLET command, fillet the internal boundaries.
For creating the partitions, offset the horizontal lines at the distance of 35 units, 450 units, 900 units, 900 units, 900 units, 1010 units, and 35 units using the OFFSET command.
Draw the boundaries around all the lines by using the OFFSET command equal to 20 units.
Using TRIM command, trim the extending lines.
Enter DIMENSION LINEAR command: DIMLIN
Specify first extension line origin:
Specify second extension line origin:
Left-click to exit the command.
Mention all the dimensions of the created partitions.
RESULT
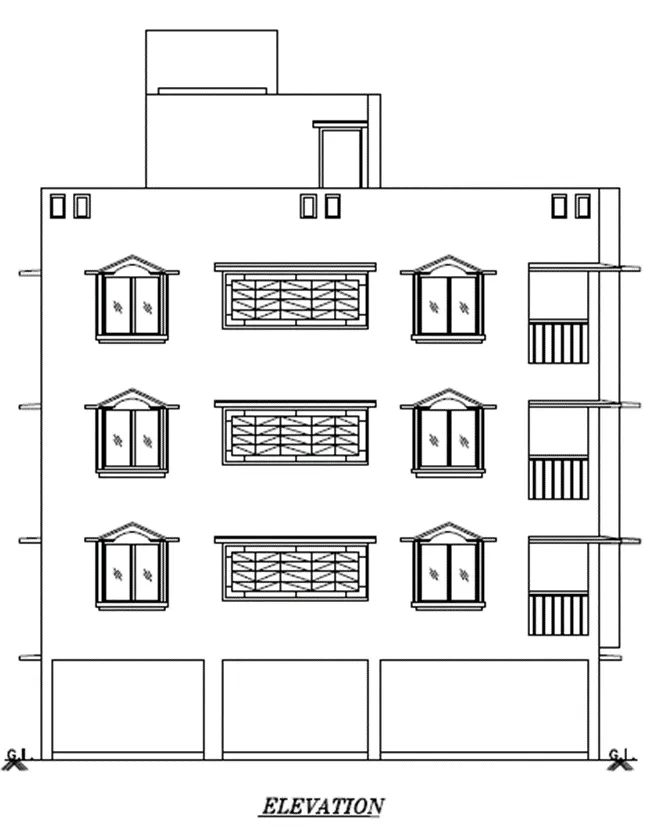
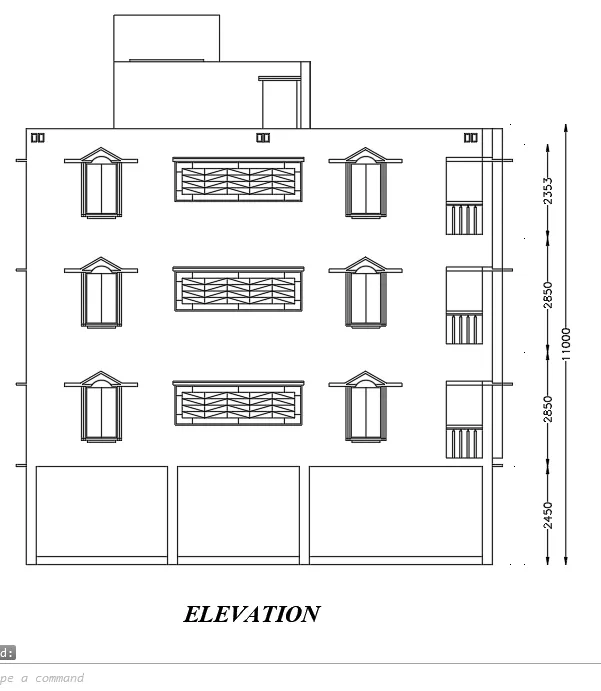
2. Create the elevation of the plan created in the Challenges 7 and apply proper hatch in the walls, doors, windows, and other architectural elements. Refer to the dimensions in Plans and sections in Challenges 7.
Refer to the elevation that needed to be created.
AIM:
Create the elevation of the plan created in Challenges 7 and apply proper hatch in the walls, doors, windows, and other architectural elements. Refer to the dimensions in Plans and sections in Challenges 7. Refer to the elevation that needed to be created.
PROCEDURE:
For drawing the elevation refer to the figure given in the week 7 challenge.
Start projecting lines from every corner of it, as shown in figure draw window 2 on the projected lines of it.
There are two windows in the plan and draw an open mesh for the veranda as shown in the figure.
And draw a balcony on the projected lines as well as lintels on both sides.
Copy this entire group of windows and mesh, chajja and place them one above the other as
It is a three-storey building.
And draw mumty at the top of the roof as shown in the figure.
RESULT
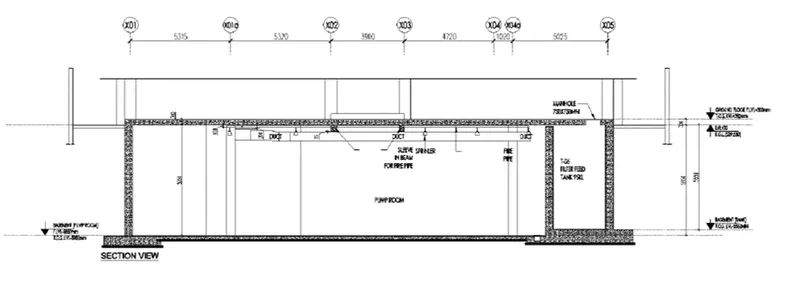
3. Create the section view of an industrial building as shown in Figure. Provide appropriate hatches and dimensions wherever required. Also, provide annotations to the drawing.
AIM
To create the section view of an industrial building as shown in Figure and to provide appropriate hatches and dimensions wherever required. Also, provide annotations to the drawing.
PROCEDURE
Draw a rectangle of the size "25600 X 6300mm".
Now give the offset of 300mm to the whole rectangle to give it the width of the wall.
Now mark the Gridline as shown in the figure at the given dimensions.
Now put the lines using Gridlines as shown in the figure to show the sprinklers.
Also, name the Grids as shown in the figure and it also makes it easy to draw the whole drawing.
Also by using commands like line, offset, extend & trim complete the following drawing.
Now put the hatch where the concrete work is to be done to differentiate it from other parts of the drawing.
Now put the Leader for the substances where it is needed.
Where the leader is not needed use "MTEXT" to notate the entity.
RESULT