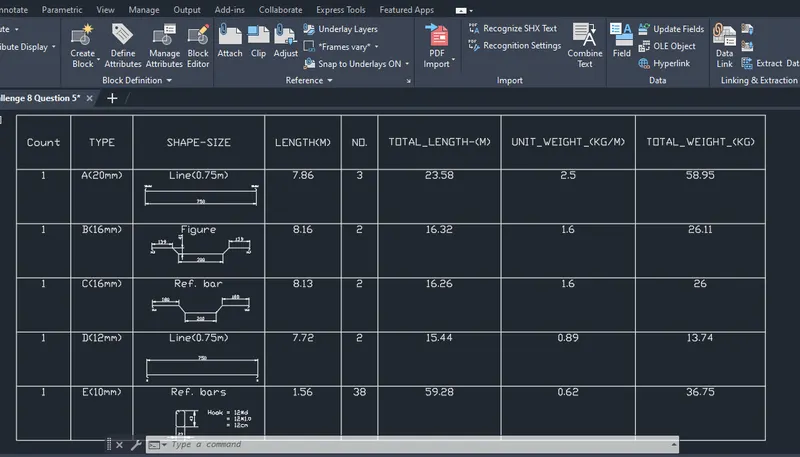
Creating Bar Bending schedule, Different Door types, and Creation of standard drawing templates using AutoCad
Aim :
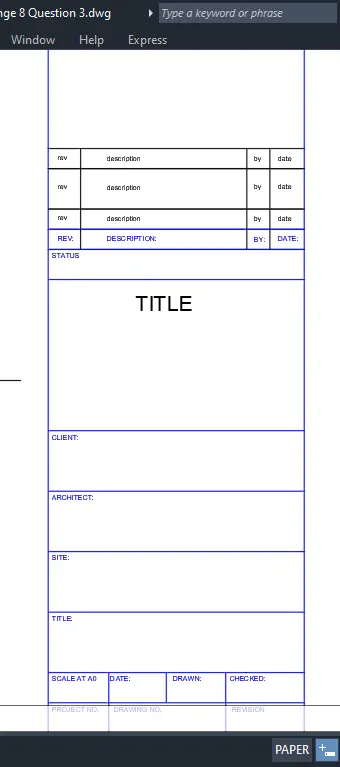
1. Create the templates as shown in Figures
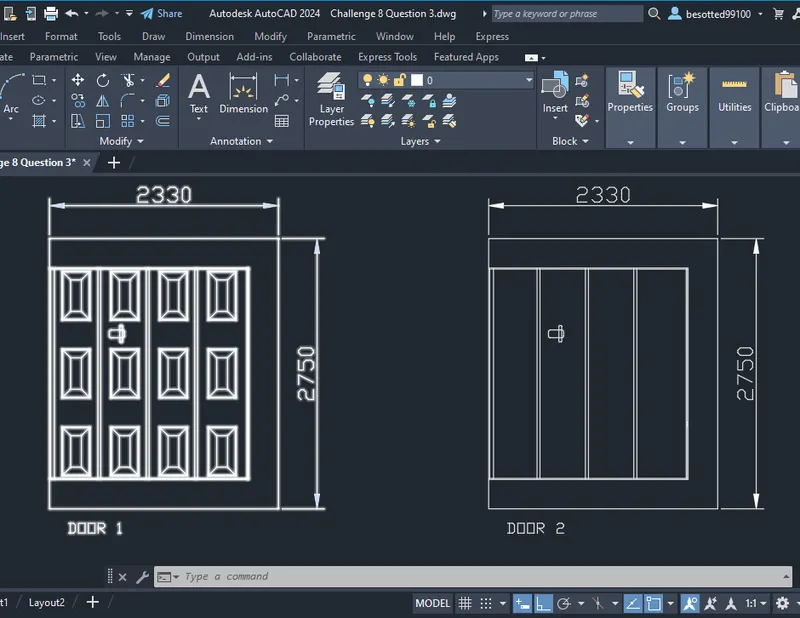
2. Create the doors type for warehouse as shown in the Figure
3. Create each symbol as a block with the name given in the legend
4. Create the door type for residential building as a block
5. Create each shape as a block as shown in the Figure
Introduction :
Blocks - CAD blocks are named groups of objects that act as a single 2D or 3D object. You can use them to create repeated content, such as drawing symbols, common components and standard details. Blocks help you to save time, maintain consistency and reduce file size, since you can re-use and share content. You can create your own CAD blocks or choose them pre-made in both AutoCAD and AutoCAD software. Insert a block into a CAD drawing either by specifying a drawing file or block definition within a drawing file. Then, you can easily move, copy, rotate or scale it.
Uses of Blocks in AutoCAD
Maintain design standards
Reduce repetitive tasks
Reduce file sizes
Creating a BLOCK, Step by Step
- Draw an individual object
- Name the block
- Define the base point
- Select the block objects
- Define the block behavior
- Add a description and create
Procedure :
1. Step by Step procedure to create the templates as shown in Figures
- Open a new file: Control +N
- Click on Start from scratch & select imperial (metric)
- Enter Drawing unit(UN): UN [Enter]
- Enter LIMMAX(LIM) command: LIM [Enter]
- Put the value of the plot according to our drawing [Enter]
- Enter ZOOM(Z) command: Z [Enter]
- Enter ALL(A) command: A [Enter] in the ZOOM command
- Another command is LIMITS
- Enter RECTANGLE(REC) command: REC [Enter]
- Enter (fn + f10) : Polar Tracking On
- Enter (fn + f3) : Object Snap On
- Enter (fn + f8) : Ortho On
- Enter (O) : Offset Command
- Enter (DIML) : Dimension Liner Command
- Enter (DIMC) : Dimension Continous Command
- Enter (MT) : Multi Text Command
- Complete the templates as shown in the figure
2. Step by Step procedure to create the doors type for warehouse as shown in the Figure
- Open a new file: Control +N
- Click on Start from scratch & select imperial (metric)
- Enter Drawing unit(UN): UN [Enter]
- Enter LIMMAX(LIM) command: LIM [Enter]
- Put the value of the plot according to our drawing [Enter]
- Enter ZOOM(Z) command: Z [Enter]
- Enter ALL(A) command: A [Enter] in the ZOOM command
- Another command is LIMITS
- Enter RECTANGLE(REC) command: REC [Enter]
- Enter (fn + f10) : Polar Tracking On
- Enter (fn + f3) : Object Snap On
- Enter (fn + f8) : Ortho On
- Enter (O) : Offset Command
- Enter (DIML) : Dimension Liner Command
- Enter (DIMC) : Dimension Continous Command
- Enter (MT) : Multi Text Command
- Complete the doors type for warehouse as shown in the figure
3. Step by Step procedure to create each symbol as a block with the name given in the legend
- Open a new file: Control +N
- Click on Start from scratch & select imperial (metric)
- Enter Drawing unit(UN): UN [Enter]
- Enter LIMMAX(LIM) command: LIM [Enter]
- Put the value of the plot according to our drawing [Enter]
- Enter ZOOM(Z) command: Z [Enter]
- Enter ALL(A) command: A [Enter] in the ZOOM command
- Another command is LIMITS
- Enter RECTANGLE(REC) command: REC [Enter]
- Enter (fn + f10) : Polar Tracking On
- Enter (fn + f3) : Object Snap On
- Enter (fn + f8) : Ortho On
- Enter (O) : Offset Command
- Enter (DIML) : Dimension Liner Command
- Enter (DIMC) : Dimension Continous Command
- Enter (MT) : Multi Text Command
- Complete the symbol as a block with the name given in the legend
4. Step by Step procedure to create the door type for residential building as a block
- Open a new file: Control +N
- Click on Start from scratch & select imperial (metric)
- Enter Drawing unit(UN): UN [Enter]
- Enter LIMMAX(LIM) command: LIM [Enter]
- Put the value of the plot according to our drawing [Enter]
- Enter ZOOM(Z) command: Z [Enter]
- Enter ALL(A) command: A [Enter] in the ZOOM command
- Another command is LIMITS
- Enter RECTANGLE(REC) command: REC [Enter]
- Enter (fn + f10) : Polar Tracking On
- Enter (fn + f3) : Object Snap On
- Enter (fn + f8) : Ortho On
- Enter (O) : Offset Command
- Enter (DIML) : Dimension Liner Command
- Enter (DIMC) : Dimension Continous Command
- Enter (MT) : Multi Text Command
- Complete the door type for residential building as a block
5. Step by Step procedure to create each shape as a block as shown in the Figure
- Open a new file: Control +N
- Click on Start from scratch & select imperial (metric)
- Enter Drawing unit(UN): UN [Enter]
- Enter LIMMAX(LIM) command: LIM [Enter]
- Put the value of the plot according to our drawing [Enter]
- Enter ZOOM(Z) command: Z [Enter]
- Enter ALL(A) command: A [Enter] in the ZOOM command
- Another command is LIMITS
- Enter RECTANGLE(REC) command: REC [Enter]
- Enter (fn + f10) : Polar Tracking On
- Enter (fn + f3) : Object Snap On
- Enter (fn + f8) : Ortho On
- Enter (O) : Offset Command
- Enter (DIML) : Dimension Liner Command
- Enter (DIMC) : Dimension Continous Command
- Enter (MT) : Multi Text Command
- Complete each shape as a block as shown in the figure
Result :
1. Created the templates as shown in Figures
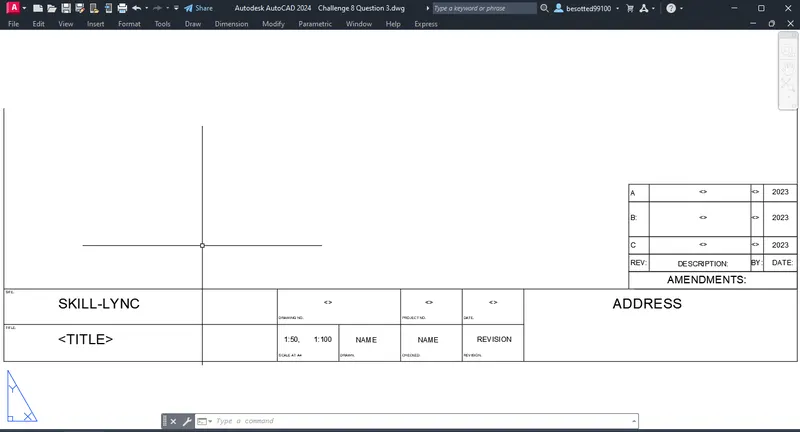
2. Created the doors type for warehouse as shown in the Figure
3. Created each symbol as a block with the name given in the legend
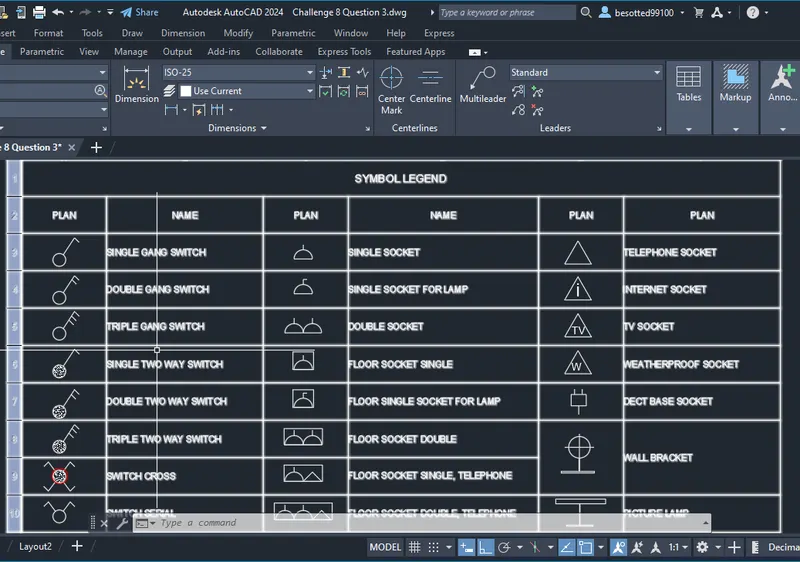
4. Created the door type for residential building as a block
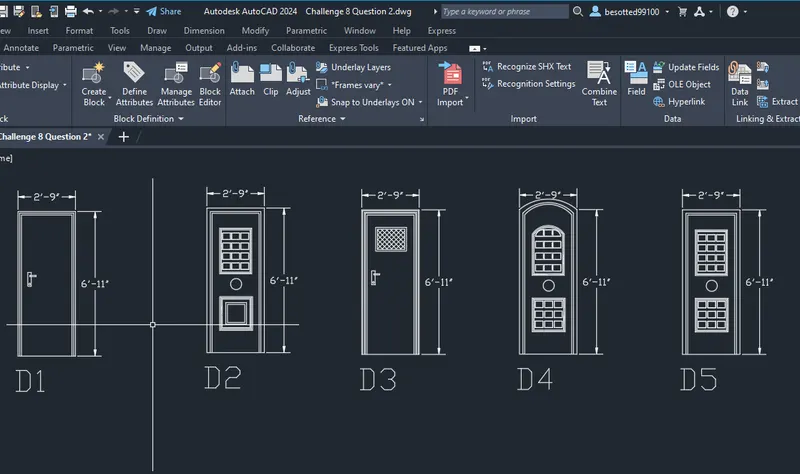
5. Created each shape as a block as shown in the Figure