Creating Bar Bending schedule, Different Door types, and Creation of standard drawing templates using AutoCad
1.
AIM:
To create a template, using attribute and create a table insert the text then convert the template to a block
1.Custom1_titleblock
2.Custom2_titleblock
INTRODUCTION:
In AutoCAD, a block is a collection of objects that are combined into a single named object. It is used to create a repeated content such as, drawing symbols, electrical fixtures, and other functional components which we can easily explode into the drawing
Blocks play a important role in reducing the time of drawing and can be easily inserted where ever required
The command used to create attribute is ATTDEF
Attribute definition are the main tool to store several text or information of an object. attribute can be added to a block definitions for making them more informative it attaches data to a block
BATTMAN is the comman used in attributes.It manages the attribute for a selected block definitions.If the current drawing does not contain any blocks with attributes a message is displayed
ATTDISP is a command used to control the visibility overrides for all block attributes in a drawing.The current visibility of attribute is stored in the ATTMODE variable.
FIELD is a command used to create a text field with dynamic contents.you can also access it through the insert option in ribbon
COMMANDS USED:
Units
Dimstyle
Limits
Line
Block
Attribute
Field
Rectangle
Mtext
Mirror
Copy
Offset
PROCEDURE:
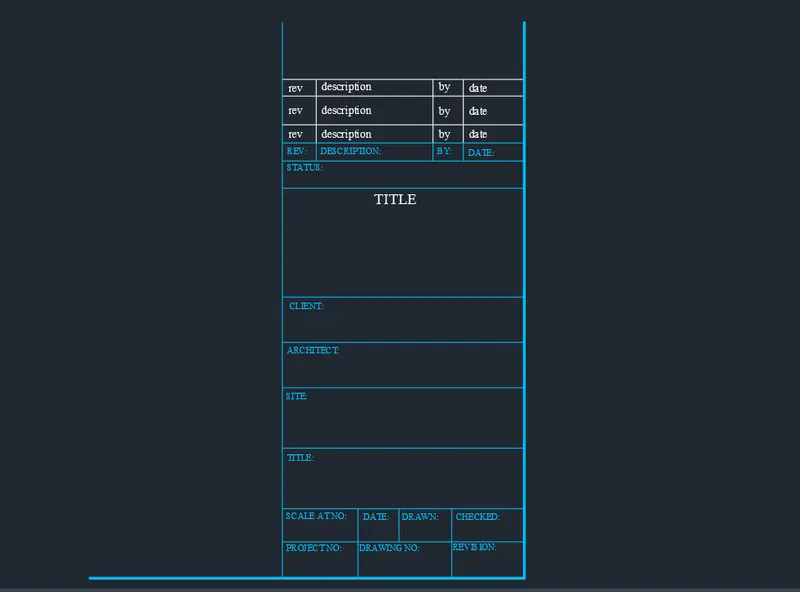
1. Custom1_titleblock:
- Open a new AutoCAD file with metric system set the units and limits by limmax command
- In comand prompt type rectangle and specify the dimensions length is 80 mm and width is 165 mm
- Divide the rectangle into a column so that the text should fit inside it
- By using offset and line command the following table is drawn
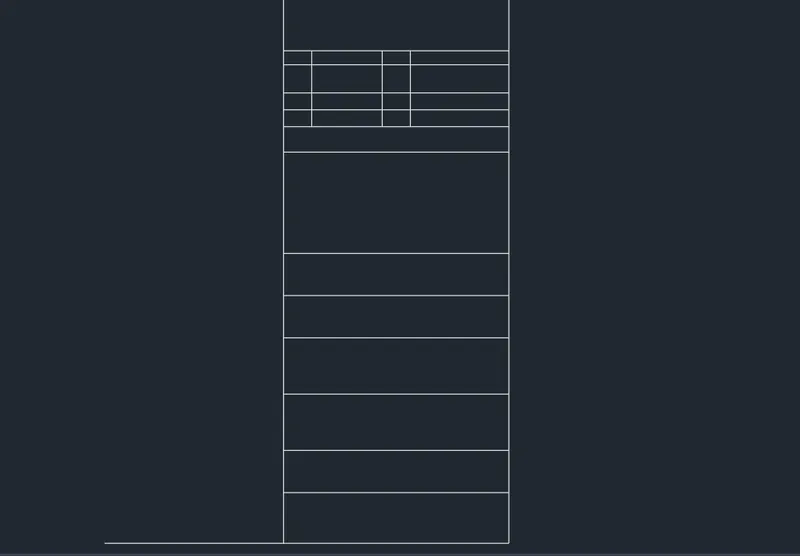
- Before entering the text we need to set the dimension and text style by command DIMSTYLE and give the text name as Times New Roman and adjuss the scale factor for better visibility
- Then by using mtext command type, rev, description, by, and date on the first row with the text height 2.5 and style - Times New Roman.
- By multiline text command the first 3 rows are fillet and the rest of the informations is created by attributes definition
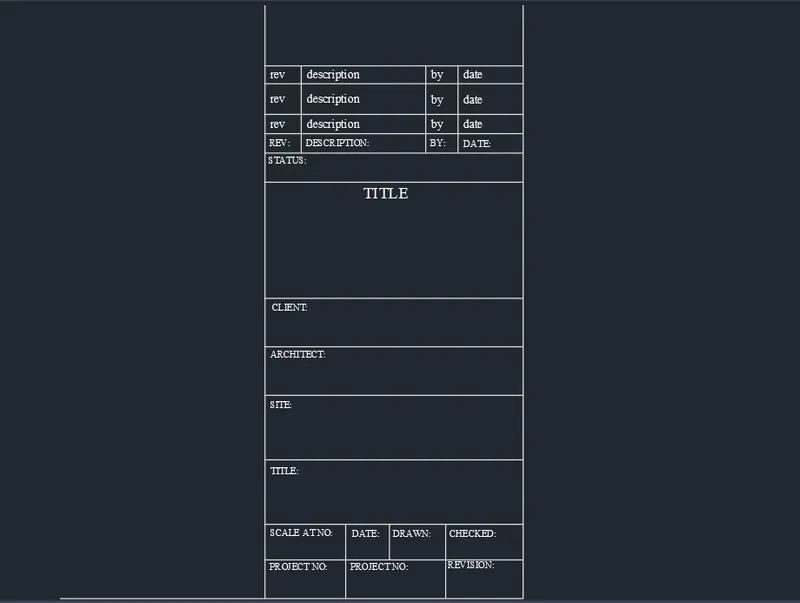
- In command prompt type ATTDEF a attribute definition dialog box will open in that give the tag, prompt, and default values
- Likewise for all the text the attributes are created and the text are inserted into the rows and columns
- And the line weight on the right side has 0.3mm thickness for that LW command is used to on the display line weight icon and adjuss the transparency for better visibility
- After finishing all the informations in sttributes layers are created and name the layer as template and the colors are given
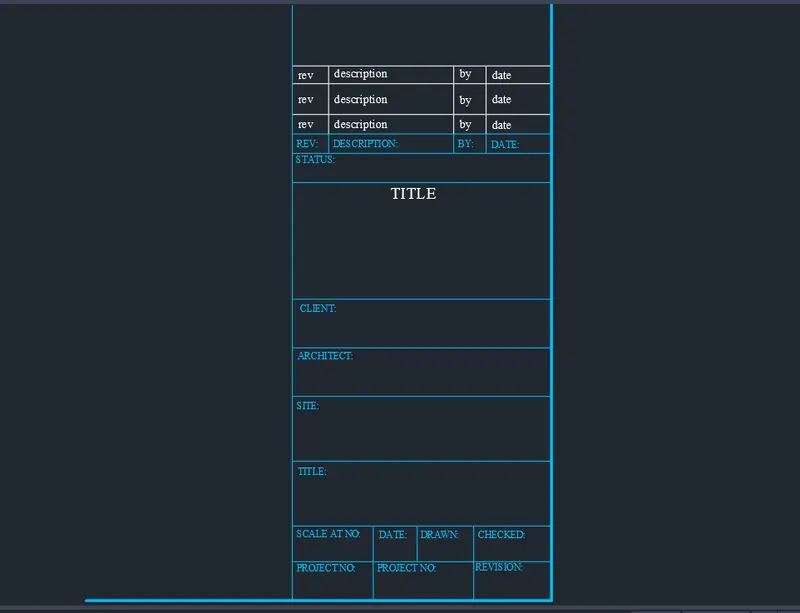
- Once the attribute is created the table is then to be created as a block
- To open a block tab use command B
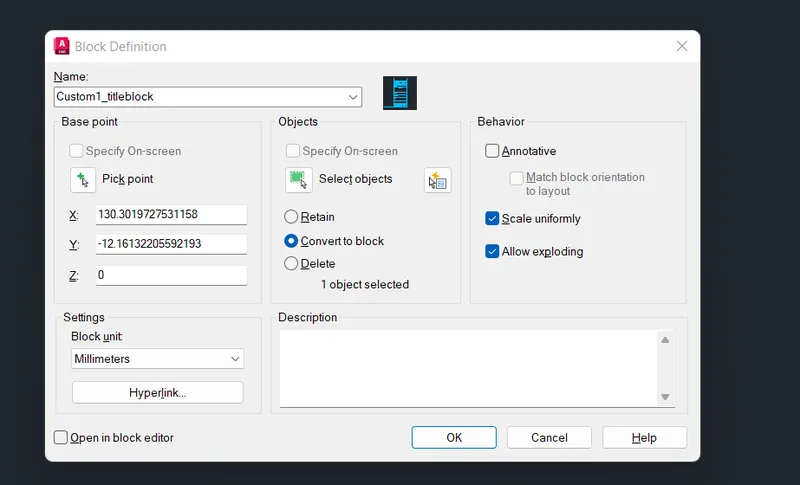
- For that in command prompt type B enter a block definition dialog box will be opened Save the name as- Custom1_titleblock
- Then click on specify the point i,e Specify the centroid of the object then give the default values , and select the entire object a preview will be shown. enable scale uniformily and allow exploding option
- As we can select any one of the following option Retain, convert to a block, or delete, here i selected convert to a block which means the block itself will get converted and remains as such in display.
- If we select retain option the object will be retained and same as the actual drawing and a block is created for the objects that have selected. If we you the delete option Then the converted block in the drawing gets deleted
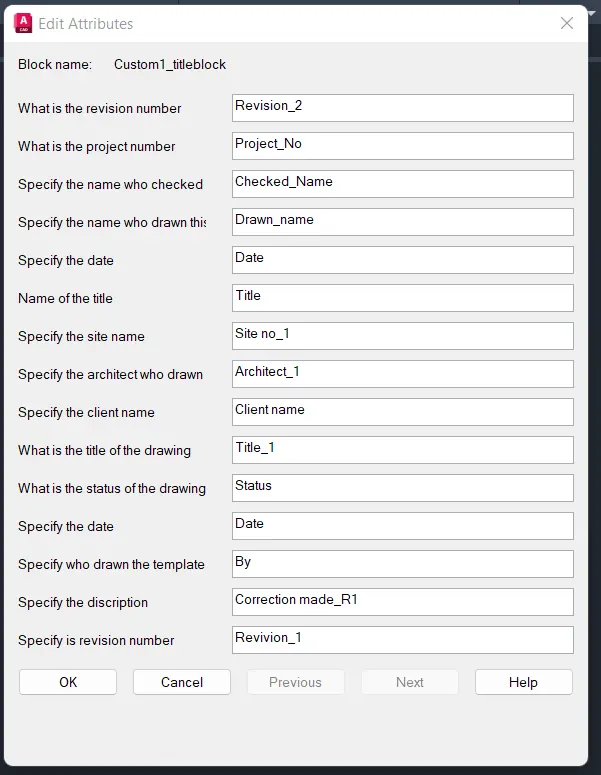
- Once the block is created then press okay after that a edit attribute dialogue box will be opened. The created attribute preview will be shown you can edit this attribute However, i kept the attribute text as such that nothing is edited
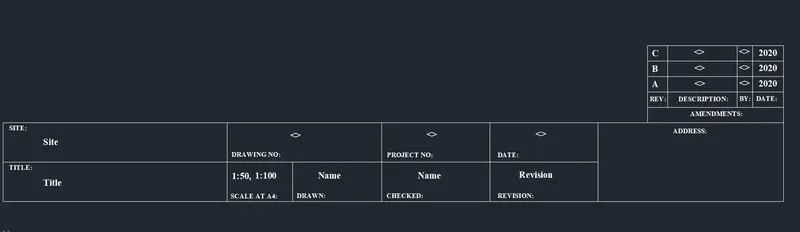
Custom2_title block:
- Draw the rectangle of dimension 280mm and 55mm with div command divide the lines into two and required rows and column are created.
- Then create a small rectange on top right cornor and explode it divide the lines to get a rows and columns and offset the lines to get a table. The offset distance are approximately made
- Open the dimstyle manager and set the font style and font size
- By using multiline text the table information are inserted with font style- Times new roman and text height- 2.5
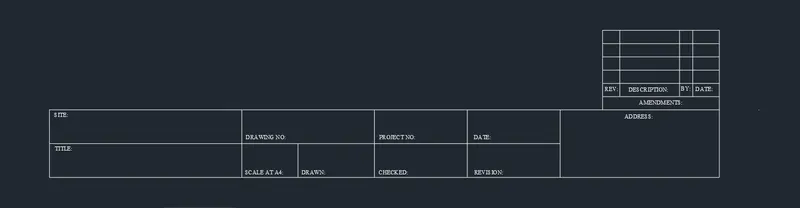
- In comand prompt type ATTDEF in that give values or text to Tag, prompt and default. In tag The informations which are present in table are to be inserted,
- In prompt question is arised relevent to the answers then in default type the answer to a question which are made in the above
- Likewise for each informations each attribute is created and the tag value alone is inserted to a table
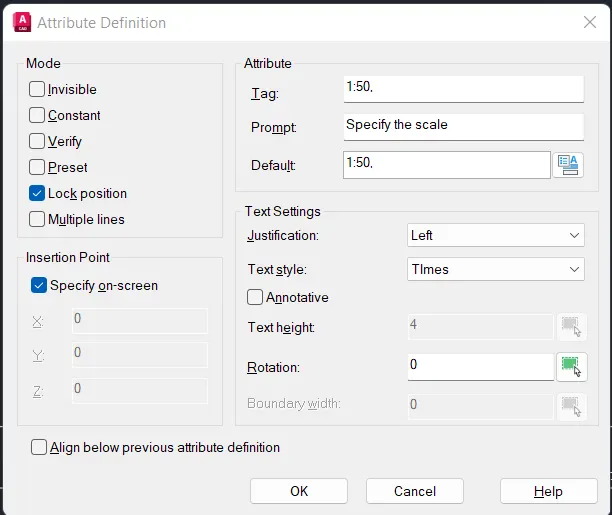
- Repate the same process By commanding ATTDEF for each element each attribute is created similarly for the rest of the text the attribute created is now converted to a block
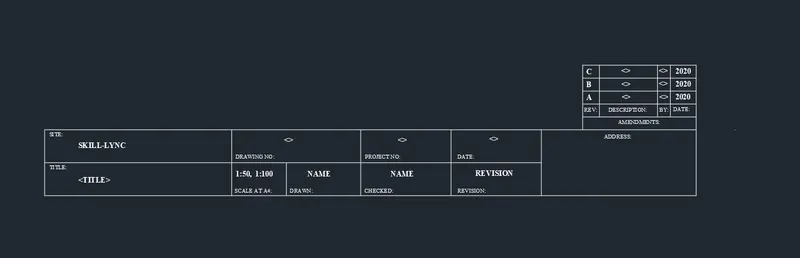
- To open a block tab use command B
- For that in command prompt type B enter a block definition dialog box will be opened Save the name as- Custom2_titleblock
- Then click on specify the point i,e Specify the centroid of the object then give the default values , and select the entire object a preview will be shown. enable scale uniformily and allow exploding option
- As we can select any one of the following option Retain, convert to a block, or delete, here i selected convert to a block which means the block itself will get converted and remains as such in display.
- If we select retain option the object will be retained and same as the actual drawing and a block is created for the objects that have selected. If we you the delete option Then the converted block in the drawing gets deleted
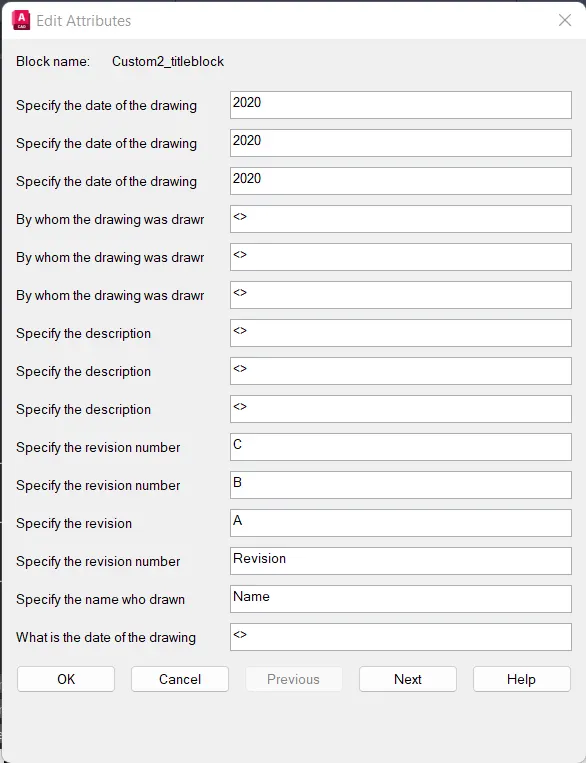
RESULT:
The blocks that is Custom1_title block and Custom2_title block are created with attributes and text are used whereever required
The created blocks are inserted by command I in the drawing
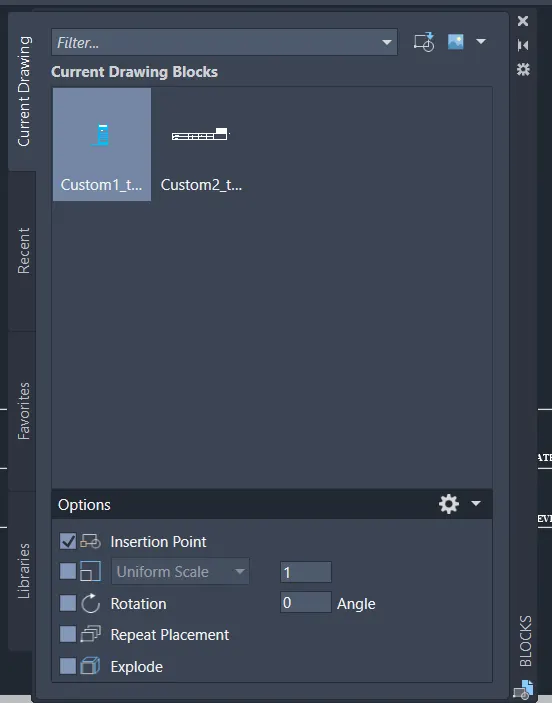
Custom1_title block:
Custom2_title block:
Q2-
AIM:
To create the doors of warehouse as per the standard size and convert them into a blocks
Door 1 - 2330 x 2750 mm
Door 2 - 2300 x 2750 mm
PROCEDURE:
- Open a new drawing with metric system set the units and limmax
- Create a rectangle of sixe 2330 x 2750 mm and explode it
- In command prompt type o and give the offset value of 60mm as a frame and further 90mm for the left side
- By divide DIV command divide the horizontal lines into 4 segments and same vertical lines to 3 segments to divide into shutters
- offset 20 mm on both side for the thickness and delete the centre lines
- Create a rectangle to show a pannel offset 20mm for the first rectangle and offset 100mm from the second rectangle then draw the lines joining the corners of outside and innerside
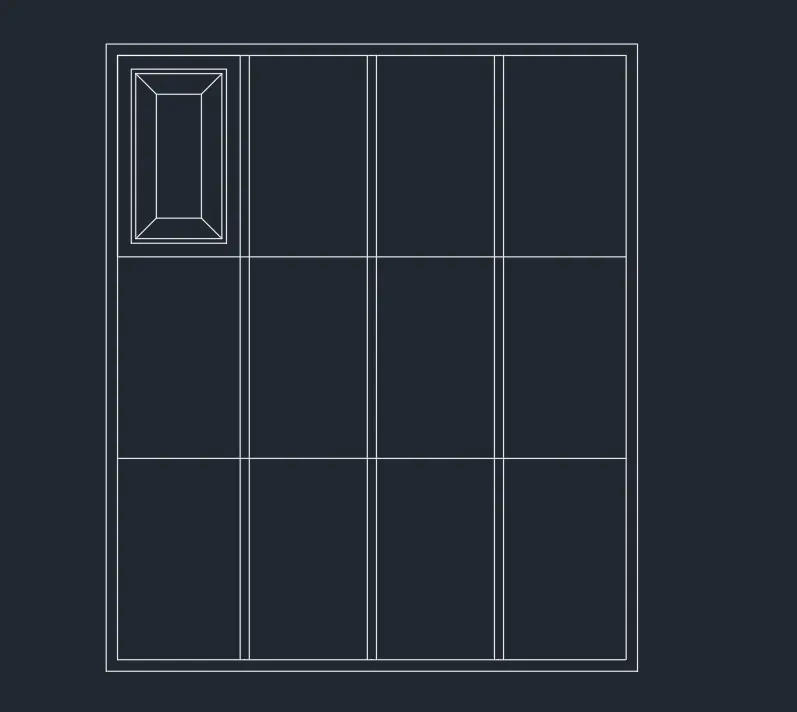
- By using co command all the frames a copied by specifying array and number of array segment into 4.
- Create a lock by command rectangle and fillet the corners with radius of 5 mm
- Layer is created and all the objects are kept in different layers
- Hatch is used for frames and lock as shown
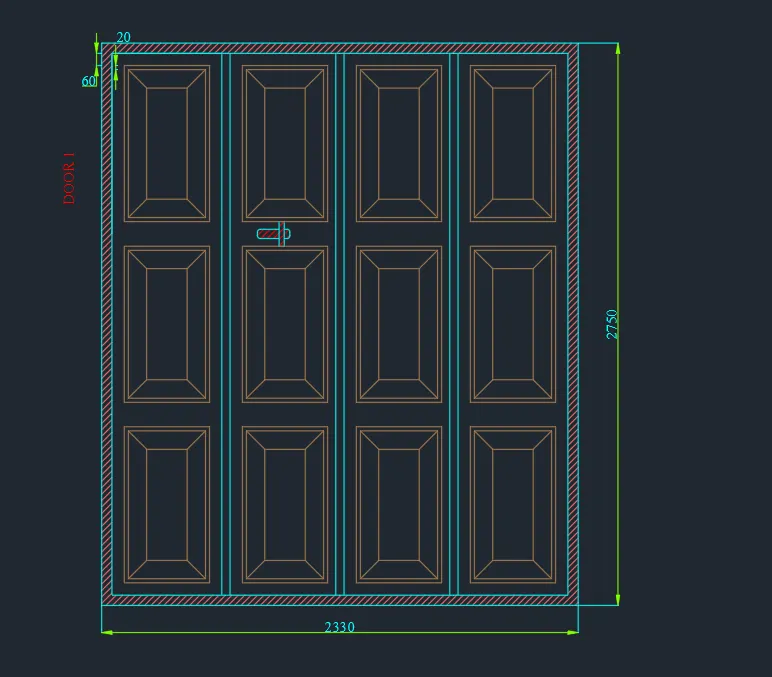
- By using co command all the frames a copied by specifying array and number of array segment into 4.
- Create a lock by command rectangle and fillet the corners with radius of 5 mm
- Layer is created and all the objects are kept in different layers
- Hatch is used for frames and lock as shown
- In command prompt type B and a block definition dialog box will opened then convert the door as a block and naming as DOOR_1
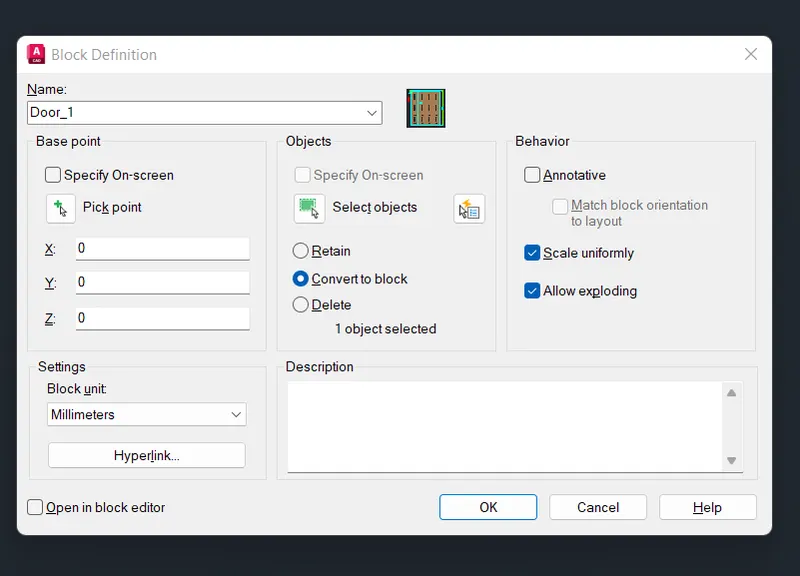
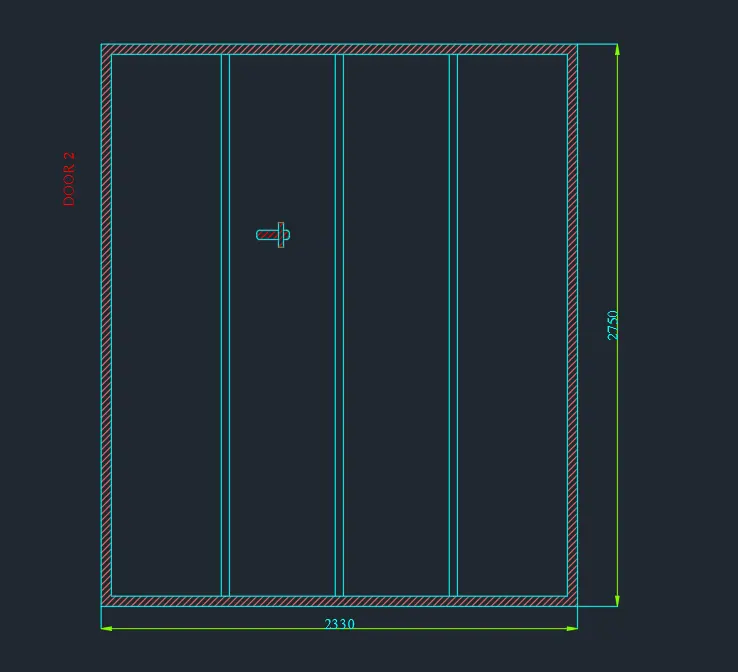
DOOR 2 - 2300 x 2700mm:
- Create a rectangle of size 2330x2750 and offset 50 mm as a frame 90mm for the left side. Explode the rectangle
- By divide comand 'div' divide the lines into 4 segments. From the division point draw the line vertically to divide into shutters.To make the division point visible command DDPTYPE and select the style of the points
- Offset 20mm on both the sides for the thickness and delete the centre line. Create a lock by using rectangle and fillet the corner with fillet radius of 5mm
- Hatch is used for frame and lock as shown
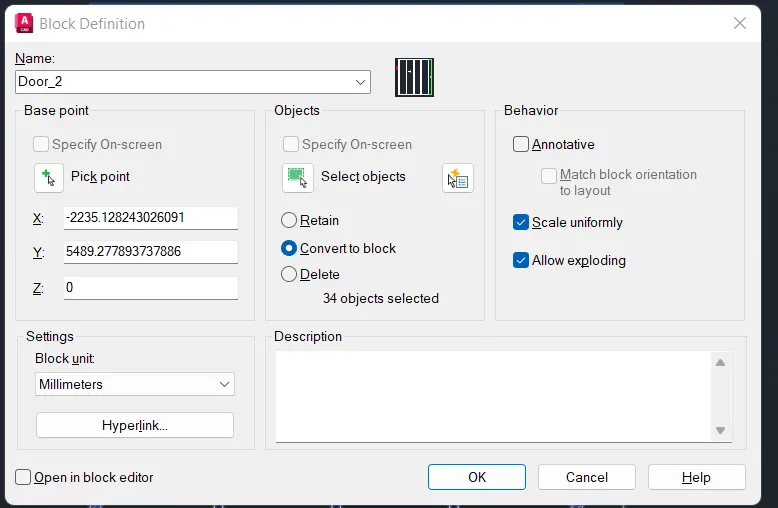
- To open a block tab use command B
- For that in command prompt type B enter a block definition dialog box will be opened Save the name as- Door_2
- Then click on specify the point i,e Specify the centroid of the object then give the default values , and select the entire object a preview will be shown. enable scale uniformily and allow exploding option
- As we can select any one of the following option Retain, convert to a block, or delete, here i selected convert to a block which means the block itself will get converted and remains as such in display.
- If we select retain option the object will be retained and same as the actual drawing and a block is created for the objects that have selected. If we you the delete option Then the converted block in the drawing gets deleted
RESULT:
The doors are created as per the standard size and converted into blocks Door_1 and Door_2
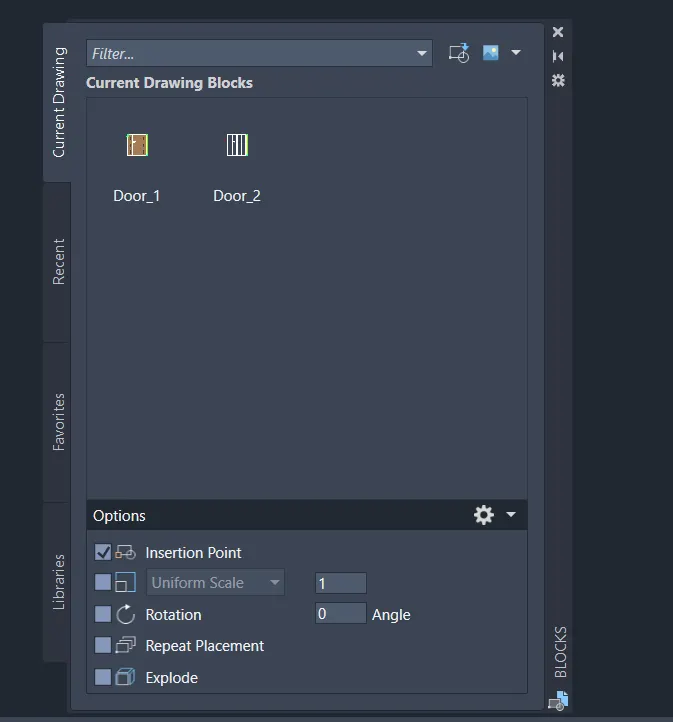
DOOR_1:
DOOR_2:
Q3-
AIM:
To create the each symbols in electrical fixtures, convert them into blocks and create legends with symbols and their names
1. Create each electrical symbol
2. Convert to block
3. Arrange them in legends
PROCEDURE:
SINGLE GANG SWITCH:
Draw a circle with radius 60mm and with line draw an inclined line vertical and horiontal line perpendicular to the inclined line

DOUBLE GANG SWITCH:
Draw a circle with radius 60mm and with line draw an inclined line vertical and horiontal line perpendicular to the inclined line offset the inclined line to 30mm

TRIPLE GANG SWITCH:
In command prompt type CO and copy the double gang switch and place it then by offset command take a offset distance of 30mm to form a triple gang switch

SINGLE TWO-WAY SWITCH:
Draw a circle with radius 60mm and with line draw an inclined line vertical and horiontal line perpendicular to the inclined line and by using HATCH command hatch the circle with solid patten

DOUBLE TWO_WAY SWITCH:
Copy the single two-way switch and by using offset command give the offset distance of 30mm from the previous perpendicular line to form a double two-way switch

TRIPLE TWO-WAY SWITCH:
Copy the single two-way switch and by using offset command give the offset distance of 30mm from the previous perpendicular line to form and again offset the previous line to 30mm

SWITCH CROSS:
Draw a circle with radius 60mm and with line draw an inclined line vertical and horiontal line perpendicular to the inclined line and by using HATCH command hatch the circle with solid patten
By using MI command mirror the inclined and perpendicular line to all four sides to make the switch cross

SWITCH SERIAL:
Copy the switch cross and place them and delete the bottom two lines and hatch
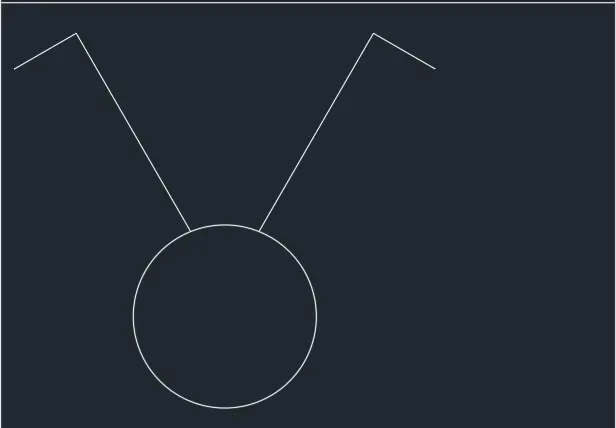
SINGLE SOCKET:
Create a line of distance 150mm and create a circle by picking up center point of the line as the center of circle and select the end point of line a circle is formed then by using trim command trim off the bottom circle to make the single socket and draw the line from center of the semicircle to 40mm

SINGLE SOCKET FOR LAMP:
Copy the single socket and draw a perpendicular line of 50mm from the pervious extended center line fom semicircle

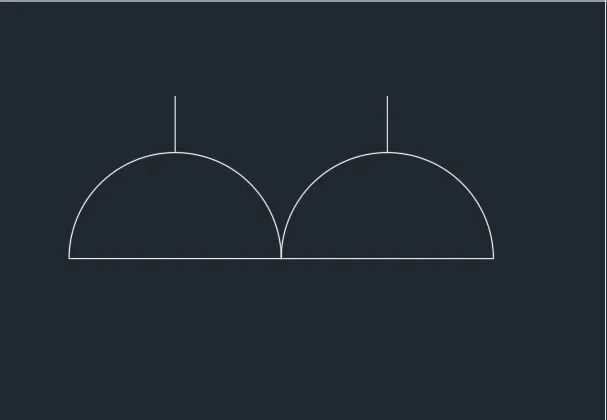
DOUBLE SOCKET:
Copy the single socket then again copy them and place it so that the one end off the single socket should touches the starting end of socket
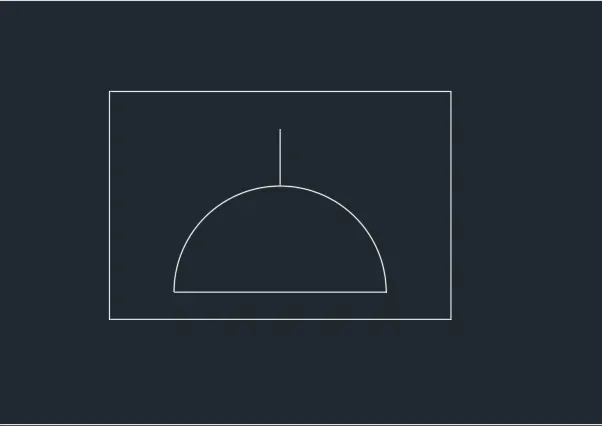
FLOOR SOCKET SINGLE:
Draw a single socket and by using rectangle command draw the rectangle over the single socket
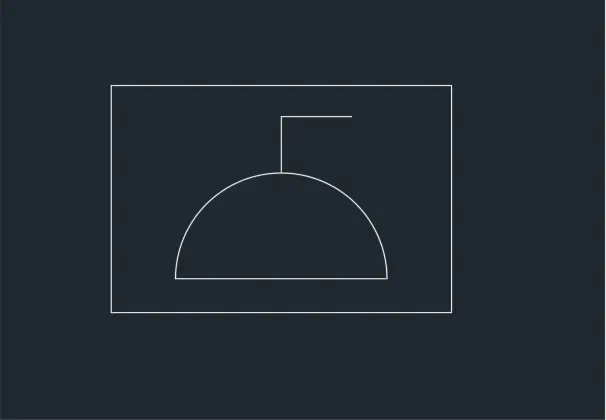
FLOOR SOCKET SINGLE FOR LAMP:
By using CO command copy the floor socket single and draw the perpendicular line from the vertical line as in single socket for lamp
FLOOR SOCKET DOUBLE:
Copy the double socket and by using rectangle command draw a rectangle which surrounds the double socket
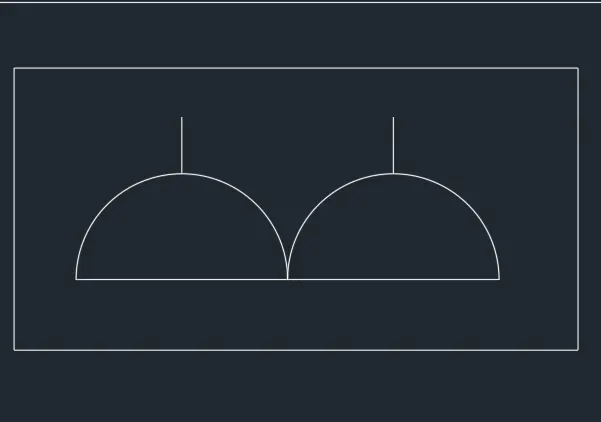
FLOOR SOCKET SINGLE TELEPHONE:
Draw a single socket then draw a line 150mm the starting end of line should be at the end poit of the single socket then by polar tracking select the midpoint as center create the triangle and draw the rectangle that surrounds the object
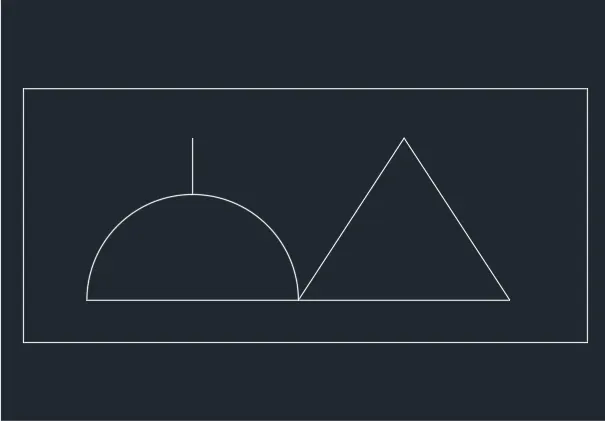
FLOOR SOCKET DOUBLE TELEPHONE:
Copy the double socket and make a triangle as specified above then draw rectangle over the double socket to surrounds it
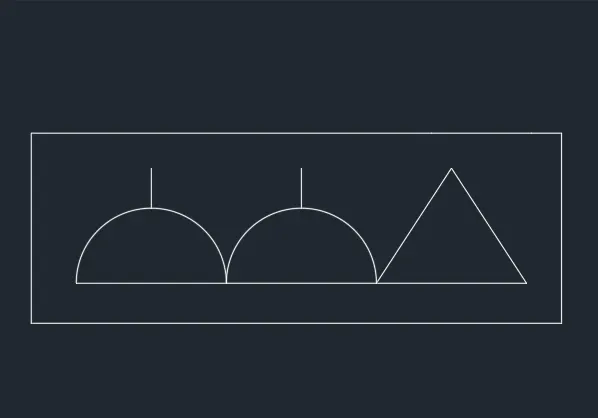
TELEPHONE SOCKET:
Draw the triangle of length 150mm then draw a inclined line to make triangle

INTERNET SOCKET:
Copy the telephone socket and by using multitext command place the text at center of the triangel

TV SOCKET:
Copy the telephone socket and by using multitext command type TV and place it on the center of triangle

WEATHER PROOF SOCKET:
Copy the telephone socket and by using multitext command type w and place it on the center of triangle

DOUBLE BASE SECTION:
Draw the vertical line then offset the line then draw a inclined line of 30 degree both line should meet the center of the two parallel line and then draw a line towards downward perpendiculae to inclined line from center. On the top draw a line at distance of 40mm towards upward on both sides

WALL BRACKET:
With rectangle command draw a rectangle then at center point draw a line towards upward which id perpendicular to rectangle and offset the line on both sides Type circle and place the circle so that the circumference of circle should touches the perpendicular lines
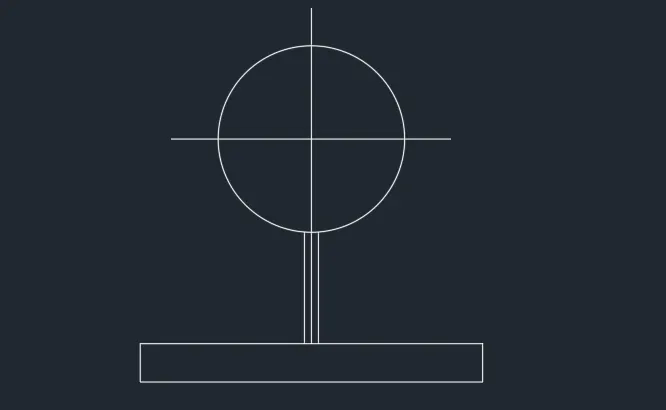
PICTURE LAMP:
Draw two rectangle of different length one below the another then connect the rectangle with line
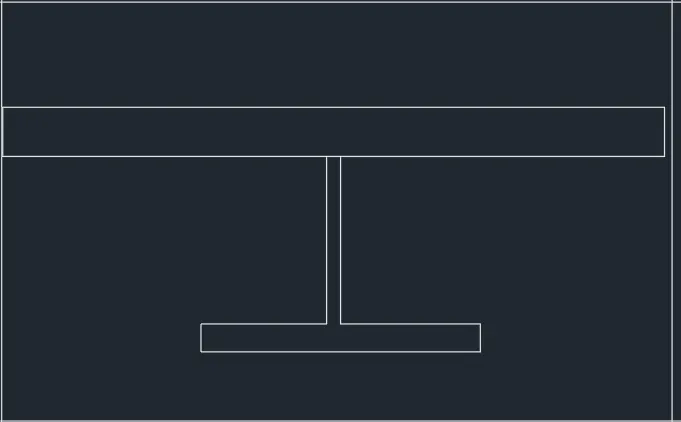
- All the electrical symbols that are created a converted into blocks
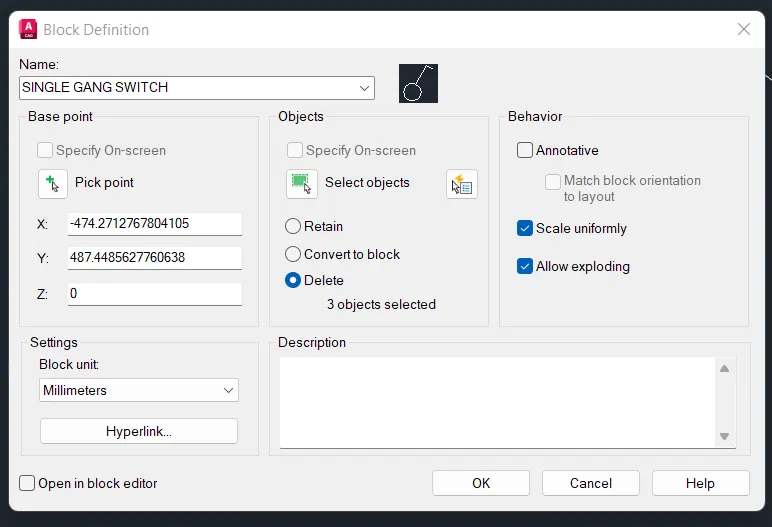
- To open a block tab use command B
- For that in command prompt type B enter a block definition dialog box will be opened Save the name as- Single gang switch
- Then click on specify the point i,e Specify the centroid of the object then give the default values , and select the entire object a preview will be shown. enable scale uniformily and allow exploding option
- As we can select any one of the following option Retain, convert to a block, or delete, here i selected convert to a block which means the block itself will get converted and remains as such in display.
- If we select retain option the object will be retained and same as the actual drawing and a block is created for the objects that have selected. If we you the delete option Then the converted block in the drawing gets deleted
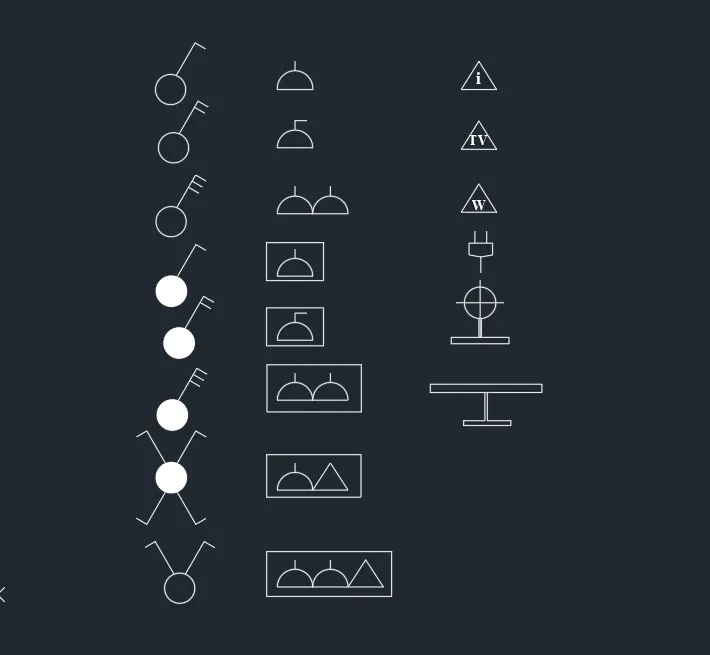
- Similarly follow the above procedure to make all the symbols into blocks the created blocks are shown in the below diagram
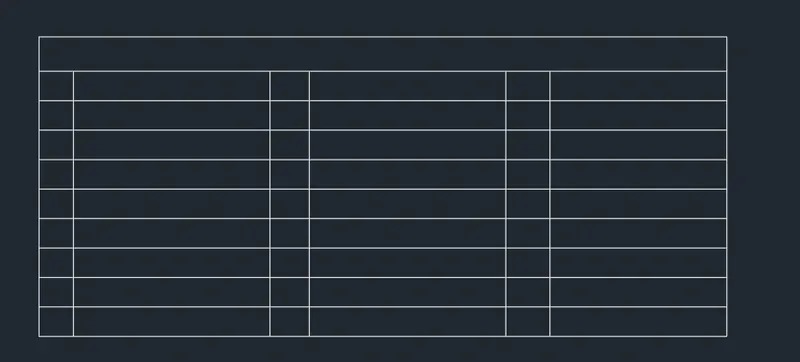
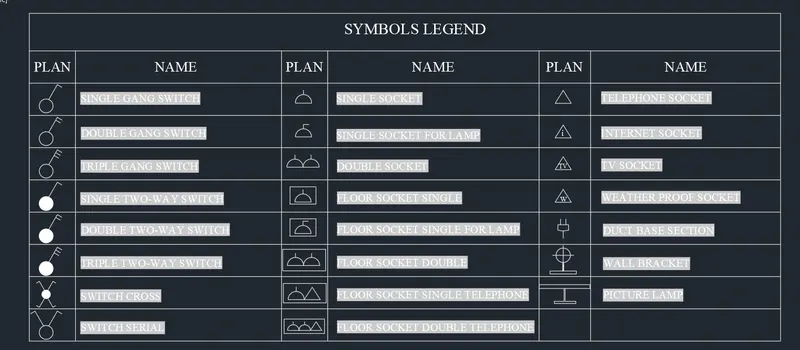
- Then create a rectangle which has 10 rows and 6 columns using line
- The created rectangle is shown below
ARRANGE THE BLOCKS IN LEGEND:
- Place each of the blocks in their respective rows and column
- Then to enter the text relevant to each block go to insert option > field > select object > select block > first capital
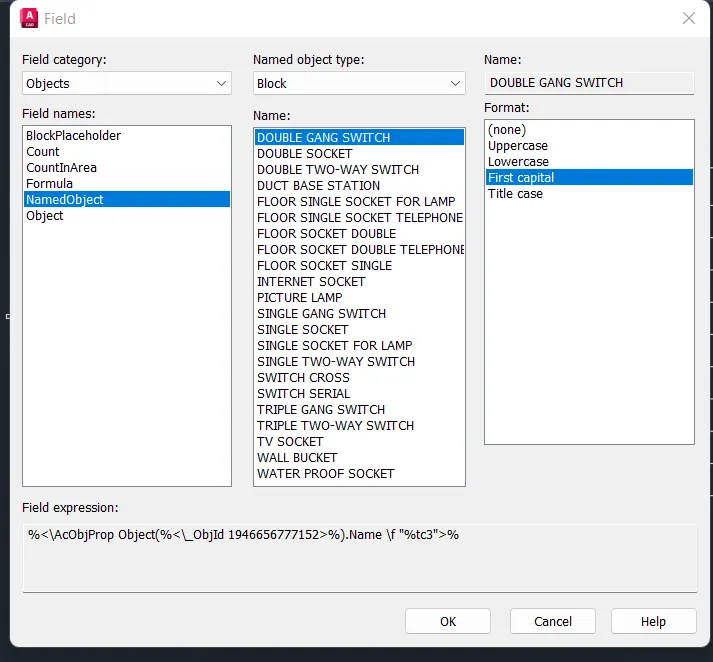
- Likewise place all the text to their respective symbols with text height of 40.
- By insert command place all the blocks and then by field command place all the text respective to their symbols
RESULT:
The block is created for each electrical symbols and are place in legend using field
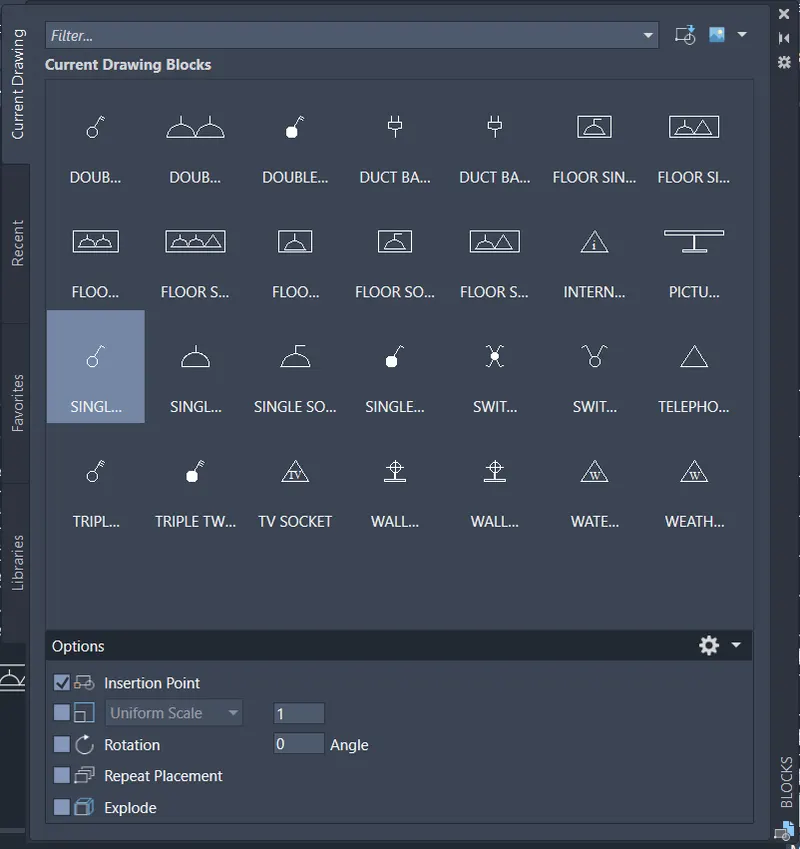
Q4-
AIM:
To create different types of door finishing for a residential building and convert them into blocks
1. D1
2. D2
3. D3
4. D4
5. D5
6. D6
PROCEDURE:
- Open a new drawing with imperial system set units and limmax
- Zoom enter and all to drawings
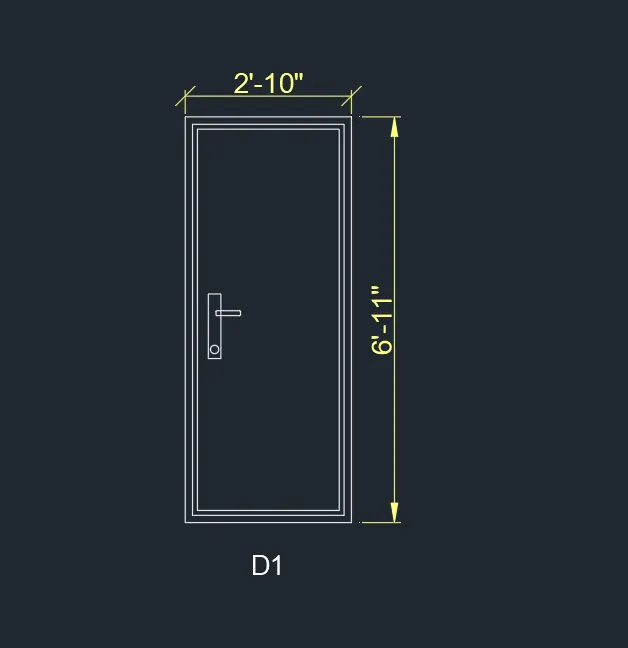
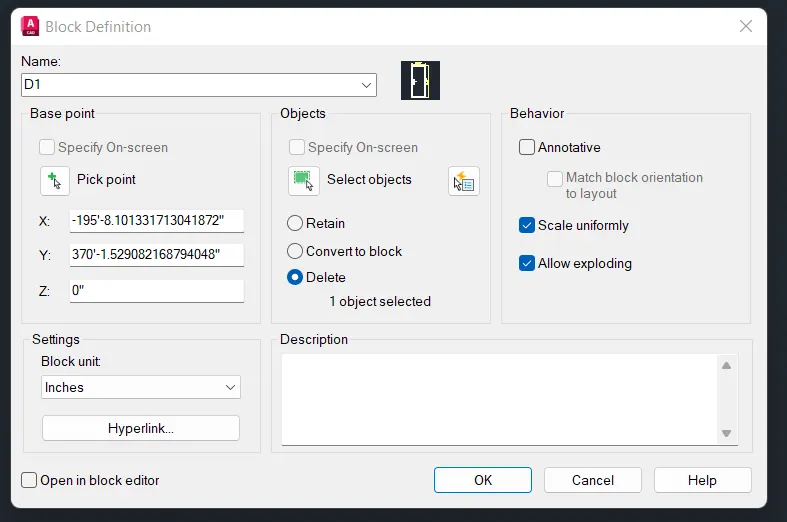
1. D1 - 2'10'' x 6'11''
- Draw rectangle with dimension 2'10'' and 6'11''. Draw offset distance of 1.5'' for frame then again take offset for 1'' for shutter
- Draw lock by two rectangle perpendicular to each other and fillet the cornor with radius of 0.2''
- By using c command draw a circle at the bottom of the rectangle
- By using multitext command write the text D1
- To open a block tab use command B
- For that in command prompt type B enter a block definition dialog box will be opened Save the name as- D1
- Then click on specify the point i,e Specify the centroid of the object then give the default values , and select the entire object a preview will be shown. enable scale uniformily and allow exploding option
- As we can select any one of the following option Retain, convert to a block, or delete, here i selected delete which means the object gets deleted when it converts into block
- If we select retain option the object will be retained and same as the actual drawing and a block is created for the objects that have selected. If we you the delete option Then the converted block in the drawing gets deleted
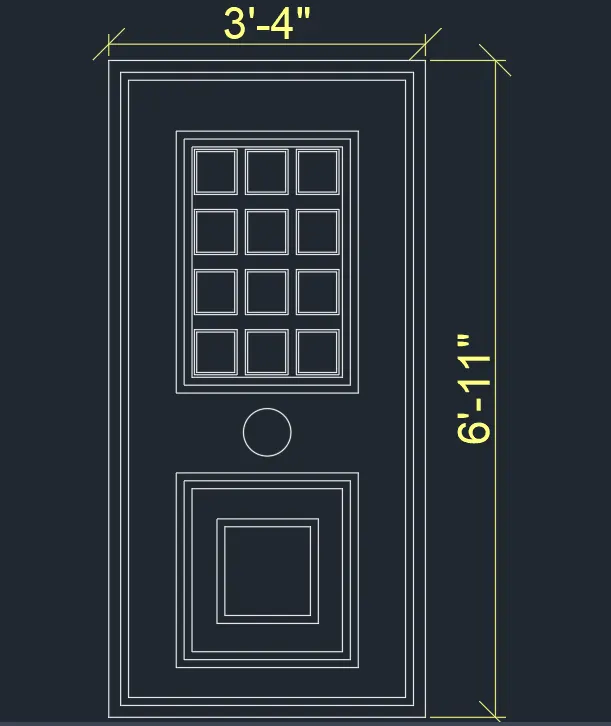
2.D2 - 3'4'' x 6'11'':
- Draw a rectangle with dimension 3'4'' and 6'11''. By offset command take offset and give distance 1.5'' for frame and 1'' for shutter respectively
- Draw a rectangle for pannel 1'11'' and 2'9'' then offset this to 1'' for two more times.Then draw a rectangle of 5.4'' and 5.7'' offset to 0.3''
- By using CO command copy the rectangle and select mode - select multiple - click the base point - select array - give array number 3
- Similarly array the same rectangle into 4 rows
- For second pannel draw a rectangle of 1'11'' and 2'1'' offset the rectangle for 1'' to 3 times . Then draw a another rectangle inside of 1'0.8'' and 1'1.2'' and offset to 1''
- Then draw a lock by creating circle using C command. And write the text using multiline text D2
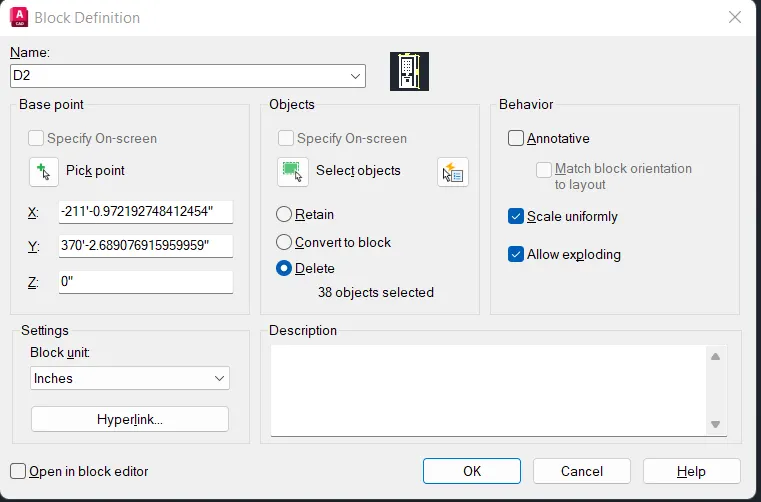
- To open a block tab use command B
- For that in command prompt type B enter a block definition dialog box will be opened Save the name as- D2
- Then click on specify the point i,e Specify the centroid of the object then give the default values , and select the entire object a preview will be shown. enable scale uniformily and allow exploding option
- As we can select any one of the following option Retain, convert to a block, or delete, here i selected delete which means the object gets deleted when it converts into block
- If we select retain option the object will be retained and same as the actual drawing and a block is created for the objects that have selected. If we you the delete option Then the converted block in the drawing gets deleted
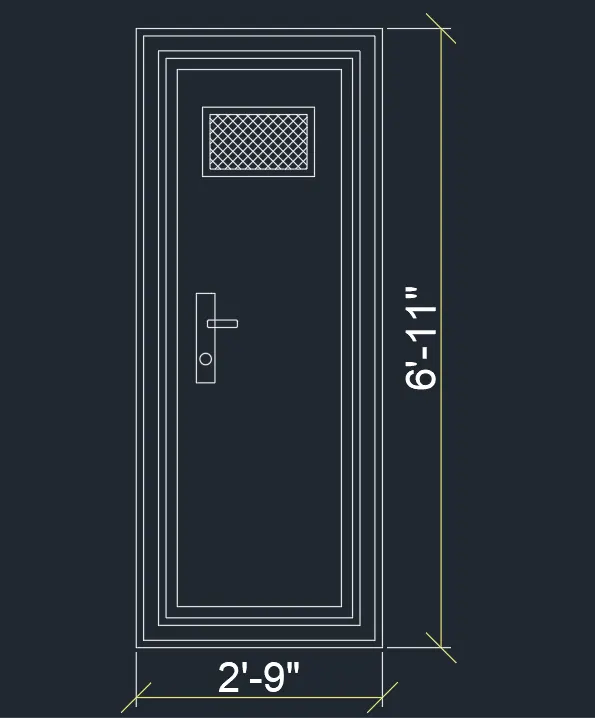
3. D3 - 2'9'' x 6'11''
- Draw a rectangle dimensions of 2'9'' x 6'11''. Offset 1'' for thickness and then 2'' for frame and again 1'' for thickness
- Draw a rectangle at a top for ventilation 1'3'' x 9.3'' and give the offset through 1'' for thickness
- By using H command hatch the inner side of ventilation with NET patten and give the inclined angle to 45 degree
- Create a lock by lock by rectangle, two rectangle should perpendicular to each other anf by Filleting give the radius of 5mm to fillet the corners of rectangle.Then draw a circle at the bottom of rectangle.
- Then this door is converts into blocks
- To open a block tab use command B
- For that in command prompt type B enter a block definition dialog box will be opened Save the name as- D3
- Then click on specify the point i,e Specify the centroid of the object then give the default values , and select the entire object a preview will be shown. enable scale uniformily and allow exploding option
- As we can select any one of the following option Retain, convert to a block, or delete, here i selected delete option which means the object gets deleted when it converts into block
- If we select retain option the object will be retained and same as the actual drawing and a block is created for the objects that have selected. If we you the delete option Then the converted block in the drawing gets deleted
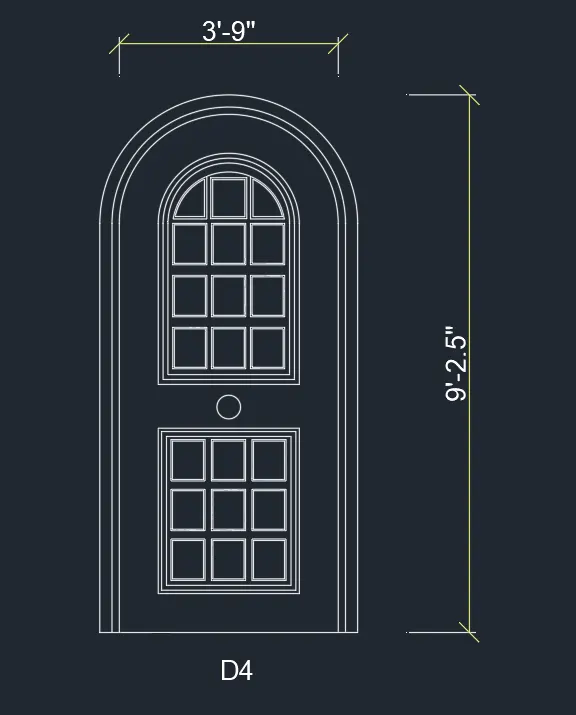
D4 - 3'9'' x 9'2.5'':
- Draw a rectangle by using rec command of dimension 3'9'' and 9'2.5''. Explode the rectangle then offset the rectangle to 1.5'' and 1'' on either sides 2 times.
- Create an arc by using 2 point method with both points as end points then offset the arc and the line with 1.5'' and 1'' recpectively.
- Then offset 8'' from arc and rectangle for pannel and divide it into two. Take 1'' offset 2 times to show the thickness on the top figure and bottom rectangle. Create rectangle inside the pannel.
- For lock create a circle between two rectangles
- To open a block tab use command B
- For that in command prompt type B enter a block definition dialog box will be opened Save the name as- D4
- Then click on specify the point i,e Specify the centroid of the object then give the default values , and select the entire object a preview will be shown. enable scale uniformily and allow exploding option
- As we can select any one of the following option Retain, convert to a block, or delete, here i selected delete which means the object gets deleted when it converts into block
- If we select retain option the object will be retained and same as the actual drawing and a block is created for the objects that have selected. If we you the delete option Then the converted block in the drawing gets deleted
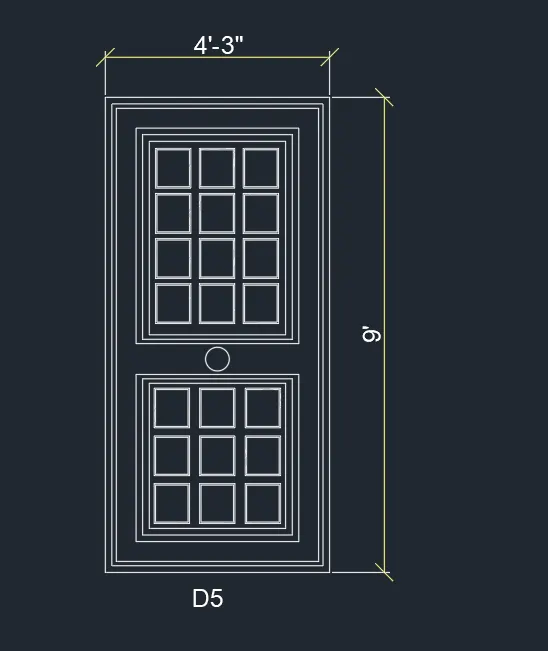
5. D5 - 4'3'' x 9':
- Draw a rectangle of 4'3'' and 9'. Offset the rectangle to 1.5'' for frame and 1'' for the shutter thickness. Then create another rectangle inside with offset value of 4.5''
- Create a rectangle on bottom with dimensions 2'2.9'' and 2'2.6''. Offset 1'' two times for both rectangles.
- Create a rectangle inside for pannels with offset 0.5''. Copy the rectangle and array value as 3 and similarly for column give the array value to 4
- To open a block tab use command B
- For that in command prompt type B enter a block definition dialog box will be opened Save the name as- D5
- Then click on specify the point i,e Specify the centroid of the object then give the default values , and select the entire object a preview will be shown. enable scale uniformily and allow exploding option
- As we can select any one of the following option Retain, convert to a block, or delete, here i selected delete which means the object gets deleted when it converts into block
- If we select retain option the object will be retained and same as the actual drawing and a block is created for the objects that have selected. If we you the delete option Then the converted block in the drawing gets deleted
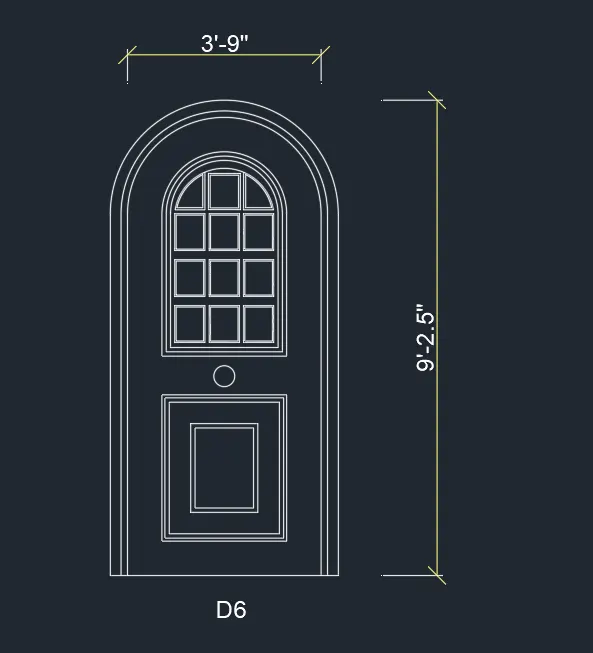
D6 - 3'9'' x 9'2.5'':
- Draw a rectangle by using rec command of dimension 3'9'' and 9'2.5''. Explode the rectangle then offset the rectangle to 1.5'' and 1'' on either sides 2 times.
- Create an arc by using 2 point method with both points as end points then offset the arc and the line with 1.5'' and 1'' recpectively.
- Then offset 8'' from arc and rectangle for pannel and divide it into two. Take 1'' offset 2 times to show the thickness on the top figure and bottom rectangle. Create rectangle inside the pannel.
- For second pannel draw a rectangle of 1'11'' and 2'1'' offset the rectangle for 1'' to 3 times . Then draw a another rectangle inside of 1'0.8'' and 1'1.2'' and offset to 1''
- Then draw a lock by creating circle using C command. And write the text using multiline text D6
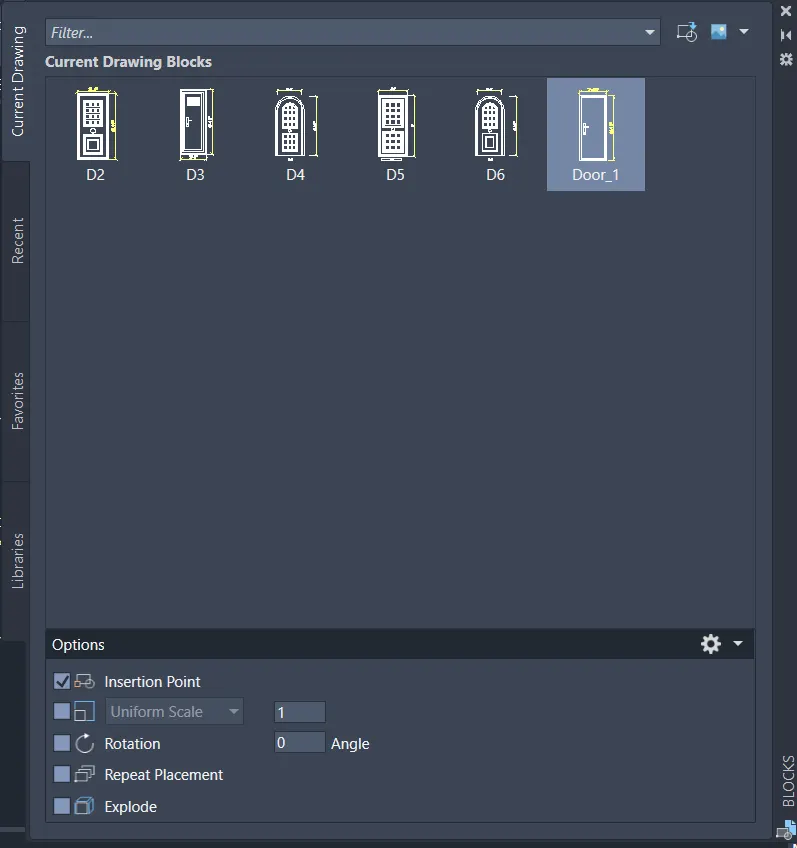
After all doors are created each doors are assign to a block with their respective names and the created blocks are inserted by unsing I command where ever required
RESULT:
All doors are created with standard dimensions and converted those into blocks
Q5-
AIM:
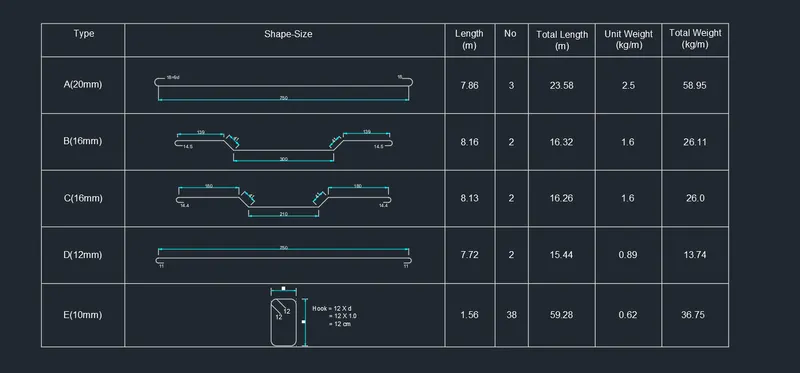
To create bentup bars as shown and convert each bentup bars into block and then making tables as shown in the figure and placing all the blocks and texts into table as shown in figure
1. Draw each bar shape
2. Convert into block
3. Insert in table as bar bending schedule
PROCEDURE:
- Open a new drawing with metric system set the units and limmax
- zoom command is also used
A-20mm:
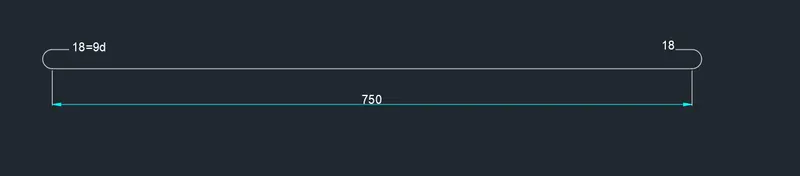
- Draw a line of 750mm for straight bars
- For bend Command FILLET and give the fillet radius to 10
- Then by using MI command mirror the bend on otherside
- Command DIMSTYLE and set the font style to arial and font size to 5
- By using multitext command texts are created
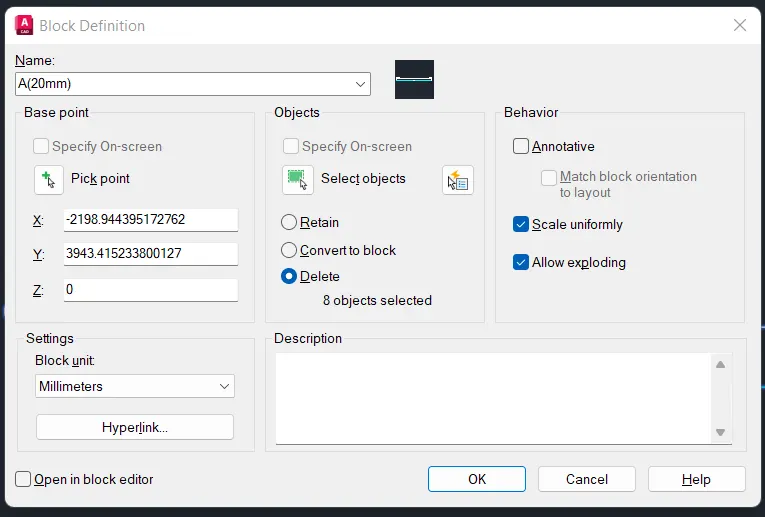
- To open a block tab use command B
- For that in command prompt type B enter a block definition dialog box will be opened Save the name as- A(20mm)
- Then click on specify the point i,e Specify the centroid of the object then give the default values , and select the entire object a preview will be shown. enable scale uniformily and allow exploding option
- As we can select any one of the following option Retain, convert to a block, or delete, here i selected delete which means the object gets deleted when it converts into block
- If we select retain option the object will be retained and same as the actual drawing and a block is created for the objects that have selected. If we you the delete option Then the converted block in the drawing gets deleted
B-(16mm):
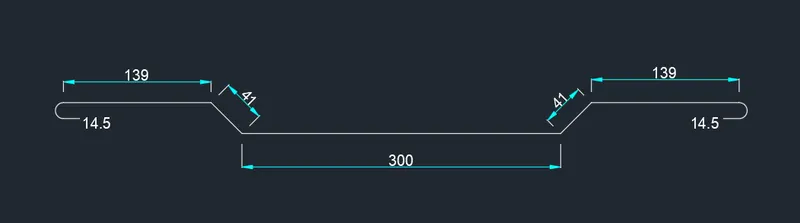
- Draw a line of 300 mm for straight bars then keep the polar tracking angle to 45 degree and draw a length of 41 mm then towards the previous line draw a straight horizontal line of 139 mm
- Then by using fillet command with fillet radius of 10 the bar is bended
- Mirror the created line and bends on the other side
- By multiline text command place the text as shown
C-(16mm):
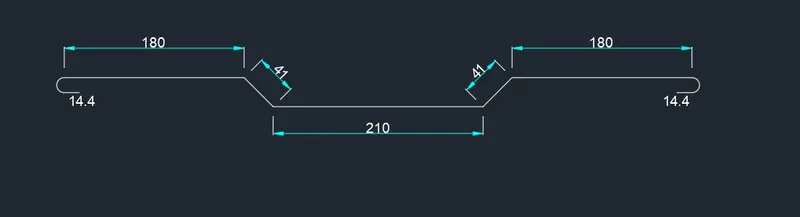
- Draw a line of 210 mm for straight bars then keep the polar tracking angle to 45 degree and draw a length of 41 mm then towards the previous line draw a straight horizontal line of 180 mm
- Then by using fillet command with fillet radius of 10 the bar is bended
- Mirror the created line and bends on the other side
- By multiline text command place the text as shown
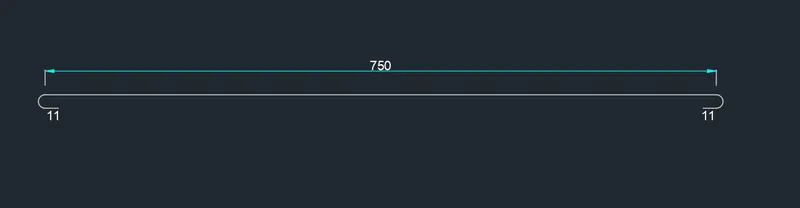
D -(12mm):
- Draw a straight horizontal line of distance 750 mm for straight bars
- By using fillet give the radius to 10 the bar is bended
- By using mirror command mirror the bend on the other side also
E-(10mm):
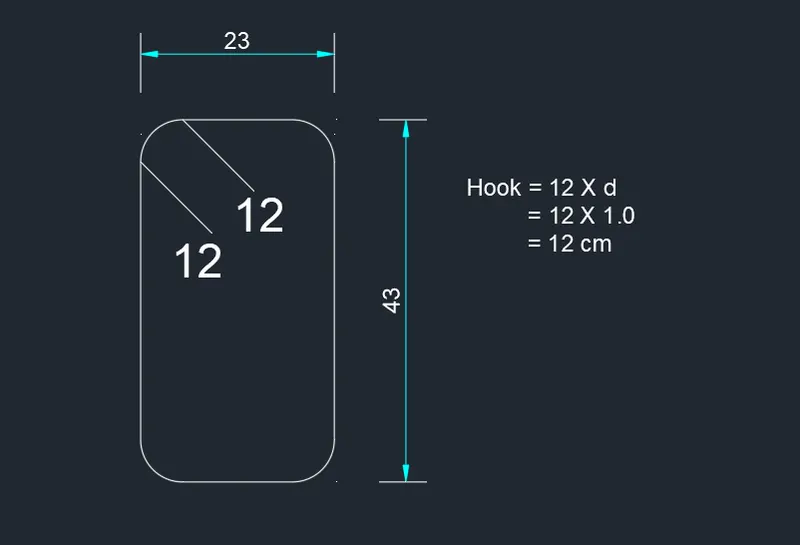
- In command prompt type REC and with dimension of 23 mm and 43 mm
- Command FILLET and give the fillet radius to 5mm then from starting line draw the hook line of 12 cm
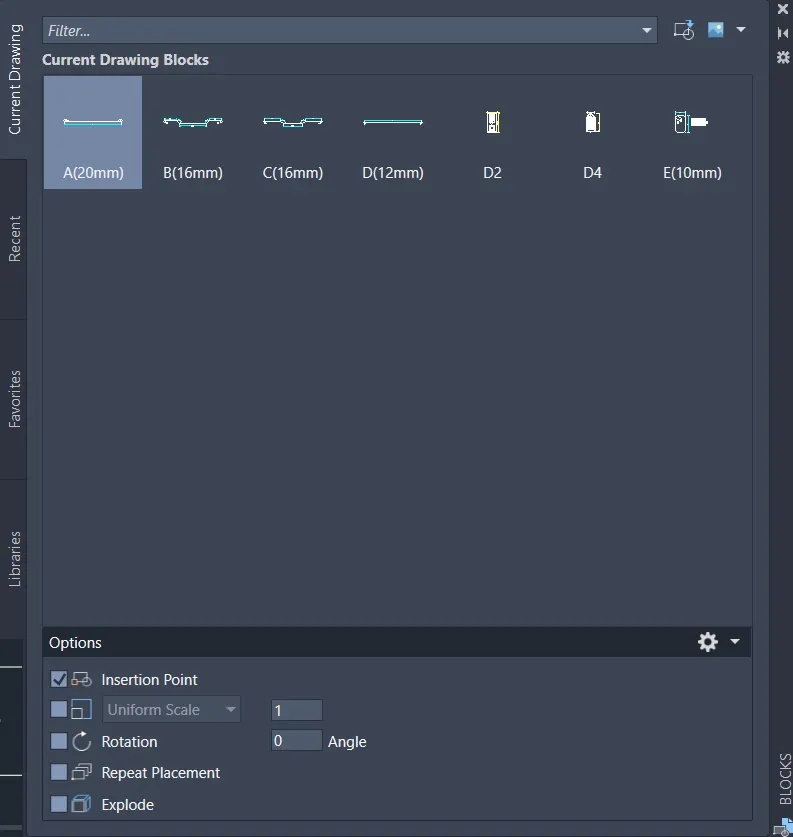
- Then all the bars created are converted into block.
- To open a block tab use command B.
- For that in command prompt type B enter a block definition dialog box will be opened Save the name as- B(16mm), C(16mm), D(12mm) and E(10mm) respectively foe each block.
- Then click on specify the point i,e Specify the centroid of the object then give the default values , and select the entire object a preview will be shown. enable scale uniformily and allow exploding option.
- As we can select any one of the following option Retain, convert to a block, or delete, here i selected delete which means the object gets deleted when it converts into block.
- If we select retain option the object will be retained and same as the actual drawing and a block is created for the objects that have selected. If we you the delete option Then the converted block in the drawing gets deleted.
- Create the table of 7 columns and 6 rows place the heading Type, shape-size, length, no, total length, unit weight, total weight by using multi line text command
- Delete all the created block then by using I insert command the block are place in the table and respective text are placed along with it.
RESULT:
The bars are created and converted into blocks and placed in table as shown