Creating Bar Bending schedule, Different Door types, and Creation of standard drawing templates using AutoCad
28/06/21
Answer
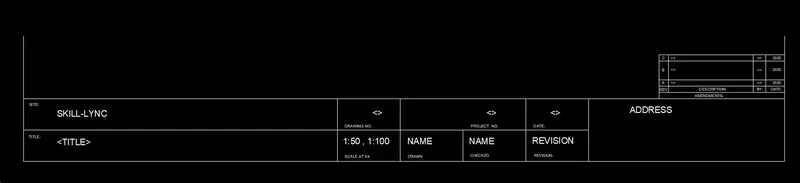
1. Create the templates as shown in the Figures. Take the size of the title block as per industry standards or you can assume it as per the size of the paper.
Custom1_titleblock Custom2_titleblock
STEP-1 opening to the AutoCAD software and entering the workspace.
STEP-2 Setting limits >specify lower-left corner:0,0
STEP-3 specify upper-left corner:100,100
STEP-4 Set>units>Demical>intersectional scale>mm
STEP-5 Limmax>100,100
STEP-6 offset command> help as to crop the area into the different level of construction.
STEP-7 trim command> help to find the trim the unwanted line and actions.
STEP-8 toolpallet command> help as to provide the trees, cars, etc.
STEP-9 rectangular command> help to create the playground area.
STEP-10 hatch command> helps to provide the hatches design in the following functions.
STEP-11 Block command> help to create a total object in one block for the feature use
STEP12 name it as Custom1_titleblock
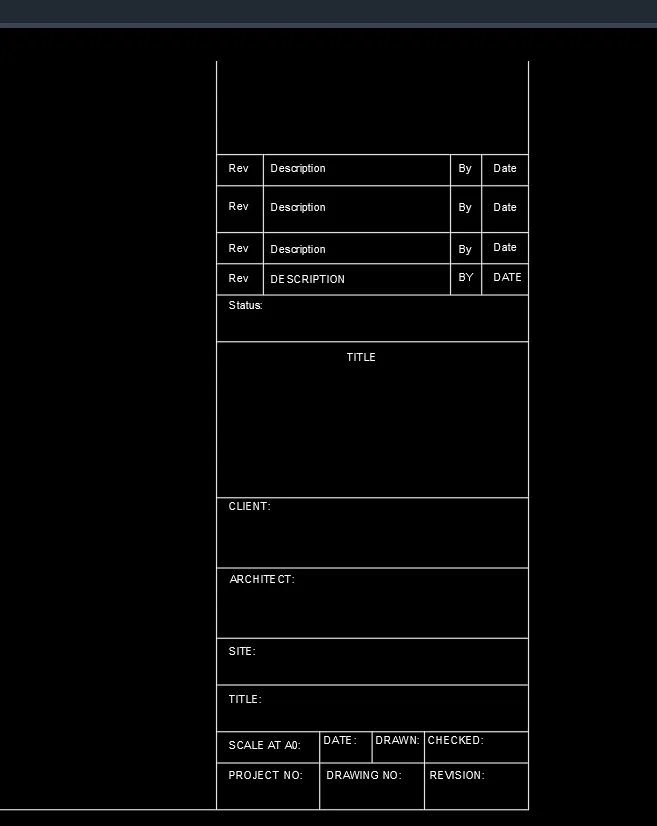
STEP-12 Custom2_titleblock for the block
STEP-13 close the entire object
STEP-14 and save the file for feature use.
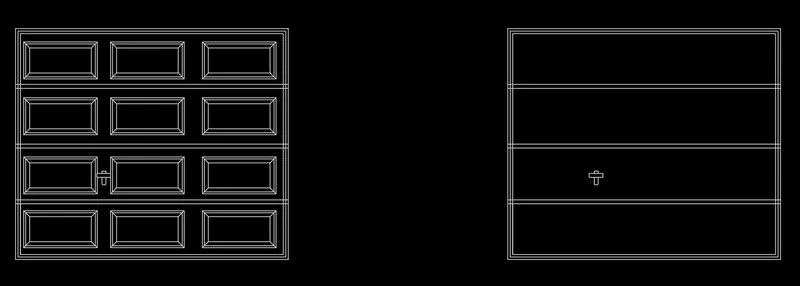
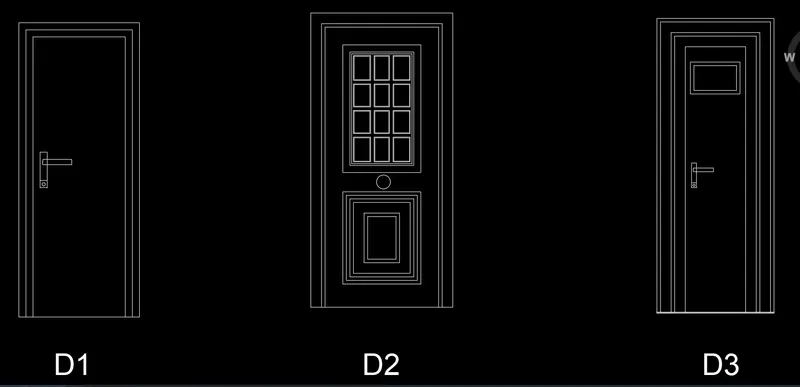
2. Create the door type for the warehouse as shown in the Figure. Create the blocks of this door type after creating them.
STEP-1 opening to the AutoCAD software and entering the workspace.
STEP-2 Setting limits >specify lower-left corner:0,0
STEP-3 specify upper-left corner:100,100
STEP-4 Set>units>Demical>intersectional scale>mm
STEP-5 Limmax>100,100
STEP-6 offset command> help to crop the area into the different level of construction.
STEP-7 trim command> help to find the trim the unwanted line and actions.
STEP-8 toolpallet command> help as to provide the trees, cars, etc.
STEP-9 rectangular command> help to create the playground area.
STEP-10 hatch command> helps to provide the hatches design in the following functions.
STEP-11 Block command> help to create a total object in one block for the feature use
STEP-12 Dimension linear command> to provide a defined length 2330,2750 for D1,2330,2750 for D2
STEP-13 separate the box in the series 4 elements in a row and 3 elements in column
STEP-14 close the entire object
STEP- 15 and save the file for feature use.
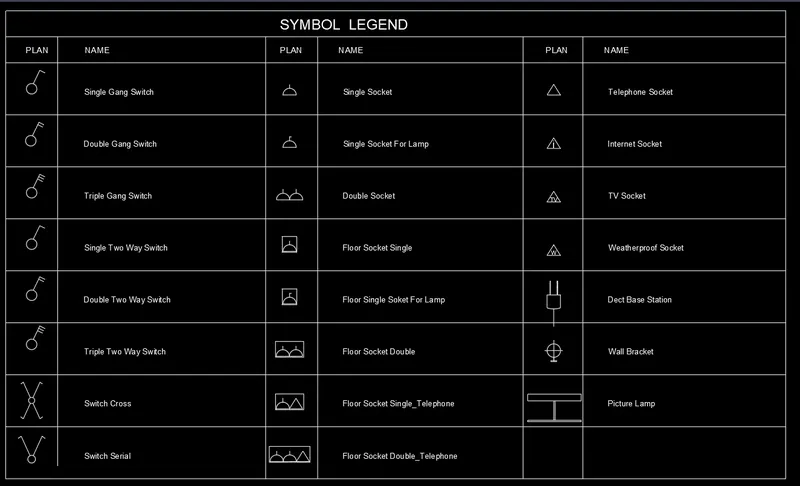
3. Create each symbol as a block with the name given in the legend. After creating the blocks arrange them in the legend as shown in the Figure.
STEP-1 opening to the AutoCAD software and entering the workspace.
STEP-2 Setting limits >specify lower-left corner:0,0
STEP-3 specify upper-left corner:100,100
STEP-4 Set>units>Demical>intersectional scale>mm
STEP-5 Limmax>100,100
STEP-6 offset command> help to crop the area into the different level of construction.
STEP-7 trim command> help to find the trim the unwanted line and actions.
STEP-8 toolpallet command> help as to provide the trees, cars, etc.
STEP-9 rectangular command> help to create the playground area.
STEP-10 Block command> help to create a total object in one block for the feature use
STEP-11 insert menu>date tab>field option to insert the data to fill the option
STEP-12 close the entire object
STEP- 13 and save the file for feature use.
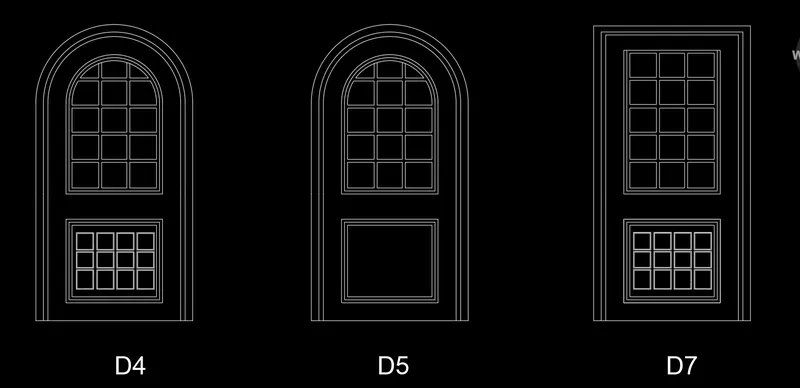
4. Create the door type for a residential building as a block. Save the name of the blocks as type. Use given dimensions or assume dimensions as per industry standards.
STEP-1 opening to the AutoCAD software and entering the workspace.
STEP-2 Setting limits >specify lower-left corner:0,0
STEP-3 specify upper-left corner:100,100
STEP-4 Set>units>Demical>intersectional scale>mm
STEP-5 Limmax>100,100
STEP-6 offset command> help to crop the area into the different level of construction.
STEP-7 trim command> help to find the trim the unwanted line and actions.
STEP-8 toolpallet command> help as to provide the trees, cars, etc.
STEP-9 rectangular command> help to create the playground area.
STEP-10filet command> radius option to provided the curve to the door
D1,D2,D3
D4,D5,D6
STEP-11 close the entire object
STEP- 12 and save the file for feature use.
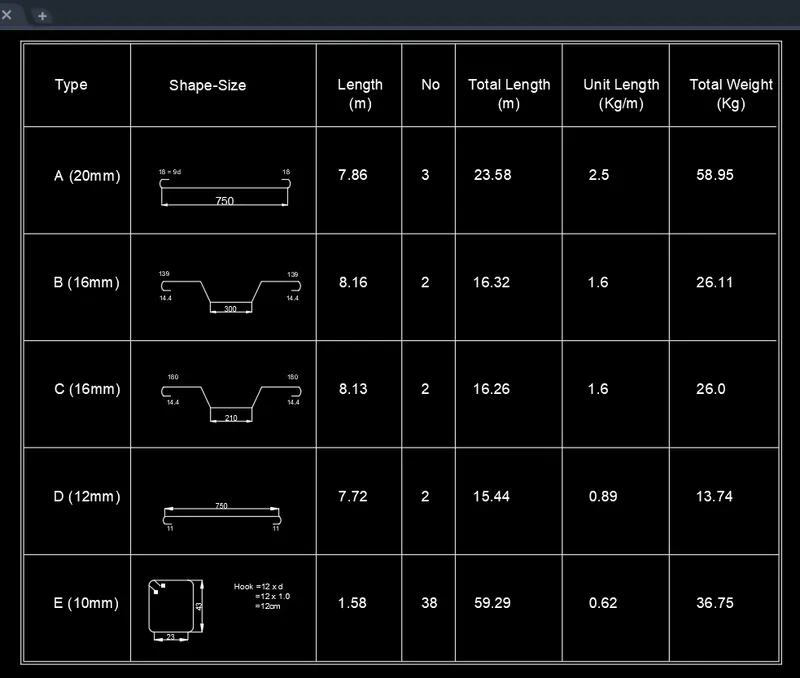
5. Create each shape as a block as shown in the Figure. Save the block and insert them on the table as shown in the Figure.
STEP-1 opening to the AutoCAD software and entering the workspace.
STEP-2 Setting limits >specify lower-left corner:0,0
STEP-3 specify upper-left corner:100,100
STEP-4 Set>units>Demical>intersectional scale>mm
STEP-5 Limmax>100,100
STEP-6 offset command> help to crop the area into the different level of construction.
STEP-7 trim command> help to find the trim the unwanted line and actions.
STEP-8 toolpallet command> help as to provide the trees, cars, etc.
STEP-9 rectangular command> help to create the playground area.
STEP-10filet command> radius option to provided the curve to the door
STEP-11 close the entire object
STEP- 12 and save the file for feature use.
STEP-13 close the entire object
STEP- 14 and save the file for feature use.