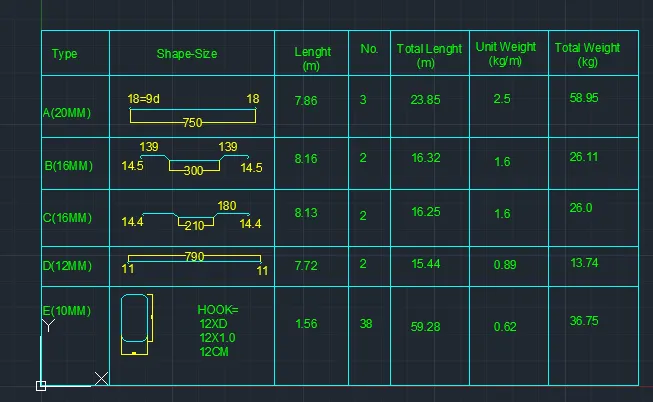
Creating Bar Bending schedule, Different Door types, and Creation of standard drawing templates using AutoCad
Q.1. Create the templates as shown in Figures. Take the size of the title block as per industry standards or you can assume it as per the size of the paper. Use text and attributes wherever required. After creating the title block you need to save it as a block with names: Custom1_titleblock and Custom2_titleblock, respectively
AIM:
To creat custom1_titleblock and custom2_titleblock using attributes and block command from autocad software.
Procedure:
Limits:-
Limit command sets an invisible rectangular boundary in the drawing area that can limit the grid dispaly and limit clicking the entire point locations.
Command- Limits press enter
shortcut - limi press enter
set the limits:-
Z enter
All enter
2. Trim command-
Trim command is used to delect the unwanted part of an object.
Command - Trim press enter
shortcut- tr and press enter
3. Offset command-
Offset command is used to create concentric circles,
Parrallel lines and parallel curves from the existing curve the geometry
Command - offset
shortcut- o nad press enter
4. Hatch command-
hatch command is used to fill an enclosed area or selected object with a selected hatch pattern, solid fill or a gradient fill .
Command - hatch and press enter
short cut - h and enter
Hatchedit- hatch edit is used to modilfy the ecisting hatch properties such as pattern scale and.
Command - Hatchedit and press enter
shortcut- he end press enter
5. Dimension-
Linear dimension is used to measure and display the linear distance value of a line or between two points.
Linear dimension can be horizontal , vertical or aligned
Command - Dimli and press enter
shortcut - Dli and press enter
Block:
A Block an object with a name , geometry , a base point which can be created , stored and retrived any number of times, with its associated attribute data.
Block feature enhances the user productivity as the user can be reuse the block in any drawing . you can reference it in the same or a different drawing.
In the following segment , you will learn about the various tools and technics used to create , store and reusing a block in autocad.
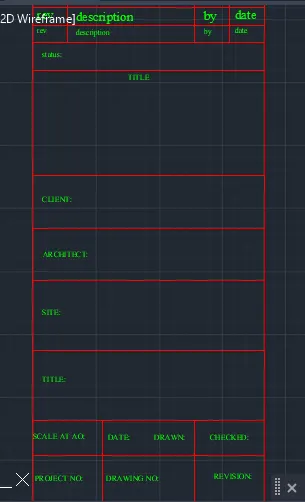
step 1 (custom1_titleblock)
- In the command prompt type l to draw the lines.
- In ribbon tab > annotate > mtline (to draft the lines)
- go to properties tab to change the colour.
- create a rec of size 66.5mm and 158mm
- Divided it with line the for the text box into colimns.
- For rows ,take offset of 5,10,5,5,8,30,15,15,20,20,10,15mm
- By multiline text type rev,description, by, date on the first row by height 2.5mm nad style - times new roman.
- As it is repeated in the other teo rows , take array give column as 1, row as 3 , spacing between rows as 7.
- Again use multiline text and type the required text in cap with the height 1.5 nad style as - times new romans.
- Status:
- Title of project
- Client
- site
- scale , date , drawn by, checked by:
- project no., drawing no., revision
Creating block:
Command - B and press enter give names as custom1_titleblock, and select pick point in the table - select the object - select the whole table including the text
select convert the block option
Give scale uniformly and tick allow exploding .
Step 2:
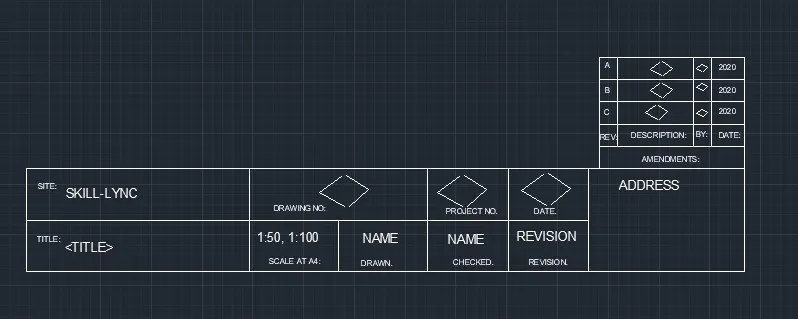
- Draw rec of 252 nad 46mm.
- with lines divide the to the required rows and columns.
- With the use of multiline text insert the following , height 2.5mm.
- Create a small rec at the right corner , ecplode it , create rows and columns .
- And creating block:
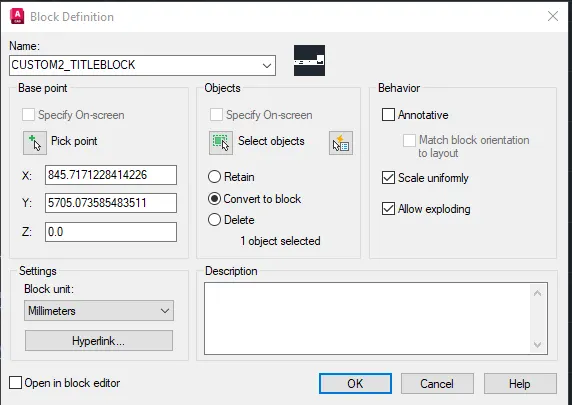
As we have selected , convert to block option , the object itself is converted to block and we do not have to insert it again.
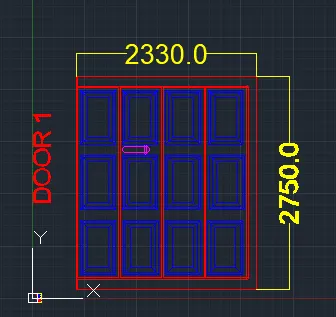
Q.2. Create the doors type for warehouse as shown in the Figure. You need to create each door type as per standard size or given dimensions. Create the blocks of this door type after creating them.
Aim: Creating doors for warehouse and placing it in blocks:
a. door 1 - 2330x2750mm
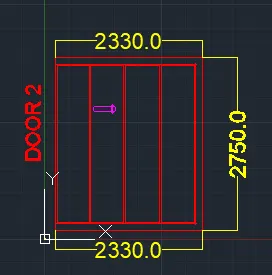
b. door 2- 2330x2750mm
Procedure:
- Create a rec of size 2330x2750mm.
- offset 50mm as a frame . 90mm for the left side.
- Explode the rectangle.
- By divided the top line 4 segments
- 0ffset 25mm an both sides for the thickness , delect the centre line.
- Create a rectangle and offset 100mm from the 2nd rectangle.
- Draw lines joining the corner the outside and inside rectangle.
- Ceate the panel as a block , so it easy to copy.
- Array the panel , taking rectangle array , rows 3 distance between 900 mm and columns 4 distance 567 mm
- create lock by rectangle command , and fillet the corner with the radius 5mm
- Layer is create and all the object are kept in different layers.
- Creating Block:
Command - B and press enter give names as custom1_titleblock, and select pick point in the table - select the object - select the whole table including the text
select convert the block option
Give scale uniformly and tick allow exploding .
b. Door 2- 2330x2750mm
Procedure:
- Create a rec of size 2330x2750mm.
- offset 50mm as a frame . 90mm for the left side.
- Explode the rectangle.
- By divided the top line 4 segments
- 0ffset 25mm an both sides for the thickness , delect the centre line.
- Create a rectangle and offset 100mm from the 2nd rectangle.
- Draw lines joining the corner the outside and inside rectangle.
- create lock by rectangle command , and fillet the corner with the radius 5mm
- Layer is create and all the object are kept in different layers.
- Creating Block:
Command - B and press enter give names as custom1_titleblock, and select pick point in the table - select the object - select the whole table including the text
select convert the block option
Give scale uniformly and tick allow exploding .
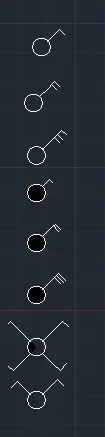
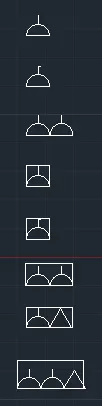
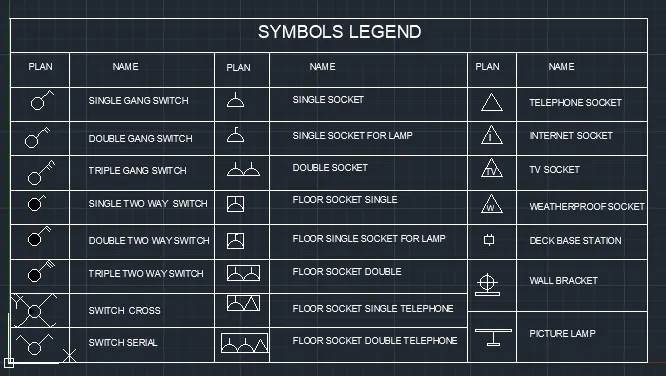
Q.3. Create each symbol as a block with the name given in the legend. After creating the blocks arrange them in the legend as shown in the Figure.
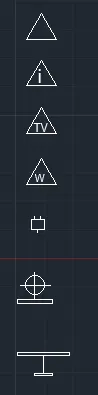
AIM: To Create electrical legend.
a. creating each electrical symbols
b. creating them as block
c. arranging them in legends
Procedure:
a. Creating elecrtical symbols:
b. Creating them as block:
Command - B and press enter give names as custom1_titleblock, and select pick point in the table - select the object - select the whole table including the text
select convert the block option
Give scale uniformly and tick allow exploding .
c. Creating and arranging in layers:
And, final result:
Q.4. Create the door type for residential building as a block. Save the name of the blocks as type. Use given dimensions or assume dimensions as per industry standards.
AIM:- To draw the doors of residential project and create it as block.
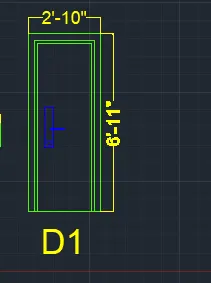
a. D1
b. D2
c. D3
d. D4
e. D5
F. D6
Procedure:
- Draw rectangle with dimension 2'10" and 6'11"
- Draw offset 1.5" for frame
- Draw offset 1" for shutter
- Draw lock bt two rectangle perpendicular to each other anf fillet the corners with radius 0.1" and circle
- write text by multiline text "D1"
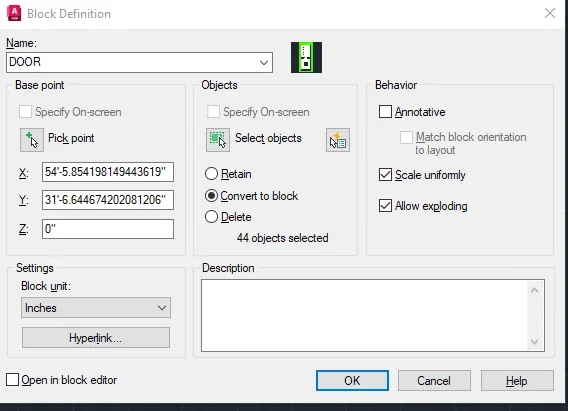
Creating them as block:
Command - B and press enter give names as custom1_titleblock, and select pick point in the table - select the object - select the whole table including the text
select convert the block option
Give scale uniformly and tick allow exploding .
And final result:
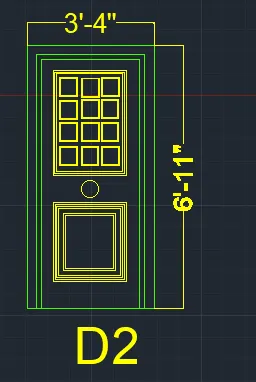
b. D2- 3'4"x6'11"
Procedure:
- Draw rectangle with dimension 3'4" and 6'11"
- Draw offset 1.5" for frame
- Draw offset 1" for shutter.
- Draw rectangle for panel 1'11' and 2'9.1", them offset 1" two lines.
- Draw a rectangle 5.4"x5.7", offset 0.3"
- Copy command - select mode - select the rectangle - select array - enter no. of array as 3 - place it as required .
- Draw lock bt two rectangle perpendicular to each other anf fillet the corners with radius 0.1" and circle
- write text by multiline text "D2"
Creating them as block:
Command - B and press enter give names as custom1_titleblock, and select pick point in the table - select the object - select the whole table including the text
select convert the block option
Give scale uniformly and tick allow exploding .
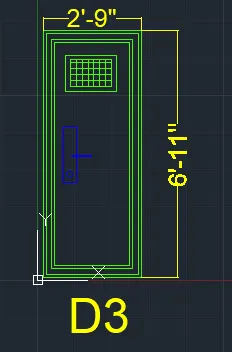
c. D3- 2'9"x6'11"
Procedure:
- Draw rectangle with dimension 2'9" and 6'11"
- Draw offset 1.5" for frame
- Draw offset 1" for shutter
- Draw a rec at the top for ventilation 1'3"x9.3", give offset 1" for thickness
- Draw lock bt two rectangle perpendicular to each other anf fillet the corners with radius 0.1" and circle
- write text by multiline text "D3"
Creating them as block:
Command - B and press enter give names as custom1_titleblock, and select pick point in the table - select the object - select the whole table including the text
select convert the block option
Give scale uniformly and tick allow exploding .
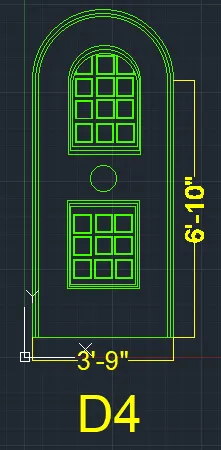
d.D4- 3'9"x8'7"
Procedure:
- Draw rectangle with dimension 3'9" and 6'10"
- Draw offset 1.5" for frame
- Draw offset 1" for shutter
- Draw lock bt two rectangle perpendicular to each other anf fillet the corners with radius 0.1" and circle
- write text by multiline text "D4"
Creating them as block:
Command - B and press enter give names as custom1_titleblock, and select pick point in the table - select the object - select the whole table including the text
select convert the block option
Give scale uniformly and tick allow exploding .
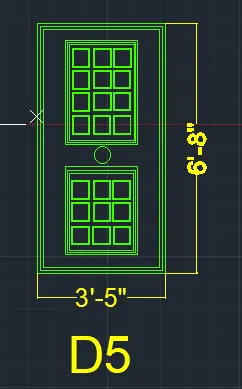
e. D5- 3'5"x6'8"
Procedure:
- Draw rectangle with dimension 3'5" and 6'8"
- Draw offset 1.5" for frame
- Draw offset 1" for shutter
- Draw another rectangle inside with offset 4.4"
- Draw another rectangle on bottom 2'2.9"x2'2.6"
- offset 1" two times for both rectangles.
- Draw lock bt two rectangle perpendicular to each other anf fillet the corners with radius 0.1" and circle
- write text by multiline text "D4"
Creating them as block:
Command - B and press enter give names as custom1_titleblock, and select pick point in the table - select the object - select the whole table including the text
select convert the block option
Give scale uniformly and tick allow exploding .
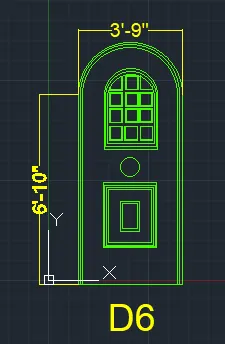
f. D6- 3'9"x6'10"
Procedure:-
- Draw rectangle with dimension 3'9" and 6'10"
- Draw offset 1.5" for frame
- Draw offset 1" for shutter
- Draw another rectangle inside with offset 4.4"
- Draw another rectangle on bottom 2'2.9"x2'2.6"
- offset 1" two times for both rectangles.
- Draw lock bt two rectangle perpendicular to each other anf fillet the corners with radius 0.1" and circle
- write text by multiline text "D4"
Creating them as block:
Command - B and press enter give names as custom1_titleblock, and select pick point in the table - select the object - select the whole table including the text
select convert the block option
Give scale uniformly and tick allow exploding .
Q.5. Create each shape as a block as shown in the Figure. Save the block and insert them on the table as shown in the Figure.
AIM:- To create bar bending shedule and insert it as block.
a. Drawing each shape
b. Creating it as block
c. inserting it in table as bar bending schedule
Procedure:
a. Drwaing each shape
Creating them as block:
Command - B and press enter give names as custom1_titleblock, and select pick point in the table - select the object - select the whole table including the text
select convert the block option
Give scale uniformly and tick allow exploding .
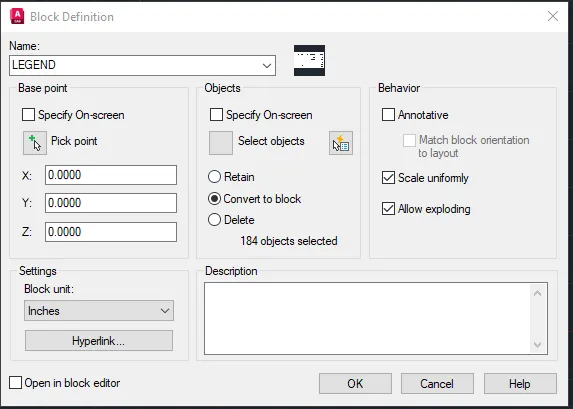
As we have selected , convert to block option , the object itself is converted to block and we do not have to insert it again.