Creating a Residence Layout, Seating plan, Toilet and Utility room plan using AutoCad
Q.1
Aim:- To Sketch the Given Residential Layout Using Auto Cad
Procedure:
Step 1:
- Type Units In Command Bar Press Enter
- Select the Types as Engineering and Scale as Inches Click OK
- Give the Command of Limits Press Enter Lower Limit as 0,0 and Upper Limit as 100,100, Press Enter
- Give the Command of X line In Command Bar Press Enter
- Type H For Hoeizontal Line Plce at Down to Wotk Space
- Give the Command of XlIne In Command Bar Press Enter
- Type V For Vertical Line Place at Left of the Workspace etc.,
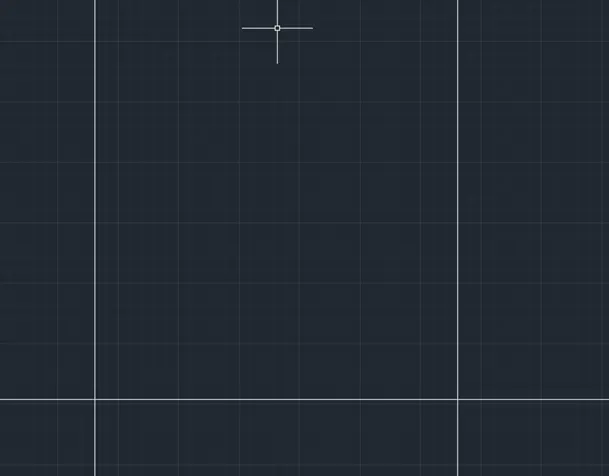
- Select the Vertical Line Give the Command of Offset give the Offset Length by 25’
Step-2:
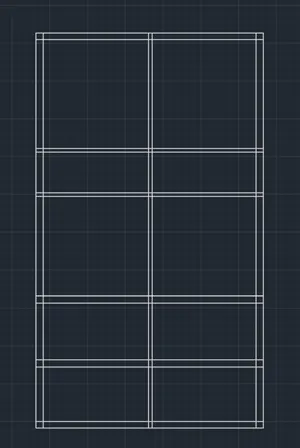
- Give the Trim Command and Press Enter
- Click Corner Lines to trim
- Type Offset Command Give the Offset Distance is 9”
- Select the Both Vertical Lines Give Offset of Inner Side .
- Type Offset Command Give the Offset Distance is 6’
- Select the Horizonal Lines Give Offset Inner Side Press Esc.
- Type Offset Command Give the Offset Distance is 9’’
- Select the Horizonal Line Give Offset Press Esc.
- Type Offset Command Give the Offset Distance is 13’-10.5’’
- Select the Horizonal Line Give Offset Inner Side Press Esc.
- Type Offset Command Give the Offset Distance is 9’’
- Select the Horizonal Line Give Offset Press Esc.
- Type Offset Command Give the Offset Distance is 11’
- Select the Horizonal Line Give Offset Inner Side Press Esc.
- Type Offset Command Give the Offset Distance is 4.5’’
- Select the Horizonal Line Give Offset Press Esc.
- Type Offset Command Give the Offset Distance is 4’6’’
- Select the Horizonal Line Give Offset Inner Side Press Esc.
- Type Offset Command Give the Offset Distance is 4.5’’
- Select the Horizonal Line Give Offset Press Esc.
- Type Offset Command Give the Offset Distance is 12’
- Select the Horizonal Line Give Offset Inner Side Press Esc.
- Type Offset Command Give the Offset Distance is 9’’
- Select the Horizonal Line Give Offset Press Esc.
- Type Offset Command Give the Offset Distance is 11.75”
- Select the Vertical Line Give Offset Press Esc.
- Type Offset Command Give the Offset Distance is 4.5’’
- Select the Vertical Line Give Offset Press Esc
Step-3:
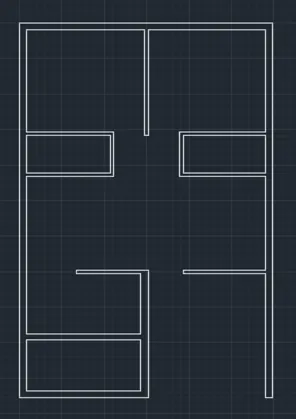
- Give the Command of Offset Give the Length is 3’ For Left Side Door Press Enter
- Select Line Give Offset Press Esc.
- Give the Command of Offset Give the Length is 9’’ For Wall Press Enter
- Select Line Give Offset Press Esc.
- Give the Command of Offset Give the Length is 2’ For Door Press Enter
- Select Line Give Offset Press Esc.
- Give the Command of Offset Give the Length is 3’ For Right Side Door Press Enter
- Select Line Give Offset Press Esc
- Give the Command of Offset Give the Length is 9’’ For Wall Press Enter
- Select Line Give Offset Press Esc.
- Give the Command of Offset Give the Length is 2’ For Door Press Enter
- Select Line Give Offset Press Esc.
- Give the Command of Offset Give the Length is 4.5’’ For Horizontal Wall Thickness Press Enter
- Select Line Give Offset Press Esc.
- Give the Command of Offset Give the Length is 4.5’’ For Vertical Wall Thickness Press Enter
- Select Line Give Offset Press Esc
- Give the Command of Offset Give the Length is 6’4” For Vertical Wall Thickness Press Enter
- Select Line Give Offset Press Esc
- Give the Command of Offset Give the Length is 3’ For Right Side Door Press Enter
- Select Line Give Offset Press Esc
- Give the Command of Fillet In Command Bar Press Enter
- Use the Fillet Tool in Suitable Place to Join Two Intersecting Lines
- Type Trim in the Command and Press enter
- Use trim Tool to Remove the Unwanted Intersection Lines
Step-4:
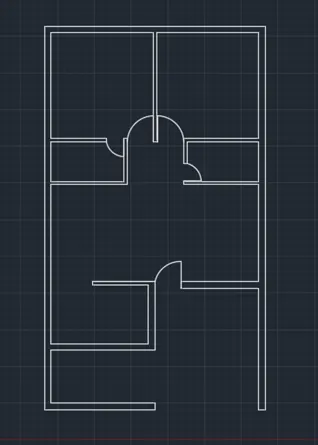
- To Create D1, Give the Command of Circle and Press Enter
- Select the Corner Point of Door Drag the Circle Until Touches End Point
- To Create D2, Give the Command of Circle and Press Enter
- Select the Corner Point of Door Drag the Circle Until Touches End Point
- To Create D3, Give the Command of Circle and Press Enter
- Select the Corner Point of Door Drag the Circle Until Touches End Point
- Give the Command of Trim Press Enter
- Trim the Use Trim Tool to Remove the Unnecessary Lines
Step-5:
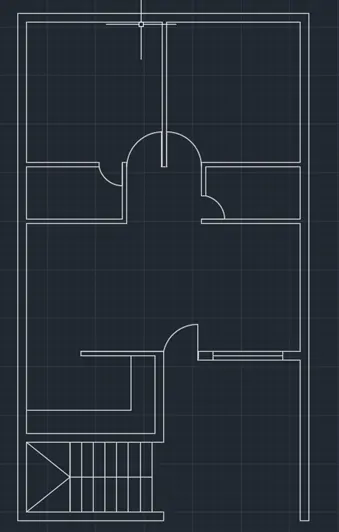
- To Draw a Window of 6’ Length the Line Up to a Distance of 1’3”
- Give the Offset Distance 6’
- Give the Command of L Draw a Line In Between Two Points By Using Snap On.
- Give the L Command Give the Length of 3’
- Type Offset Press Enter the Offset Distance 1’ and Select the Line to offset
- Repeat the Offset for 9 Times
- Type Copy in the Command Bar and Stair Case Objects Choose Base Points Place it.
- Give the Offset to 2 Feet’s for Kitchen Slab in Both Sides Use Trim Unnecessary Lines
Step-6:
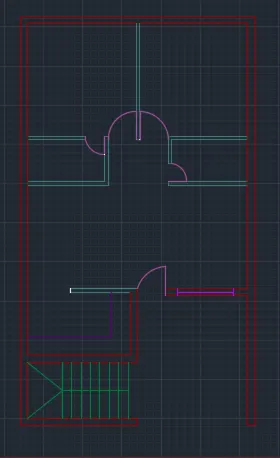
- Type Layers In The Command Bar and Press Enter
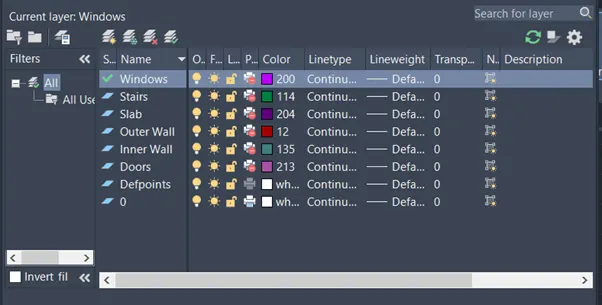
- Layer Property Manager Dialog Box Opens
- Click on the New Layer Icons to Add New Layer
- Its Rename it By Outer Walls
- Modify the Colour Using Colour Option
- In work Space Select all the Lines indicating the Outer Walls
- Click in the Layer tool from the Ribbon Tab
- Drop Down List Selected Walls
- Now Layer has Been Set
- Similarly Create all Layers For other Properties to Create
Step-7:
- Type D in Command Bar Press enter
- Modify Dimensions Select the Units as Engineering Click Ok
- Select Dimensions tool From The Ribbon Tab Specify the 1st Point and 2nd Point to Measure Dimensions
- Repeat the Procedure to Measuring all the Lines
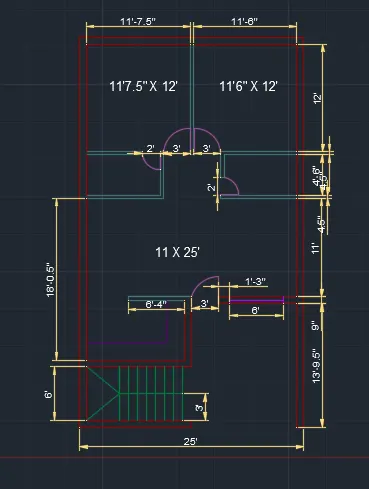
Result:
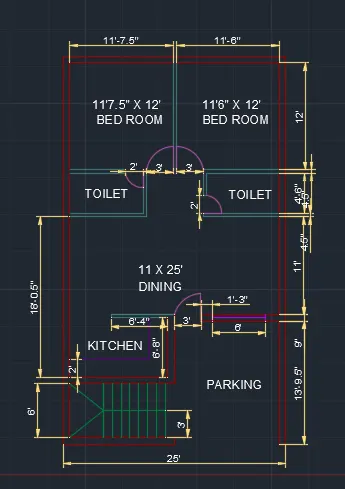
Q.2
Aim: - Sketch the seating plan for an outdoor canopy
Procedure.
Step-1
- Type units in the Command Bar Press Enter
- Select Type as Decimal and Insertion Scale as MM Click ok
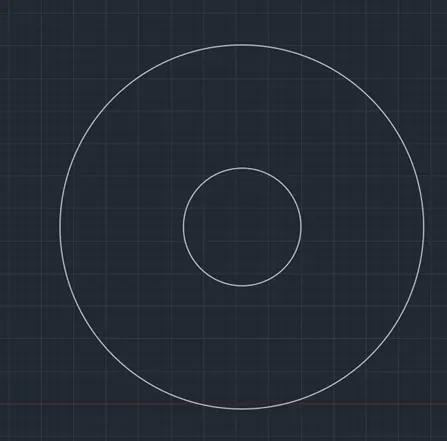
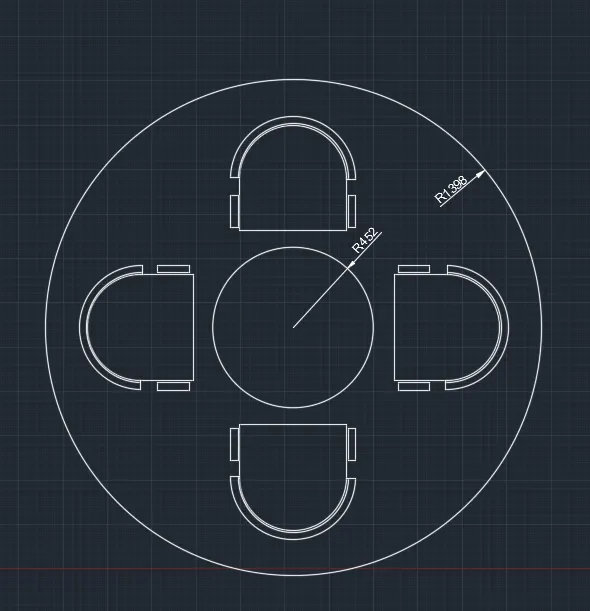
- Give the Command of Circle Specify the Centre Point and Give the Radius as 1398 Press Enter
- To Create a Another Circle by Giving the Command of Cir and Specify the Same Centre Point by Using Snap On
- Give the Radius of 452 Press Enter
Step-2
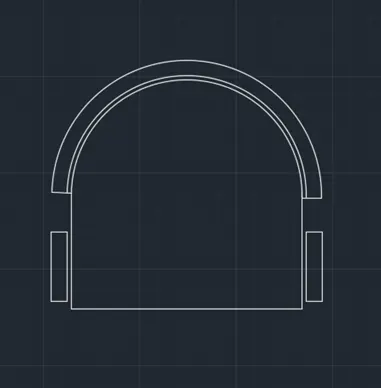
- Give a Command of L and Press Enter
- Specify the Starting point Give length as 300 mm in -Y Direction
- Move the Cursor to X Direction Give the Length as 600 mm
- Move the Cursor to Y Direction Give the Length as 300 mm
- Give the Command of Arc in Command Bar Press Enter
- Select the Start and End Point From Command Bar
- Press Esc.
- Give the Offset Command Bar and Pres Enter
- Select arc and Give the 50 mm Offset
- Join the Ends of arc Using Line
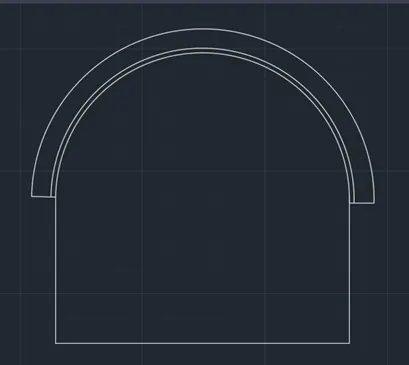
- Give the Command of Rec For Rectangle Draw in Arc Alignment With a Required Dimensions With Both Sides
Step-3
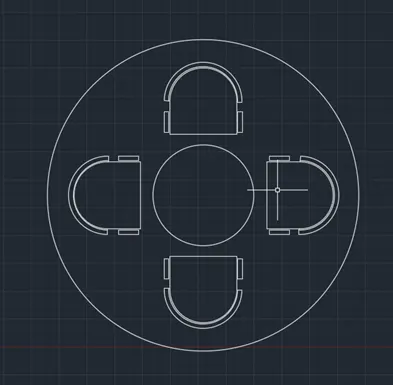
- Place the Created Chair Inside of the Circle of 1392 mm Radius, Align Properly.
- Ortho On
- Copy the Object Place it and Rotate it By Required Face place it According Path of 452 mm Radius of Circle
Result: -
Q.3
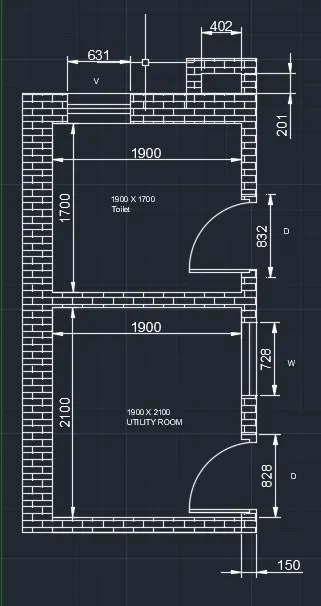
Aim: - Sketch the part plan for the toilers and utilities room
Procedure: -
Step-1
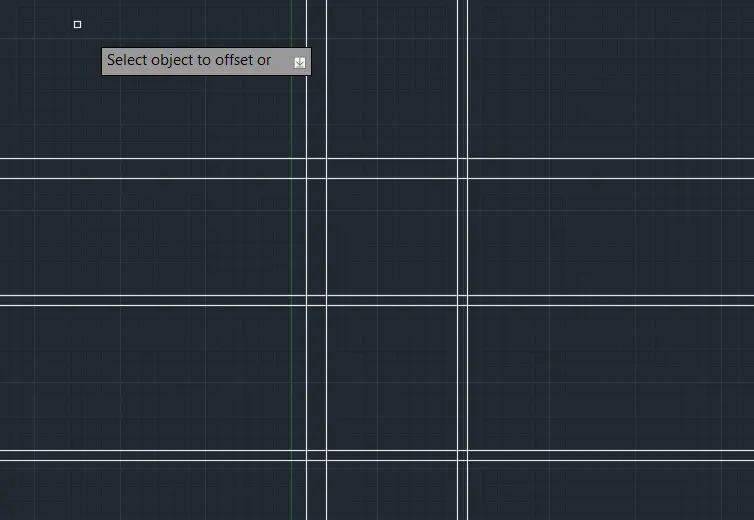
- Give the Command of X Line Select H and Enter Place at Corner of Work Space
- Give the Command of X Line Select V and Enter Place at Left Corner of Work Space
Step-2 :-
- Give Offset Command and Press Enter
- Give the Offset Distance of 300 and Select the Object and offset it
- Give Offset Command and Press Enter
- Give the Offset Distance of 1900 and Select the Object and offset it
- Give Offset Command and Press Enter
- Give the Offset Distance of 150 and Select the Object and offset it
- Give Offset Command and Press Enter
- Give the Offset Distance of 150 and Select the Object and offset it
- Give Offset Command and Press Enter
- Give the Offset Distance of 2100 and Select the Object and offset it
- Give Offset Command and Press Enter
- Give the Offset Distance of 150 and Select the Object and offset it
- Give Offset Command and Press Enter
- Give the Offset Distance of 1700 and Select the Object and offset it
- Give Offset Command and Press Enter
- Give the Offset Distance of 300 and Select the Object and offset it
Step-3
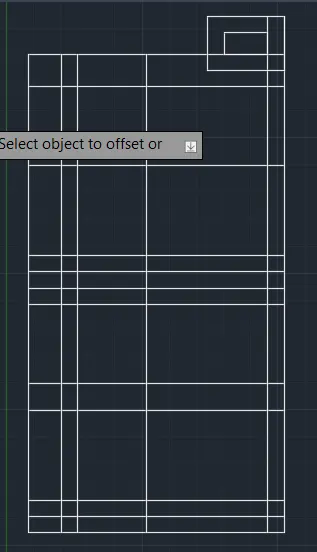
- Trim Corner Lines and Unnecessarly Line By Using Trim Command
- Give Offset Command and Press Enter
- Give the Offset Distance of 150 and Select the Object and offset it
- Give Offset Command and Press Enter
- Give the Offset Distance of 631 and Select the Object and offset it
- Give Offset Command and Press Enter
- Draw a Line In Middle Using Line By Command L Enter and Keep Orho on and Select Middle Point and Apply it.
- Give the Offset Distance of 150 and Select the Object and offset it
- Give Offset Command and Press Enter
- Give the Offset Distance of 832 and Select the Object and offset it
- Give Offset Command and Press Enter
- Give the Offset Distance of 150 and Select the Object and offset it
- Give Offset Command and Press Enter
- Give the Offset Distance of 728 and Select the Object and offset it
- Draw a Line In Middle Using Line By Command L Enter and Keep Orho on and Select Middle Point and Apply it.
- Give Offset Command and Press Enter
- Give the Offset Distance of 150 and Select the Object and offset it
- Give Offset Command and Press Enter
- Give the Offset Distance of 832and Select the Object and offset it
- Draw a Rectnagle by Using Command of Rec Enter and Specify the Corner Point of Wall Give Dimenstion of Length 402, Width 201 Press Enter
Step 4
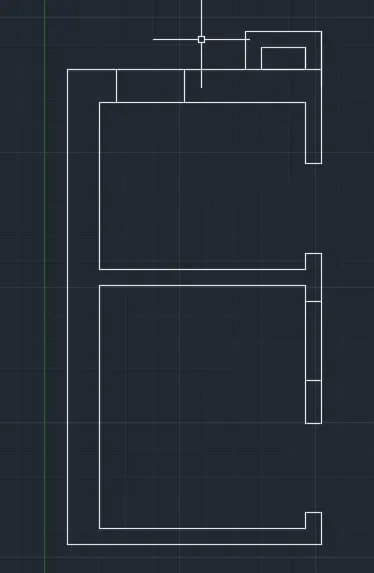
- Fillet the Corner Points By Give the Command of Fillet and Press Enter
- Trim Unnecessary Lines By Give the Command Trim and Enter
Step 5 :-
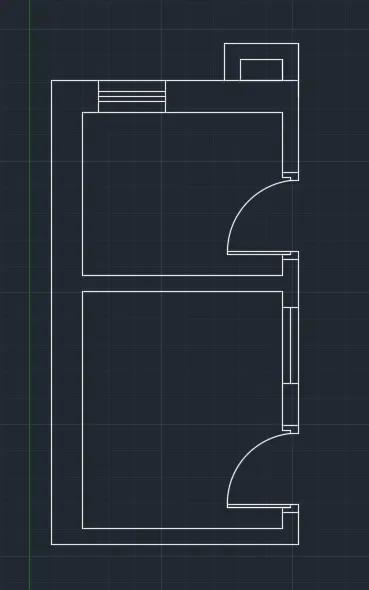
- To Create Door, Give the Command of Circle and Press Enter
- Select the Corner Point of Door Drag the Circle Until Touches End Point
- Follow the Same Procedure to Create another Doors
Result.