Creating a Residence Layout, Seating plan, Toilet and Utility room plan using AutoCad
Aim: This challenge aims to show the application of the AutoCAD software in the Civil Engineering industry. In this challenge, the AutoCAD software is applied in the sketching of a Residence Layout, Seating Plan, and Toilet Rooms. With the combination of the different AutoCAD tools, the sketch can be provided easier and faster. The amount of knowledge in using the different AutoCAD software tools will prove useful in these situations. This challenge aims to showcase how these tools are utilized in the following sketches.
Introduction: The AutoCAD software provides different tools. The tools used in this challenge is as described below:
- Line - creates line object
- Rectangle - creates rectangle object
- Circle - create circle object
- Trim - Cut unwanted lines or shapes with the provided cutting edges.
- Extend - Extend lines to opposite corners.
- Move - Move objects to particular locations.
- Copy - Copy objects to particular locations.
- Rotate - Rotate selected objects to a particular angle with respect to base point.
- Array - Copy an object in a set path linearly or polarly.
- Dimlinear (DLI) - Provides vertical or horizontal linear/straight dimensions.
- Leader - Creates an arrow head line.
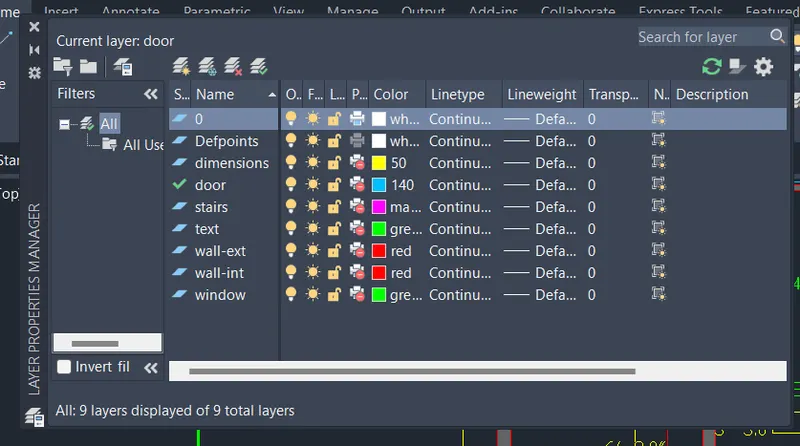
- Layers - Provide identification of line or object groups by their properties.
- Units - Open "Drawing Units" window to specify the drawings units.
- Dimstyle - Open "Dimension Style Manager" window to modify the dimension properties.
Layers:
- The layers are important in the sketch to distinguish the objects. The layer can also be used to specify the lines within the given group so that working with the sketch will be easier. The following layers will be used in Sketch 1 and 3.
- To see the layers, the "Layer" command is typed in the command prompt. The icon tools inside the opened layer window are easy to understand like "Add Layer", "Delete Layer" and "Set Current". They are self-explanatory so this window is easy to use. The layer properties can be specified as shown above. Color, Line-type, Line-weight, Transparency, and many more properties can be altered.
Question no.1
- Residence Layout
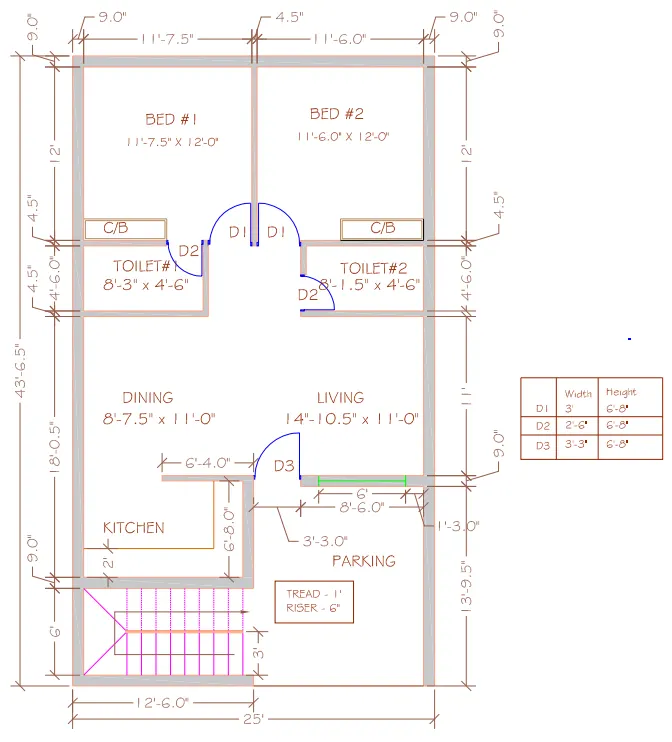
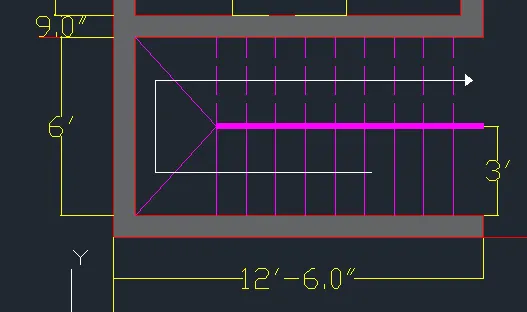
- STEP :1
- start the autocad software
- command : QNEW
- select the :IMPERIAL TEMPLATE
- Click on ADVANCE SETUP
- UNITS :ENGINEERING , PRECISION :0'-0-0"
- angle : DECIMAL DEGREE
- ANGLE MEASURE :EAST
- ANGLE MEASURE :CLOCKWISE
- SELECT AREA
- AND FINISHED IT
- command :LIMMX >70',70'
- command :LIMITS >0',0>UPPER RIGHT CORNER>70',70'
- command : Z ( zoom ) command all
- command :XL
- type v and mark vertical line
- press :ENTER
- COMMAND : XL
- type h and mark horizontal line
- command : O (for offset )
- distance :9"
- give the ofset at both horizontal and vertical line
- command :o (for offset)
- distance :6'
- select horizontal line
- and mark the ofset line at a distance of 6'
- command :o (for offset )
- distance :12'-6.0"
- select vertical line and mark line
- command :o (for offset )
- distance :3'
- select the horizontal line
- and mark ofset line at a distance of 3'
- command : o (for offset )
- distance :0.5"
- and mark 2 ofset line
- press :ENTER
- command :o ( for ofset )
- distance :9"
- select :MULTIPLE OPTION
- and give the 12 steps at a disttance of 9"
- command :TR (trim )
- trim the unessensial part
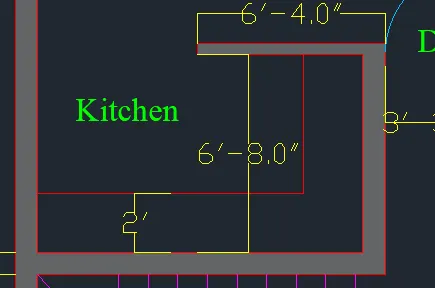
- STEP :2
- command : o (for offset )
- distance :6'-8.0"
- select the horizontal line
- mark line at a distance of 6'-8.0"
- command :o (for offset )
- distance :4.5"
- select line and mark ofset line at a distance of 4.5"
- command :o
- distance :12'-6.0"
- select vertical line and mark vertical line at a distance of 12'-6.0"
- command :o
- distance :2"
- mark horizontal and vertical ofset line at a distnce of 2'
- command :0
- distance :6'-4.0"
- mark ofset line at a distance of 6'-4.0"
- command TR (trim )
- trim the unrequired part .
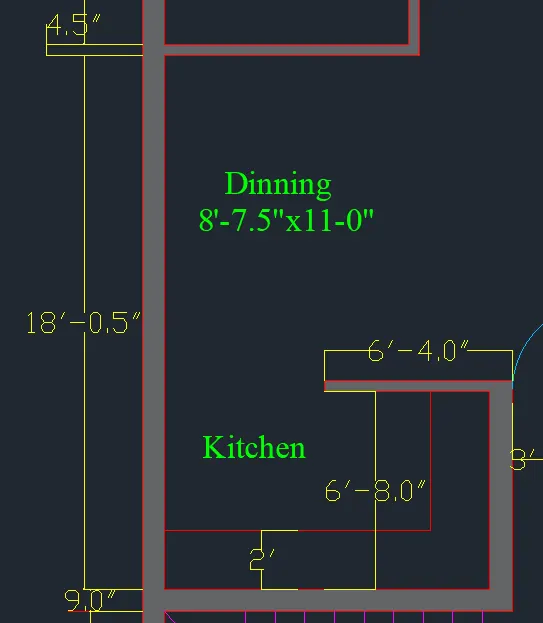
- STEP :3
- command :o
- distance :18'-0.5"
- select line
- and mark the vertical ofset line at a distance of 18;-0.5"
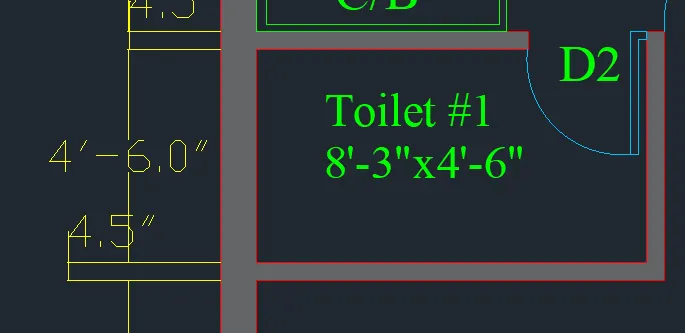
- STEP :4
- command :o
- distance :8'-3"
- select vertical line and mark the ofset line at a distance of 8'-3"
- again
- command :o
- distance 4.5"
- and mark line
- command : o
- distance :4'-6.0"
- select horizontal line
- and ofset line at a distance of 4'-6.0"
- command :o
- distance :4.5"
- mark line
- again command :o
- distance :2'-6" for door
- select the vertical line
- and mark ofset line at a distance of 2'-6"
- command :TR (for trim )
- trim the unrequired part
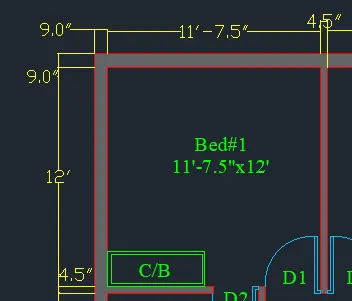
- STEP :5
- command :o
- distance :12'
- select horizontal line and mark 12' ofset line
- again
- command :o
- distance :0.9"
- mark ofset line
- command :o
- distance :11'-7.5"
- mark line at a distance of 11'-7.5"
- command :o
- distance :4.5"
- mark line at a distancre 4.5"
- command : F (fillet )
- and join the line
- care should be taken fillet radius is 0
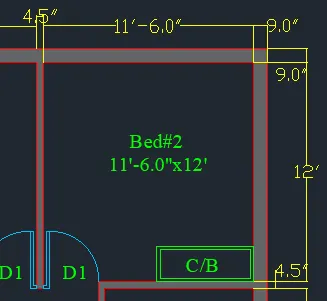
- STEP : 6
- command :o
- distance :11'-6.0"
- mark hirizontal line at adistance of 11'-6.0"
- command :0
- distance :0.9"
- and matk line
- command :o
- distance 12'-0"
- and mark vertical line
- command :F (fillet )
- and join the internal and external line of a wall
- care should be taken fillet radius is 0
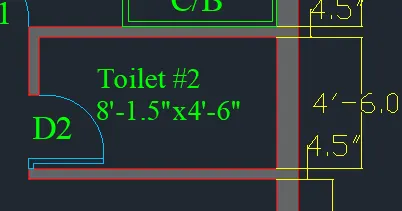
- STEP : 7
- command :0
- distance :8'-1.5"
- mark horizontal line at a distance of 8'-1.5" distance
- command :o (for offset )
- distance :4.5"
- select the line and mark the horizontal line distance of 4.5"
- again
- command :o
- distance :4'-6"
- command :0
- distance :4.5"
- command :TR (for trim )
- command : F (fillet )
- join the external wall
- STEP : 8
- command :o
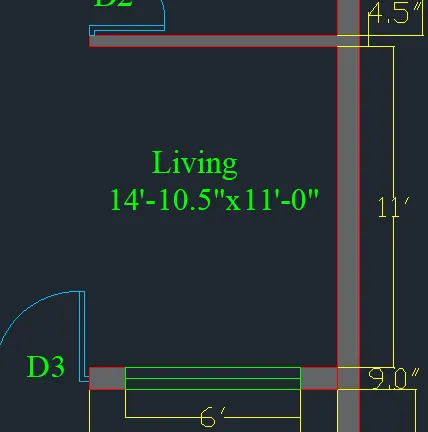
- distance :11'
- mark outer wall at a distance of 11'
- command :o
- distance :9"
- command :o
- distance :8'-6.0"
- commnad :o
- distance :9"
- and mark it
- command :o
- distance :1'-3"
- mark vertical offset line at a distance of 1'-3"
- command :0
- distance :6'
- command :TR (trim )
- trim the unrequired lines
- STEP : 9
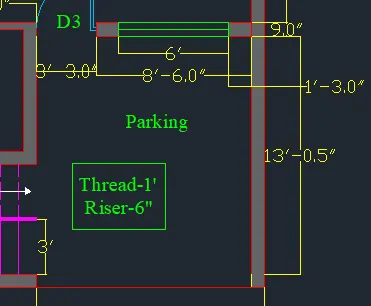
- command :o
- distance :13'-9.5"
- mark verticel line at a distance of 13'-9.5"
- command :o
- distance :9"
- and mark it
- STEP : 10
- command :DIM (for dimension )
- give the all dimension to all component of a building
- command :L
- create hinged of the door
- hinged dimension :1',0.5"
- command :C (for circle )
- starting point :center point of hinged and another point is other size of door
- command : EXTEND
- extend the line of hingerd
- commnd :TR ( trim )
- triam the unrequired part of a circle
- in this way all doors are created
- then go to the layer propertices
- and create the new layers
- the layers are given below
FINAL SKETCH -1
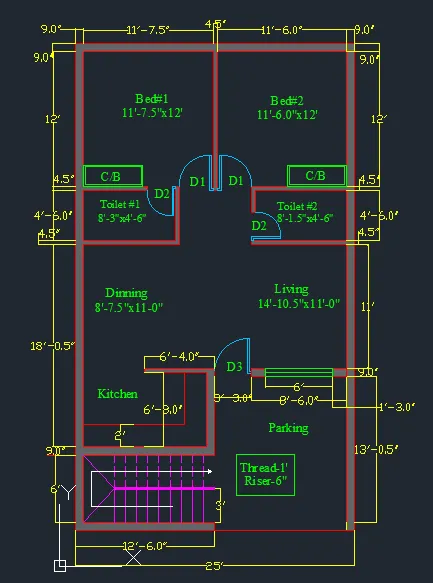
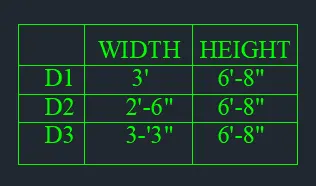
- RESULT:
- The drawing was drawn using engineering units.
- The drawing contains the dimension values.
Question no.2:
AIM:
- Sketch the seating plan for an outdoor canopy.
- To consider the dimensions in mm.
Procedure:
- First create the outter circle of radius 1398mm
- Then another inner circle of radius 452mm.
- Then a line of 200mm whose centre is aligned to the centre of the circles at any one quadrant of the circle.
- the a draw a line at one end of the first drawn line for 150mm. and copy the line to the other end of the first drawn line.
- Create a circle using the two end of the newly created lines as diameter.
- Then crop the circle at inner half. offset the half circle to 50mm. and off set again to 20mm.
- Then draw a handle line structure at desired shape.
- A chair shape is obtaind.
- Now array the chair shape in polar array setting no. of objects as 4.
- Then the drawing of outdoor seating with canopy is done.
FINAL SKETCH -2
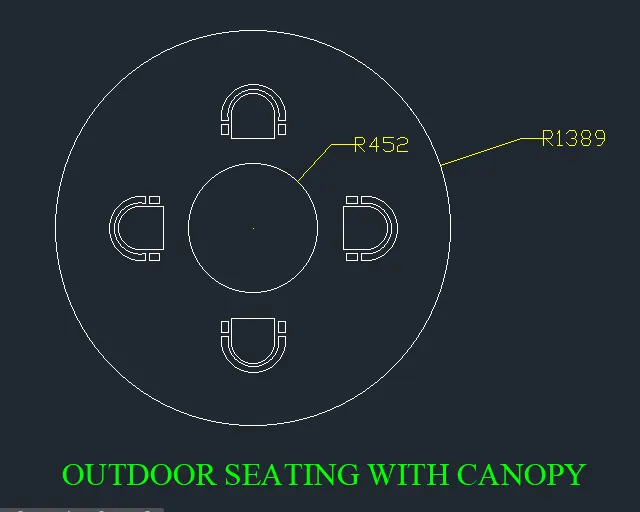
RESULT:
- The outdoor seating with canopy was sketched succcessfully.
- The drawing was drawn using decimal units.
- The drawing contains the dimension values.
Question no.3:
Sketch the part plan for the toilers and utilities room. Consider the outer wall thickness as 300mm and inner wall thickness as 150mm. Also, assume the missing dimension, Texts, dimensions, and hatches are only for references. Also, symbols for toilets and w/c are also for references.
SOFTWARE USED : AUTODESK AUTOCAD 2021
PROCEDURE :
- start the autocad software
- command : QNEW
- select the :IMPERIAL TEMPLATE
- Click on ADVANCE SETUP
- UNITS :DECIMAL , PRECISION :0.0
- angle : DECIMAL DEGREE
- ANGLE MEASURE :EAST
- ANGLE MEASURE :CLOCKWISE
- SELECT AREA
- AND FINISHED IT
- command : UN ( for units )
- units :mm , precision :0.0
- command :LIMMAX >100,100
- command :Z ( for zoom )
- Type : A FOR ALL
- press : ENTER
- command : XL
- mark vertical line
- press : ENTER
- command : XL
- Mark horizontal line
- press: ENTER
- command : o (offset )
- distance :300
- select line and mark vertical ofset line
- commnad : o ( for offset )
- distance :150
- mark horizontal ofset line at a distance of 150
- commnad : 0 ( for offset )
- distance :2100
- mark horizontal ofset line at a distance of 2100
- commnad : o ( for offset)
- distance :150
- mark horizontal line at a distance of 150
- command : 0 ( for offset )
- distance : 1900
- mark vertical line at a distance of 1900
- command : o ( for offset )
- distance :150
- command : TR (for trim )
- triam unrequried line
- command :0 ( for offset)
- distance :150
- mark horizintal line
- command :o ( for offset )
- distance :828
- mark horizontal line
- command : TR ( for trim )
- and draw the door
- command :o ( for ofset )
- distance :150
- mark horizontal line
- command :o ( for offset )
- distance :728
- mark horizontal line
- and draw the window
- command : TR ( for trim )
- triam the extra line
- command : L ( for line )
- select the center point of window and mark the window
- command : C ( for circle )
- mode : circle , diameter
- and draw the circle
- command : tr ( for trim )
- triam the extra line of a door
- command : o
- distance :1700
- mark the vertical line at a distance of 1700
- command : o ( for offset )
- distance :1900
- mark horizontal line
- command : o( for offset )
- distance :300
- mark the horizontal line a distance of 300
- command : TR ( for trim )
- triam the extra vertical and horizontal line
- command : o
- distance : 250
- mark vertical line at a distnace of 250
- command : o( for ofset )
- distance : 631
- mark the line
- command : TR ( trim )
- triam the extra line of window
- command : L ( for line )
- select the midpoint of a window and mark the center line of a window
- again
- command : o
- distance :150
- mark horizontal line
- command :o ( for offset )
- distance : 832
- mark horizontal line of window
- command : TR ( for trim )
- triam the extra line
- command : c ( for circle )
- mode : circle , diameter
- and draw the circle for arc of dooe
- command : TR ( for trim )
- triam the extra line of a door
- then go to the layer properties
- create the properties
- layers are given below :
FINAL SKETCH -3 :
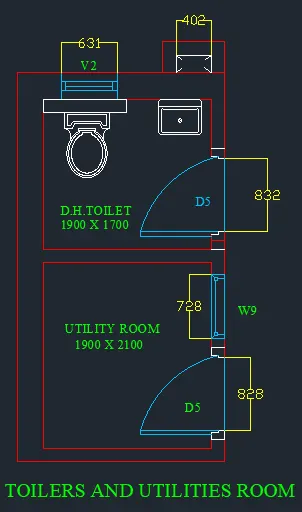
- RESULT:
- Thus our part plan of toilets and utilities are obtained.
- The drawing was drawn using decimal units.
- The drawing contains the dimension values