Creating a Residence Layout, Seating plan, Toilet and Utility room plan using AutoCad
Aim:
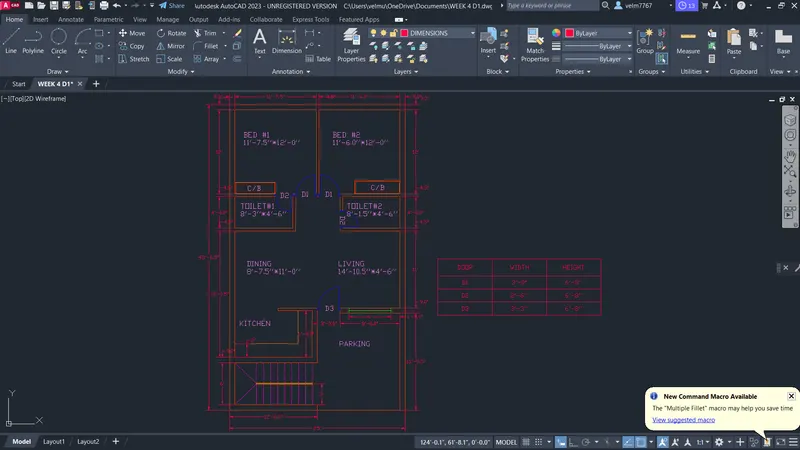
To sketch the layout of a residence by using the construction line, offset tool and other necessary tools in Autocad.
Procedure:
- In this residence plan outer walls are 9'' thick and inner walls are 4.5'' thick. Door D1 is 3' width and 6'-8'' height and D2 is 2'-6'' and 6'-8'' and D3 is 3'-3'' and 6'-8''.
- Open the new drawing in Autocad. Set the limits as 0,0 and 100',100' and units as engineering and precision 0'-0.0''.
- First create the construction line in vertical direction and horizontal direction.
- Then offset the vertical line through a distance of 9'' and horizontal line as 9''
- Then offset the offseted horizontal line through a distance of 6' then offset the line 9'' and offset the line as 6'-8'' then offset 4.5''
- Now using fillet and trim command, trim the unwanted lines. offset the outer vertical line through a distance of 12'-6'' and offset the line as 9''
- Then offset the living area front line as 9'' then offset. Offset the kitchen wall line as 3'3'' and using trim tool trim the unwanted lines in the door.
- Now offset the outer wall line through a distance of 25' and offset the line as 9''
- Then offset the kitchen wall line and living wall line through a distance of 11'. Then offset the line through a distance of 4.5''
- Now offset the line as 4'-6''. Then offset the outer left side wall line as 8'-7.5'' and right side wall line as 8'-1.5''
- Offset the line as 2'-6'' to create a door opening.
- Then offset the line through a distance of 12' and by using grip to extend the line to the outer walls in either side.
- Now offset the left side wall line through a distance of 11'-7.5'' and offset the line as 4.5''
- Then create the stairs as tread 1' and riser 6'' by using copy and array tools to create the steps.
- Now creat the layers and define the colors of each layer.
- For walls define the color number 20, for stairs define the color number 220, for text colour number 211, for window color green and for doors color bule.
- Finally create the dimension and create the text and the dimensions of the rooms.
Result:
The residence layout plan is created by using the command line, offset, trim and fillet tools.
Aim:
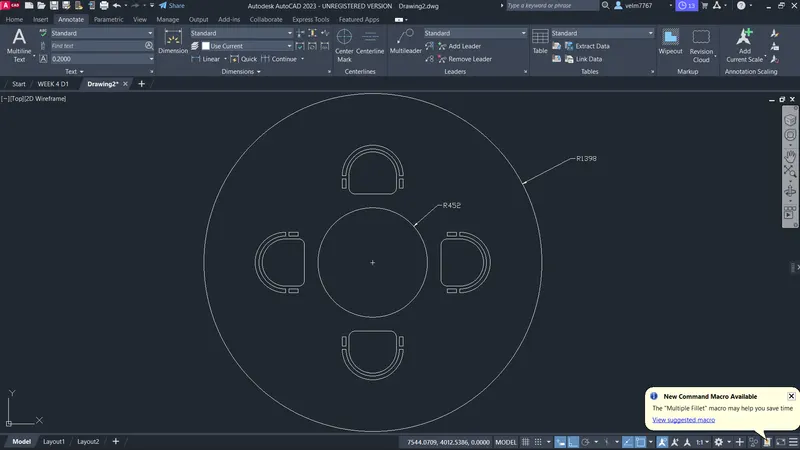
To create the outdoor seating with canopy using circle and array tools.
Procedure:
- using circle tool specify the center point of the circle and enter the radius 1398
- Then using circle tool specifiy the center point of the circle as the previous circle center point and enter the radius 452
- Now create the chair by using the rectangle, create a rectangle then explode the rectangle and create the arc in the rectangle.
- Then fillet the two corners of the rectangle. Then offset the arc as 10 units again offset it 10 units
- Then create the rectangle at the starting point of the chair and copy it to the other side.
- Now using the polar array to create a array of 4 numbers of chairs the center point as the center point of the circle.
Result:
The outdoor seating out with canopy is created by using the rectangle, circle and array tools.
Aim:
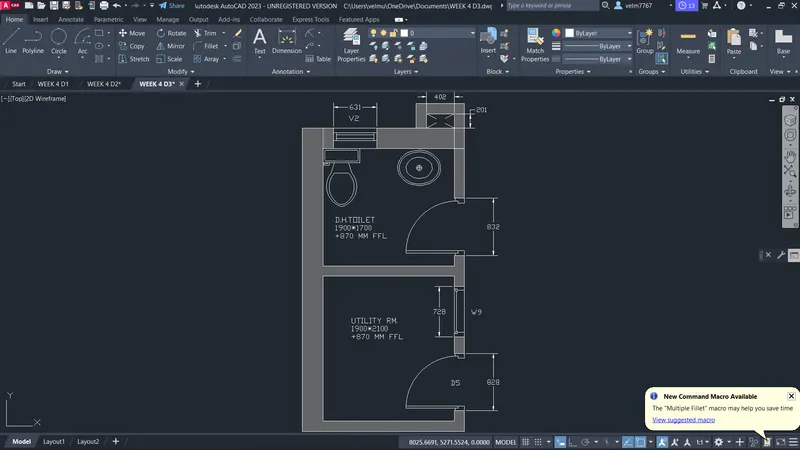
To sketch the part plan of the toilet and utility room by using construction line, offset and fillet command.
Procedure:
- In this part plan of toilet and utility room the outer walls are 300mm thick and inner walls are 150mm thick.
- Create the construction line in the vertial direction and in the horizontal direction.
- Now offset the vertal line through a distance of 300mm and horizontal line as 150mm.
- Then offset the vertal line as 1900mm and again offset it through a distance of 150mm.
- Now offset teh horizontal line as 2100mm and again offset it through a distance of 150mm.
- Then offset the inner wall line through a distance of 1700mm and again offset the line as 300mm. The toilet and utility room is created.
- Then offset the toilet wall outer line as 201 and offset the vertical line as 402mm and again 150mm offset.
- Now using trim and fillet command create the door, window and ventilator opening.
- Then fix the door, window and ventilator unit.
- Then create a text to the room and add the dimensions.
Result:
The part plan of toilet and utility room is sketched by using the construction line, offset and fillet tools.