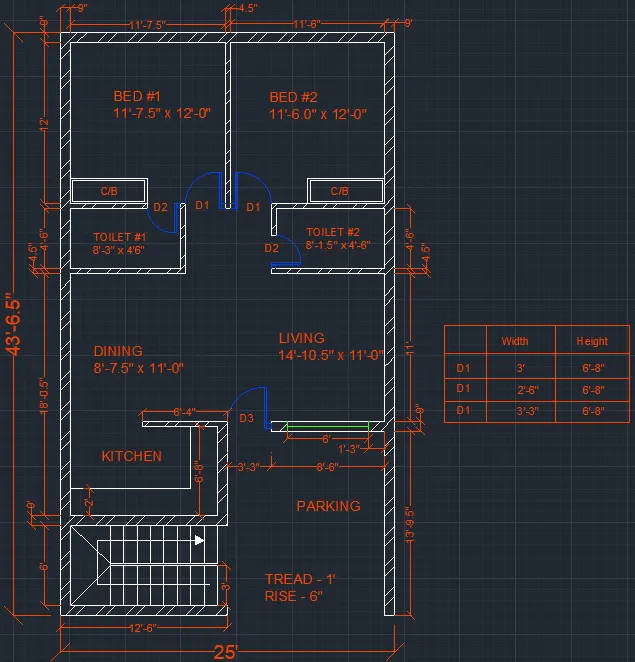
Creating a Residence Layout, Seating plan, Toilet and Utility room plan using AutoCad
1) Aim: TO sketch the layout of a residence as given.
Procedure:
- Open Auto cad and open new drawing.
- Type ‘LIMITS’ in command bar and set the sheet limit as per drawing.
- Keep ortho on so that the lines move only in Right angles.
- Type ‘UNITS’ in command bar and set the unit type as Engineering and unit in inches required for drawing.
- Select layer and create new layers for dimension, Door and window, with different color.
- Select Construction line and draw a vertical and horizontal lines anywhere in screen.
- Start with wall thickness and room dimension vertically.
- After that do the same horizontally.
- Once the all offset work is finished then start to trim in junction and trim off all the extra lines.
- The trimming is completed now do the door opening work.
- The width of door is given using offset draw line and trim the between lines.
- Now place the window as shown in figure.
- Do the staircase part as shown using array command by specifying the distance between each riser.
- The drawing part is done so now carry on with the dimensioning part.
- While doing all the drawing use the appropriate layers for each.
- Do the schedule part of door size by making a tabular column.
- Before starting go to Dimension style and there go to Primary units and there set as Engineering.
- Then while doing the dimensioning we can see that all the dimensions are in engineering format.
- Then while doing the dimensioning we can see that the size of arrow and text may not match the drawing so do the required adjustments so that the dimension is clearly visible.
- After all the dimensioning work is finished now carry with naming part.
- Select Text and write down the room name with respect to drawing.
- Adjust the size so that the naming are clearly visible.
Result:
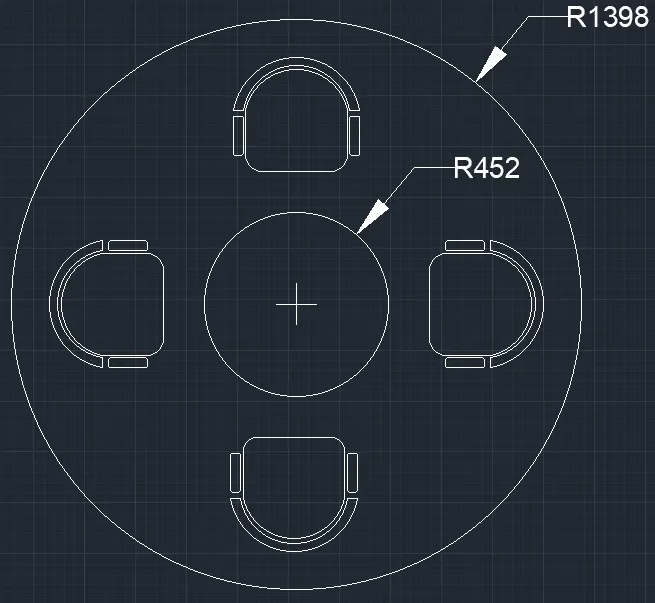
2) Aim: To sketch the seating plan for an outdoor canopy.
Assumptions: Here the Chair size is taken 500mm x 500mm
Procedure:
- Open Auto cad and open new drawing.
- Type ‘LIMITS’ in command bar and set the sheet limit as per drawing.
- Type ‘UNITS’ in command bar and set the unit type as Decimal and unit in millimeter set precision as required for drawing.
- Keep ortho on so that the lines move only in Right angles.
- Select the circle command and click anywhere in the screen make it the centre of circle.
- Type the given radius and draw the second circle using same centre point.
- Now after the completion of table we have to do the chairs in four directions.
- The chair size is assumed w.r.t standard sizes.
- Draw the rectangle and use fillet command to edit the edges.
- For back arch use 3 point arc and trim off the extra lines.
- For the back rest make use of offset command and show the thickness and join it using line command.
- Next draw rectangle for hand rest and use fillet to edit the edges.
- After completion of one chair use copy command and make it four.
- Use rotate command for each chair to rotate in each direction.
- Then place all the chairs in equal distance.
- After completing the drawing start with the dimensioning part.
- Do the dimensioning using Radius option and adjust the text and arrow size so that it matches the drawing and clearly visible.
Result:
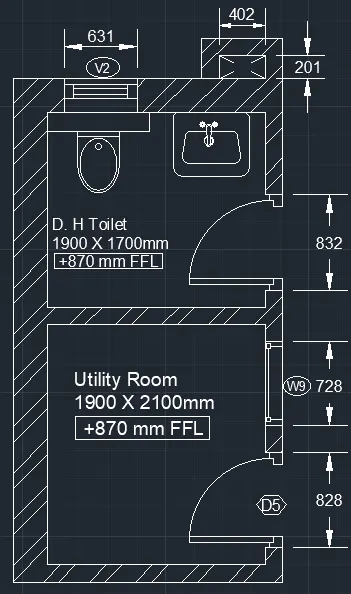
3) Aim:
Assumption: Dimension of commode and wash basin.
Procedure:
- Open Auto cad and open new drawing.
- Type ‘LIMITS’ in command bar and set the sheet limit as per drawing.
- Type ‘UNITS’ in command bar and set the unit type as Decimal and unit in millimeter set precision as required for drawing.
- Keep ortho on so that the lines move only in Right angles.
- Use construction line and draw the outer wall line. Either vertical or horizontal.
- Using offset command draw the thickness of wall as given.
- Here there are two types of wall with different thickness.
- Use fillet command with 0 radius in the corners. Do this in all junctions, now the wall is ready.
- Trim off the excess lines and do the openings of door, window and ventilator.
- Draw the door using line command and show the direction of door using a arc.
- Windows are shown using the thickness and placement point.
- After all the placement of door, window and ventilator, Place the command and wash basin part in the toilet using the assumed dimension.
- After placing wash basin and commode in the drawing start with the dimensioning part.
- Do the dimensioning using Radius option and adjust the text and arrow size so that it matches the drawing and clearly visible.
- Using Text do the naming of the room and adjust the size as per drawing requirement.
Result: