Creating a Residence Layout, Seating plan, Toilet and Utility room plan using AutoCad
1) Residential Plan:
Aim:-
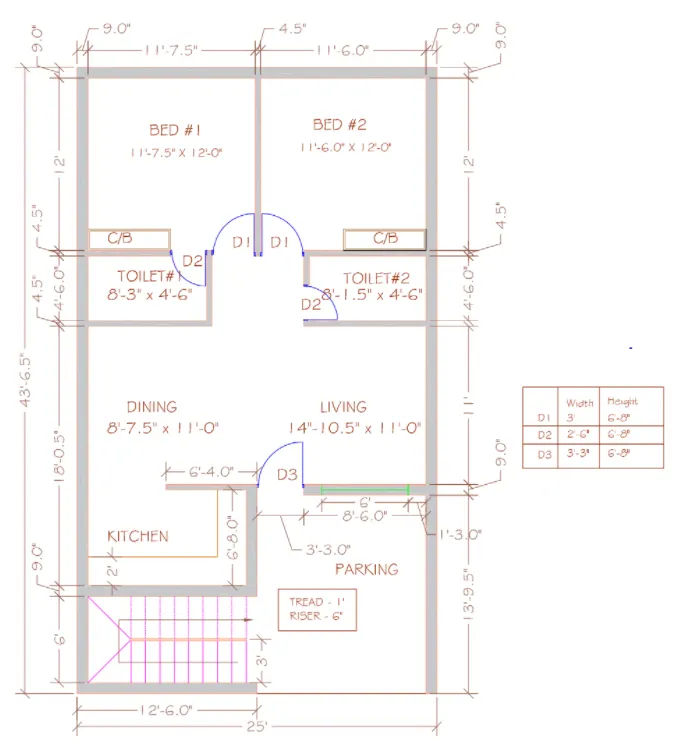
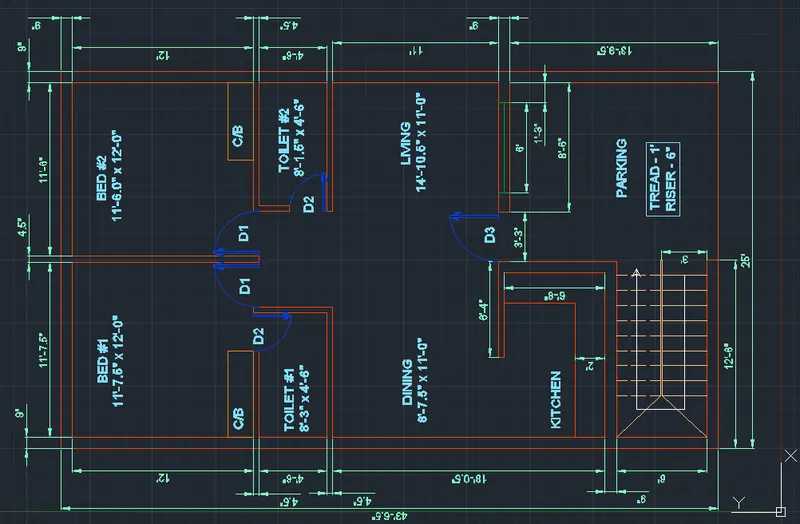
Sketch the layout of a residence as shown in the Figure. Consider all dimensions as reference to sketch the unit plan. Also the text in the layout are only for reference. Assume the missing dimensions. Also, refer the schedule for size of the doors.
Introduction:-
The desired residence layout plan is created below by using Line, Offset, Trim, circle, dimlin and Mtext command tools.
Procedure:-
Step-1(Setup):
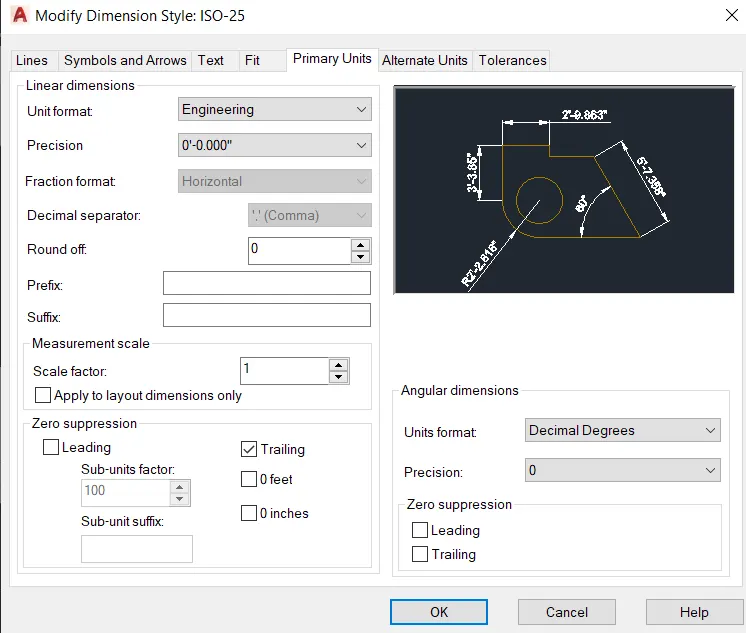
- For the Foot & inch dimension, go to "Dimstyle" and setup primary units as engineering unit.
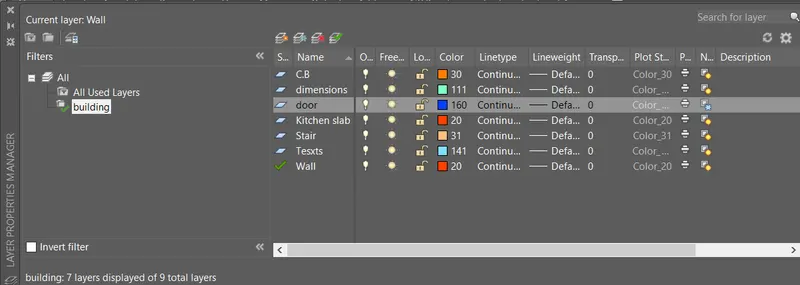
- For creating the residence layout plan we make some layers as Walls, Doors, Stairs, Cupboard, Kitchen slab, dimensions, texts by the command "La" and add the layers name, colours and line type.
Step-2(Creating Walls):
- Choose Wall option from layer option.
- Type the command "Rec" for the rectangle and specify the first corner point (50",50").
- Specify the other corner point: select dimension
- Specify the length of the rectangle: 25'-0".
- Specify the width of the rectangle: 43'-6.5".
- Type the command "O" for the Offset the rectangle as 9" main wall.
- Specify offset distance: 9"
- Select the object to offset.
- Specify point on side to offset.
- Type E for exit.
- Type the command "L" for the line for Bedroom#1
- Specify the first point: fro
- Line base point: Top left corner point of the inner main wall.
- Line base point: 11'-7.5"
- Specify the next point: @12'-4.5"<270
- Specify the next point: @-9'<270.
- Type the command "O" for the Offset the line as 4.5" inner wall.
- Specify offset distance: 4.5"
- Select the object to offset: select the above line
- Specify point on side to offset: move crusher in x direction and click.
- Type the command "L" for the line.
- Specify the first point: fro
- Line base point: Top left corner point of the inner main wall.
- Line base point: 12'-0"
- Specify the next point: make perpendicular line to its opposite.
- Type the command "O" for the Offset the line as 4.5" inner wall.
- Specify offset distance: 4.5"
- Select the object to offset: select the above line
- Specify point on side to offset: move crusher in -ve y direction and click. [Bed room #1 complete]
- Type the command "O" for the Offset the line for Toilet room.
- Specify offset distance: 4'-6"
- Select the object to offset: select the above offest line.
- Specify point on side to offset: move crusher in -ve y direction and click.
- Type the command "O" for the Offset the line as 4.5" inner wall.
- Specify offset distance: 4.5"
- Select the object to offset: select the above line
- Specify point on side to offset: move crusher in -ve y direction and click.
- Type the command "L" for the line.
- Specify the first point: fro
- Line base point: left corner point of the 2nd offset line.
- Line base point: 8'-3"
- Specify the next point: make perpendicular line to its opposite.
- Type the command "O" for the Offset the line as 4.5" inner wall.
- Specify offset distance: 4.5"
- Select the object to offset: select the above line
- Specify point on side to offset: move crusher in x direction and click.[Toilet#1 complete]
- Type the command "L" for the line.
- Specify the first point: fro
- Line base point: right corner point of the 2nd offset line.
- Line base point: 8'-1.5"
- Specify the next point: make perpendicular line to its opposite.
- Type the command "O" for the Offset the line as 4.5" inner wall.
- Specify offset distance: 4.5"
- Select the object to offset: select the above line
- Specify point on side to offset: move crusher in -ve x direction and click.[Toilet#2 complete]
- Type the command "O" for the Offset the line as Living & Dining room.
- Specify offset distance: 11'-0"
- Select the object to offset: select the 3rd offset line.
- Specify point on side to offset: move crusher in -ve y direction and click.
- Type the command "O" for the Offset the line as 4.5" inner wall.
- Specify offset distance: 4.5"
- Select the object to offset: select the above offset line
- Specify point on side to offset: move crusher in -ve y direction and click.
- Type the command "O" for the Offset the line as 9" main wall.
- Specify offset distance: 4.5"
- Select the object to offset: select the above offset line
- Specify point on side to offset: move crusher in -ve y direction and click.
- Type the command "L" for the line.
- Specify the first point: fro
- Line base point: right corner point of the 7th offset line.
- Line base point: 11'-9"
- Specify the next point: @7'-9.5"<270.
- Specify the next point: perpendicular to the -ve x axis wall. [Kitchen room]
- Type the command "O" for the Kitchen slab.
- Specify offset distance: 2'
- Select the object to offset: select the above lines of kitchen room.
- Specify point on side to offset: move crusher in +ve y direction and click.
- Specify point on side to offset: move crusher in -ve x direction and click.
- Type the command "L" for the line.
- Specify the first point: fro
- Line base point: right corner point of the 7th offset line.
- Line base point: 8'-6"
- Specify the next point: @9"<270.
- Type the command "L" for the line.
- Specify the first point: fro
- Line base point: right corner point of the 7th offset line.
- Line base point: 18'-1"
- Specify the next point: @4.5"<270.
- Type the command "L" for the line.
- Specify the first point: fro
- Line base point: bottom left corner point of the inner rectangle point.
- Line base point: 12'-0"
- Specify the next point: @9"<270.
- Result:-
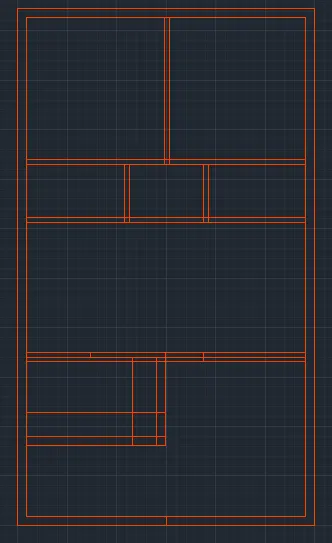
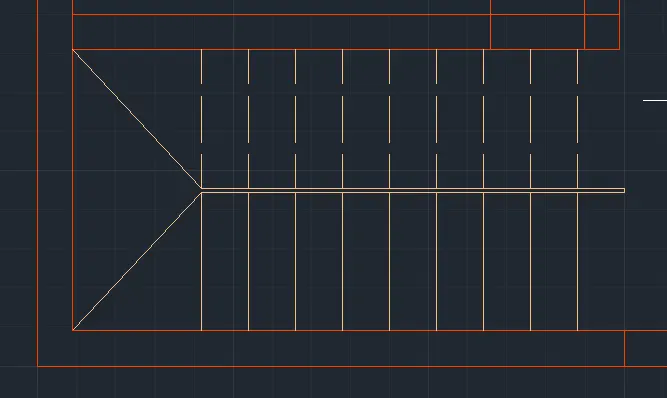
Step-3(creating Stair):
- Choose Stair case option from layer option.
- Type the command "L" for the line.
- Specify the first point: fro
- Line base point: bottom left corner point of the inner rectangle point.
- Line base point: 3'-0".
- Specify the next point: 12'-0".
- Type the command "O" for the Offset.
- Specify offset distance: 2.25"
- Select the object to offset: select the above line.
- Specify point on side to offset: move crusher in -ve y direction and click.
- Specify point on side to offset: move crusher in +ve y direction and click.
- Type the command "L" for the line.
- Specify the first point: fro
- Line base point: right corner point of the 1st offset line of this step.
- Line base point: 1'-0".
- Specify the next point: Draw perpendicular towards -ve y axis.
- Type the command "O" for the Offset.
- Specify offset distance: 1'-0"
- Select the object to offset: select the above line.
- Specify point on side to offset: move crusher in -ve x direction and click. [Like the same make total 9 lines]
- Type the command "L" for the line.
- Specify the first point: select the last ending line of steps
- Specify the next point: Bottom left corner of the inner rectangle.
- Type the command "Mi" to mirror the object.
- Specify the objects: Select the lines of staircase.
- Specify first point of mirror line: Select the 1st line of this step.
- Earse source object?: No.
- Choose all the mirror lines of treads and choose the linetype as ISO dash.
- Type the command "Tr" and press "double enter" to trim unwanted lines.
- Result:-
Step-4(Doors):
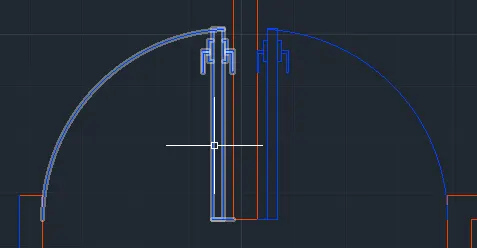
- Create door blocks from block tool bar.
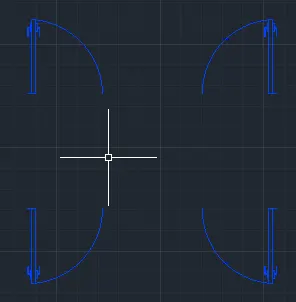
- Select the door blocks and layer them in door layer option from layer option.
- Type the command "CO" for copying the objects.
- Select the objects: Select the door block.
- Specify base point: Choose one constant point.
- Specify second point: Click at inner bottom right corner of the bedrrom#1 wall.
- Specify second point: Type "E" enter for exit. [Similarly fit all door blocks as its desired room locations]
- If door block size is small or big then follow as below:-
- Type the command "Sc" for scaling the objects.
- Select objects: Select the door which need to be in scale.
- Specify base point: Select one constatnt point.
- Specify scale factor: "R" enter for reference.
- Specify reference length: Select first constant point.
- Specify second point: Select another constant point.
- Specify new length: 3'-0" [for D1], 2'-6"[for D2], 3'-3"[for D3].
- Result:-
Step-5(Assigning the dimensions & Room names):
- Choose dimension option from layer option.
- Type the command "Dimlin" to measure the dimensions of the objects.
- Specify the first and second extension line origin.
- Choose Text option from layer option.
- Type the command "Mtext" to name the rooms.
- Specify the first corner
- Specify opposite corner
- From the style tool bar change the height of the texts and styles.
Result:-
2) Outdoor seating with Canopy:
Aim:-
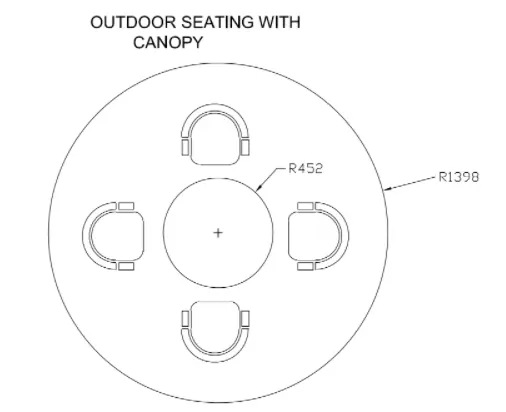
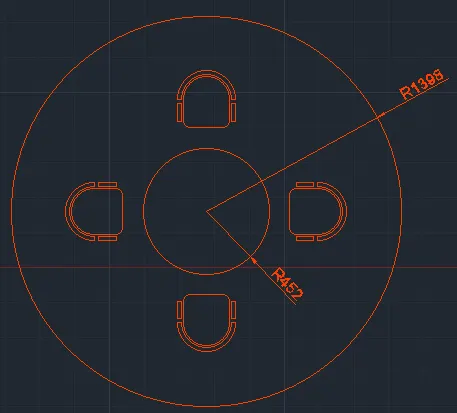
Sketch the seating plan for an outdoor canopy by assuming the dimensions for the seating. Also, consider the dimensions in mm.
Introduction:-
The desired residence layout plan is created below by using Line, Offset, Trim, circle, block, and dimlin command tools.
Procedure:-
Step-1:-
- Create a seat by using Line, Fillet & trim commands. [Assume all dimensions]
- select create block from block tool bar.
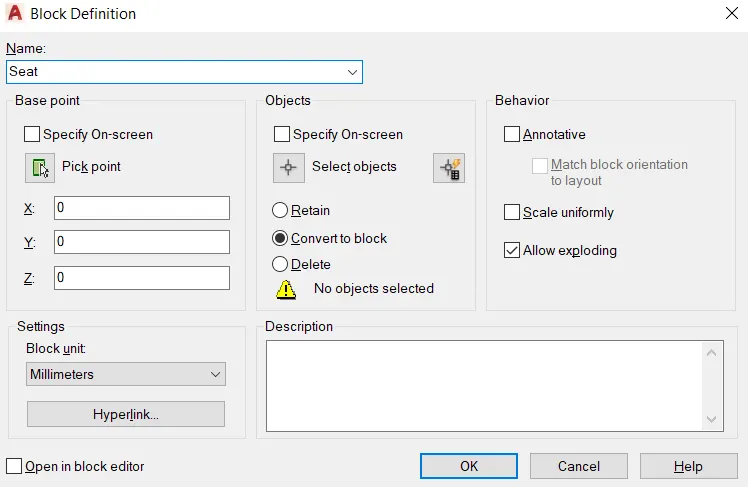
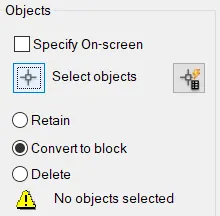
- Select the object: select the seat.
- Then choose "OK" in block definition table.
- Result:-
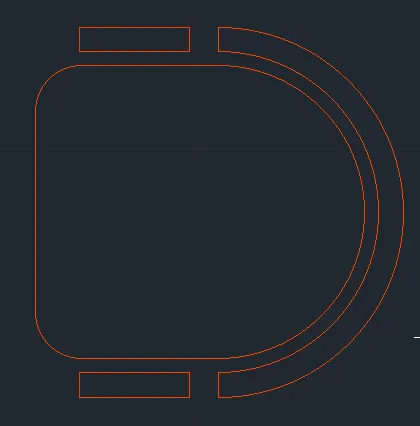
Step-2:-
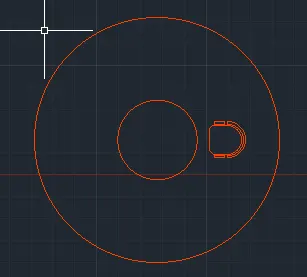
- Type the command "C" for the circle and specify the centre point of the circle.
- Specify radius of the circle: 1398
- Type the command "C" for the circle and specify the centre point of the circle: same centre point of the previous circle.
- Specify radius of the circle: 452
Step-3:-
- Type the command "M" for move the block to its appropritive seating area.
- Select object: Choose the seat.
- Specify base point: choose the mid point of the block
- Specify second point: move the block to its appropritive seating area.
- Type the command "Sc" for scaling the objects.
- Select objects: Select the door which need to be in scale.
- Specify base point: Select one constatnt point.
- Specify scale factor: "R" enter for reference.
- Specify reference length: Select first constant point.
- Specify second point: Select another constant point.
- Specify new length.
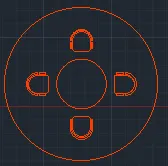
- Type the command "Mi" to mirror the object.
- Specify the objects: Select the seat.
- Specify first point of mirror line: Select the centre of the circle. [Polar tracking mode On as 45, 90, 135, 180 like]
- Earse source object?: No.
- By using the mirror command make all 3 seats.
Step-4:-
- Type the command "Dimlin" to measure the dimensions of the objects.
- Specify the first and second extension line origin.
Result:-
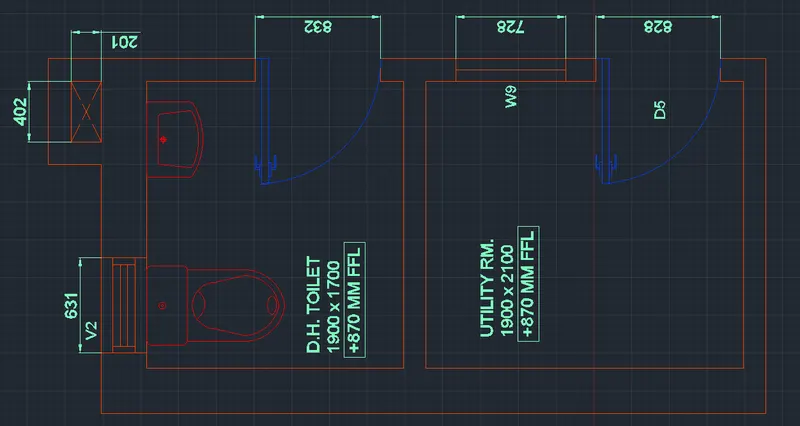
3) Plan for the toilers and utilities room:
Aim:-
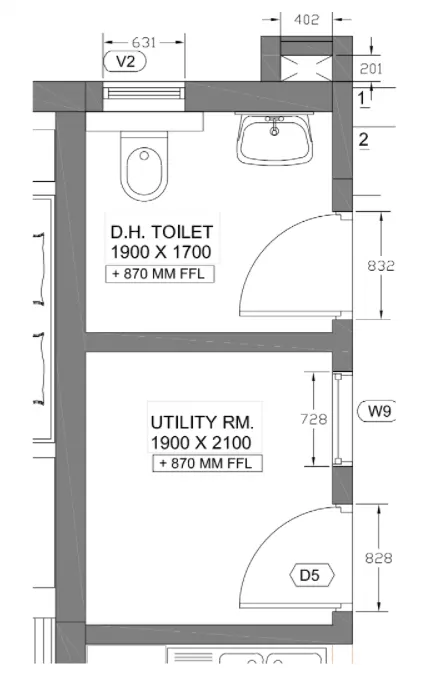
Sketch the part plan for the toilers and utilities room. Consider the outer wall thickness as 300mm and inner wall thickness as 150mm. Also, assume the missing dimension, Texts, dimensions, and hatches are only for references. Also, symbols for toilets and w/c are also for references.
Introduction:-
The desired plan for the toilers and utilities room is created below by using Line, Offset, Trim, circle, dimlin and Mtext command tools.
Procedure:-
Step-1 [To draw the walls of utility & toilet room]:-
- Type the command "L" for the line and specify the starting point.
- Specify the next point: @4400<270.
- Type the command "O" for the Offset.
- Specify offset distance: 300
- Select the object to offset: select 1st line.
- Specify point on side to offset: move crusher in +ve x direction and click.
- Type the command "O" for the Offset.
- Specify offset distance: 1900
- Select the object to offset: select 1st offset line.
- Specify point on side to offset: move crusher in +ve x direction and click.
- Type the command "O" for the Offset.
- Specify offset distance: 150
- Select the object to offset: select 2nd offset line.
- Specify point on side to offset: move crusher in +ve x direction and click.
- Type the command "L" for the line and joint the bottom of lines.
- Type the command "O" for the Offset.
- Specify offset distance: 150
- Select the object to offset: select 2nd line.
- Specify point on side to offset: move crusher in +ve y direction and click.
- Type the command "O" for the Offset.
- Specify offset distance: 2100
- Select the object to offset: select 4th offset line.
- Specify point on side to offset: move crusher in +ve y direction and click.
- Type the command "O" for the Offset.
- Specify offset distance: 150
- Select the object to offset: select 5th offset line.
- Specify point on side to offset: move crusher in +ve y direction and click.
- Type the command "O" for the Offset.
- Specify offset distance: 1700
- Select the object to offset: select 6th offset line.
- Specify point on side to offset: move crusher in +ve y direction and click.
- Type the command "O" for the Offset.
- Specify offset distance: 300
- Select the object to offset: select 7th offset line.
- Specify point on side to offset: move crusher in +ve y direction and click.
- Type the command "L" for the line and specify the starting point: right point of the 8th offset line.
- Specify the next point: @351<90.
- Specify the next point: @702<180.
- Specify the next point: @351<270.
- Type the command "O" for the Offset.
- Specify offset distance: 150
- Select the object to offset: select 3rd line.
- Specify point on side to offset: move crusher in -ve x direction and click.
- Type the command "O" for the Offset.
- Specify offset distance: 150
- Select the object to offset: select 4th line.
- Specify point on side to offset: move crusher in -ve y direction and click.
- Type the command "O" for the Offset.
- Specify offset distance: 150
- Select the object to offset: select 5th line.
- Specify point on side to offset: move crusher in +ve x direction and click.
- Result:
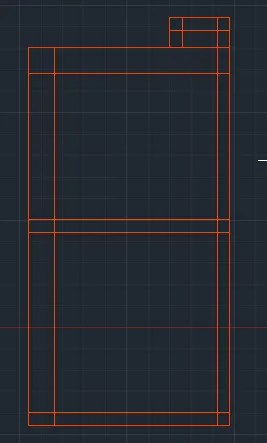
Step-2 [Creating the door, window, ventilator & utility facilities]:-
- Draw a line in Utility Room at offset of 150mm from the wall
- Offset this line at 828mm distance. [Door size completed]
- Again offset the previous line at 200mm & 928mm distance respectively. [Window size completed]
- Draw a line in D.H. Toilet at offset of 150mm from the wall.
- Offset this line at 832 mm distance.
- Draw a line in D.H. Toilet at offset of 100mm from the wall.
- Offset this line at 631 mm distance.
- Draw a line in D.H. Toilet at offset of 150mm from the wall.
- Offset this line at 832 mm distance. [Ventilator size completed]
- Insert utility facities from block toolbar.
- If required block size is small or big then follow as below:-
- Type the command "Sc" for scaling the objects.
- Select objects: Select the door which need to be in scale.
- Specify base point: Select one constatnt point.
- Specify scale factor: "R" enter for reference.
- Specify reference length: Select first constant point.
- Specify second point: Select another constant point.
- Specify new length.
Step-3(Assigning the dimensions & Room names):
- Type the command "Dimlin" to measure the dimensions of the objects.
- Specify the first and second extension line origin.
- Type the command "Mtext" to name the rooms.
- Specify the first corner
- Specify opposite corner
- From the style tool bar change the height of the texts and styles.
Result:-