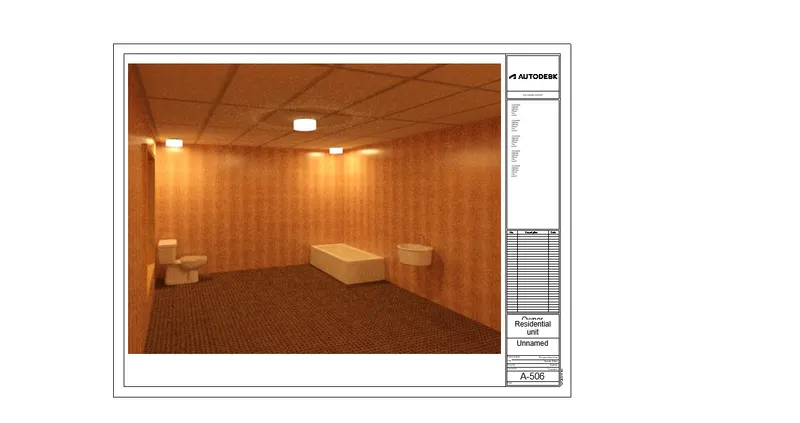
3D Creation of Celing, Roof, Architectural plan, Structural plan, Sectional view, Elevation view and Camera specific view for a house plan using REVIT
1) Based on the project saved from Week 3, proceed from the First Floor Level. Model a Ceiling from the architecture tab above the walls at the first-floor level
AIM:
To create a ceiling by using architectural tab over the walls created in week 3 drawings further proceed towards the first level
INTRODUCTION TO CEILING:
- Autodesk revit is building information modeling software for architects, structural engineers, MEP engineers, designers and contractors developed by autodesk.
- It allows user to design building and structure and its components in 3D
- Same like floors and roof revit offers ceiling tool consists of 3D geometry and non-graphical parameters, These are created by using dedicated ceiling tools.
- There are two types of method that revit offers us to create a ceiling over any walls and floors bottoms,
- Automatic ceiling
- Sketch ceiling
- Automatic ceiling - This will make revit to automatically detect where the bounding walls that enclose potential ceiling spaces. Revit is going to try and guess from our model where ceiling should be created.
- Sketch ceiling - This icon will allows we to sketch the ceiling manualy wherever we want we can sketch by picking any one of way in "draw palette" we can either pick a "pick line" option or "line" option or "rectangle" option and some other option that revit offers.
- This is a similiar process like creating of floor in revit software
- Ceilings are level based parameters it refers to a architectiral elements under architectural tab which means taht we can sketch them at a specified distance abouve the level in which they reside.
- you can create a singke ceiling in ground floor and that ceiling can transfered to multi level by using assigned to selected level option that revit offers to us.
TOOLS USED AND FUNCTION:
VIEW TAB:
- In the ribbon bar there is a option called "view" in the draw area each view has its own tab. we can title views so we can see multiple views at once,
- Using view tab we can render a images that we created a through a camera view, here we can make a sheets using the "view tab"
- similaerly we can add sections and elevations where ever we want so see the building.
- Revit offers various options that will improve our drawing " view tab" is most important one of the ribbon tabs
Navigation bar - we can use the stearing wheel, Project Browser, or View Cube to open a view and navigate to different areas of the model.
use the navigation wheel to zoom, rewind, pan etc, we can also do all these by using middle mouse scroll button.
The Project Browser - Located on the lower left of your Revit screen, the Project Browser acts as a table of contents for your project. Use it to navigate and open views of the model. You can organize, sort, filter, and customize the Project Browser to support your workflow.
The Properties - The Properties palette lets you view and modify parameters for selected elements. If no element is selected, it displays the properties of the current view. The palette appears by default to the left of the drawing area above the Project Browser.
Grids
- Grid lines are finite planes, We can drag their extents in elevation views so that they do not intersect level lines.
- This allows you to determine whether grid lines appear in each new plan view that you create for a project.
- Grids can be straight lines, arcs or multi-segmented. You can hide grid lines after you add them.
- Use the Grid tool to place column grid lines in the building design.
- We can then add columns along the column grid lines.
Levels
- Levels are finite horizontal planes that act as a reference for level-hosted elements, such as roofs, floors, and ceilings.
- Levels gives the option to create a new plan view associated with the new level. Ticking the box creates the new plan view and sets the level tag as blue, Un-ticking the box does not create a new plan view and sets the level tag as black. Gives the option to create either a floor plan, ceiling plan or both.
WALL - Use a Wall tool to create a non-bearing or structural wall in the building model. Like other basic elements in a building model, walls are instances of predefined system family types, which represent standard varieties of wall function, composition, and thickness
PROCEDURE
STEP 1
- Open revit software 2023, open the week 3 challenge that we saved in previous week
- For that on the right side of the revit there are some saved files open the Challenge-3 question-4 project by clicking on it.
- Now the choosen project will open in revit.
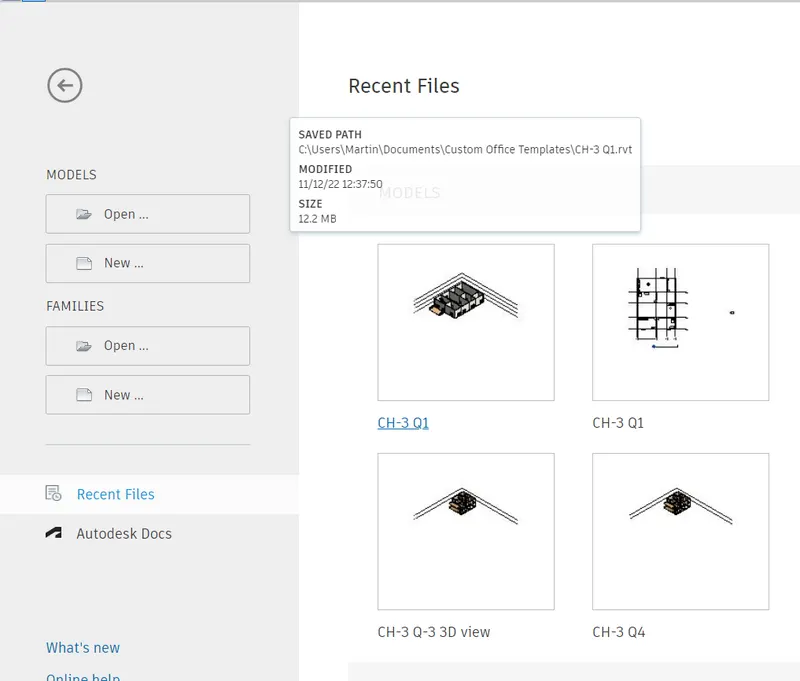
- Now the project that we are saved in the week 3 are opened
- In question they asking to create a ceiling and proceed to first floor level
- So we are going to create a ceiling using architectural too bar
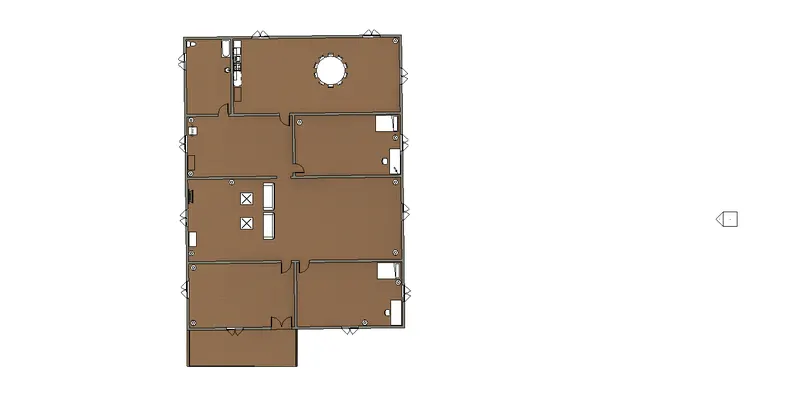
STEP 2
CREATING CEILING:
- First go to the "ribbon tab" and click on "Architectural tab".
- There is a icon shows as "ceiling" click on it
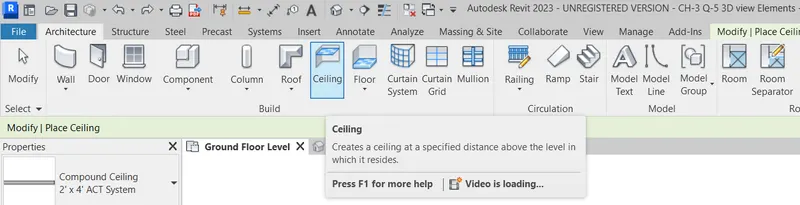
- Now go to the "Project browser" and under the "floor plan" select the "ground floor" option
- Then by using any of the tools in "Draw pannel" option we can draw ceiling, here i have picked the "Pick line" option
- Pick the Corner line of all the sides of wall it will mark a boundary now the ceiling is created
- Now on the ribbon tab click on the "tick" icon to close the ceiling
- You can check it in default 3D view to see the created ceiling
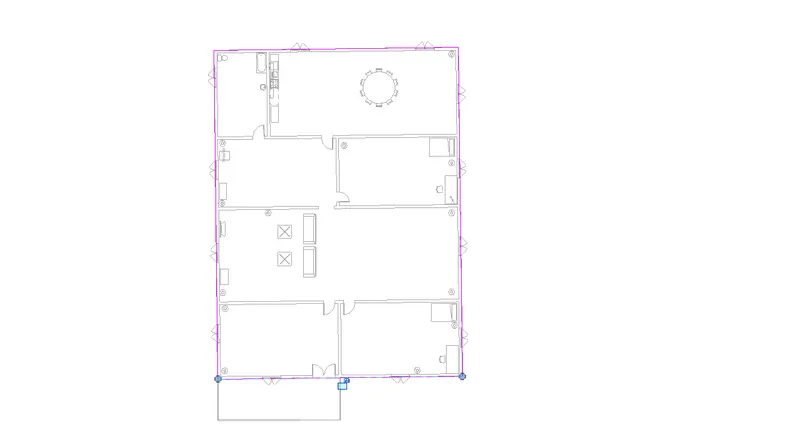
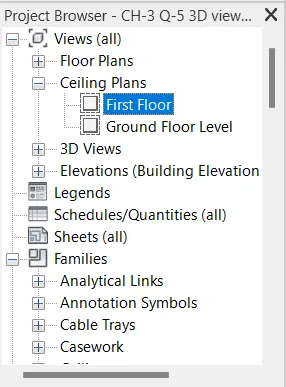
- To ensure that ceiling is created go to the "project browser" click on ceiling (+) icon under the ceiling there is option ground floor ceiling
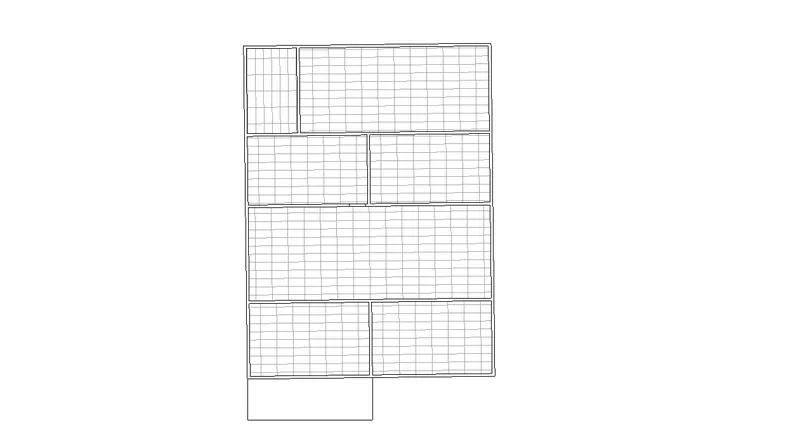
- Click on it then the created ceiling will be visible as shown in the below
STEP 3
Created First Floor:
- To create a floor over the ceiling go to "Project browser" > set to floor plan- ground floor
- Now select the ground floor drawings on the above in "ribbon" click on filter icon
- And select what are all the things you need to copy to first level
- Then go to "ribbon bar > click -"copy to clipboard" > ckick on "paste"-drop down > select "Aligned to selected levels"
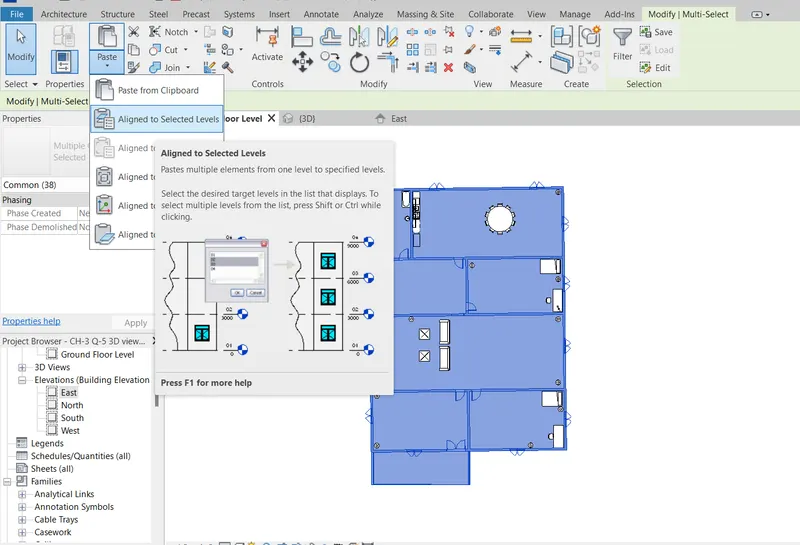
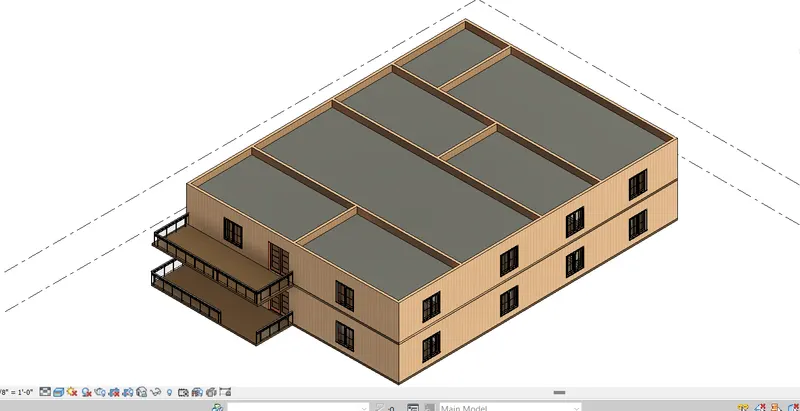
- Now the ground floor plan is copied to the first floor plan along with the ceilings
RESULT:
The ceiling is created using architectural tab abouve the wall and proceded to first floor levels.
GROUND FLOOR CEILING PLAN
3D VIEW OF CEILING WITH WALL
2) Model a roof above the ceiling by selecting the footprints of the ceiling. Using the adjustment toolbars appearing on-screen adjust the roof slope to 10 degrees
AIM:
To model a roof above the ceiling by using the roof by foot print option under roof tab and to adjuss the slope of the roof created
INTRODUCTION:
- Autodesk Revit is a building information modeling software tool for architects, landscape architects, structural engineers, mechanical, electrical, and plumbing (MEP) engineers, designers, and contractors.
- Roof, covering of the top of a building, serving to protect against rain, snow, sunlight wind, and extremes of temperature.
- Roofs have been constructed in a wide variety of forms flat, pitched, vaulted, domed, or in combinations as dictated by technical, economic, or aesthetic considerations, The earliest roofs constructed by man were probably thatched roofs that were made of straw, leaves, branches, or reeds; they were usually set at a slope, or pitch, so that rainfall could drain off them.
- Conical thatched roofs are a good example of this type and are still widely used in the rural areas of Africa and elsewhere.
- Thicker branches and timbers eventually came to be used to span a roof, with clay or some other relatively impermeable substance pressed into the interstices between them.
- Gabled and flat roofs were possible with these materials. With the invention of brick and cut stone for building, the basic roof forms of the dome and vault
PROCEDURE
STEP 1
CREATING ROOF:
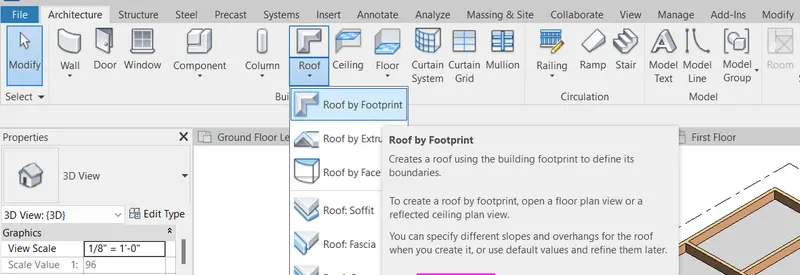
- To create a roof over the first floor created go to the "Architectural tab" > Click on - "Roof" drop down > select "Roof by footprint" options
- After clicking on roof by footprint option there are varies of draw tool revit offers to create a roof
- We can draw br using "line" option , "rectangle option", "pick line option"
STEP 2
CREATING ROOF BOUNDARY:
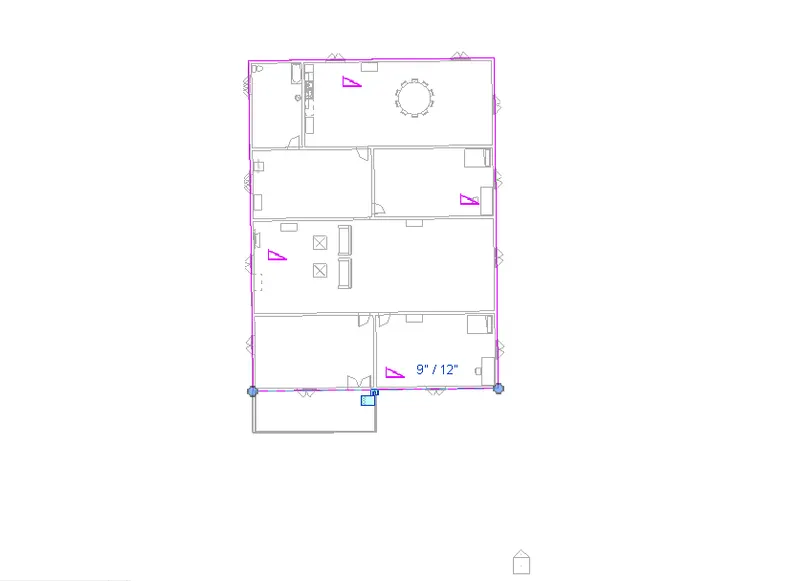
- First go to "project browser" set the flor plan view to ground floor
- In "draw pannel" i have selected the "pick line" option to create a roof
- Create a roof by using pick line option a boundary has created. click the "tick" mark to close the roof tab
STEP 3
COPYING TO ROOF LEVEL:
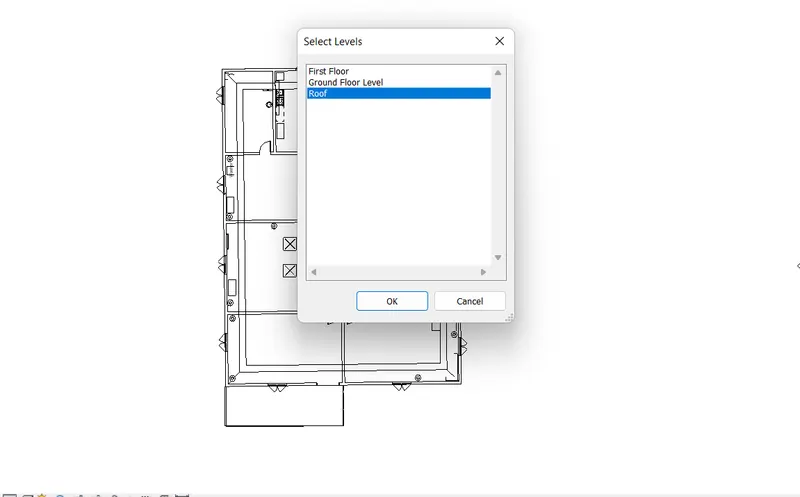
- Select the entire drawing and using "Filter" icon unclick all othe relements only roof is selected
- Now go to the ribbon > click-"copy to clipboard" > "paste"- drop down > select "align to selected levels"
- Select the "Roof" option to copy to the roof
STEP 4
ADGUSS SLOPE OF ROOF:
- To adjuss the slope of the roof to 10 degree, first need to set the units to degree
- Command "UN" > under- slope > select to the degree.
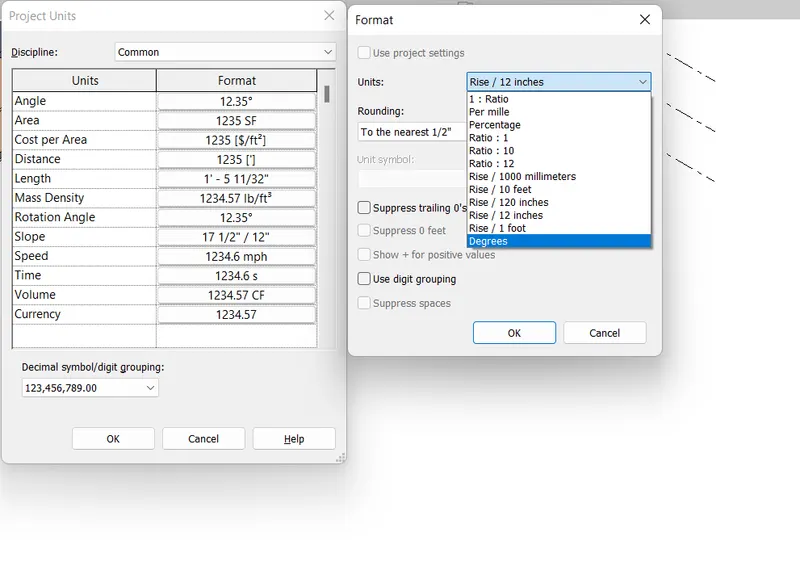
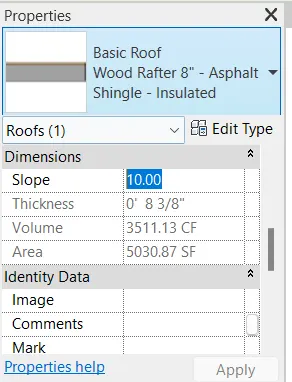
- Then click on the roof and select the roof
- Now go to "properties browser" > slope > change to 10 degree
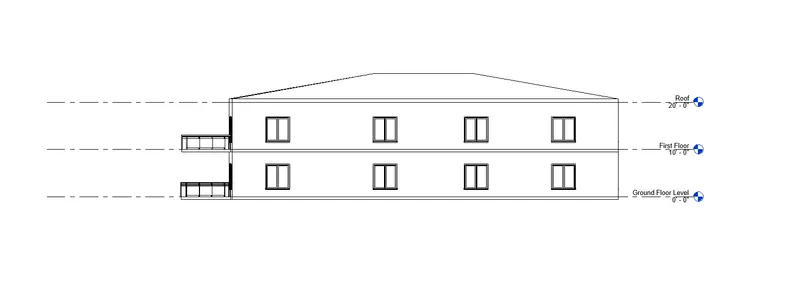
- The slope height is now changed to 10 degree
RESULT:
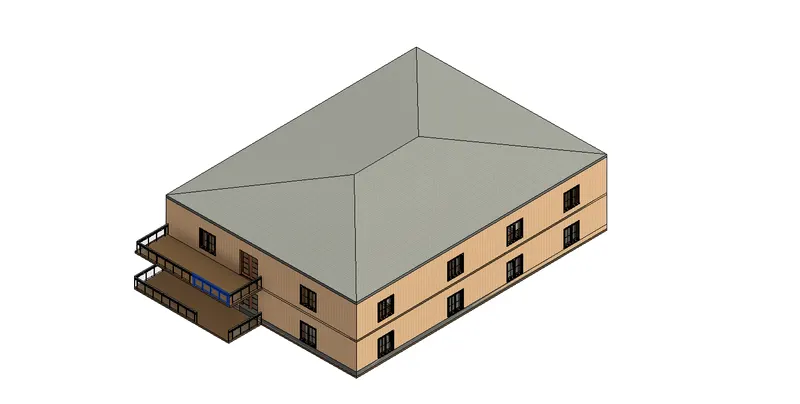
The roof is created over the ceiling using roof by footprint option under architectural tab.
ELEVATION VIEW OF ROOF
3D REALISTIC VIEW
3) Using the file saved from weeks 2 to 4, create plan views for ground floor level and first-floor level including all the walls, floors, and components. Separate them to
architecture and structural plans
AIM:
To create plan views for ground floor level and first-floor level including all the walls, floors, and components.
And to Separate them to architecture and structural plans.
INTRODUCTION:
- The structural plan view is the default view when you start a new project using a structural template.
- Most projects include at least one structural plan. New structural plan views are created automatically as you add new levels to your project. You can create multiple structural plan view types.
- The floor plan view is the default view in a new architectural project.
- Most projects include at least one floor plan.
- Floor plan views are created automatically as you add new levels to your project.
PROCEDURE:
STEP 1
- Open the drawing saved in week-3
- And now create a architectural plan go to "View tab" > click "plan view"- drop down > select - "Floor plan"
- Now "new floor plan" dialog box will appear, set the Type to " floor plan" > click ok
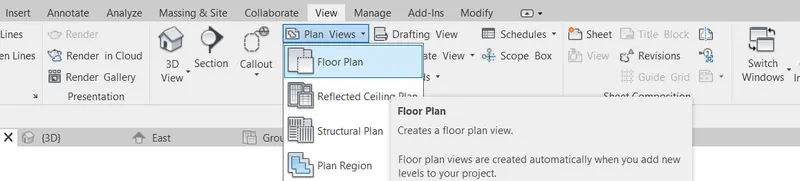
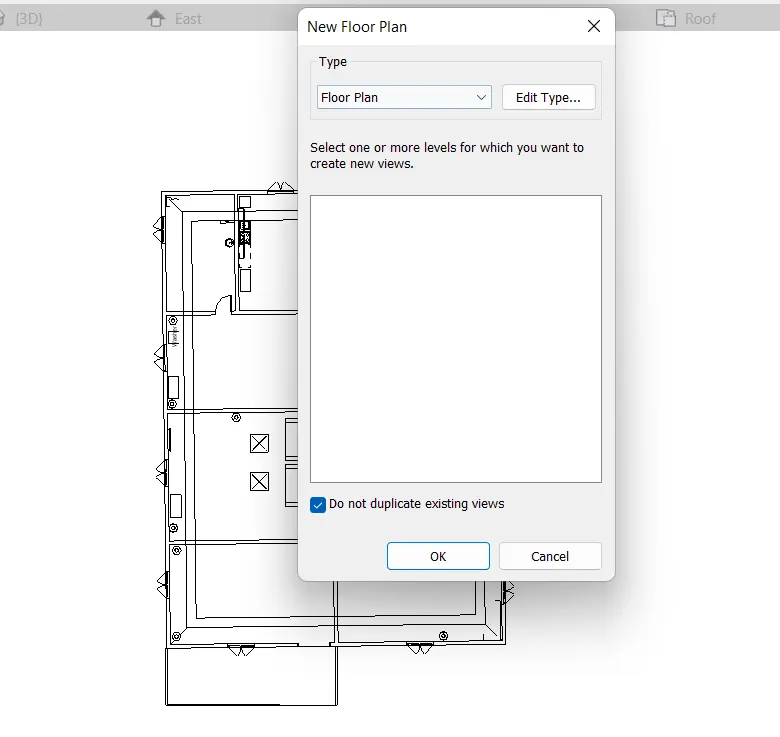
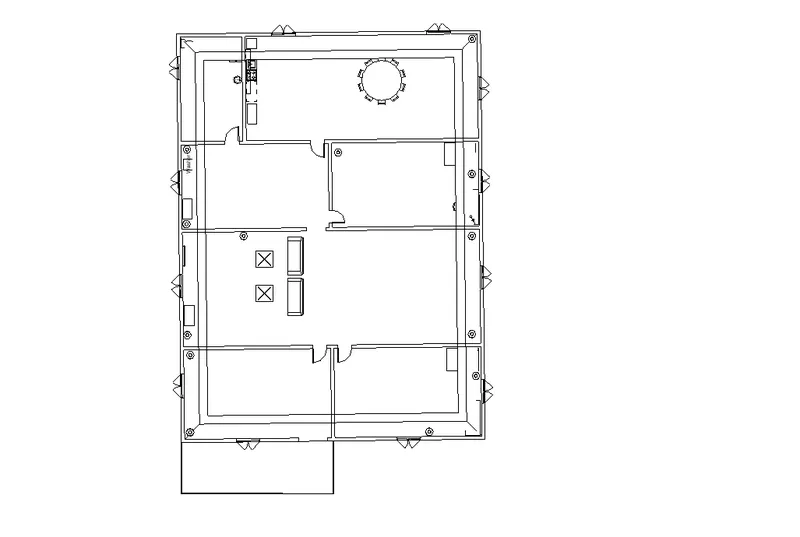
- Now the architectural floor plan view is created like in below figure
- Architectural floor plan include walls, windows, doors, elements and components
- All the components are visible in architectural floor plan view as in below.
STEP 2
CREATING STRUCTURAL PLAN:
- similiarly for creating structural plan go to "view tab" > under "plan view" drop-down > select the "structural plan"
- A new structural plan dialog box will appear set to the structural plan view and click ok
- Now the structural view of plan will be shown
- You can see this under "structural tab" in "project browser"
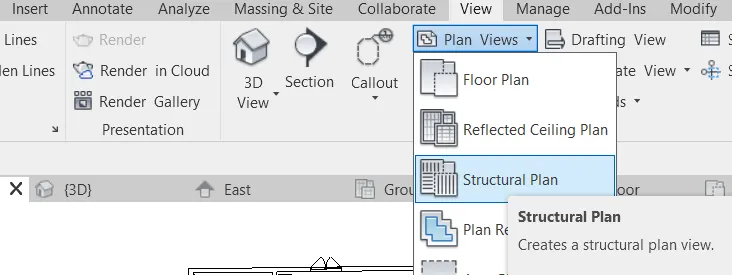
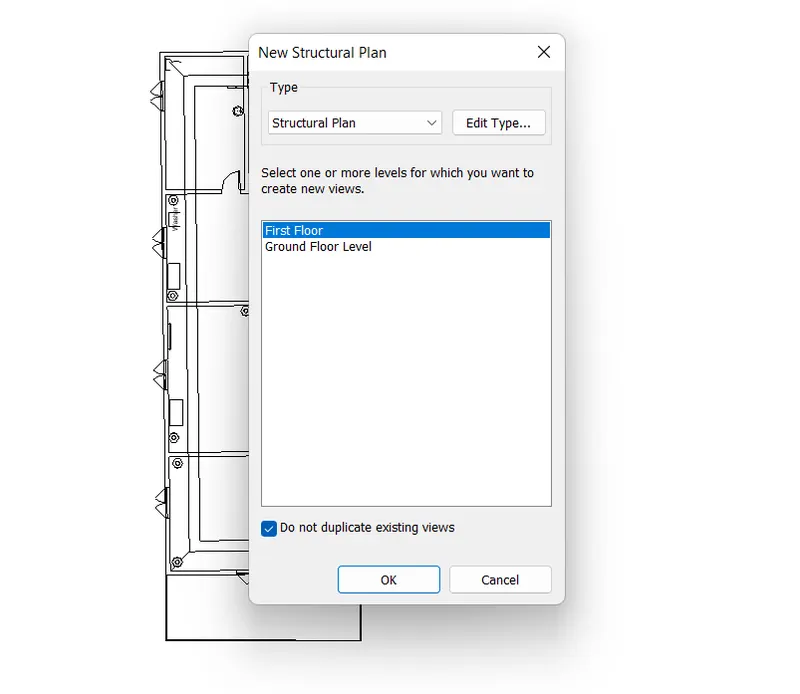
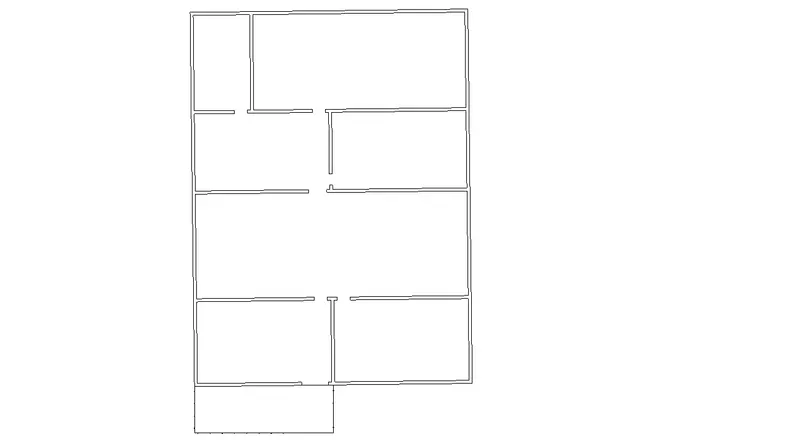
- The structural plan view is shown as in below
- In structural plan view only the structural elements like walls, beams and columns are visibile
RESULT:
All plan views for ground floor level and first-floor level including all the walls, floors, and components are created seperately as structural plan and architectural plan views.
4) Using annotate toolbar add dimensions to all the walls and floors with reference to the longitudinal and transverse grids created in the project file
AIM:
To add dimensions to all the walls and floors with reference to the longitudinal and transverse grids created in the project file.
INTRODUCTION:
- The structural plan view is the default view when you start a new project using a structural template.
- Most projects include at least one structural plan. New structural plan views are created automatically as you add new levels to your project. You can create multiple structural plan view types.
- Go to view tab under view plan drop down select the structural option to see the structural plan view of drawing
- The floor plan view is the default view in a new architectural project. Most projects include at least one floor plan.
- Floor plan views are created automatically as you add new levels to your project.
PROCEDURE
STEP 1
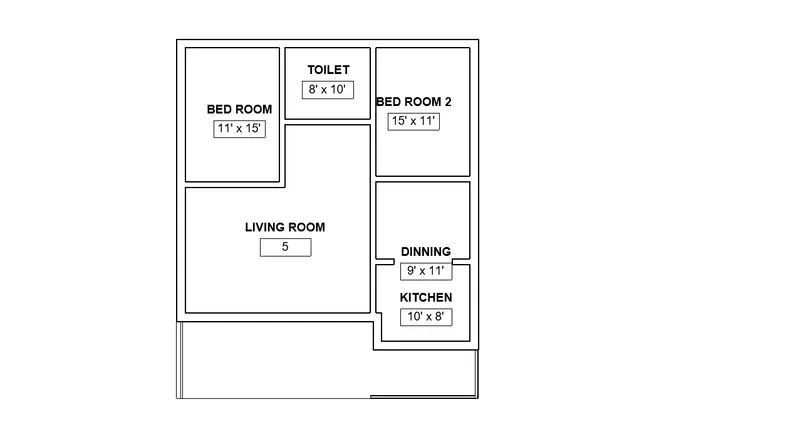
- Open a new architectural template with imperial units
- Go to "Architectural tab" and select the wall components drop down button, and click on the "Architectural wall"
- For placing the outer wall, select the our wall type as "Generic-12'' using "Properties browser" and wall are created along with location line as- finish face exterior.
- For internal partition wall, in properties browser select the wall type to - Generic - 8'' and the partion wall are drawn which divides our unit with their respective rooms.
- Then Room tags are made to represent the particular room type and dimensions using "Room tag" icon
STEP 2
- For architectural plan view we have taken over all dimensions
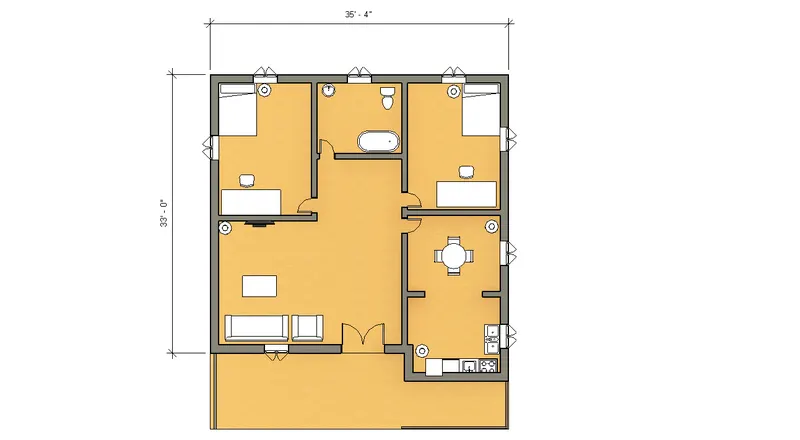
- To mark a dimension fo to "Annotate tab" > dimension "linear" / "Aligned" is choosen
- Here i have choosen both of them to place a dimension according to the grids
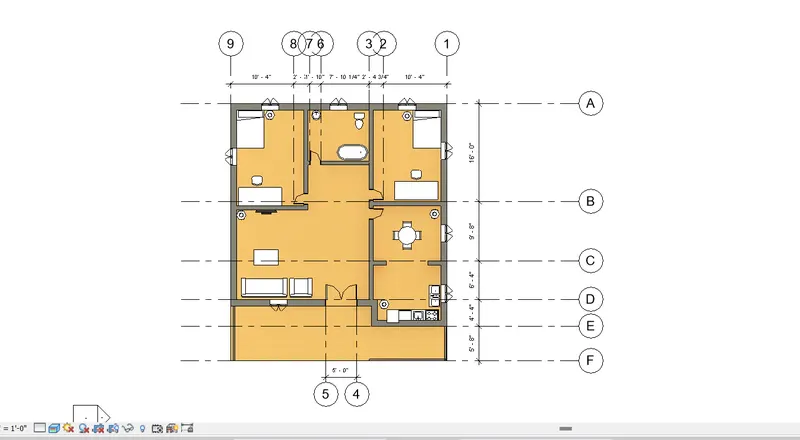
- The below figure shows the two architectural plan drawings and there dimensions
- Here we drawn the longitudinal and transverse grids to the architectural floor plans as shown below.
- And add the dimensions to the architectural plans as shown below.
STEP 3
For "structural plan"
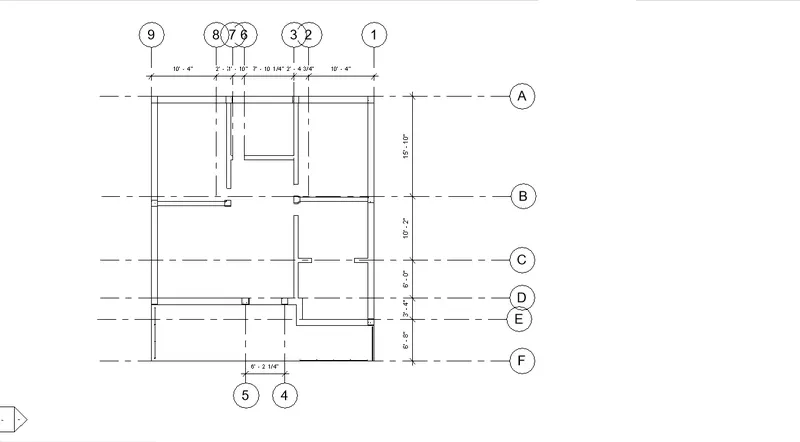
- Next we draw the longitudinal and transverse grids to the Structural floor plans as shown below.
- And add the dimensions to the Structural plans as shown below.
RESULT:
- The dimensions are added to the structural floor plans and the architectural floor plans.
- And the longitudinal and transverse grids are also created in the project file.
5) Create a sheet template from the view tab and adjust the parameters on the sheet to add appropriate views
AIM:
To create a sheet template from the view tab and adjust the parameters on the sheet to add appropriate views.
INTRODUCTION:
- Create views on a project template before you start building the model to streamline the project documentation process.
- When creating a project template, you can include sheets in the template. Start with a blank project file, and create the standard views and levels that each project should include.
- Leave the views empty, but assign standard names to them. To create a standard set of construction documents, create sheets using the desired title blocks.
- Add views to the sheets, using the desired viewport templates and view title types.
- Then save the empty project as a project template.
- When you create a project using this project template, all of the views and sheets are already created and listed in the Project Browser.
- As you start to draw the building model in the project views, the views on the sheets update automatically.
- This technique streamlines the project documentation process and maintains organizational standards.
PROCEDURE
STEP 1
CREATING A SHEET:
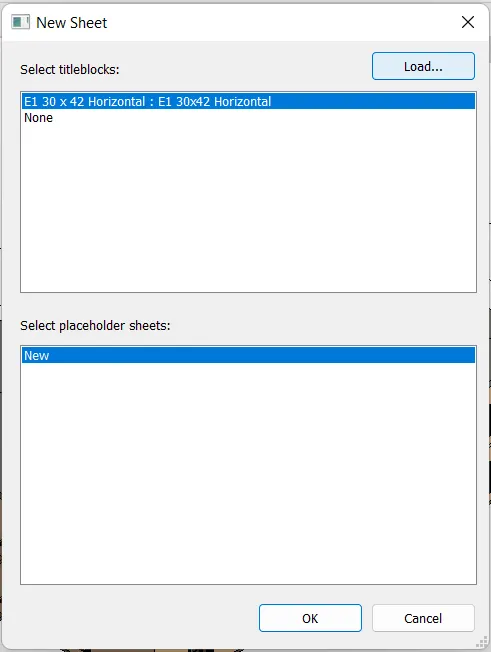
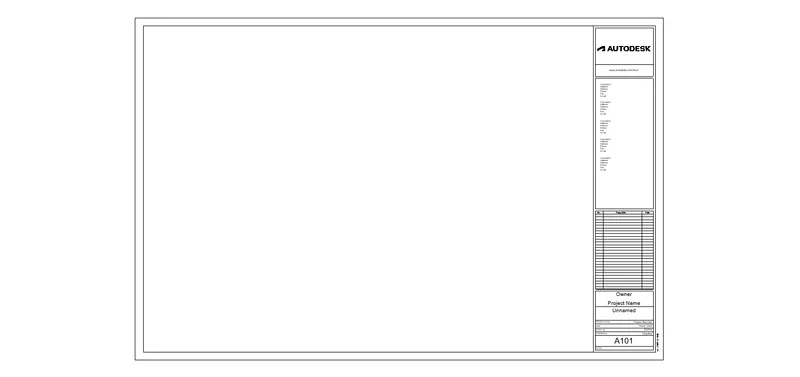
To create a sheet go to the "View tab" > click on -"sheet" a load > a new sheet option will open > click on - "load"
we need to load some more sheets into the file so that we can choose the sheet accordily our needs.

STEP 2
LOADING SHEET
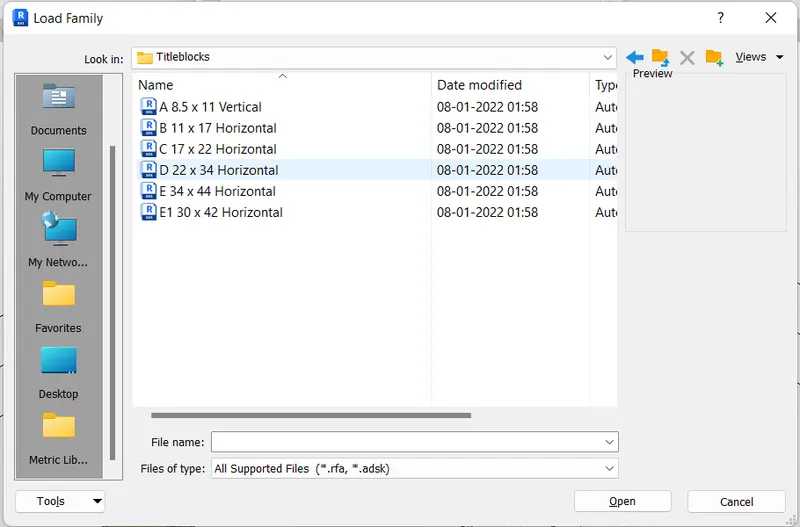
- To load the sheet after clicking "load" option in new sheet dialog box > go to "english imperial " > click on "Title block" under this there are several sheets available
- I have selected the "D 22x34 horizontal sheets.
- Click on "open" now the sheets is loaded in the new sheet dialog box
- Click on the " D22x34 sheet and seleck ok to load into our drawings
STEP 3
INSERTING GROUND FLOOR PLAN TO SHEET:
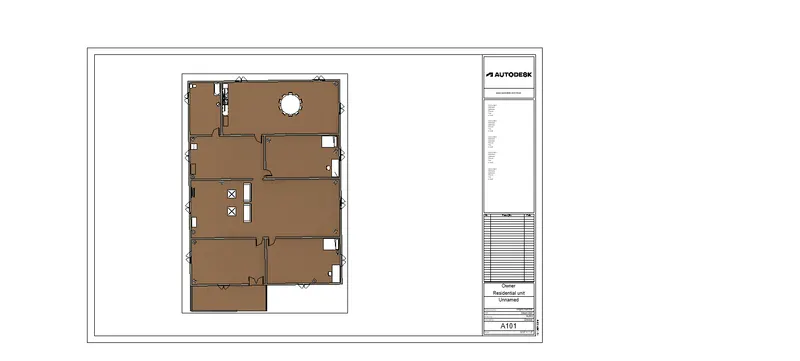
- To insert the drawing "right click on sheet" > select the "add view" then select the view that you want to insert in the sheet
- Another way of inserting is the drawing is go to the " project browser" > select the any view > select the ground floor plan view > drag the ground floor to the sheet.
- Then we can adjuss the drawing size by using the scale option
- Click on the drawing > go to "properties" > click on "scale" drop down > choose appropriate sclae which suites in to sheet
- I have inserted the ground floor plan view of residential bulding
- All the informations of the sheet are edited by using "Project information"
STEP 4
INSERTING 3D VIEW TO SHEET:
- Using "viewtab " load the another sheet from the "Title bar"
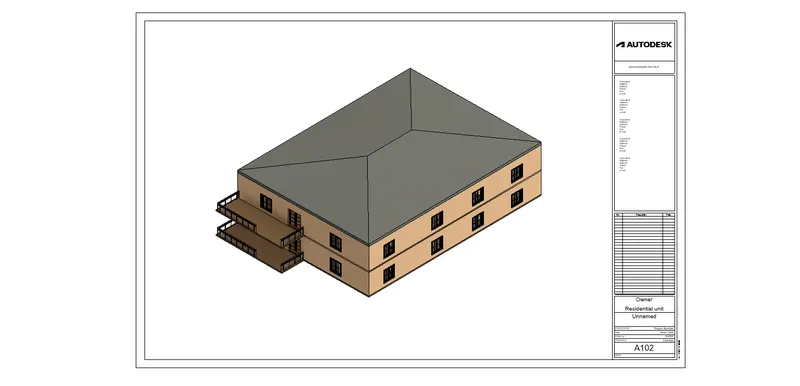
- To insert the drawing "right click on sheet" > select the "add view" then select the view that you want to insert in the sheet
- Another way of inserting is the drawing is go to the " project browser" > select the any view > select the3D view > drag the ground floor to the sheet.
- Then we can adjuss the drawing size by using the scale option
- Click on the drawing > go to "properties" > click on "scale" drop down > choose appropriate sclae which suites in to sheet
- I have inserted the ground floor plan view of residential bulding
- All the informations of the sheet are edited by using "Project information"
RESULT:
The drawing sheets are created using view tab and all the parameters are adjussed and views are inserted to the sheets.
GROUND FLOOR PLAN
3D VIEW
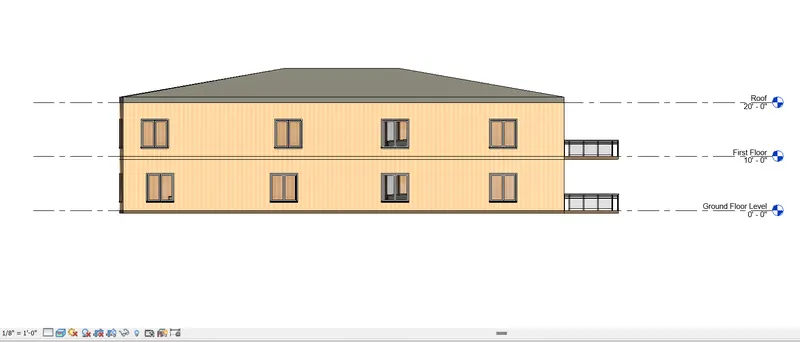
6) Using the elevation tab create the elevation views, looking at your building from East, North, South, and West
AIM:
To create the elevation views, looking at your building from East, North, South, and West using the elevation tab.
INTRODUCTION:
- An elevation is a view of a building seen from one side, a flat representation of one view.
- This is the most common view used to describe the external appearance of a building.
- Each elevation is labelled in relation to the compass direction it faces, e.g. looking toward the north you would be seeing the southern elevation of the building.
PROCEDURE
STEP 1
PLACING OF ELEVATION VIEW:
- To place the elevation views in east, west, north, south sides
- Go to "View tab" > then click on "Elevation" > and place the elevation in all the sides
- The placed evevation view of all the side are shown in the pricture.
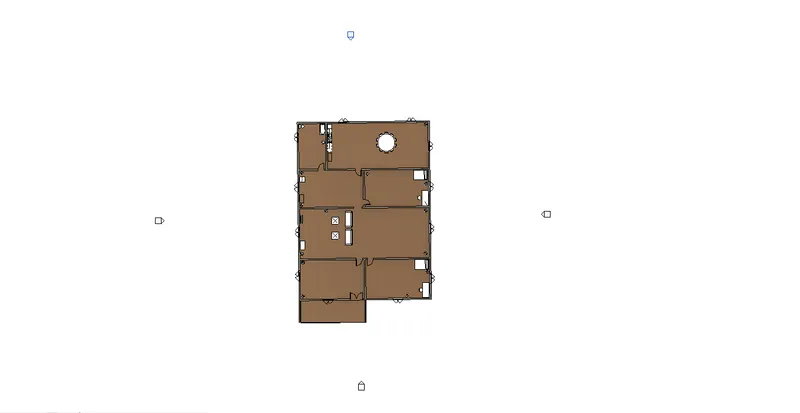
- The inserted eleation view of east, west, noth, south are shown in figure below
- Go to "project browser" > click on "elevation + icon > all the loaded elevation views are shown
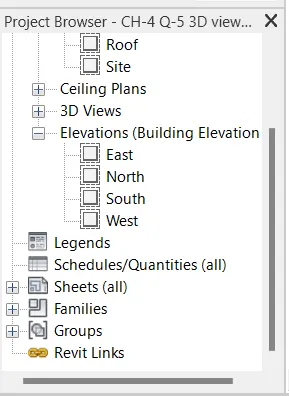
EAST ELEVATION
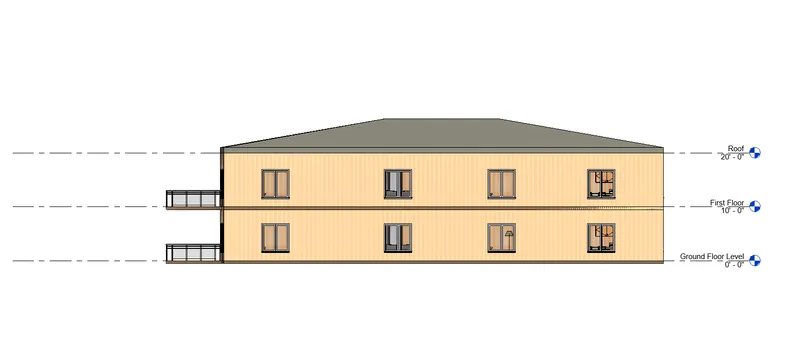
NORTH ELEVATION
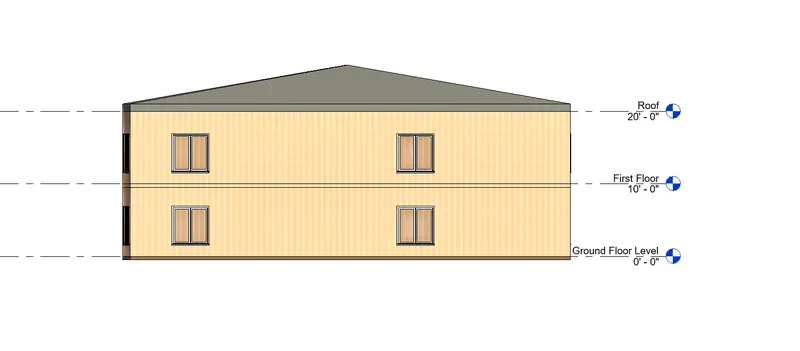
SOUTH ELEVATION
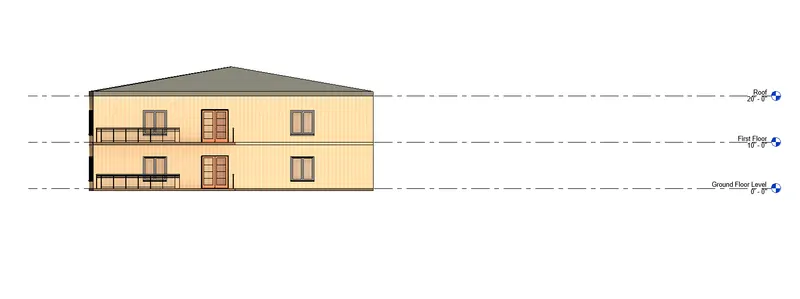
WEST ELEVATION
RESULT:
The elevation view of east, west, north, south views are inserted using elevation option.
7) Produce section cut through each room either cutting across longitudinally or in a transverse direction
AIM:
To produce section cut through each room either cutting across longitudinally or in a transverse direction.
INTRODUCTION:
- Sectional views reveal hidden details in a mechanical drawing.
- These views assume that a cutting plane has removed portions of the object represented by the drawing, displaying the appropriate section of the interior.
- Sectional views are used in engineering and architectural drawings.
- They help civil engineers, architects, and airplane designers communicate their ideas to their peers.
PROCEDURE
STEP 1
CREATING SECTIONAL CUT:
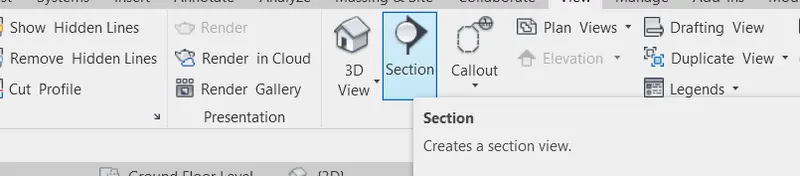
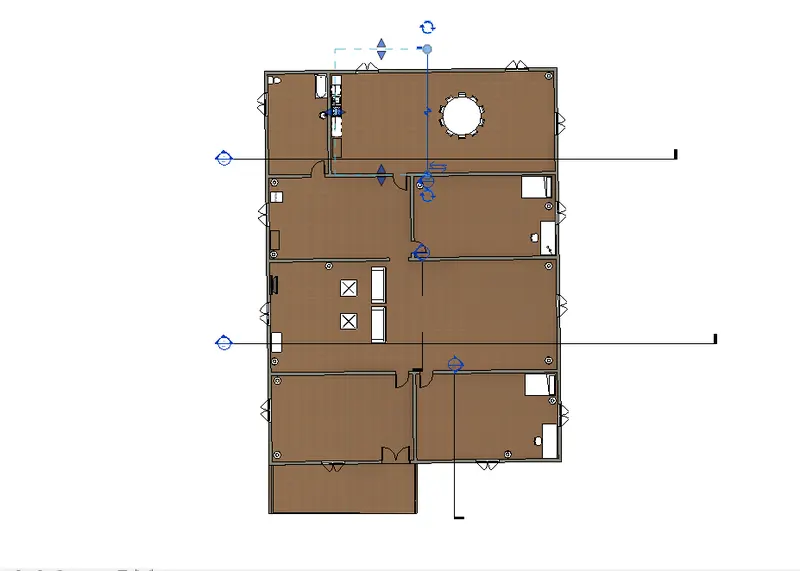
- To create a section cut go to the "view tab" > and click on "section" > and place the section on each room
- Click on the room and then drag the line to either longitudinaly or transversly
STEP 2
- First we click on the section option from the view toolbar, as shown below.
- Next we produce the section view of the bed room as shown in the below figure.
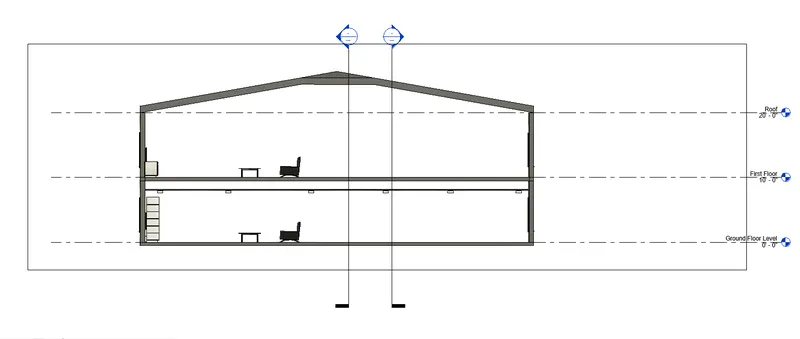
HALL TRANSVERSE VIEW:
- To see the created sectional view,
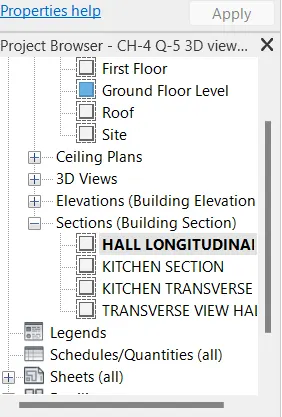
- We need to go to "project browser" > then under "section (+)" > all the loaded section views are seen there
- Click on the saved hall transverse sectional view
KITCHEN TRANSVERSE VIEW:
- To see the created sectional view,
- We need to go to "project browser" > then under "section (+)" > all the loaded section views are seen there
- Click on the saved kitchen transverse sectional view to open
- The sectional view of kitchen is shown in the below drawing
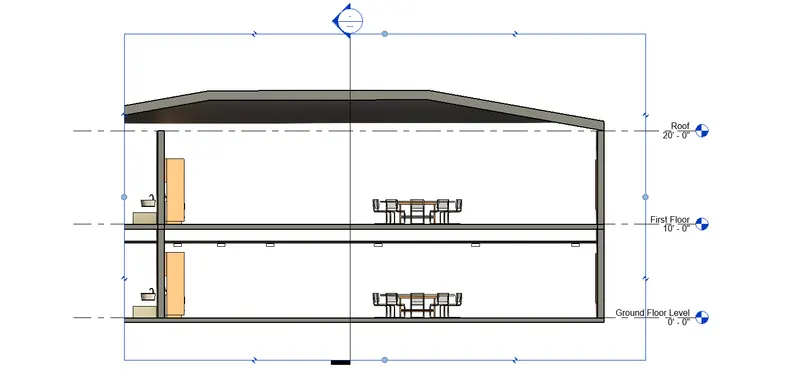
SECTION VIEW OF HALL LONGITUDINAL:
- To see the created sectional view,
- We need to go to "project browser" > then under "section (+)" > all the loaded section views are seen there
- Click on the saved hall longitudinal sectional view to open
- The sectional view of kitchen is shown in the below drawing
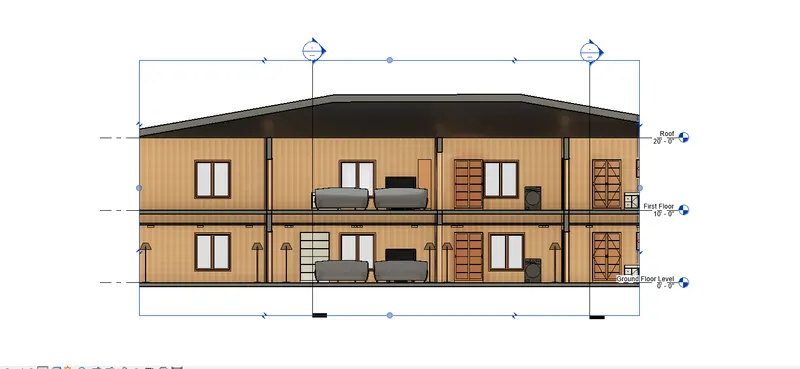
RESULT:
All the sectional views of room both longitudinal as well as transverse are created.
8) Classify the views, Plan Views, Section Views, and Elevation views to either Design or Documentation category using Properties browser
AIM:
To classify the views, Plan Views, Section Views, and Elevation views to either Design or Documentation category using Properties browser.
INTRODUCTION:
- The structural plan view is the default view when you start a new project using a structural template.
- Most projects include at least one structural plan. New structural plan views are created automatically as you add new levels to your project. You can create multiple structural plan view types.
- The floor plan view is the default view in a new architectural project. Most projects include at least one floor plan.
- Floor plan views are created automatically as you add new levels to your project.
- Sectional views reveal hidden details in a mechanical drawing.
- These views assume that a cutting plane has removed portions of the object represented by the drawing, displaying the appropriate section of the interior.
- Sectional views are used in engineering and architectural drawings.
- They help civil engineers, architects, and airplane designers communicate their ideas to their peers.
- An elevation is a view of a building seen from one side, a flat representation of one view.
- This is the most common view used to describe the external appearance of a building.
- Each elevation is labelled in relation to the compass direction it faces, e.g. looking toward the north you would be seeing the southern elevation of the building.
PROCEDURE
STEP 1
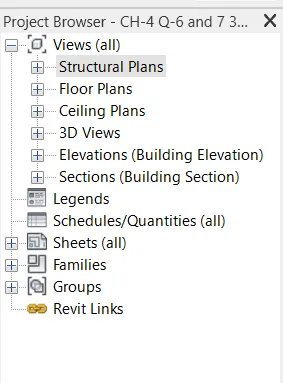
- The Project browser has all the views that we have saved, here we can assess all the view from here itself
- In the view we create 6 types of views that are Structural plans, Floor Plans, Ceiling plans 3D views, Elevation, and sections.
STEP 2
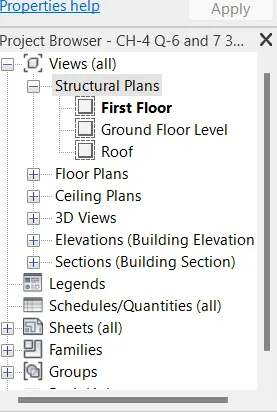
- Go to the Project Brower and open the structural plan by clicking the + icon which is present in front of the structural plan
- Two views are created in the structural plan as shown in the picture.
STEP 3
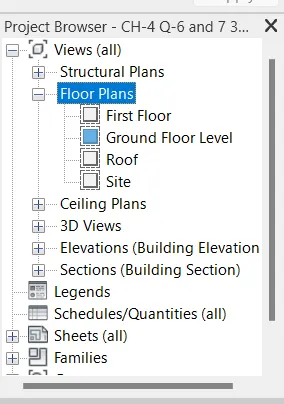
- Go to the Project Brower open the Floor plan by clicking the + icon which is present in front of the Floor plan
- Four views are created in the Floor plan as shown in the picture.
STEP 4
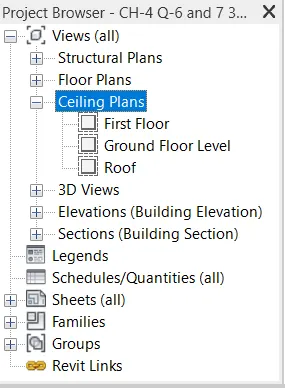
- Go to the Project Brower open the Ceiling plan by clicking the + icon which is present in front of the Ceiling plan
- Two views are created in the Ceiling plan as shown in the picture.
STEP 5
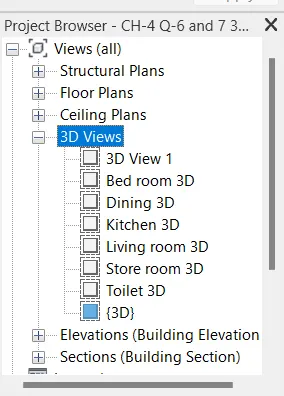
- Go to the Project Brower open the 3D Views by clicking the + icon which is present in front of the 3D Views
- These views are created in the 3d Views as shown in the picture.
STEP 6
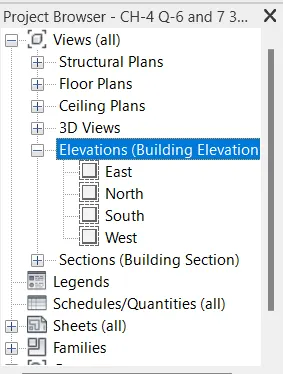
- Go to the Project Brower open the Elevation by clicking the + icon which is present in front of the Elevation
- These views are created in the Elevation as shown in the picture.
STEP 7
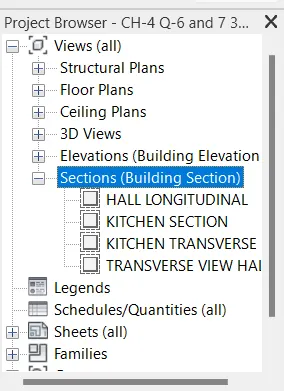
- Go to the Project Brower open the Sections by clicking the + icon which is present in front of the Sections
- These views are created in the Sections as shown in the picture.
RESULT:
The plan view (Architectural, Structural), section view, elevation view, are classifed using "project browser".
9) Using the sheet template produced create multiple sheets as follows
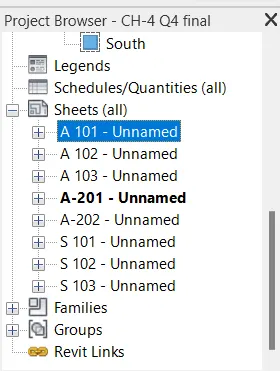
a. A 101- Ground Floor Architecture Plan
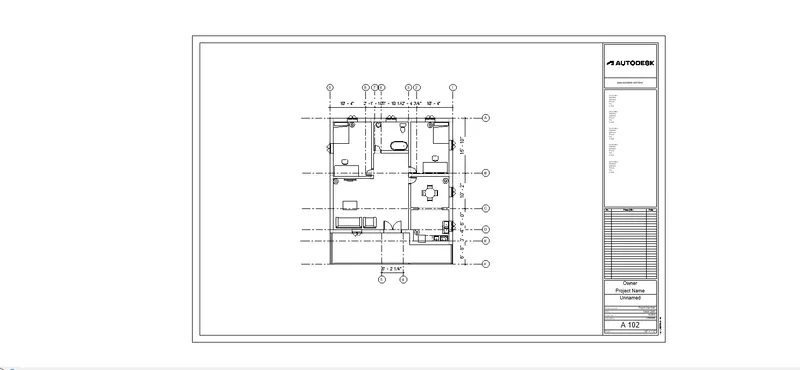
b. A 102- First Floor Architecture Plan
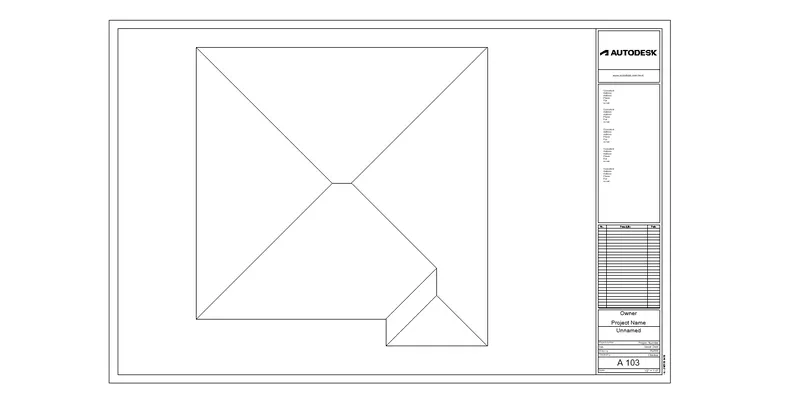
c. A 103- Roof Plan
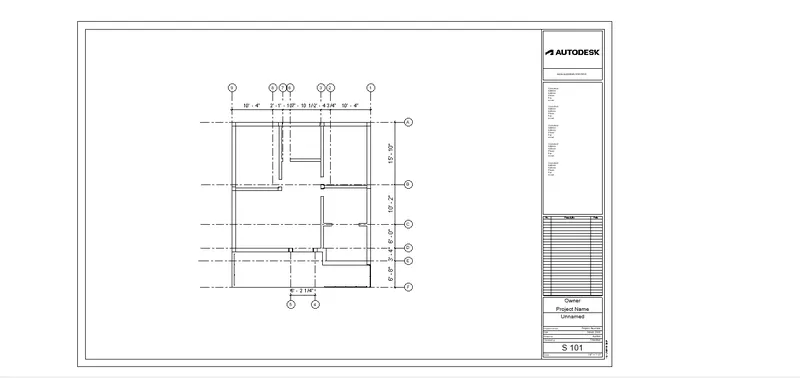
d. S 101- Ground Floor Structural Plan
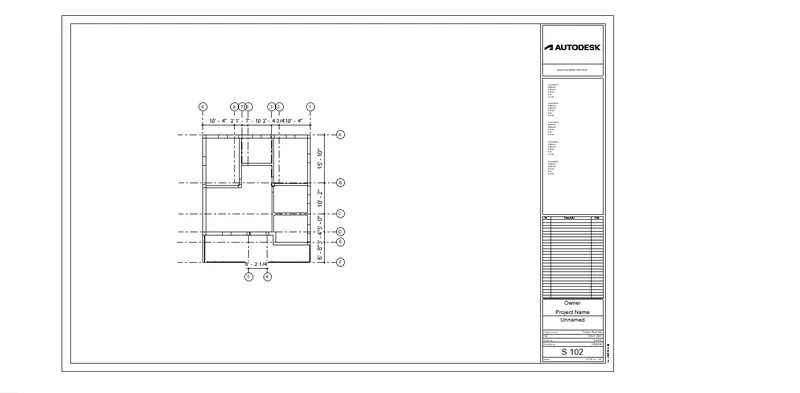
e. S 102- First Floor Structural Plan
f. S 103- Roof Framing Plan
g. A-201- North-South Elevations
h. A-202- East-West Elevations
AIM:
To create the multiple sheets and produce the drawings in the sheets, from the given drawing list.
INTRODUCTION:
- Create views on a project template before you start building the model to streamline the project documentation process.
- When creating a project template, you can include sheets in the template. Start with a blank project file, and create the standard views and levels that each project should include.
- Leave the views empty, but assign standard names to them. To create a standard set of construction documents, create sheets using the desired title blocks.
- Add views to the sheets, using the desired viewport templates and view title types.
- Then save the empty project as a project template.
- When you create a project using this project template, all of the views and sheets are already created and listed in the Project Browser.
- As you start to draw the building model in the project views, the views on the sheets update automatically.
- This technique streamlines the project documentation process and maintains organizational standards.
PROCEDURE
STEP 1
TO CREATE A SHEET:
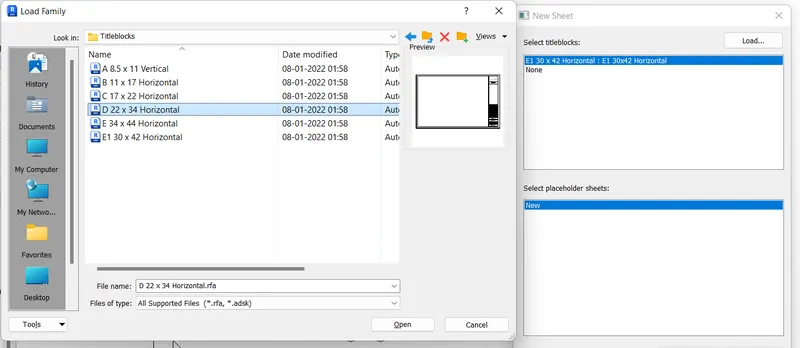
- To load the sheet after clicking "load" option in new sheet dialog box > go to "english imperial " > click on "Title block" under this there are several sheets available
- I have selected the "D 22x34" horizontal sheets.
- Click on "open" now the sheets is loaded in the new sheet dialog box
- Click on the " D22x34" sheet and seleck ok to load into our drawings
STEP 2
LOADING DRAWING
a. A 101- Ground Floor Architecture Plan
- After loading the sheet in tho the screen, then we need to insert a view in to the sheet
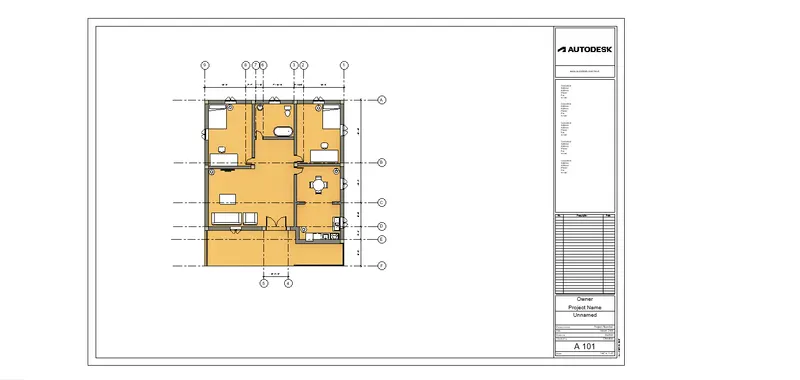
- Go to "Project browser" > under- floor plan - click on "ground floor plan" > right click on it and > select "Add view"
- Now select the view i,e "ground floor plan" and insert to the sheet
- If the drawing is very small to adjuss the size go to the "properties" > scale > set the appropriate scale which sets to sheet
STEP 3
b. A 102- First Floor Architecture Plan
- After loading the sheet in tho the screen, then we need to insert a view in to the sheet
- Go to "Project browser" > under- floor plan - click on "first floor plan" > right click on it and > select "Add view"
- Now select the view i,e "First floor plan" and insert to the sheet
- If the drawing is very small to adjuss the size go to the "properties" > scale > set the appropriate scale which sets to sheet
STEP 4
c. A 103- Roof Plan
- After loading the sheet in tho the screen, then we need to insert a view in to the sheet
- Go to "Project browser" > under- floor plan - click on "Roof plan" > right click on it and > select "Add view"
- Now select the view i,e "ground floor plan" and insert to the sheet
- If the drawing is very small to adjuss the size go to the "properties" > scale > set the appropriate scale which sets to sheet
STEP 6
d. S 101- Ground Floor Structural Plan
- After loading the sheet in tho the screen, then we need to insert a view in to the sheet
- Go to "Project browser" > under- "Structural plan" - click on "ground floor plan" structural > right click on it and > select "Add view"
- Now select the view i,e "ground floor structural plan" and insert to the sheet
- If the drawing is very small to adjuss the size go to the "properties" > scale > set the appropriate scale which sets to sheet
STEP 6
e. S 102- First Floor Structural Plan
- After loading the sheet in tho the screen, then we need to insert a view in to the sheet
- Go to "Project browser" > under- Structural plan - click on "first floor plan" > right click on it and > select "Add view"
- Now select the view i,e "First floor plan" structural and insert to the sheet
- If the drawing is very small to adjuss the size go to the "properties" > scale > set the appropriate scale which sets to sheet
STEP 7
f. S 103- Roof Framing Plan
- After loading the sheet in tho the screen, then we need to insert a view in to the sheet
- Go to "Project browser" > under- floor plan - click on "ground floor plan" > right click on it and > select "Add view"
- Now select the view i,e "ground floor plan" and insert to the sheet
- If the drawing is very small to adjuss the size go to the "properties" > scale > set the appropriate scale which sets to sheet
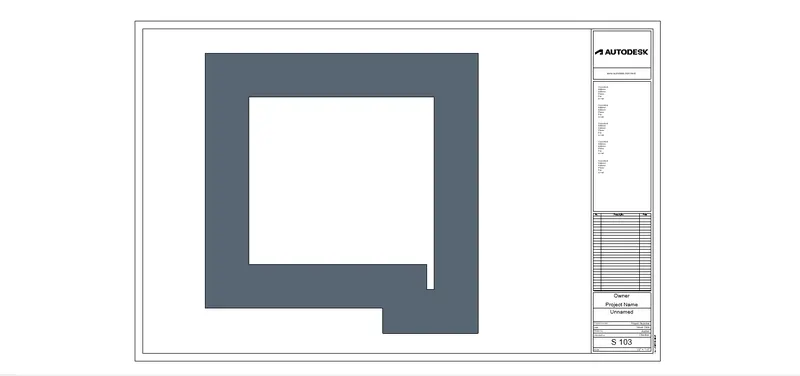
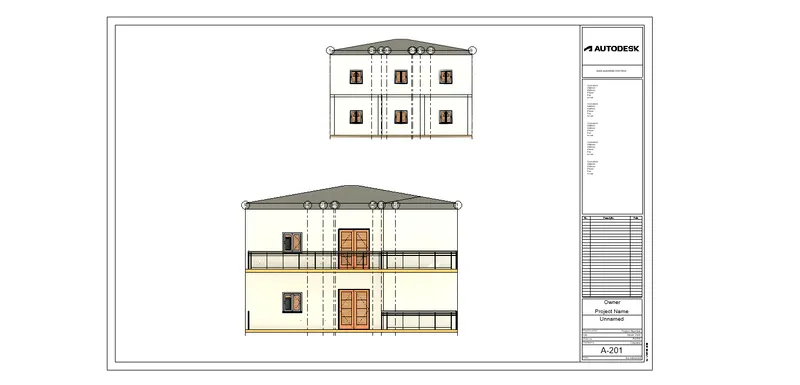
STEP 8
A-201 NOETH SOUTH
- After loading the sheet in tho the screen, then we need to insert a view in to the sheet
- Go to "Project browser" > under- "ELevation view" - click on "Elevation north" > right click on it and > select "Add view"
- Now select the view i,e "elevation north" and insert to the sheet
- If the drawing is very small to adjuss the size go to the "properties" > scale > set the appropriate scale which sets to sheet
- similarly for south elevation view g to "Project browser" > under- "ELevation view" - click on "Elevation south" > right click on it and > select "Add view"
- Now select the view i,e "elevation south" and insert to the sheet
- If the drawing is very small to adjuss the size go to the "properties" > scale > set the appropriate scale which sets to sheet
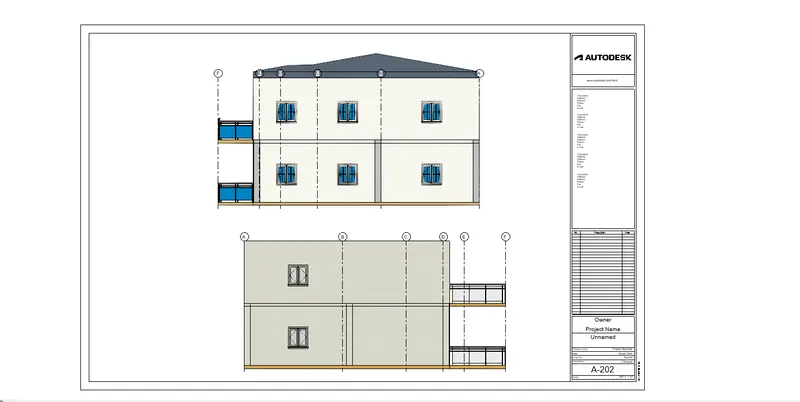
h. A-202- East-West Elevations
EAST WEST A-202
- After loading the sheet in tho the screen, then we need to insert a view in to the sheet
- Go to "Project browser" > under- "ELevation view" - click on "Elevation East" > right click on it and > select "Add view"
- Now select the view i,e "elevation East" and insert to the sheet
- If the drawing is very small to adjuss the size go to the "properties" > scale > set the appropriate scale which sets to sheet
- similarly for south elevation view g to "Project browser" > under- "ELevation view" - click on "Elevation West" > right click on it and > select "Add view"
- Now select the view i,e "elevation West" and insert to the sheet
- If the drawing is very small to adjuss the size go to the "properties" > scale > set the appropriate scale which sets to sheet
The sheet created are shown in below figure,
10) Create a camera-specific view or a 3D view in each room ( living, dining, bedroom). Based on the views create a new set of sheets starting A-501 (you can add as many sheets after, 502, 503.. n)to place the 3D view images. Produce the sheets as a part of project drafting.
AIM:
To create a camera view in 3D view for each room like living room, dining, bedroom and based on the created view create a sheet accordingly.
INTRODUCTION:
- Camera Views are really useful in Revit.
- They allow us to view what we would actually see if we were standing at any given location in our design.
- This can be invaluable for both understanding and communicating the nature of a space before we go to the expensive lengths of actually constructing it for real.
PROCEDURE
STEP 1
SET THE CAMERA VIEW:
- First before 3D view we set to set the camera view in each room
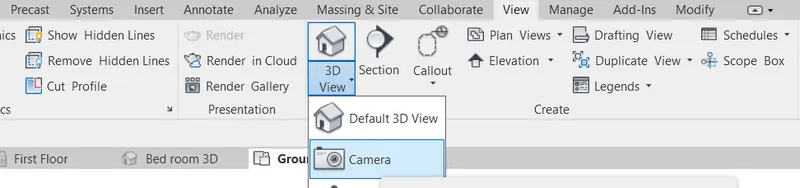
- To set camera view go to "View tab" > click on - "default 3D view" drop down > select the "camera" option
- Then place the camera in allthe room
STEP 2
PLACING CAMERA
- To place a camera select each room first i have select the kitachen room, here place the camera
- After placing set the view size upto which length will we want to see the camera
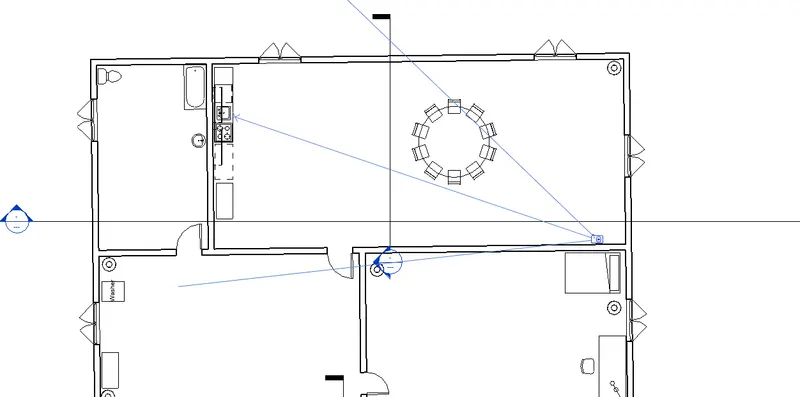
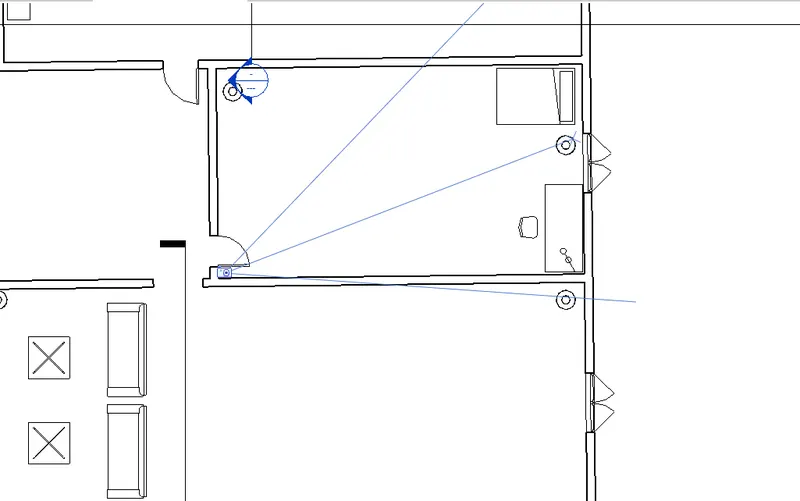
- Similarly placing the camera in Bed room as well, dining room, and toilet and living room
- And adgussing the visibility line inorder to view a clear camera views
STEP 3
CREATING SHEETS:
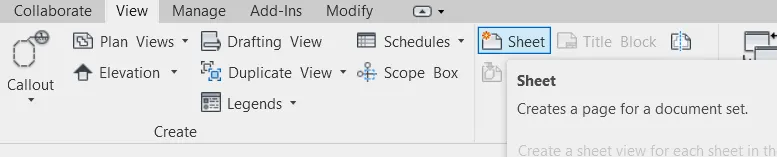
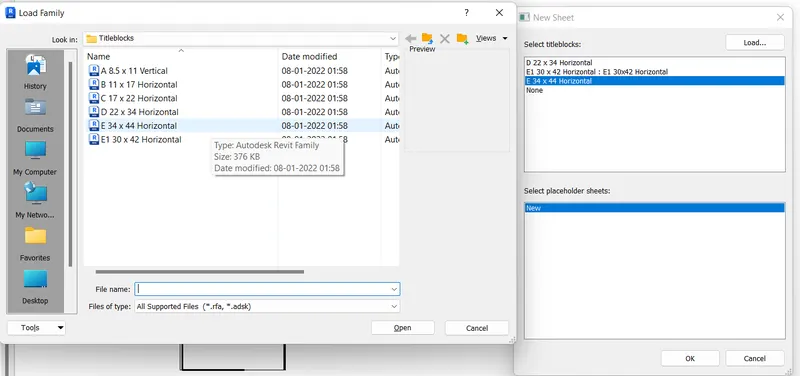
- To load the sheet after clicking "load" option in new sheet dialog box > go to "english imperial " > click on "Title block" under this there are several sheets available
- I have selected the " E34 x 44" horizontal sheets.
- Click on "open" now the sheets is loaded in the new sheet dialog box
- Click on the " E34 x 44" sheet and seleck ok to load into our drawings
STEP 4
LOADING SHEETS FROM TITLE BLOCK:
- If the sheet available in new sheets dialog box are not enough we can load more sheets by using "title block" folder
- To load sheet click on > click on "load" option > and click the "title block" folders > and select the appropriate sheet
- And click open the sheets is loaded
STEP 5
RENDERING
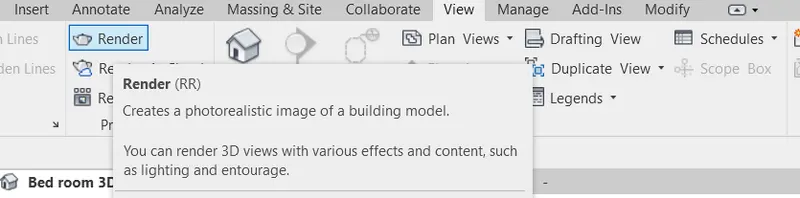
- To render a view Go to "View tab" > click on "render"
- A rendering dialog box will appear which is shown below
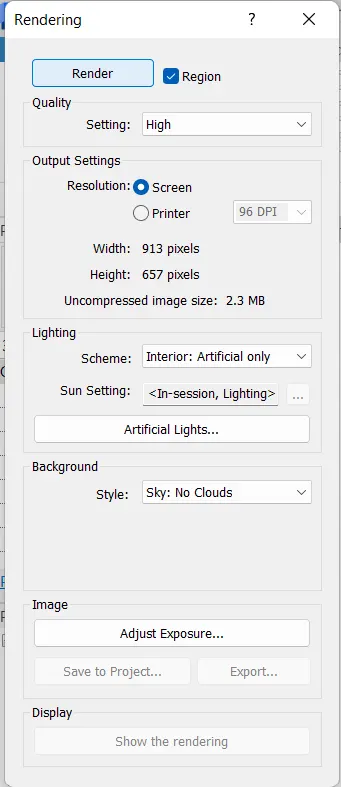
- set all the parameters in render dialog box and click render
STEP 6
SETTING PARAMETRS FOR RENDERING
- This is the rendering dialog box, first we need to set the region, click on region and a boundary will be created in the camera view
- Now adjuss the region beacause only the material within this region will be rendered
- And set the quality settings to "High"
- Lightning as - "Interior artificial" only and background style as - "no cloud"
- And click on the "Render" option finally to start rendering our 3d camera views.
STEP 7
LOADING THE RENDERED VIEWS INTO SHEETS:
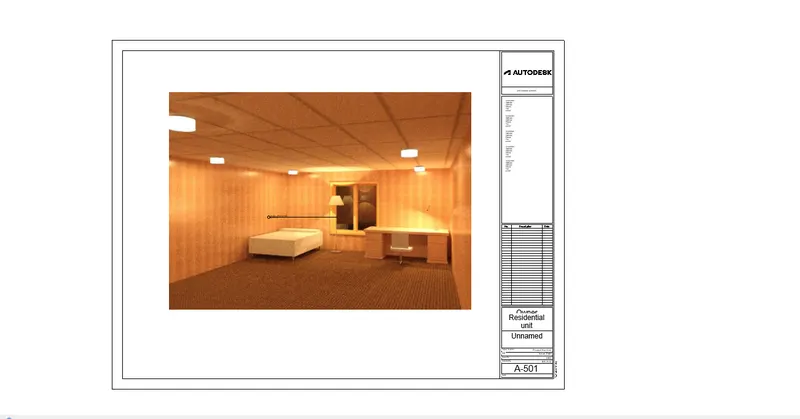
- Once all the 3D camera views are rendered , all are to be placed in therir respective sheets
- The sheet that we are loaded are opened through the "project browser" > then the views are inserted
- The below views shows the rendered camera view of a Bed room
- RESULT:
- All the specific 3D camera views of each rooms like living room, dining room, kitachen, toilet are rendered and inserted in the sheets using "view tab icon"
RESULT:
3D RENDERED VIEW OF BED ROOM:
3D RENDERED VIEW OF DINING:
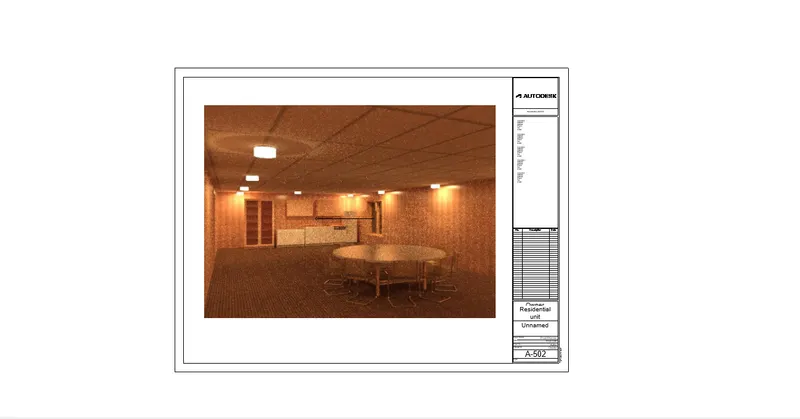
3D RENDERED VIEW OF KITCHEN:
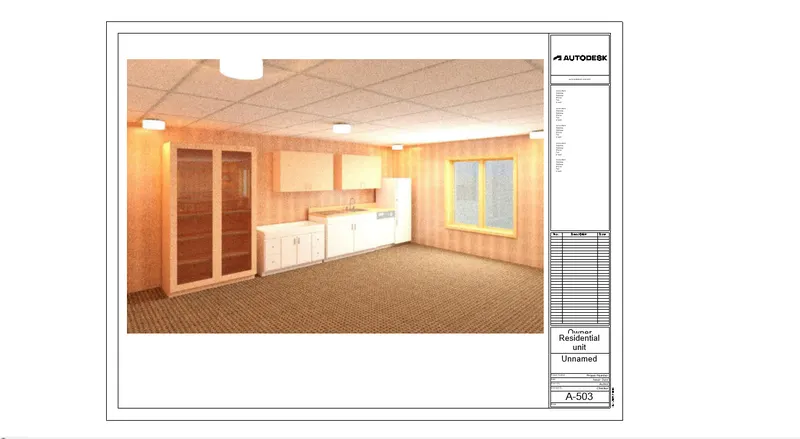
3D RENDERED VIEW OF LIVING ROOM:
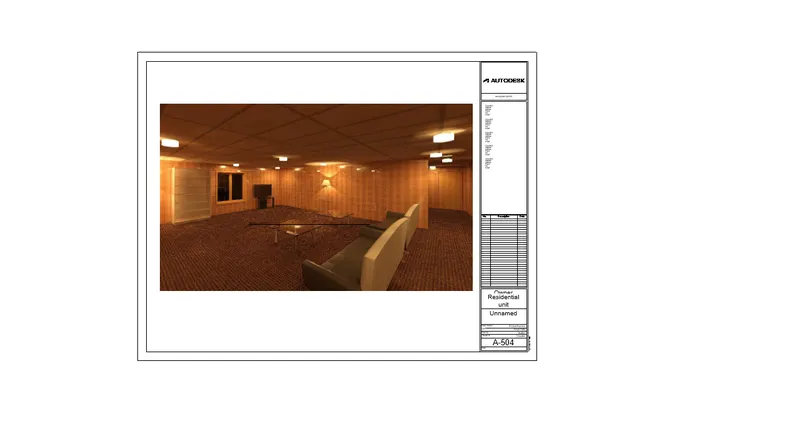
3D RENDERED VIEW OF STORE ROOM:
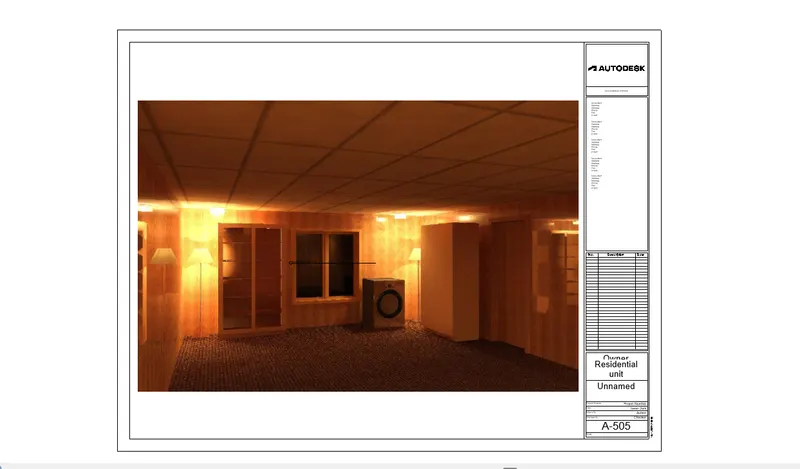
3D RENDERED VIEW OF TOILET: