Week 8 - Simulation of a backward facing step in OpenFOAM
Objective:-
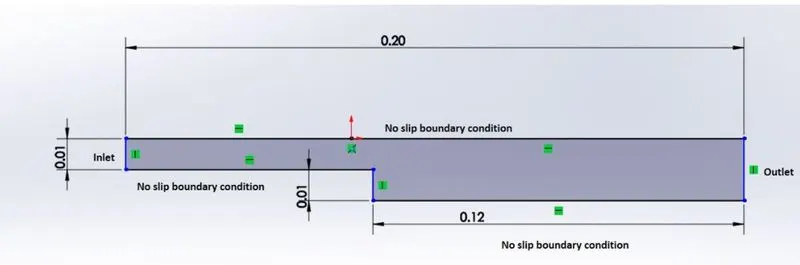
To simulate an incompressible laminar viscous flow through the backward-facing step geometry with variation in time (i.e transient analysis).
Steps:-
Velocity is chosen such that the flow is laminar ( I have taken velocity to be 1 m/s)
To perform 2 case studies and compare the results.
i) To simulate the flow without using any grading factor (i.e GF =1)
ii) To simulate the flow with a grading factor of 0.2. The cells should be finer near the walls (including the step wall)
Number of cells along the x-direction =200
Number of cells along the y-direction =20
Boundary Condition Specification
1. First, start terminal in Linux operating system by going to Home then right-click then select open terminal.
2. The problem is to be solved using OpenFoam so we will be using tutorials available in OpenFoam. So just type 'tut' to open the tutorial directory and type 'ls' to see the contents present in the directory.
3. We have to solve incompressible flow simulation so select incompressible directory by typing 'cd incompressible' and then type 'ls' to see what is available inside the incompressible folder.
4. We see that there are so many solvers. But we need a solver for laminar incompressible viscous flow so we chose 'icoFoam' to solve for laminar incompressible viscous fluid for Newtonioan Fluid.
5. Thus we enter into the icoFoam folder by typing 'cd icoFoam' and type 'ls' to explore the contents available in icoFoam in the terminal.
6. In the icoFoam folder we have cavity and elbow solver. Our problem is pertinent to the cavity problem so we will choose cavity by typing 'cd cavity' and then type 'ls' to see all the contents available to chose from the cavity folder.
7. In the cavity folder we are again going to visit the cavity folder where we have to define the geometry (the fluid domain) and generate the mesh.
8. But we are not going to make any changes to the tutorial section. Open Foam does not allow any user to make modifications to the tutorial file. If the tutorial file is made changes then OpenFoam becomes corrupt and we have to install the software again.
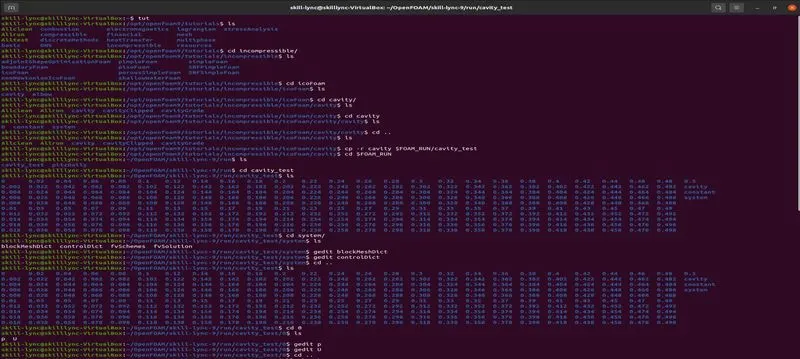
9. So we are going to copy this cavity folder by typing 'cp -r cavity' command and paste it in openFoam run folder by using the command 'cp -r cavity $ FOAM_RUN/cavity_test' and then open the run folder by typing 'cd $FOAM_RUN' where we can see cavity_test file.
10. Now we can make changes to the cavity_test file. Here we can specify for the blockMesh in the system folder.
Code in terminal:-
11. By opening blockMeshDict we can create a domain and provide specifications for blockMesh. So open this file by typing the command 'gedit blockMeshDict'. We can make changes to the script file.
12. The blockMeshDict file is a script file containing geometry parameters and these parameters can be modified.
13. Now units are set since the standard unit is meter so no need to convert.
14. In the blockMesh file go to the lines where 'hex' is found. That is the line where we specify the faces of the block and the number of cells in X,Y and Z direction.Also, we specify the faces as inlet, outlet and walls.
15. Next step is to navigate the controlDict folder and specify the simulation time (end time ).
16. To create the geometry, we will consider using 5 blocks as shown in the diagram.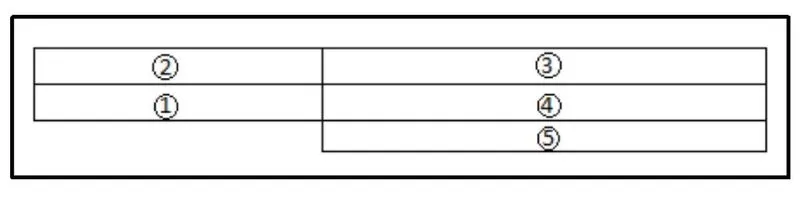
17. Vertices of each block is shown below:-
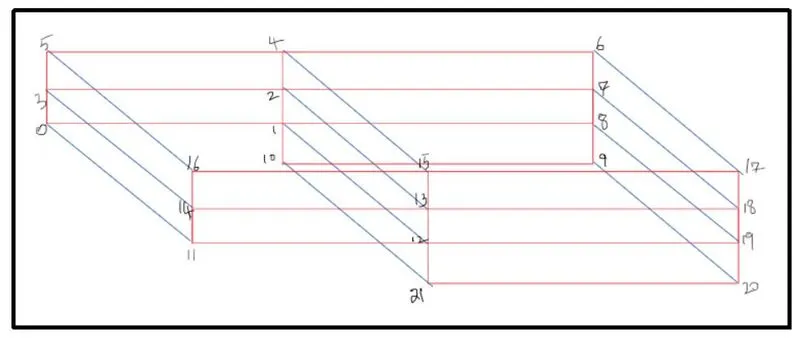
18. Now we have to remember to give vertices according to the right-hand thumb rule according to which the flow should be outward normal to the face and not into the system.
19. Grading factor = size of the end cell/ size of the starting cell. So in the first case, all cell sizes in the x,y and z-direction are kept the same.
20. Now the boundary of the problem is defined, we can define the faces of the geometry according to the right-hand thumb rule.
21. After editing of blockMeshDict file we will save it and follow the same procedure for the controlDict file .
/*--------------------------------*- C++ -*----------------------------------*\
  =========                 |
  \\      /  F ield         | OpenFOAM: The Open Source CFD Toolbox
   \\    /   O peration     | Website:  https://openfoam.org
    \\  /    A nd           | Version:  9
     \\/     M anipulation  |
\*---------------------------------------------------------------------------*/
FoamFile
{
    format      ascii;
    class       dictionary;
    object      blockMeshDict;
}
// * * * * * * * * * * * * * * * * * * * * * * * * * * * * * * * * * * * * * //

convertToMeters 1;

vertices
(
    (0 0 0)//0
    (0.08 0 0)//1
    (0.08 0.005 0)//2
    (0 0.005 0)//3
    (0.08 0.01 0)//4
    (0 0.01 0) //5
    (0.2 0.01 0) //6
    (0.2 0.005 0)//7
    (0.2 0 0 )//8
    (0.2 -0.01 0)//9
    (0.08 -0.01 0)//10
    (0 0 0.1)//11
    (0.08 0 0.1) //12
    (0.08 0.005 0.1)//13
    (0 0.005 0.1)//14
    (0.08 0.01 0.1)//15
    (0 0.01 0.1)//16
    (0.2 0.01 0.1)//17
    (0.2 0.005 0.1)//18
    (0.2 0 0.1)//19
    (0.2 -0.01 0.1)//20
    (0.08 -0.01 0.1)//21


);

blocks
(
    hex (0 1 2 3 11 12 13 14) (80 5 1) simpleGrading (1 1 1) // Block 1
    hex (3 2 4 5 14 13 15 16) (80 5 1) simpleGrading (1 1 1) // Block 2
    hex (2 7 6 4 13 18 17 15) (120 5 1) simpleGrading (1 1 1) // Block 3
    hex (1 8 7 2 12 19 18 13) (120 5 1) simpleGrading (1 1 1) // Block 4
    hex (10 9 8 1 21 20 19 12) (120 10 1) simpleGrading (1 1 1) // Block 5

);

edges
(
);

boundary
(
    inlet
    {
        type patch;
        faces
        (
            (0 11 14 3)
            (3 14 16 5)
        );
    }
    outlet
    {
        type patch;
        faces
        (
            (9 8 19 20)
            (8 7 18 19)
            (7 6 17 18)
        );
    }
    frontAndBack
    {
        type empty;
        faces
        (
            (0 3 2 1)
            (3 5 4 2)
            (2 4 6 7)
            (1 2 7 8)
            (10 1 8 9)
            (11 12 13 14)
            (14 13 15 16)
            (13 18 17 15)
            (12 19 18 13)
            (21 20 19 12)
        );
    }
    fixedwalls
    {
    type wall;
    faces
    (
       (6 4 15 17)
       (4 5 16 15)
       (10 21 12 1)
       (12 11 0 1)
       (21 20 9 10)
     );
     }

);

mergePatchPairs
(
);

// ************************************************************************* //
Control_Dict file
/*--------------------------------*- C++ -*----------------------------------*\
  =========                 |
  \\      /  F ield         | OpenFOAM: The Open Source CFD Toolbox
   \\    /   O peration     | Website:  https://openfoam.org
    \\  /    A nd           | Version:  9
     \\/     M anipulation  |
\*---------------------------------------------------------------------------*/
FoamFile
{
    format      ascii;
    class       dictionary;
    location    "system";
    object      controlDict;
}
// * * * * * * * * * * * * * * * * * * * * * * * * * * * * * * * * * * * * * //

application     icoFoam;

startFrom       startTime;

startTime       0;

stopAt          endTime;

endTime         0.5;

deltaT          0.005;

writeControl    timeStep;

writeInterval   20;

purgeWrite      0;

writeFormat     ascii;

writePrecision  6;

writeCompression off;

timeFormat      general;

timePrecision   6;

runTimeModifiable true;


// ************************************************************************* //
22. Now we have to define the initial value for pressure and velocity term,so we have to go back to the cavity_copy directory using cd .. command and select folder named '0' by typing command 'ls'.
Pressure File
/*--------------------------------*- C++ -*----------------------------------*\
  =========                 |
  \\      /  F ield         | OpenFOAM: The Open Source CFD Toolbox
   \\    /   O peration     | Website:  https://openfoam.org
    \\  /    A nd           | Version:  9
     \\/     M anipulation  |
\*---------------------------------------------------------------------------*/
FoamFile
{
    format      ascii;
    class       volScalarField;
    object      p;
}
// * * * * * * * * * * * * * * * * * * * * * * * * * * * * * * * * * * * * * //

dimensions      [0 2 -2 0 0 0 0];

internalField   uniform 0;

boundaryField
{
    movingWall
    {
        type            zeroGradient;
    }

    fixedWalls
    {
        type            zeroGradient;
    }

    frontAndBack
    {
        type            empty;
    }
}

// ************************************************************************* //
Velocity File
/*--------------------------------*- C++ -*----------------------------------*\
  =========                 |
  \\      /  F ield         | OpenFOAM: The Open Source CFD Toolbox
   \\    /   O peration     | Website:  https://openfoam.org
    \\  /    A nd           | Version:  9
     \\/     M anipulation  |
\*---------------------------------------------------------------------------*/
FoamFile
{
    format      ascii;
    class       volVectorField;
    object      U;
}
// * * * * * * * * * * * * * * * * * * * * * * * * * * * * * * * * * * * * * //

dimensions      [0 1 -1 0 0 0 0];

internalField   uniform (0 0 0);

boundaryField
{
    movingWall
    {
        type            fixedValue;
        value           uniform (1 0 0);
    }

    fixedWalls
    {
        type            noSlip;
    }

    frontAndBack
    {
        type            empty;
    }
}

// ************************************************************************* //
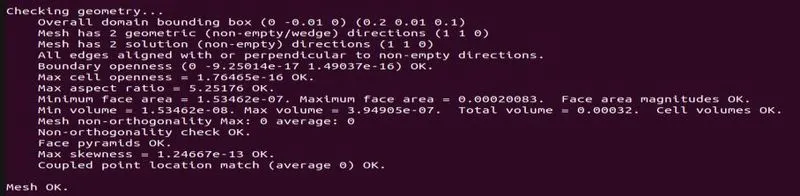
23. At this point, our geometry is set and now we can deploy mesh using 'blockMesh' command and use 'checkMesh' command to check mesh metrics like skewness, orthogonality.
Mesh Metrics:-
24. At this stage, we can check our mesh as per our requirement or not by typing paraFoam to see the mesh in paraFoam .
25. After deploying mesh certain modifications can be made to check the uniformity everywhere.
26. Now we are ready to run the simulation. Just type 'icoFoam' and the simulation will start.
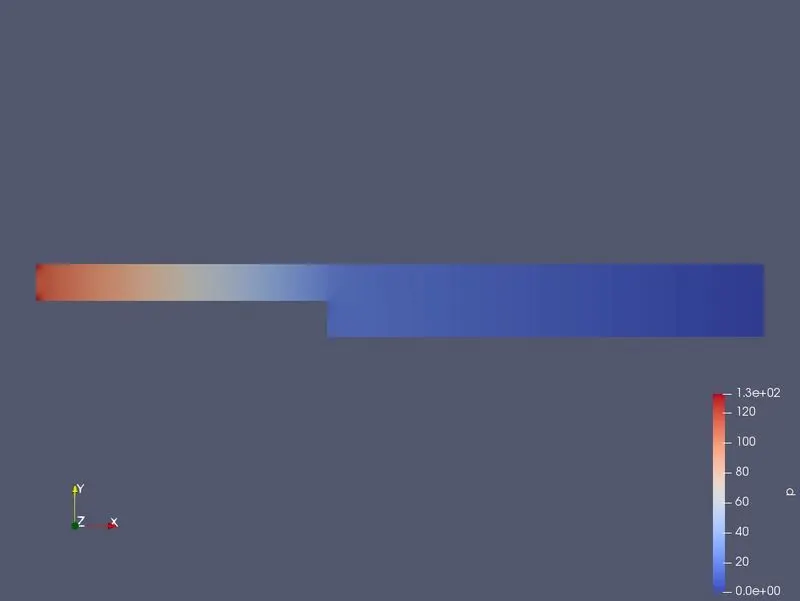
Pressure Contour
Velocity Contour
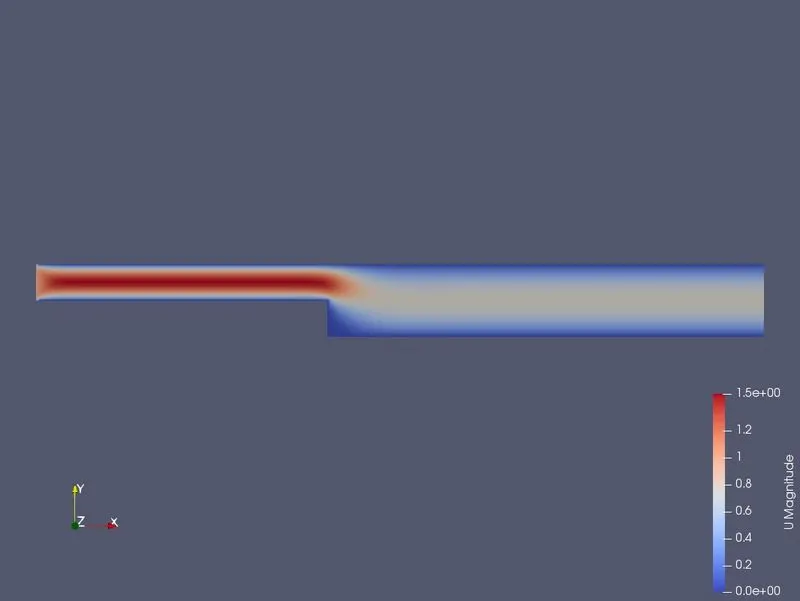
27 . To find the velocity at 0.085 m from the inlet , we will use the plot over line tool to find the velocity profile .
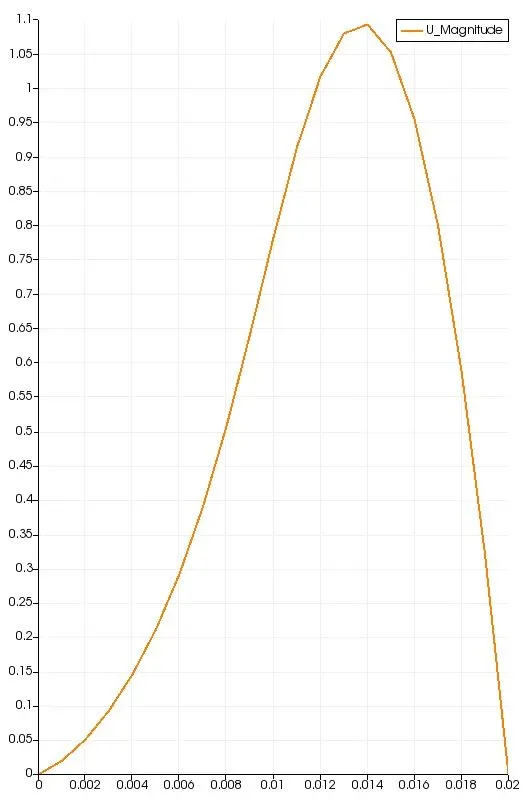
Results:-
1. Grading provides a fine mesh along the x-direction whereas the mesh is coarse along the y-direction. In CFD, fluid shows large deviations where walls and obstacles are present and to capture those changes fine mesh or grading has to be used.
2. But to get effective results if we use more number elements, it increases the computational time, as well as large memory is required (i.e we have to increase the Ram size )
3. Fine mesh is to be used near the walls and obstacles and coarse mesh near the open area.