Week - 8 - Creating component and property
Aim:
To create a code that performs creating components and properties
Objective:
Ask the user to enter name of the components
Write a code that will automatically create components and assign thickness to it and the code should decide on its own what type of collector should be created depending on the user profile/dec
Auto color the created component and property
Code:
set a .window
catch {destroy $a}
toplevel $a -class TopLevel

wm title $a "Create Component"
wm geometry $a 350x250+100+50; update
wm resizable $a 0 0
wm deiconify $a

label $a.01 -text "Component" -bg grey -font {times 10 bold}; 				place $a.01 -x 20 -y 20 -width 150 -height 50
label $a.02 -text "Thickness" -bg grey -font {times 10 bold};        		place $a.02 -x 20 -y 80 -width 150 -height 50
entry $a.03 -textvariable ::comp_name -bg white -font {times 10};     				place $a.03 -x 180 -y 20 -width 150 -height 50
entry $a.04 -textvariable ::T_value -bg white -font {times 10};     				place $a.04 -x 180 -y 80 -width 150 -height 50
button $a.05 -text "Create" -command {create} -bg green -font {times 10 bold};	place $a.05 -x 100 -y 140 -width 150 -height 50

set ::comp_name {}
set ::T_value {}

proc optistruct {} {
set opti [hm_getsolver]
if {$opti == "optistruct"} {
*createmark comps 1 $::comp_name
	if {[hm_entityinfo exist comps $::comp_name]!=0} {
	puts [tk_messageBox -message "The Component already exists" -icon warning -type ok -title Message]
	} else {
	*createentity comps cardimage=Part includeid=0 name=$::comp_name
	*createmark components 1 $::comp_name
	set compid [hm_getmark comps 1]
	*createentity props cardimage=PSHELL includeid=0 name=$::comp_name
	*createmark props 2 $::comp_name
	set propid [hm_getmark props 2]
	*setvalue props id=$propid STATUS=1 95=$::T_value;
	*setvalue comps id=$compid propertyid={props $propid}
	*createmark components 1 "all"
	*autocolorwithmark components 1
	*createmark properties 1 "all"
	*autocolorwithmark properties 1
	}
}
}

proc radioss {} {
set radi [hm_getsolver]
if {$radi == "radioss"} {
*createmark comps 1 $::comp_name
	if {[hm_entityinfo exist comps $::comp_name]!=0} {
	puts [tk_messageBox -message "The Component already exists" -icon warning -type ok -title Message]
	} else {
	*createentity comps cardimage=Part includeid=0 name=$::comp_name
	*createmark components 1 $::comp_name
	set compid [hm_getmark comps 1]
	*createentity props cardimage=P1_SHELL includeid=0 name=$::comp_name
	*createmark props 2 $::comp_name
	set propid [hm_getmark props 2]
	*setvalue props id=$propid STATUS=1 431=$::T_value;
	*setvalue comps id=$compid propertyid={props $propid}
	*createmark components 1 "all"
	*autocolorwithmark components 1
	*createmark properties 1 "all"
	*autocolorwithmark properties 1
	}
}
}


proc create {} {
optistruct
radioss
}
Procedure and code explanation:
Set the global variable for component name and its thickness
Create a procedure called optistruct and set opti [hm_getsolver] command is used to find the solver deck
if {$opti == "optistruct"} command is used if the deck is optstruct then you can proceed with further commands
*createmark comps 1 $::comp_name is the command that is used to store the components into a mark id 1
if {[hm_entityinfo exist comps $::comp_name]!=0} is used to find the exists component with the same name. If there are any tk_messageBox -message "The Component already exists" -icon warning -type ok -title Message command is used to dispay the message box with warning of "The Component already exists"
*createentity comps cardimage=Part includeid=0 name=$::comp_name is the command that is used to create a component with the specified name.
set p $::comp_name is the command used to store the component names in the variable p
*createentity props cardimage=PSHELL includeid=0 name=$p is the command that is used to create a property with the specified name.
*setvalue props name=$p STATUS=1 95=$::T_value is the command used to assign thickness with the specified value.
*autocolorwithmark is used to autocolor the components and properties
Using this procedure, create another procedure called radioss
Also create a procedure called 'create' and call both operation into these procedue.
Create a tk widget that performs these operations.
set a .window is the command. .window is the window name or path by which it will be referred saved in.
catch {destroy $a} is the command where catch is used to hide errors and destroy is used to close any previously existing window by same name.
toplevel $a -class TopLevel is the command that builds the window.
wm title $a "Free Edges" is the command that is used to create title of the window.
wm geometry $a 350x250+100+50 is the command that is used to create dimension of the window. 350x250 is width and height of the window. +100+50 is the origin of the hypermesh window where the windoe shoud be placed.
wm resizable $a 0 0 is the command that is used to fix the window means we can not resize the window by dragging. If you put 1 0, you can drag or resize the window on x axix, if you put 0 1, you can drag or resize it on y axix and if you put 1 1, you can drag and resize on both axis.
wm deiconify $a is the command that is used to make the window as active window.
And then we have to create two label called 'Component' and 'Thickness'. The syntax for create label is label $windowpath -text "Label" -bg grey -font {times 20 bold} ; place $windowpath -x value -y value -width value -height value. Using this syntax label for 'Component' and 'Thickness' is created.
We have to create entry box to give inputs . The syntax for create entry box is entry $windoepath -textvariable "::var" place $windowpath -x value -y value -width value -height value. Textvariable should be the variable assigned to a command.i.e., ::comp_name & ::T_value
We have to create one button that will automatically create component and property. The syntax for create button is button $windowpath -text "text" -command {something}; place $windowpath -x value -y value -width value - height value. Using this syntax button called 'create' is created. In command give procedure name that will perfoem both operations.
To run this code on hypermesh, open hyper mesh and go to preference and go to keyboard setting. Now, you can create your own shortcut key to run this file by uploading the tcl file into any keyboard button.
When you run this file new window will open. This is the window we created tk widgets.
Output:
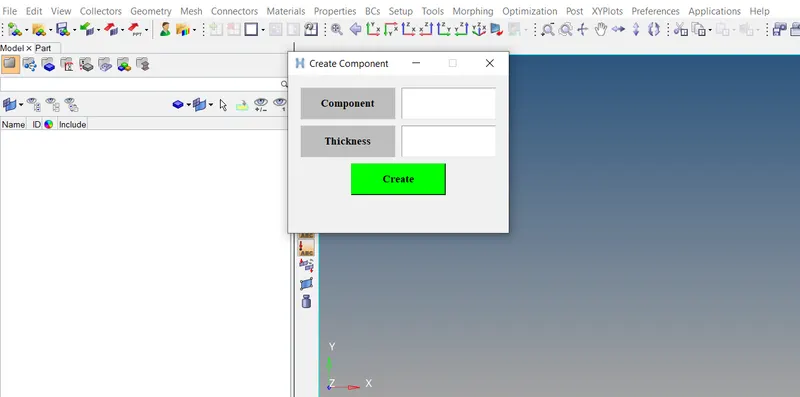
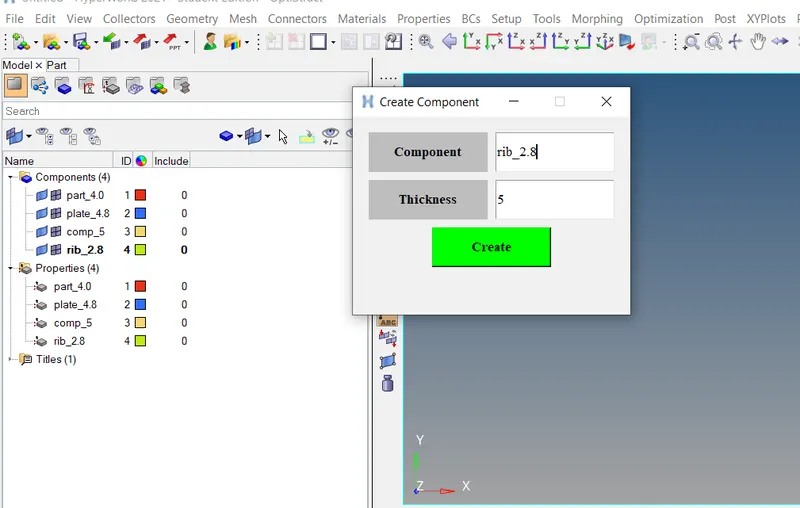
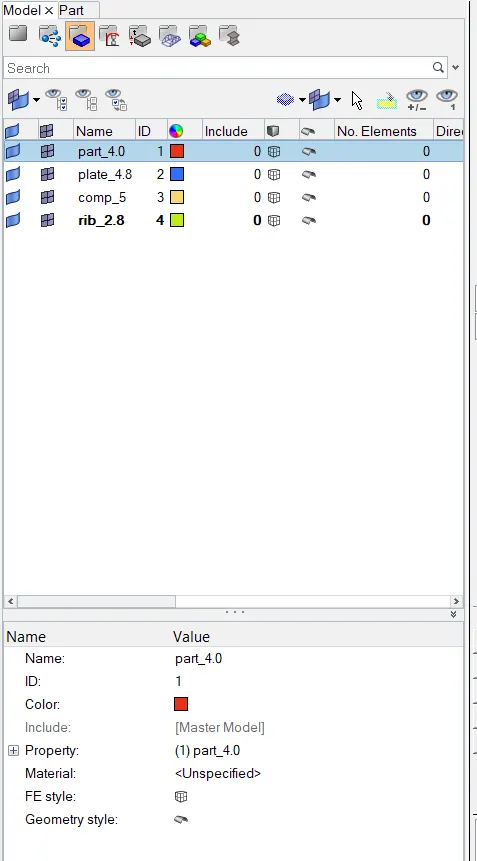
Property is assigned to the component.
Conclusion:
Sucessfully created a code that performs creating components and property automatically using tk wiget.