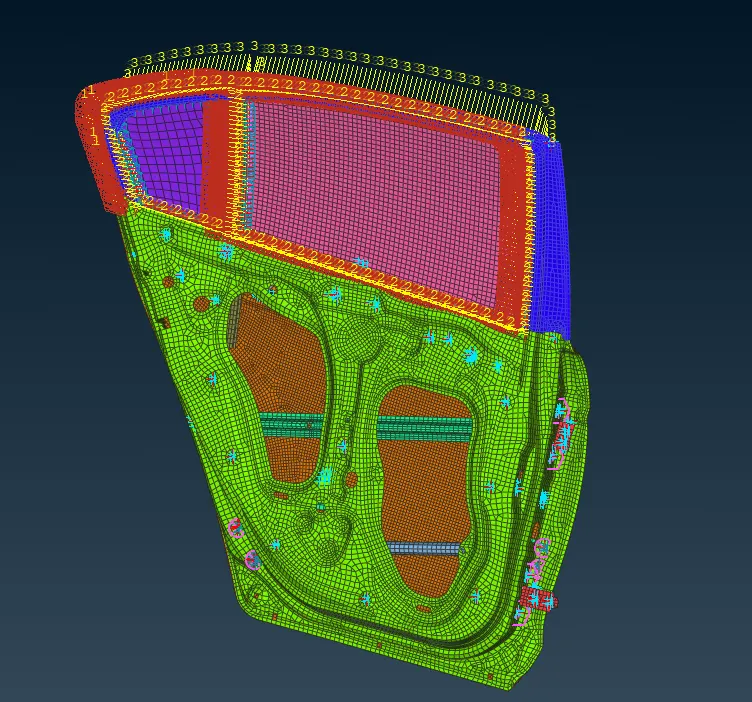
Week 7 - Creating connection for Rear door
AIM :
For the given Rear door model perform suitable connections for the FE model using ANSA.
OBJECTIVE :
- To give different types of connections for the rear door model of the car.
- These connections are given to the model using ANSA in the NASTRAN deck which will be used later for NVH simulation.
THEORY :
Door Assembly :
Door assembly is a very important model in the car as it consists of different types of connection representations. Different mechanisms are also present in the door assembly model like door lock mechanism, hinge mechanism, glass slider mechanism, and latch mechanism.
Modern automobile manufacturing employs two key strategies: weight reduction and enhanced design. To achieve this, customized cuts are utilized in crafting components like doors. Door panels, for instance, incorporate varying thicknesses, with the side near the hinges being thicker to bear the door's weight. Laser welding is favored for joining these different thicknesses due to its precision and absence of filler material, preserving the original chemical composition and minimizing the heat-affected zone. Additionally, a sealing atmospheric strip, typically composed of rubber, is integrated to prevent external air from infiltrating the cabin, contributing to overall vehicle efficiency and comfort.
PROCEDURE :
Step 01 : Importing CAD Model.
- The initial step is to import the geometry into ANSA Software.
- File -----> Open -----> Select the file -----> Open (We can also drag and drop the file into ANSA)
- There are file formats like IGES, STEP and Parasolid where we can import these file formats into any CAD, or CAE Software.
- In ANSA we can import all the CAD Software file formats like:-
- IGES [Initial Graphics Exchange Specification].
- STEP [Standard for the Exchange of Product Model Data].
Step 02 : Geometry cleanup
- The cleanup will be checking any geometrical errors and cleaning it.
- Tool tab -----> Check -----> Geometry -----> Execute -----> If any errors pop up in red color select them at once---> Right mouse click -----> Fix
- Most of the errors can be fixed this way but some errors still need manual attention.
- Solve these errors by using different tool in the topo deck
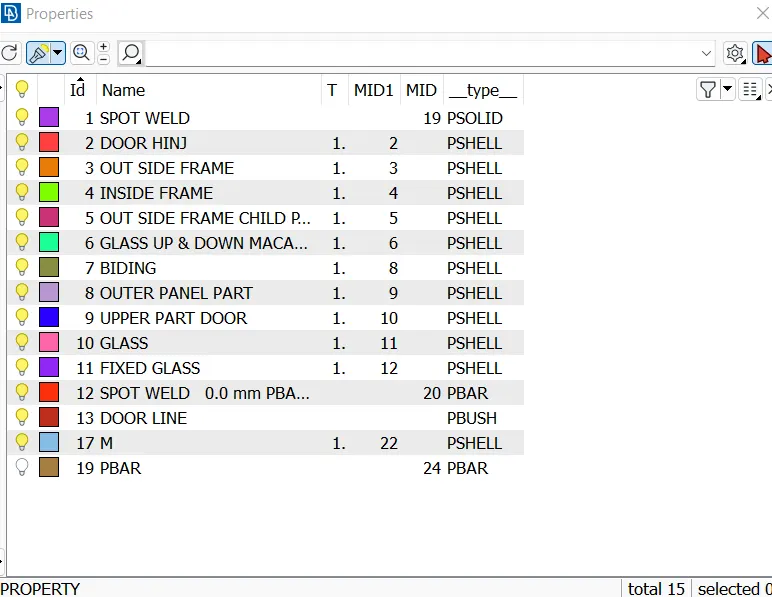
Step 03 : Creating Property ID
- For every Component of the Rear door, a separate property ID (PID) must be assigned.
- For assigning PID, the Set PID command is used.
- Topo module -----> Faces -----> Set PID -----> Macros/Shells -----> Select part and confirm -----> Dialogue box will appear----->Create New ---> Pshell -----> OK.
Step 04 : Creating the Connections.
Deploying Bolt Connectors in Hinges :
Following are the steps to Deploying the Bolt Connection
- Create a point in the circular edges by navigating to Topo module -----> Points -----> On COG -----> Select the Hole where the point must be created -----> Confirm.
- Convert the point into Bolt by navigating to Assembly Tab -----> Convert -----> 3D Points, select the point and confirm-----> Select Bolt -----> OK.
- Deploy the bolt connection by navigating to Assembly Tab -----> Connection Manager -----> Select the Bolt and confirm-----> Dialogue box will appear -----> Right click on P1, in modify column click F1, select appropriate part -----> Similarly select P2, P3 as required -----> Apply and Realize.
- Here while deploying the connection Select the zones option in the FE rep. Settings as In/Out.
- Similarly do the same process in every region where the bolt connection is required.
Creating RBE2 Elements in Required Regions :
- The RBE2 element can be used for connecting two nodes to model a 'rigid' welded type connection with all 6 DOFs(Degrees of Freedom) or a pinned connection with 3 translational DOFs. The RBE2 element can also be used to model a wagon wheel-type connection between the independent and the dependent nodes.
Following are the steps to Deploying the RBE2 Elements
- NASTRAN Deck Module -----> Elements -----> RBE2 -----> Many nodes -----> Select the Slave nodes -----> Confirm and finish -----> Model Browser window --->New -----> Name it and store every connection of RBE2 in it.
- Here all the Nodes on the main frame were connected with the RBE2 method
Creating Cluster RBE2 Elements :
- The RBE2 method and the Cluster RBE2 method are almost similar in performance, only the obtained result is different.
- In the RBE2 method, only 1 hole is selected with 1 single-master node which ANSA detects automatically between the hollow section. But in the Cluster RBE2 method, two or more holes are selected and ANSA detects one single master node between them.
Following are the steps to Deploying the Cluster RBE2 Elements
- NASTRAN Deck Module -----> Elements -----> RBE2 -----> Many nodes -----> Select the Slave nodes of both the holes -----> Confirm and finish -----> Model browser window---> Create New part -----> Name it and store every connection of RBE2 in it.
Creating a Spot Weld Connection :
- The Hinges must be connected to the Support Rod, Hence a Spot weld connection must be applied.
For creating a Spot weld Connection following steps must be followed:-
- Create a 3D point in the area where the weld must be done by navigating to Topo module -----> Points -----> On COG -----> Select the area where the point must be created -----> Confirm.
- Convert the 3D points into spot weld by navigating to Assembly Tab -----> Convert -----> 3D Points, select the point which was created and Confirm -----> Select spot weld -----> OK.
- Deploy the Connection by navigating to Assembly Tab -----> Connection Manager -----> Select the spot weld and Confirm -----> Dialogue box will appear -----> Right click on P1, in modify column click F1, select appropriate part -----> Select P1, P2, P3 as required -----> Select RBE3-HEXA-RBE3 in FE Rep Type, Enter search distance as 20, and create PSOLID(Using Shift + ?) -----> Apply and Realize.
Creating Door Handle Connection :
- The Door handle hole section is shown. For creating the connection following steps must be followed.
- Creating the connection in those two hollow sections by navigating to NASTRAN Deck Module -----> Elements -----> RBE2 -----> Many nodes -----> Select the Slave nodes of any one hollow section -----> Confirm and finish -----> In the model browser create a new part -----> Name it and store every connection of RBE2 in it.
- Similarly do the same steps for the other hollow section.
Creating a connection for those two connections.
- The steps will be similar to the above just select the master nodes of the created connection as slave nodes.
Assigning Mass to the master node.
- As this is the connection of the door handle hollow section, in the future, there will be a door handle with some mass. Hence, here the mass must be assigned.
- For assign the mass by navigating to NASTRAN Deck Module -----> Elements -----> CONMi -----> CONM2 -----> Nodes and Select the center node -----> Confirm and a dialogue box will appear for mass values -----> Enter the Mass Value as 0.0001 below the M column -----> Confirm.
NOTE :
- The Mass Value is taken randomly as 100 grams.
- The mass value must be given in tons (1 Tonne = 1000000 Grams)
- Hence mass value will be 0.0001
Creating Connections for the Windows :
- There is some mechanism for opening and closing the Windows but while simulation it must be considered as a rigid connection. The windows must be connected with either Door frame or Weather strips.
For creating the connection following steps must be followed:-
- Making Curves around the Glass by navigating to Classic Mesh Module -----> Perimeter -----> Feat2Curves -----> Select the Boundary of the Glass -----> Confirm.
Creating one more Curve at the bottom.
- In the bottom area the mechanism is present and through that mechanism the window glass will slide up and down.
- For that movement the glass must be connected on the both side of the Door frame, Hence two curves are deployed by navigating to Utilities Tab -----> Transform -----> Copy -----> Select the bottom entities -----> Enter 1 in "dy" column as the copy must be done in the Y direction -----> Confirm -----> Finish.
- Converting the Curves into Seam Line by navigting to Assembly Tab -----> Convert -----> Curves, Select the curves in order (Bottom, left, right, top) which was created and confirm -----> Select Seam Line -----> OK.
- Deploying the connection on each seam line by navigating to Assembly Tab -----> Connection Manager -----> Select the Seam line connection data and Confirm -----> Connection manager Dialogue box will appear -----> Right-click on P1, in modify column click F1, and select the appropriate part -----> Select P2 & P3 as required -----> Select RBE3-CBUSH-RBE3 in FE. Rep Type, Search Dist - 50, Create PID and insert it in PBUSH -----> Apply and Realize.
Orientation of the CBUSH.
- While deploying the connection on the seam line, the connections are deployed in different direction.
- Hence, for aligning all the connection in same direction orientation must be given.
- Orient all the CBUSH elements by navigating to Database -----> Elements -----> Open CBUSH -----> Select all the CBUSH PID's and click on modify -----> In first column select orient and in front of that other column select with Cord -----> Click + sign -----> First column select CID and in front of that other column enter value 0 -----> OK.
RESULT:
- Finally, Deployed the necessary connections for the given meshed rear door model.