Usage of Collaborate tool in REVIT
1. Open an architectural template. Using the Manage tab set project base point and project shared coordinates for the project
AIM:- To set project base point and project shared coordinates for the project using the manage tab.
INTRODUCTION:-
PROJECT SHARED COORDINATES:-
- When you combine multiple models and files in a single project, use shared coordinates to establish the positions of the files in relation to each other.
- A Revit project has internal coordinates for all the elements that compose the model in a project. Those coordinates are known to this project only. This is sufficient if you have a standalone model whose position is not relevant to other models or to a site.
- However, if you want the position of the model to be known to other linked models, you need to share coordinates. Use the Shared Coordinate tools to establish the relative positions of the different files and ensure that those relationships are maintained.
- To establish a common coordinate position and then share that position between files, use the Acquire Coordinates tool or the Publish Coordinates tool.
- If the significant coordinates for a project are in a linked model or file, such as a building model with a linked site, acquire the coordinates from the linked model.
- If the significant coordinates for a project are in the host model, such as a site with linked building models, publish coordinates from the host to the linked models.
PROJECT BASE POINT:-
- When you start a Revit model, specify the location of the project base point to establish a reference for measuring distances and positioning objects within the context of the model.
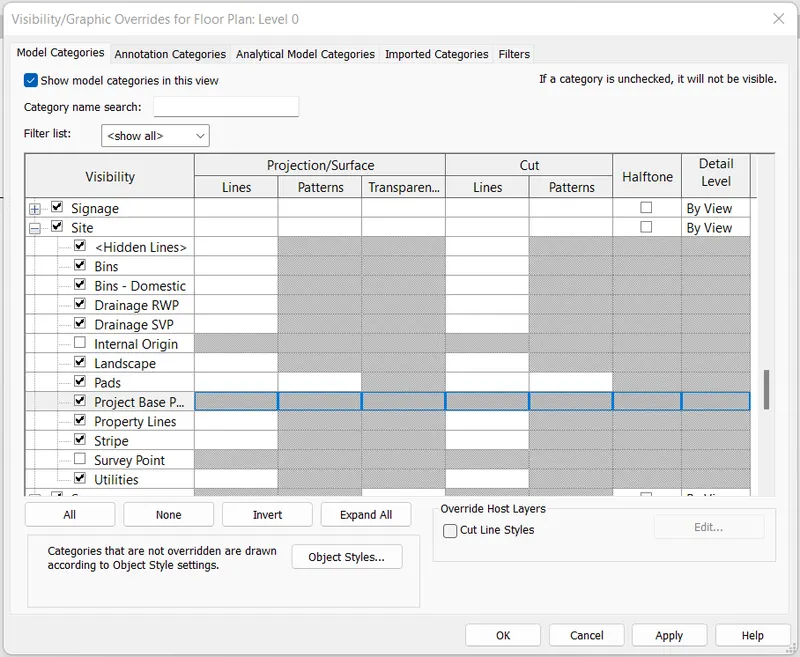
- To create Project base point. Click on the visibility / graphics tool from view tab. In model category there is a option called Site. In that there are many sub divisions. In that there is a option called project base point enable it. So, that the project base point display on the screen.
- To select the project base point, move the cursor over the symbol and look at the tooltip or the status bar.
- If it says Site: Survey Point, press Tab until it says Site: Project Base Point. Click to select the project base point.
- Drag the project base point to the desired location.
- As an alternative, using the Properties palette or the Project Base Point fields in the drawing area, enter values for N/S (northing), E/W (easting), Elevation, and Angle to True North.
- Setting the angle to True North is the same as using the Rotate True North tool.
- To ensure that the project base point does not move inadvertently, pin it in place by clicking Modify tab - Modify panel - (Pin).
- Pinning the project base point disables the Relocate Project and the Rotate Project North tools.
PROCEDURE:-
To Create a project shared coordinates:-
- Open Revit and the Open Architectutal Template.
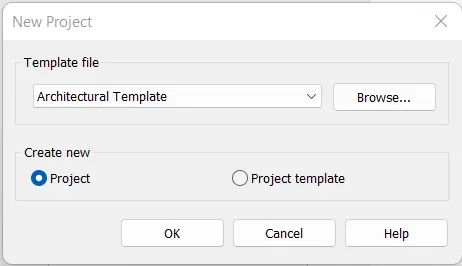
- Go to Architectural tab, click on grid and then specify grid from left to right and bottom to top.
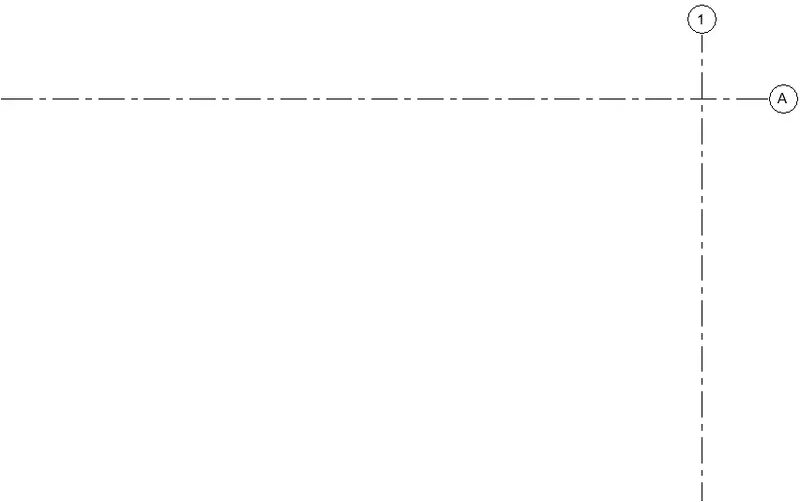
- Both vertical and horizontal grids are created as shown.
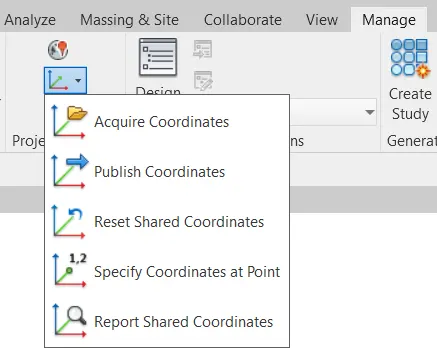
- Open Manage tab
- Click on project coordinates and then specific shared coordinates.
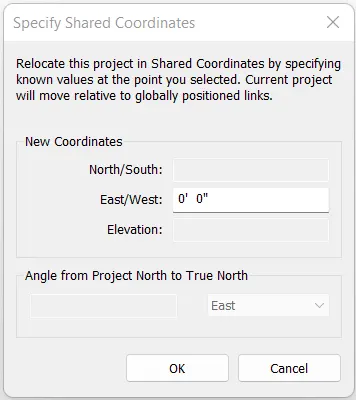
- Click on grid to specify the coordinates in north/south type 0'0" and in east/west type 0'0".
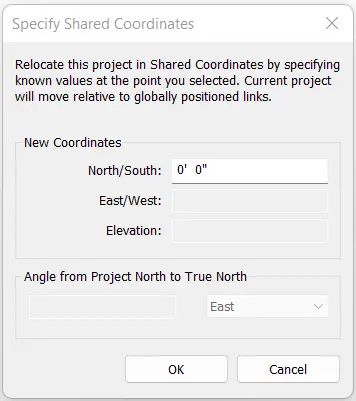
- For the grids shown. the coordinates are created.
To Create Base Point:-
- Go to View tab.
- Click on visibility / graphics or type VG
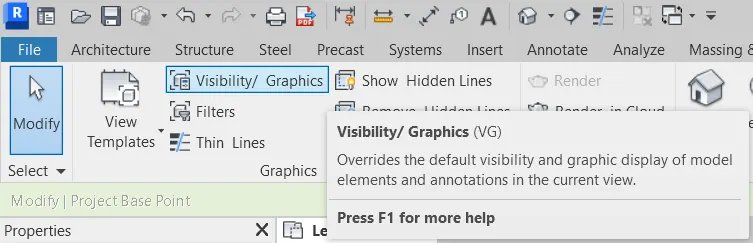
- A dialogue box appears on screen as shown below. In model category, scroll down to site option appears and there are many sub division, in that select the option called Project Base Point.
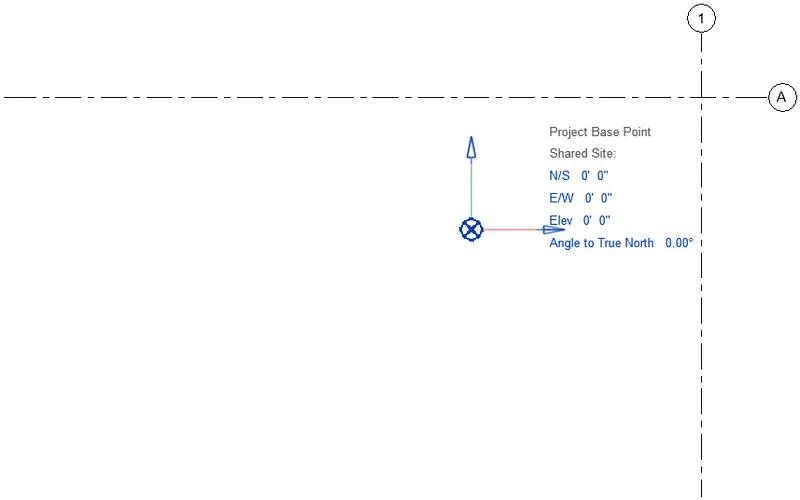
- The figure that attached below shows the project base point.
- Double click on the base point and change the point to 0'0" in all directions.
- Find the image attached as follows
RESULT:-
The project shared coordinates and the project base point are created in architectural template as shown above.
____________________________________________________________________________________
2. Open another new file but with a structural template. Using the manage tab set project parameters the same as the architectural model. Copy the parameters from the architectural model to the structural template or enter the parameters manually into the structural model
AIM:- To create structural template with the same parameters as a project architectural template.
INTRODUCTION:-
- When you use a structural template as the starting point for a new model, the view properties and ranges are modified to work with structural components.
- Although you can work with structural components in projects based on non-structural templates, you must modify view ranges to display the structural components in the view.
- This is because structural components, such as beams and columns, are placed on the level below the view you are working in. Therefore, they fall below the bottom cut plane of the view range and do not display.
To Create a project shared coordinates:-
- Open Revit and the Open Structural Template.
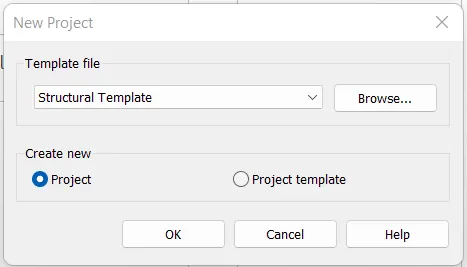
- Go to Structural tab, click on grid and then specify grid from left to right and bottom to top.
- Both vertical and horizontal grids are created as shown.
- Open Manage tab
- Click on project coordinates and then specific shared coordinates.
- Click on grid to specify the coordinates in north/south type 0'0" and in east/west type 0'0".
- For the grids shown. the coordinates are created.
To Create Base Point:-
- Go to View tab.
- Click on visibility / graphics or type VG
- A dialogue box appears on screen as shown below. In model category, scroll down to site option appears and there are many sub division, in that select the option called Project Base Point.
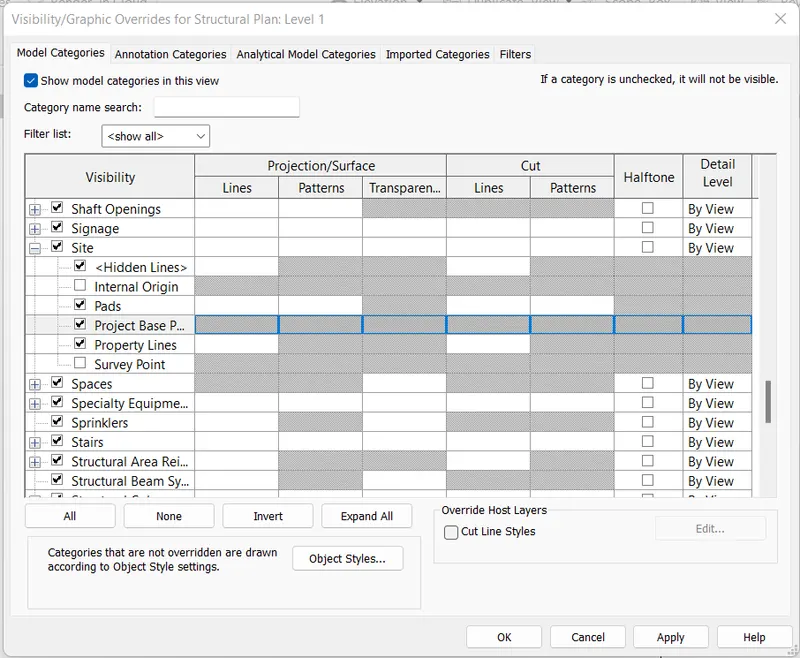
- The figure that attached below shows the project base point.
- Double click on the base point and change the point to 0'0" in all directions.
- Find the image attached as follows
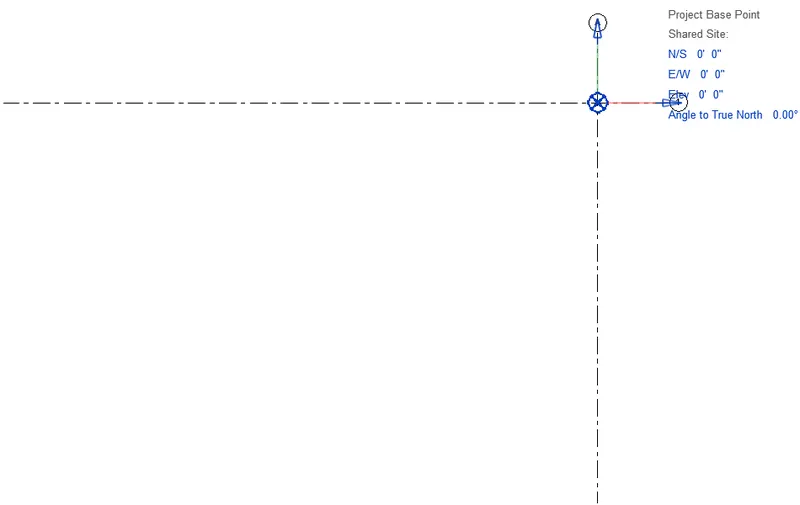
RESULT:-
The project shared coordinates and the project base point are created in structural template as shown above.
____________________________________________________________________________________
3. Re-open the architectural model. Using the tools under the Collaborate tab make the architectural model a central model (enabling simultaneous working on the model)
AIM:- To create architectural model as a central model using collaborate tool.
INTRODUCTION:-
- Revit provides several different ways to collaborate with team members who are also using the software.
- You can link multiple Revit models together, allowing team members to work in context.
- Through worksharing, users on the same local area network (LAN) can work together in the same Revit model.
- When collaboration needs to occur among users who are not in the same geographic location, use Revit Server or Revit Cloud Worksharing.
- Revit Server connects offices who share a network but are not in the same geographic location.
- Revit Cloud Worksharing is a cloud-based service that allows any Revit users inside or outside a network to collaborate on a Revit model.
- Worksharing is a design method that allows multiple team members to work on the same project model at the same time. On many projects, team members are assigned a specific functional area to work on.
PROCEDURE:-
- Reopen the architectural model. which is alreaady saved in the name of Challenge_06_Architectural.
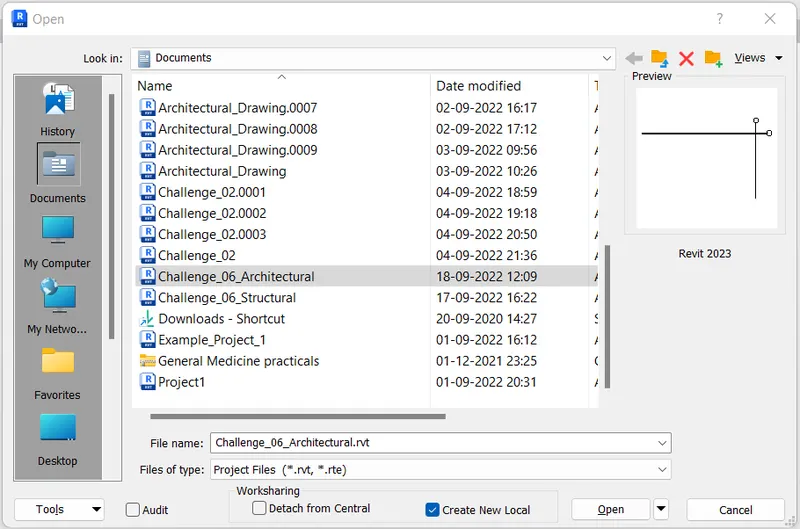
- Use collaborate tab and Use the tool collaborate under the collaborate tab.
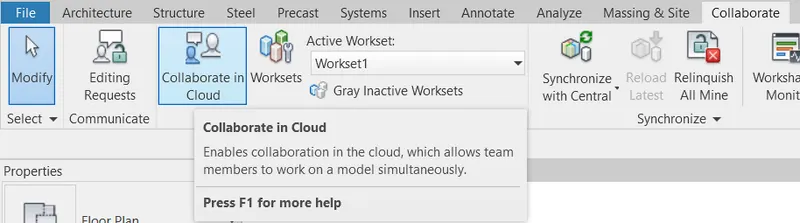
- After clicking on collaborate a dialogue box appears, In which it asks how would you like to collaborate. In which there are two options those are within your network and within cloud.
- Tool collaborate enable multiple people to work on it.
- Opt first option among those. Here i opted is collaborate with in netework.
- Click OK
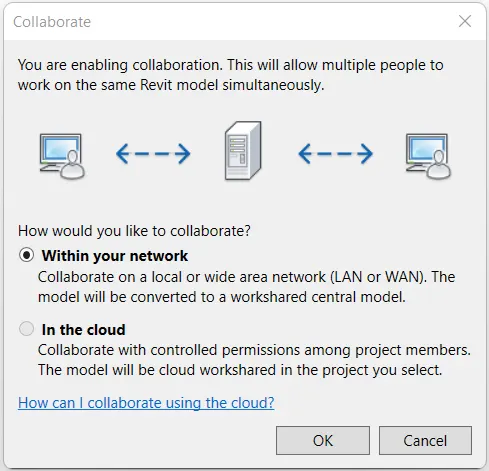
- Then automaticatically work sharing enables.
- Once it has been collaborated and then click on save button. Then a dialogue box appears, which ask you that, is this is the first time that the project has been saved since worksharing enabled. This project will therefore become the central model. Do yoy want to save this project as the central model.
- Click Yes, to save the project as central file.
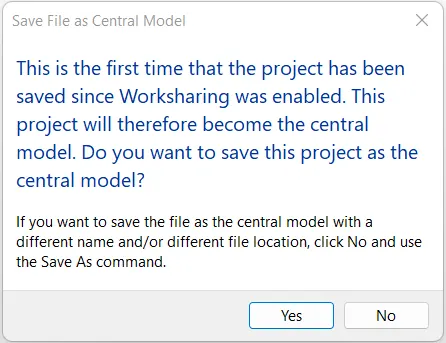
- Then grid appears as shown. Except worksharing there were no changes
RESULT:-
The structural model is collaborated and is saved as a central fil as shown above..
____________________________________________________________________________________
4. Create the Grids Longitudinal and Transverse pattern for the project similar to the task done in Week 2
AIM:- To Create the Grids Longitudinal and Transverse pattern for the project similar to the task done in Week 2
INTRODUCTION:-
- Grid lines are lines that cross the chart plot to show axis divisions.
- Grid lines help viewers of the chart see what value is represented by an unlabeled data point.
- Especially for large or complicated charts, grid lines give valuable cues to the viewer.
- Grid lines come in two types: major and minor.
- Grids are annotation elements that help organize your design.
- Add grid lines to a model to create a reference and framework for the design.
- Change the grid type during placement or change the type of existing grids in a view.
- Revit provides several different ways to collaborate with team members who are also using the software.
- You can link multiple Revit models together, allowing team members to work in context.
- Through worksharing, users on the same local area network (LAN) can work together in the same Revit model.
PROCEDURE:-
- Open the architectural model. which is already saved in the name of Challenge_06_Architectural as it is saved as central file.
- I have changed the units from metric to imperial.
- Go to Arhitectural tab, taken the same grid option and use the offset at below the toolbar.

- Give the value of offset as 15' and make the line offset with help of pick option in modify tool bar option.

- Grids are placed on both directions that transverse and longitudinal direction.
- Finally result is shown below.
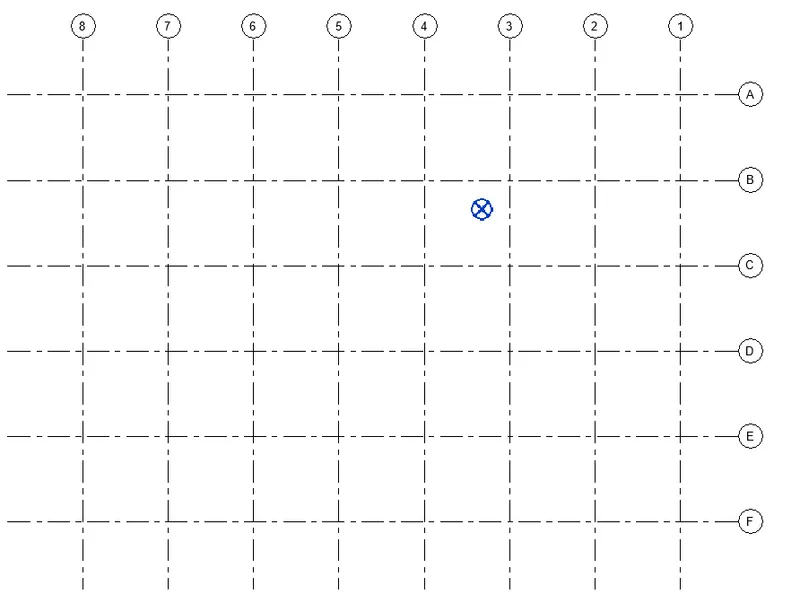
RESULT:-
Grids are created in both the Longitudinal and Transverse pattern for the project as shown above.
____________________________________________________________________________________
5. Synchronize the changes from the local copy to the central file of the architectural model.
AIM:- To Synchronize the changes from the local copy to the central file of the architectural model.
INTRODUCTION:-
- When working on a workshared project, use the Synchronize with Central tool to save your local changes to the central model.
- To Synchronize with Central: Click Collaborate tab Synchronize panel Synchronize with Central drop-down (Synchronize Now).
- The central model stores the current ownership information for all worksets and elements in the project, and acts as the distribution point for all changes made to the model.
PROCEDURE:-
- Open the Architectural model. which is already saved in the name of Challenge_06_Architectural.
- I need to reflect the changes made in local file should be synchorinzed, to reflect changes made in central file.
- Go to collaborate tab, there are 2 ways to synchronize the changes using central option. For synchronize there is a tool above the tool bar or we can synchronize using collaborate tab in which there is a option called synchronize with central tool.
- Just drop down the synchronize with central, in which there are two options that is, synchronize or modify settings and synchronize now.
- Synchronize or modify settings enables you to change the path, that to if it is required.
- Click on Synchronize or modify option
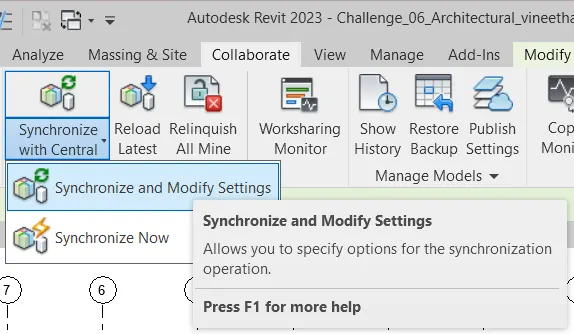
- And then a dialogue box appears.
- In which enable the compact it central option and then click on ok button.
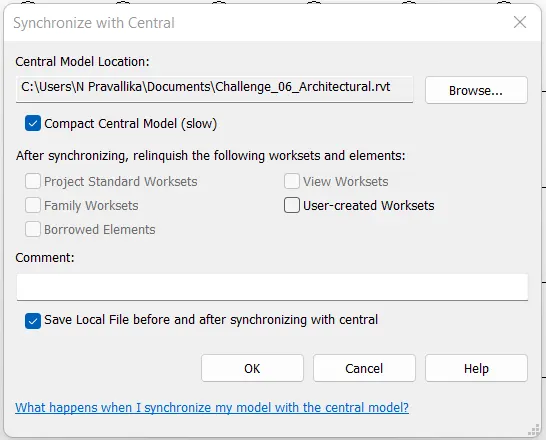
- Finally finishing the settings and give save option to save file in central model.
RESULT:-
The model is synchronized as shown above.
____________________________________________________________________________________
6. Open the structural model and use the collaborate tools to save the model as a central file.
AIM:- To Open the structural model and use the collaborate tools to save the model as a central file.
INTRODUCTION:-
- When working on a workshared project, use the Synchronize with Central tool to save your local changes to the central model.
- To Synchronize with Central: Click Collaborate tab Synchronize panel Synchronize with Central drop-down (Synchronize Now).
- The central model stores the current ownership information for all worksets and elements in the project, and acts as the distribution point for all changes made to the model.
PROCEDURE:-
- Reopen the structural model. which is alreaady saved in the name of Challenge_06_Structural.
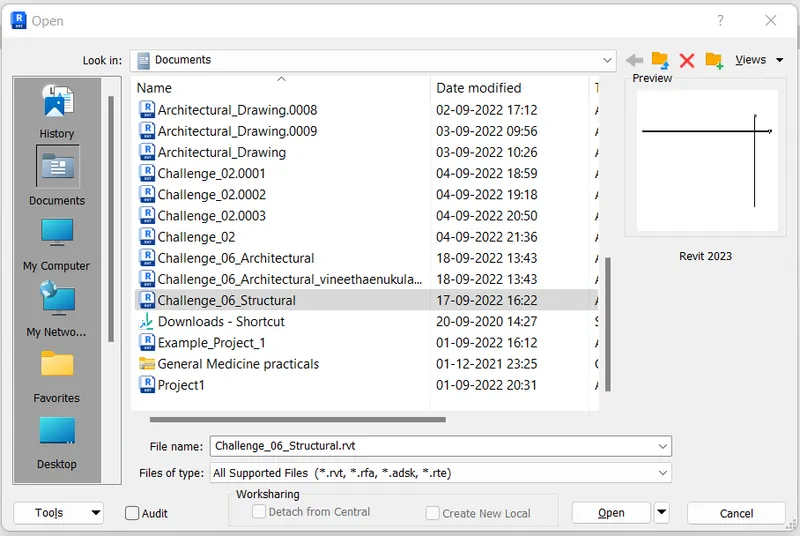
- Use collaborate tab and Use the tool collaborate under the collaborate tab.
- After clicking on collaborate a dialogue box appears, In which it asks how would you like to collaborate. In which there are two options those are within your network and within cloud.
- Tool collaborate enable multiple people to work on it.
- Opt first option among those. Here i opted is collaborate with in network.
- Click OK
- Then automaticatically work sharing enables.
- Once it has been collaborated and then click on save button. Then a dialogue box appears, which ask you that, is this is the first time that the project has been saved since worksharing enabled. This project will therefore become the central model. Do you want to save this project as the central model.
- Click Yes, to save the project as central file.
- Then grid appears as shown. Except worksharing there were no changes
RESULT:-
The structural model is collaborated and is saved as a central fil as shown above.
____________________________________________________________________________________
7. Under the Collaborate tab, select the grids and levels from the architectural model, and using Copy Monitor try to copy the grids to the structural model. See what happens when the copy monitored grid is moved around in the structural model
AIM:- To select the grids and levels from the architectural model, and using Copy Monitor copy the grids to the structural model.
INTRODUCTION:-
- The Copy/Monitor tool is designed for use with important elements of a building model to streamline coordination and collaboration on a project that involves multiple teams. When you start the Copy/Monitor tool, you can select Use Current Project or Select Link.
- When working on a workshared project, use the Synchronize with Central tool to save your local changes to the central model. To Synchronize with Central: Click Collaborate tab Synchronize panel Synchronize with Central drop-down (Synchronize Now).
PROCEDURE:-
- Open the Structural model. which is already saved in the name of Challenge_06_Structural.
- Before using the copy monitor tool.
- We need insert the architectural template in to the structural one.
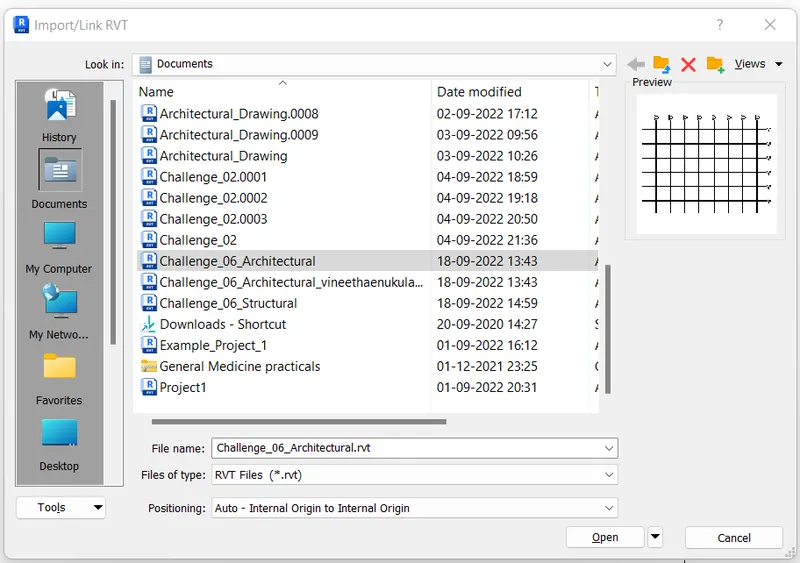
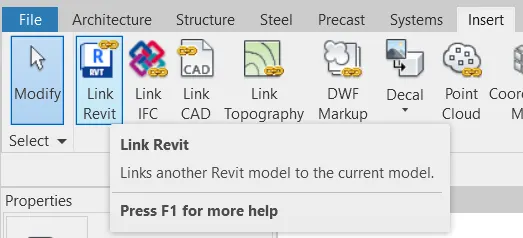
- For that just go to insert tab then click on link revit then insert the architectural template to structural one.
- Here architectural template is linked with structural template but not copied.
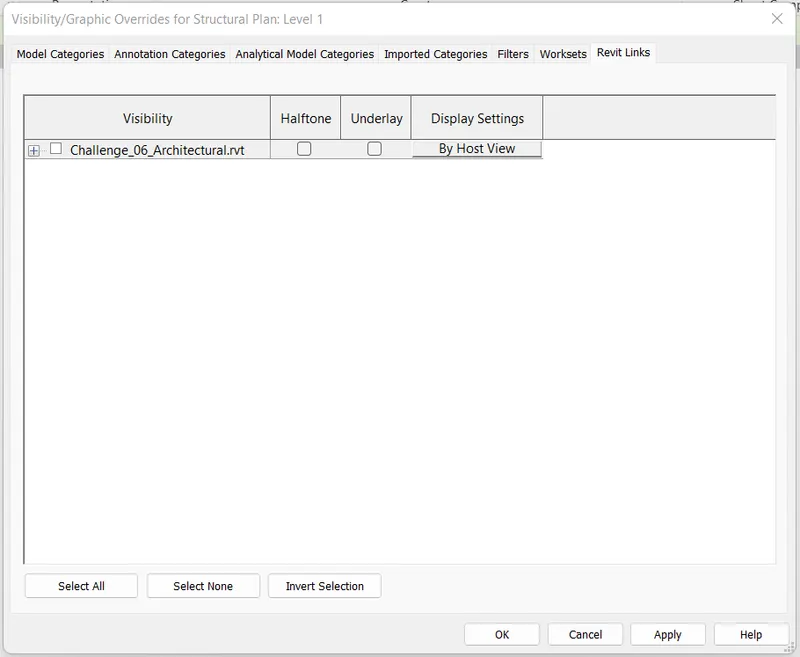
- Click on visibility / graphics or type VG and then click on revit link.
- And then uncheck the challenge_06_Architectural.
- Again Click on visibility / graphics or type VG and then click on revit link and then check the challenge_06_Architectural. Then difference between linked model is known.
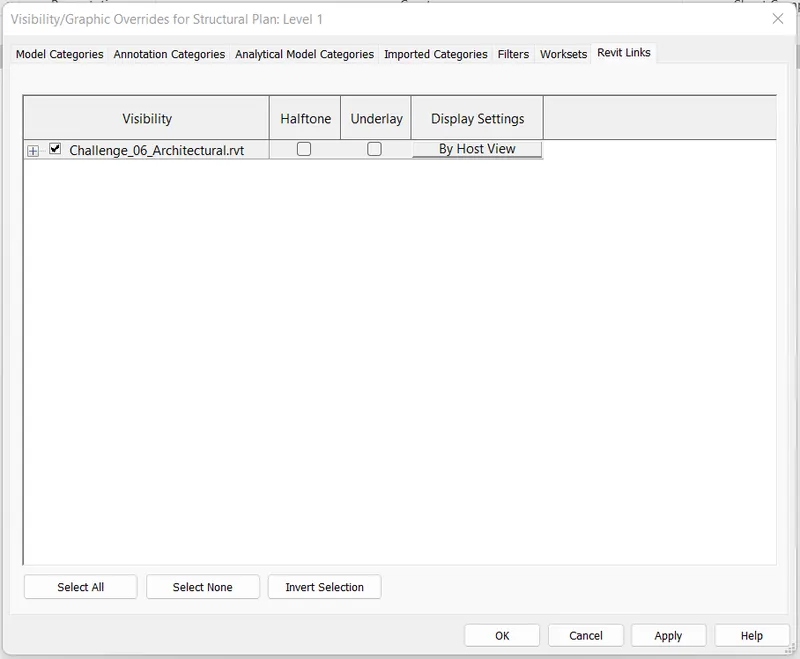
- Structural link model will attach if we check the visibility and if we uncheck the visibility the structural link will be detached.
- Click on Apply and Click OK.
- Go to collaborate tab, Click on copy / monitor option.
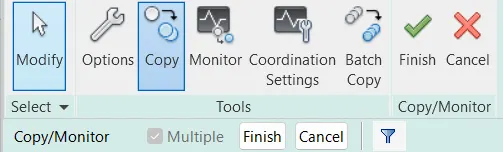
- In that click on select link option and click on architectural model.
- Using multiple option select all the grids.
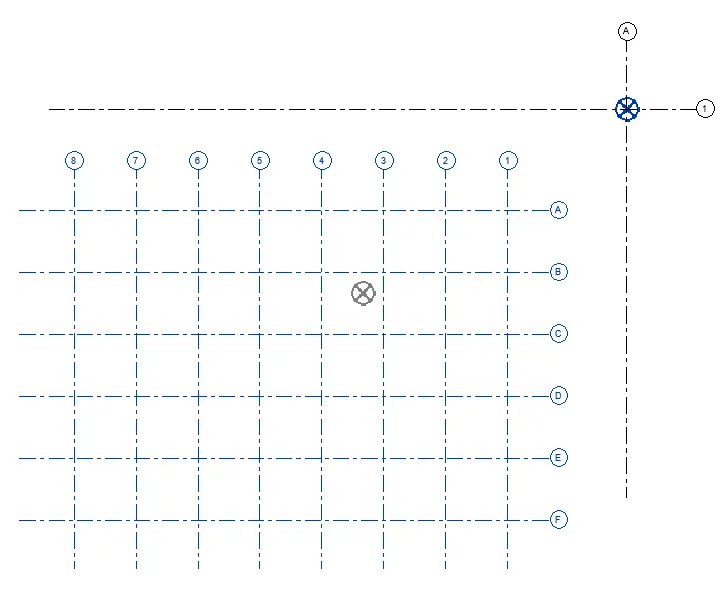
- Click on finish button below the tool bar.
- In tool bar there is option called finish, click on it.
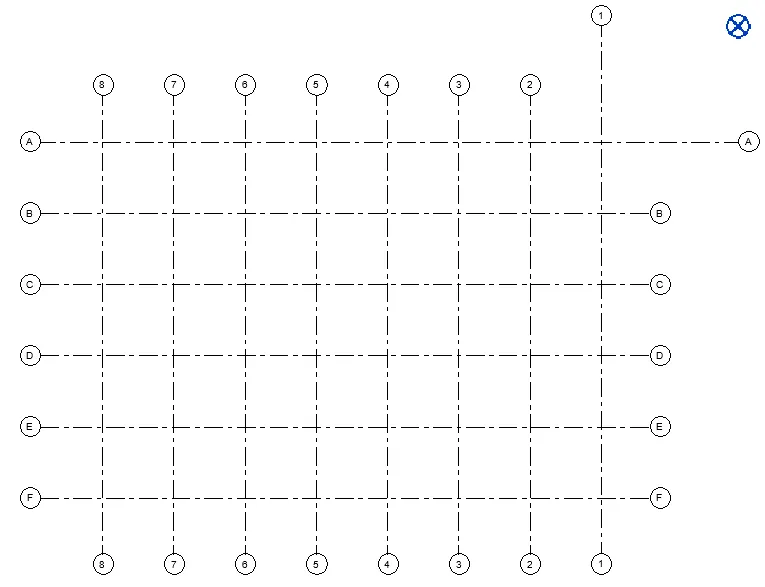
RESULT:-
The grids and levels from the architectural model, and using Copy Monitor copy the grids to the structural model are created.
____________________________________________________________________________________
8. Create another new file with a construction template. Save the new file as a central model. This file will include both architectural and structural model. Under the manage tab, Click manage links to link both architectural and structural files. Save the file and close all the files.
AIM:- To Create the Construction Template and save it as a central file and then Link both Architectural and Structural revit file.
INTRODUCTION:-
- In Projects, use Structural Template to create a new structural model. Next, you transfer project settings. Choose Link Revit, then in the Import/Link dialog box select the architectural model RVT file.
PROCEDURE:-
- Open Revit software
- In the Model select New from Autodesk Revit home interface
- Select construction Template from template file.
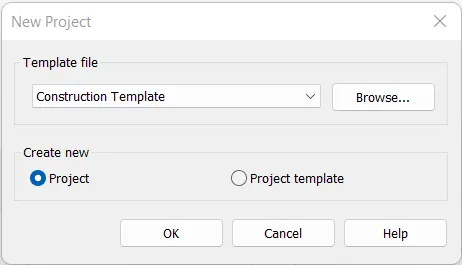
- Select Project from create new in new project dialog box.
- Save the file as a central file
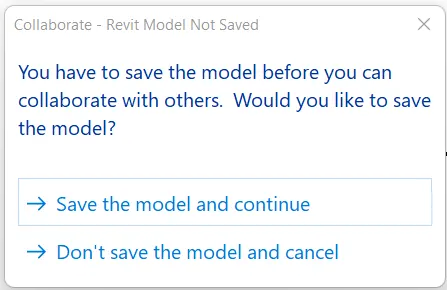
- Click on save the model and continue.
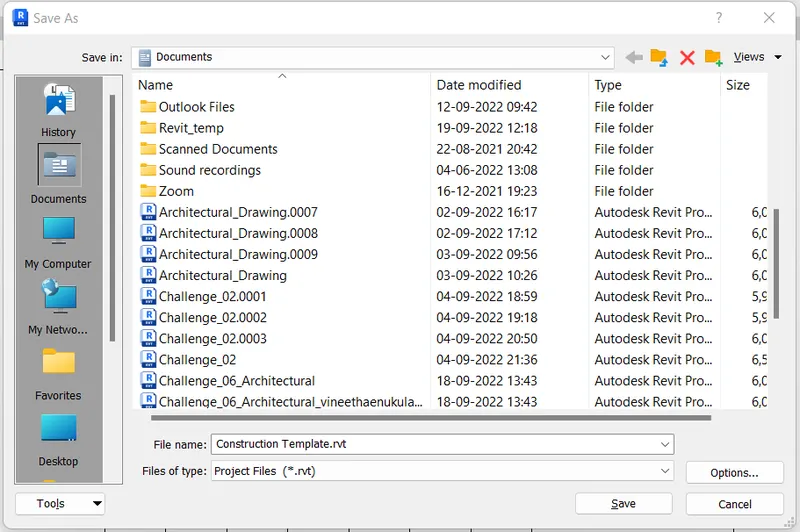
- Use collaborate tab and Use the tool collaborate under the collaborate tab.
- After clicking on collaborate a dialogue box appears, In which it asks how would you like to collaborate. In which there are two options those are within your network and within cloud.
- Tool collaborate enable multiple people to work on it.
- Opt first option among those. Here i opted is collaborate with in network.
- Click OK
- Then automaticatically work sharing enables.
- Once it has been collaborated and then click on save button. Then a dialogue box appears, which ask you that, is this is the first time that the project has been saved since worksharing enabled. This project will therefore become the central model. Do you want to save this project as the central model.
- Click Yes, to save the project as central file.
- Go to manage tab, and then click on manage links, there is a option called Add, right bottom side.
- Click on Add
- Then Import/Link RVT dialogue appears.
- Click on architectural and structural model, one after the other. In which we are working on it.
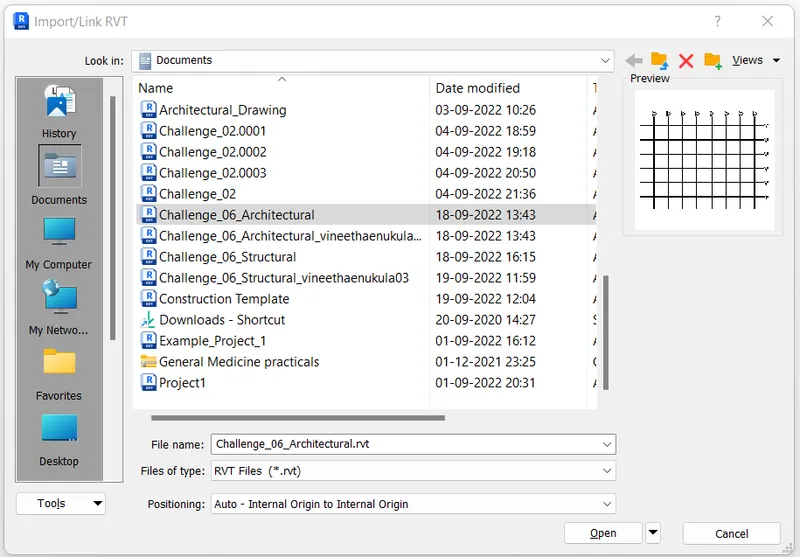
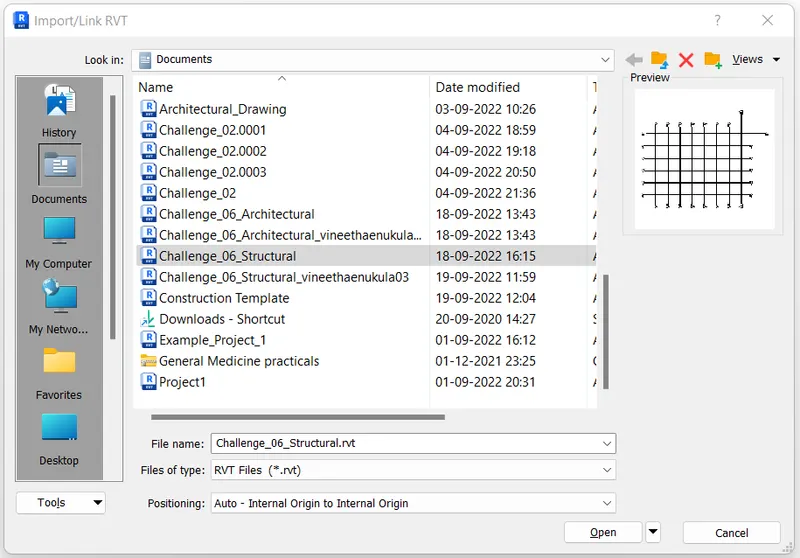
- Go to manage tab, click on manage link, as we already linked the revit file.
- In that dialogue box, we can see the linked model. We can delete the model if required.
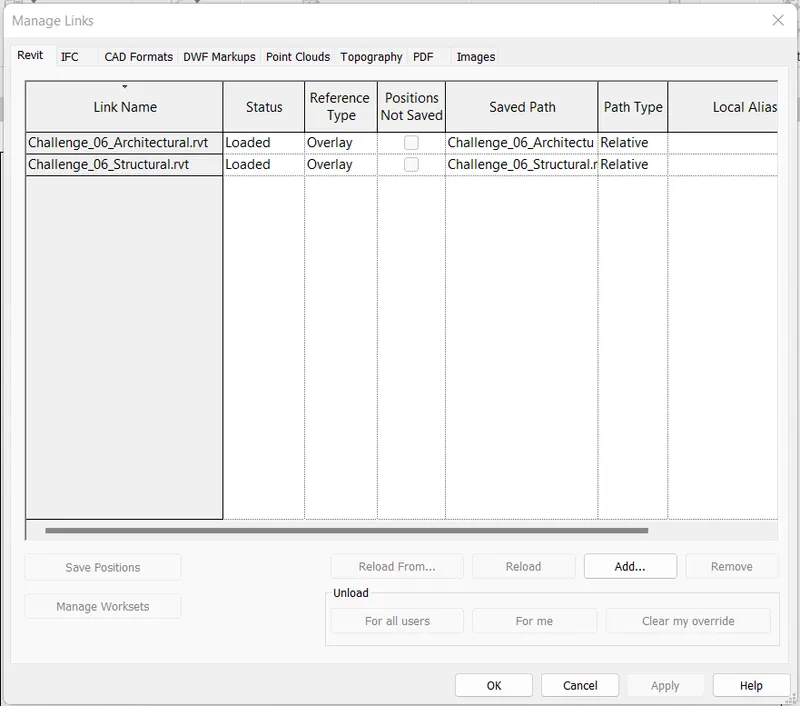
- Then grid appears as shown. Except worksharing there were no changes
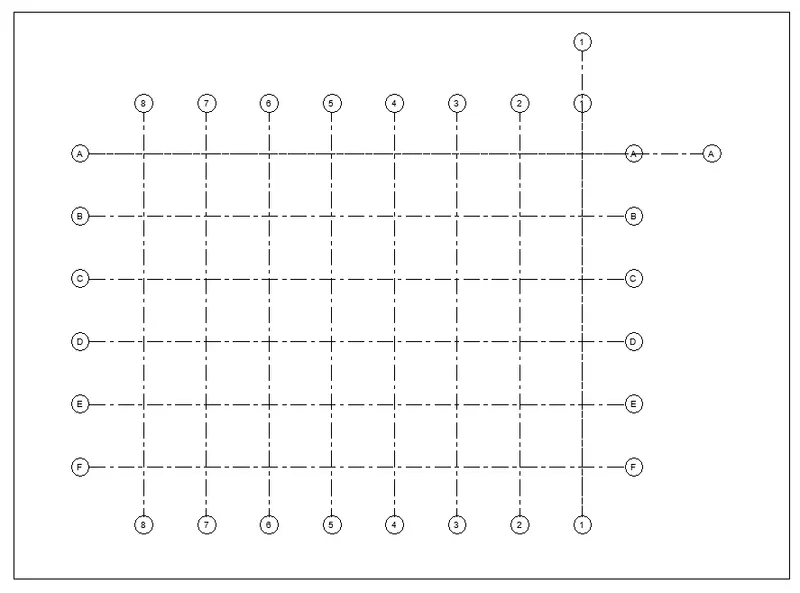
RESULT:-
- Construction Template is created and savee it as a central file and then Linked both Architectural and Structural revit file as shown above.
___________________________________________________________________________________
9. Are the grids from structural and architectural model matching in the construction template created? If yes the model is set up for project 2. If not work on the shared parameters and linking options under Manage links
( Hint: origin to origin, by shared coordinates or by project base point to base point ) to link the models in an appropriate manner
AIM:- To Check wheather the grids from structural and architectural model is matching or not.
INTRODUCTION:-
When you import or link geometry to the current Revit model, use the Positioning option of the related Import or Link dialog to specify how the incoming geometry is placed relative to the host model. Choose an option that best matches your situation and workflow.
- Automatic positioning options place the incoming geometry in the host model based on a set of rules. If you know the position of coordinates in the host model and in the imported or linked file, use automatic positioning to precisely place the incoming geometry. These options streamline the process and avoid errors that can occur during manual placement.
- Manual positioning options allow you to place the incoming geometry based on a specific point defined in the imported or linked file. These options give you direct control over the placement of the incoming geometry in the host model.
- Auto - Center to Center
- Auto - Origin to Origin
- Auto - By Shared Coordinates
- Auto - Project Base Point to Project Base Point
PROCEDURE:-
- The girds are matched in construction template ( Architectural and structural ) and we saved the model for project 2.
RESULT:-
The girds are matched in construction template.
____________________________________________________________________________________
10. List a flow chart of a project tree set up in terms of Construction model, Architecture & Structure model, in this exercise and understand how many people can work on the same project using Revit simultaneously
- Revit allows multiple users to work simultaneously on one Revit project this can be achieved through the work-sharing using linked elements, project elements are separated into individually managed models that can be linked together members from various discipline can work together in Revit project.
- Architects
- Structure Engineer
- Mechanical Engineer
- Electrical Engineer
- Plumbing Engineer
CONSTRUCTION MODEL
|
ARCHITECTURAL MODEL |
STRUCTURAL MODEL |
|
|
|
|
|
|
|
|
|
|
|
|
|
|
|
|
|
_____________________________________***THE END____________________________________