Underbody Coating
UNDERBODY COATING
INTRODUCTION:
A car’s underbody is exposed to the most wear and tear caused by muddy water, potholed roads, stones and other obstacles on the road. Because it’s not in plain sight, we often do not see the damage.
Underbody coating provides long term protection from corrosion to car's underbody. It also protects parts like internal body panels, frame rails and other inner cavities that are not physically accessible but are prone to corrosion.
Protecting the underbelly of the car should be our top priority. Especially during monsoon when heavy precipitation causes the roads to become mini-rivers and our cars are left stranded there. This makes them prone to heavy corrosion in the underbody region.
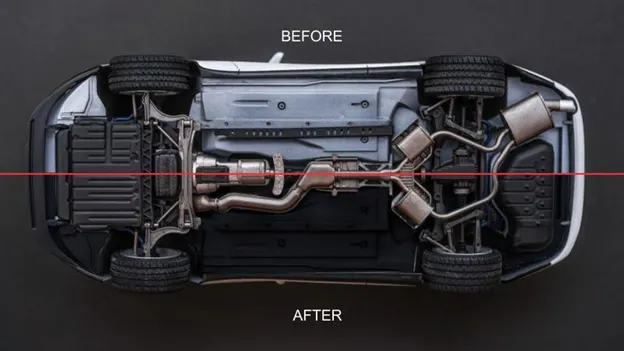
Undercoating
This method involves spraying a tar-based substance on the exposed parts of a vehicle's underbody. The tar-like undercoating acts as a barrier once it hardens, keeping out moisture, salt, and other substances. This undercoating works best when applied to the undercarriage of a new vehicle.
Rustproofing and undercoating your vehicle can protect it from corrosion and rust. This is especially important for the undercarriage of your vehicle, which commonly comes into contact with substances such as water, chemicals such as salt, and other dirt and debris from the road. Without some sort of protection, the bottom of your vehicle can rust and corrode, leading to part failure.
Underbody Coatings:– available in both thin film and foaming types are designed to provide a critical protective barrier between the road and vulnerable underbody surfaces. In addition to protecting from moisture and impact, the foaming‐type products provide excellent sound dampening properties.
Before rustproofing or undercoating your undercarriage, you need to consider a few things.
Modern Automotive Coating Processes
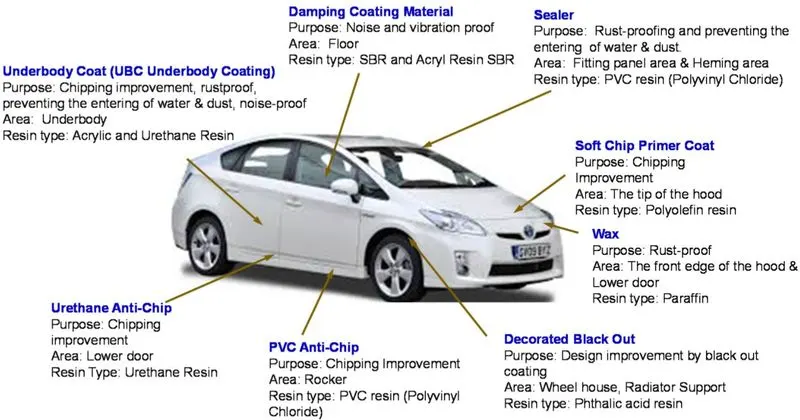
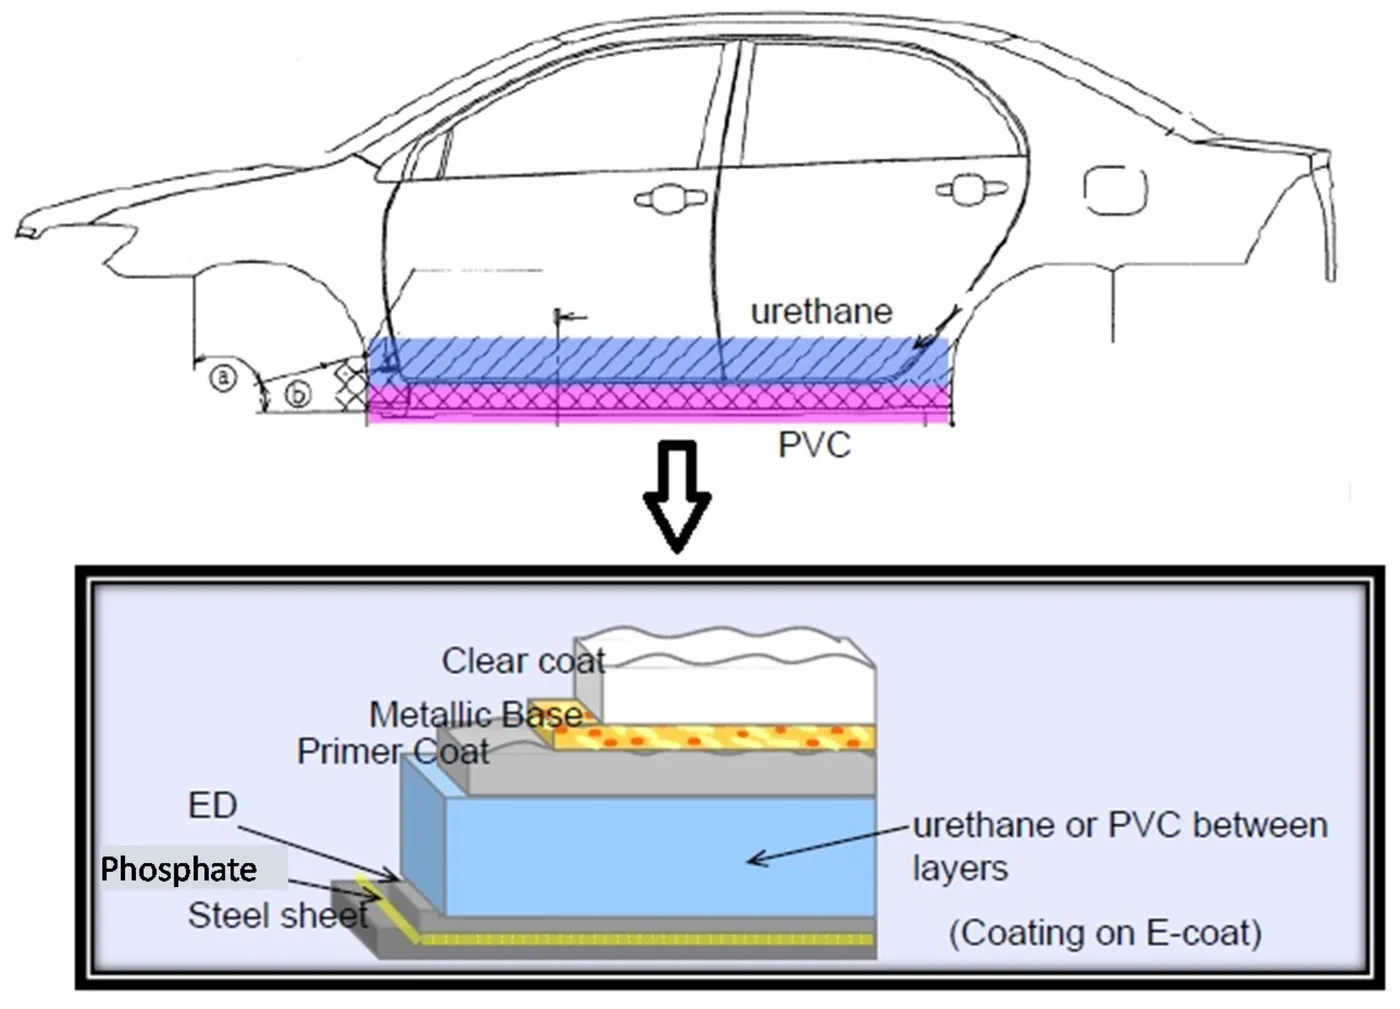
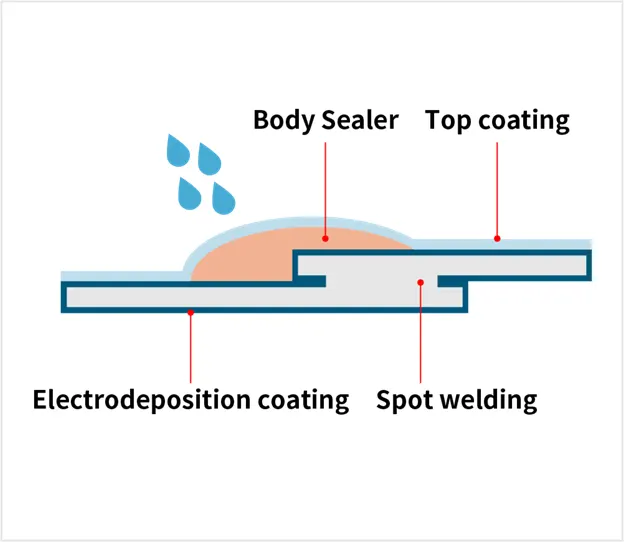
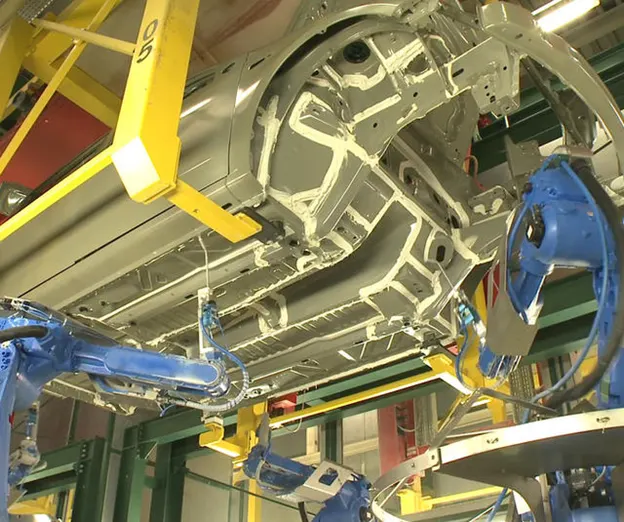
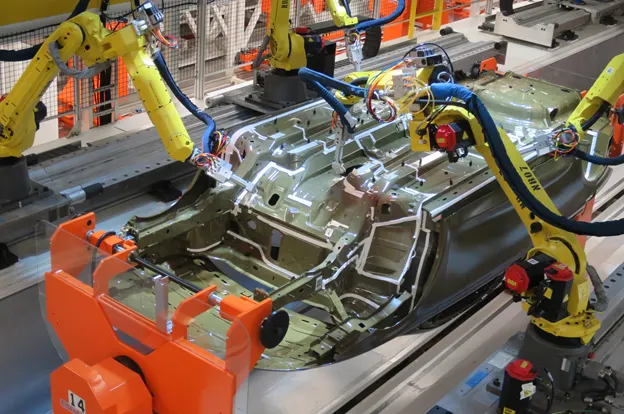
Modern automotive coating methods consist of five main steps. They include the following:‚Pre treatment: removes and cleans excess metal and forms an appropriate surface structure enabling bonding of a corrosion protection layer.‚The next step is electrode position (ED) of the anti-corrosion or rust prevention layer.‚A sealer like Poly Vinyl Chloride (PVC) is applied for anti-corrosion, elimination of water leaks,and minimization of chipping and vibrational noise.‚A primer is then applied to promote adhesion between the surface and the basecoat; it also impartsa smoother surface for subsequent layers and has anti-chipping properties. Finally, the topcoats that include a basecoat and clearcoat are applied; they providesurface properties that are sought after, including color, appearance, gloss, smoothness, and weather resistance.The areas of an automobile depicted in Figure 1 show where these five steps of coating and other additional coatings are used. As can be realized when examining this figure, a significant numberof specific coatings and materials are needed in addition to the above-listed steps to manufacturea salable automobile.
It protects the underbody substrates from:
- Environmental conditions
- Impacts
- Dampens sound and vibration
- Insulates against cold and heat
- Protects against Corrosion
- Seals off seams
- Hides welds, repairs & bodywork with spray
TYPES:
Rubberized Undercoating
Rubberized Undercoating is easy to apply and offers sound-cushioning as well as protection from dust, moisture, and dings or dents.
In addition to your undercarriage, rubberized undercoating is also safe to use on wheel wells and quarter panels, and dries to a soft rubbery finish that prevents further rust, damage, or moisture seeps. The coating can be painted over and, if necessary for bodywork, can be easily removed with an undercoating removal spray.
Overall, Rubberized Undercoating is generally the best option for protecting your vehicle's undercarriage, as it provides the simplest and best protective measures against rust and moisture.
Polyurethane Undercoating
The other option for undercoating your vehicle is to use a polyurethane-based sealant. This type of vehicle undercoating is a little bit quicker and easier to apply.
Oftentimes, polyurethane undercoating will come in canister preload into an application gun. This type of sealant works by seeping into all cracks and seams, displacing salt and moisture and oozing around rusty areas to bond with and protect unoxidized metal. It also sands quickly in case you'll need to perform bodywork and can be painted over.
On the flipside, this type of car undercoating generally requires a little bit more surface prep work before applying -- sanding and applying an etching primer to bare metals before using are generally recommended.
Wax or Paraffin-Based Undercoatings
A paraffin-based undercoating will be the cheapest and quickest option available with which to protect the undercarriage of your vehicle. However, keep in mind that it will wear off quicker than other types of undercoating and will need to be stripped and reapplied at least once every year.
Wax-based undercoatings never truly harden. During application, they drip or flow into seams and cracks to provide protective properties. They are usually available in a spray gun canister or in an aerosol can and offer at least a base protection in moderately humid climates.
Asphalt-Based Undercoating
For standard vehicles, any of the aforementioned types of undercoating will provide sufficient protection. For large trucks and heavy machinery, asphalt-based undercoating provides a bit of extra durability against rocks, chips, and moisture.
Asphalt-based undercoating generally contains a little bit of rubberized material that sets up firmly and also helps soften noise. Generally sold in five gallon containers, this type of undercoating also needs more cure time than the other three, and is NOT paintable, making it best to use only for undercarriages
Process-
- When it comes to updating your vehicle or using any sort of coating, remove the rust completely firstand then proceed. Rust removal is easily achieved by sandblasting or sanding, depending on the area and the extent of the rust.
- Once you've removed the rust and prepped your undercarriage for coating, give it a quick rinse and let it dry to ensure you aren't further trapping any contaminants on your vehicle's underbelly. Using a degreaser to clean the metal first is also recommended.
- Most undercoating is generally applied with a spray gun. A disposable spray gun will work best; once the undercoating hardens, it becomes very difficult to clean the gun even with a lot of thinner. A Schutz disposable spray gun is the best option.
- No matter what type of vehicle undercoating you've selected, two coats will provide the optimum protection. Allow ample dry time between coats.
- Let the undercoating cure completely (usually overnight) before driving your vehicle on the road.
The advantages and disadvantages of rustproofing/undercoating your vehicle
- The best time to rustproof or apply undercoating protection is when you buy a brand new vehicle that hasn't been driven yet. In essence, ask the dealership to apply the protection before you even drive off the lot. For used vehicles, rustproofing could just be a waste of time, as all you are really doing is covering up dirt and grime that already exists on the vehicle.
- Apply protection while at the dealership. Many dealerships offer rustproofing or undercoating as an add-on when buying a new car.
- This represents the best time to have an undercoating applied, as the underbody of the vehicle is probably the cleanest it will ever be.
- If you only plan on keeping the vehicle for a few years, you might consider sparing the expense and foregoing getting an undercoating applied.
- Applying an undercoating on a used vehicle. Another option to having an undercoating applied at the dealership is to have one applied at a later time.
- This applies most commonly to used vehicles. While the underside of the vehicle has already been exposed to water, dirt, and other debris from the road at this point, applying an undercoating now can protect it from further exposure.
Different types of rustproofing/undercoating
When having your vehicle rustproofed or an undercoating applied, you have a few options to choose from. Whether you prefer the latest technology or a more tried and true method, knowing what the different options are should allow you to choose the best one for your vehicle.
Spray method:
- The spray is the most common method used by dealers. The spray consists of a tar-like substance that is applied to the undercarriage. It functions as a barrier for salt, moisture, and oxygen, which causes corrosion.
- You can also purchase it as a DIY product, but the whole magic lies behind the method of application, so it’s better to do the job with a dealer, especially if you have a new vehicle.
Electronic method
- Using a weak electric current, this small device can stop the corroding effects of rust.
- You can have these electronic devices installed at the dealership, or save some money and buy them from a source outside of the dealership.
- The reviews on these devices are mixed, as this is a virtually new technology.
Dripless oil spray method
- A wax-like substance applied to the entire body of the vehicle, it hardens once it has dried.
- One of the downsides of dripless oil sprays is that you need to have holes drilled into the body of the car at specific points to make it effective.
- The spray also has a high viscosity, meaning that it does not always get into all of the nooks and crannies of your vehicle.
Drip oil spray method
- This is the most commonly recommended rust protection.
- Drip oil sprays tend to continue to drip once applied until they dry. This dripping can last anywhere up to 48 hours after application.
- Unlike the dripless varieties, the more watery nature of drip oil sprays means it gets into more areas on your vehicle, though you still need to have holes drilled in your vehicle's fenders, doors, and other areas to make sure that it gets to all the areas it needs to.
How to apply and remove an undercoating
Step 1: –
Cleaning the Underbody:-
You have to remove all debris and contaminants from the chassis to start with the undercoating process. It is another way to maintain your car in routine. You will need a hydraulic hoist or lift to complete this step in the right manner.Here is how you can clean the underbody.
- Degreaser:
A high-quality commercial-grade degreaser would be helpful in removing oil and grime from the undercarriage. Follow the exact steps listed on the cover or recommended by the manufacturer. Spray the degreaser, then allow it to soak for a moment, then wipe it off with a microfiber towel or shop rag.
- Grinding:
Now, grind the existing hard contaminants and rust from the undercarriage and other components that you want to treat. You can use a mild grinding pad to remove the debris easily, but remember to wear eye protection while doing it.
- Sanding:
After degreasing and grinding, remove those scratches and other stubborn contaminants using a 200 to 400 grit.
- Use a Tack Rag or IPA solution:
To wind up the cleaning process, wipe down the area with a tack rag or IPA solution.
Step 2 :– Applying Priming
You will need a primer for applying DIY consumers. Primers serve as a basecoat. You need to follow the instructions listed by the manufacturer for expected results. The recommended primers usually contain a high level of zinc. Zinc helps in reducing rusting, even if the protective layer is penetrated.
Step 3:– Applying Undercoating
This is the final step. The undercoating sprays are similar to bed liners. Most products are applied in two steps as dual layers. The first layer should be thin, covering the entire surface. Allow it to rest at least for an hour, especially if you are applying a rubberized undercoating.
After this layer has been dried, you can apply the second coat generously. Don’t forget to apply it as per the instructions given by the manufacturer. It will take a few hours to days for curing.
When you are done with the process, you need to look after the undercarriage to protect it from saltwater, road grime, or mag chloride as these contaminants are corrosive and result in oxidation and rusting.
Materials Needed
- Degreaser
- Grinder
- Microfiber towels
- Paint (black automotive paint)
- Paint Brush
- Primer
- Safety Glasses
- Sandpaper (at least 220 grit or larger)
- Scraper
- Undercoating
- Undercoating removal spray
- Vehicle hoist
While you could pay someone to apply an undercoating to your vehicle, you can also save money by doing it yourself. Before beginning, make sure you have the right equipment to successfully complete the task and enough space to complete the task safely.
- Clean the underbody. Start by cleaning the underbody of the vehicle.
- This requires you to put the vehicle up on a hoist.
- Using a degreaser, clean the underside of the vehicle.
- Next, remove all rust from the undercarriage using a grinder. Make sure to wear eye protection when doing so.
- Sand any remaining rust using sandpaper designed for metal. You need a sandpaper with a grit of at least 220 or larger.
- Wipe away all of the dust created from grinding and sanding.
- Paint and prime the underbody. After removing any rust, it is time to prime and paint the underside of the vehicle.
- Start by priming all of the areas you cleaned of rust. One of the best primer types to use is a high zinc primer. Allow the primer to dry.
- Your next step is to paint over the primer with black automotive paint. Allow the paint to dry.
- Undercoat the underbody. The last step in the process requires you to apply an undercoating to the underbody of your vehicle.
- Apply the undercoating liberally to the underbody of your vehicle. Make sure to apply it to every part that you expect to be exposed to the road. Allow this coat to dry for at least an hour, or longer if the instructions call for it.
- Apply a second coat of undercoating to the bottom of your vehicle. Allow this coat to dry overnight before driving on the road.
Tip: Use a rubberized undercoating for best results. A rubberized undercoating is more durable and seals better, protecting the metal from exposure to water.
- Removing an undercoating. Removing an undercoating is a simple process.
- Spray the undercoating with an undercoating removal spray.
- Once the undercoating has been softened enough, use a scraper to remove the undercoating.
Pros-
- Minimizes Sound: It minimizes the sound from underneath the car resulting a noiseless, smooth driving experience.
- Heat Insulation: It insulates the interior of the car from extreme temperatures from beneath the vehicle providing a comfortable cabin experience.
- Anti-chipping property: If any stone hits the coating it does not get chipped away hence protects the underbody from exposure to water.
Cons-
- Applying underbody coating will not have any effect to the already corroded part.
- Undercoating is costly.
- Since the corrosion itself starts after few year, underbody coating is not preferable to owner who change their car after few year.
Distinct Benefits
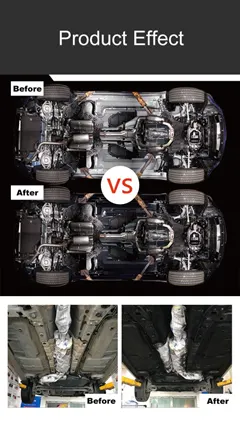
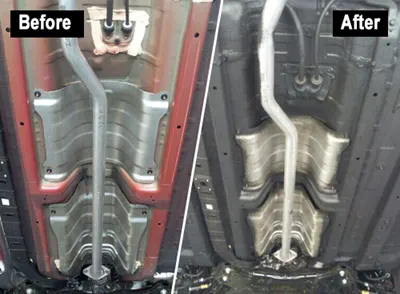
Low weight. High performance. The thin‐film type underbody coating has a thinner application and a lower specific gravity, it delivers the same performance as thicker, heavier coatings thanks to its advanced formulation.
Lower cabin noise. The flexible foaming‐type underbody coating provides a tough, sound‐deadening barrier that reduces stone and cinder noise, contributing to a more comfortable, quiet driving experience.
The Disadvantages of Undercoating
Nothing comes for free in this world. The same goes for undercoating. The undercoating or rustproofing spray is heavy in pockets. However, it is nothing when you compare it with the cost of replacing a vehicle after corrosion.
Where to apply underbody sealant
But if there is already considerable rust,
- Applying a sealant will accelerate corrosion rather than protect the underbody against it, because the corrosion will spread unseen and unchecked beneath the covering layer.
- Raise the car securely on ramps or axle stands, and check the underside.
- If the floor and the insides of the front and rear wings are already rusty, Do not attempt to seal.
- A sealant will be effective only if the underside of the car is completely clean.
- Wash it thoroughly with hot water containing a small amount of detergent, and when it is dry apply a proprietary engine -cleaning solvent with a stiff brush.
- Use a hose to remove the residue.
- When the underbody is dry, clean off any remaining film of dirt, Oil or grease with a clean cloth moistened with white spirit.
- After cleaning, treat any small areas of rust with a proprietary rust remover.
- When it is dry, apply a coat of pure zinc primer or a rust inhibitor.
- Parts of systems attached to or passing beneath the underbody, Such as the exhaust system, hydraulic pipes, and the moving parts of the braking and suspension systems, need to be masked before the sealant is applied.
Applying the sealant:-
- Prepare the sealant as directed on its container.
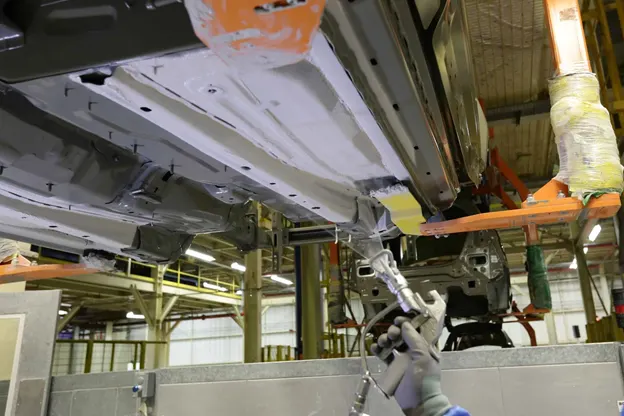
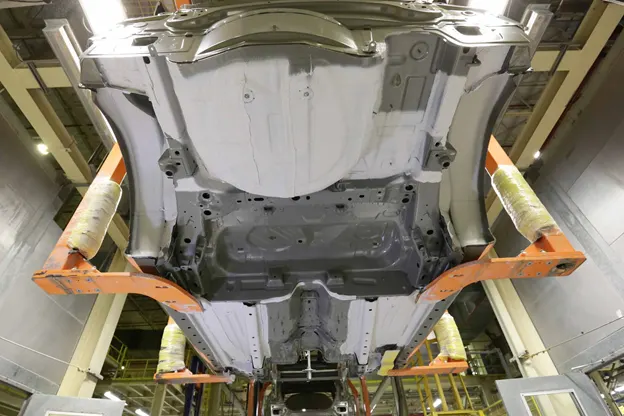
- Following the maker’s instructions, start applying the sealant under the floor area starting at one end of the car and working methodically to the other.
- Apply generously, painting all unmasked parts.
- Work in sections, and check each section with a torch to make sure, It is completely covered before you move on.
- When coating the wings, start at the front with the difficult areas, The top front and top rear corners. Check with a torch that these areas are completely sealed.
- Coat the rest of the underwing areas, making sure the wheel-arch edge is well covered.
- Front wings with a built-in plastic underwing do not need treatment.
- On completion, remove all the masking when the sealant is set, not forgetting the tape covering the drain holes.
- If you have accidentally applied sealant to the paintwork, clean it off with white spirit while it is still soft.
Patching uncoated areas:-
- New, unsealed parts fitted to a sealed underbody should be treated with sealant as soon as possible.
- If an existing sealing coat has begun to lift, the damaged areas should also be retreated at once.
- If possible, use the same type of sealant as that already applied. Mastic-based sealants are not always compatible with factory-applied underbody sealants.
- If you patch the sealing coat with a product, that is not approved by the car manufacturer, the corrosion warranty may be invalidated.
- Peel off damaged or lifting sealant with a knife blade. Workaround the area until you reach a sound part. Remove any dirt on the metal with a stiff brush, and use a neutralizer on any rust patches.
- Clean the area with a cloth moistened with white spirit, and wipe dry. Mask any moving parts nearby or parts that heat up, before applying the sealant.
- For small patches, sealant in an aerosol can is easy to apply.
Preparing the car:-
- Components that get hot or have moving parts must not be coated with a sealant.
- Use newspaper, brown paper, pieces of cardboard and old rags, held in place with masking tape, to protect them. Large parts such as the engine, gearbox and back axle are easy to avoid and need not be masked.
- Wrap carton around smaller parts of the engine, such as the propeller and driveshaft.
- Remove the wheels, and where the sealant is to be applied close to the suspension, tape newspapers over the pivots and cover any grease nipples with tape. Wrap pieces of rag around ball joints in the steering system.
- Wrap cardboard round coil springs and telescopic dampers. Mask leaf springs and lever dampers with newspaper or old rags. Also, wrap cardboard and newspaper round the exhaust system.
- Do not apply a sealant to any brake pipes.
- It prevents thorough inspection of the pipes for rust, and if the sealant is penetrated, local corrosion will be accelerated.
- Do not coat the handbrake linkage; wrap the cables securely with brown paper and make sure the pivots are masked.
- When working inside the wings, drape the or drum assembly and the suspension arms with an old cloth or plastic bag.
- Under the wings, mask the backs of any lights, such as headlights, sidelights, side markers, and direction indicators.
- Do not seal any areas that are used as jacking points.
- Tape over all box-section drain holes to prevent them from becoming blocked with sealant.
CONCLUSION:-
Using an after Market underbody coating offer extra protection. The thicker underbody coatings used on cars also act as effective sound dampeners. They can reduce road noise and tyre noise and make the cabin seem quieter due to the sound absorptive nature of rubberized paints.