PYTHON Project: 2R Robotic Arm Animation
Aim
To write a PYTHON program to simulate the forward kinematics of a 2R Robotic Arm, and to create the animation of the motion.
Theory
A robotic arm is basically a type of mechanical arm, usually programmed as similar to that of a human arm. For such mechanisms, the links are connected by joints allowing it to have either rotational or translational motion or displacement. A 2R robotic arm is such a robotic arm which have two rotational motions. That is, the two links of the mechanism will have rotational motion over a 2D plane with only single degree of freedom.
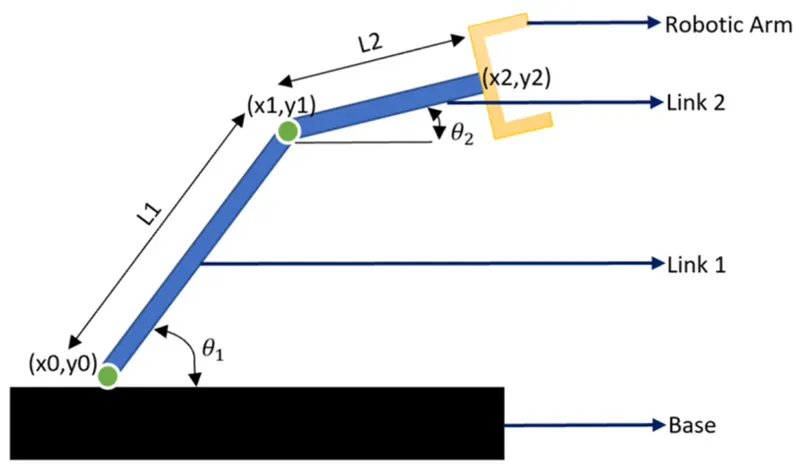
Figure 1: 2R Robotic arm
The figure 1 shows the 2R robotic arm where its constituent parts are labelled, namely Base, Link 1, Link 2 and robotic arm or manipulator.
Here, `L_1` and `L_2` are the dimension of the two links, Link 1 and Link 2 of the mechanism which undergoes rotational motion. The Link 1 rotates about the fixed point `(x_0,y_0)`. The other end of the Link 1 will be at the position `(x_1,y_1)`. The one end of the Link 2 will have the position `(x_1,y_1)` and will rotate about this point. The other end of the Link 2 will be at the position `(x_2,y_2)`.
Let's consider that the `(x_0,y_0)` is the origin which is the fixed position.
ie., `(x_0,y_0) = (0,0) => x_0 = 0; y_0 = 0`
Let `theta_1` and `theta_2` be the angles subtended by both Link 1 and 2 with respect to the x-axis. Therefore,
`x_1 = L_1.costheta_1` and `y_1 = L_1.sintheta_1`
`x_2=x_1+L_2.costheta_2` and `y_2=y_1+L_2.sintheta_2`
Objectives
- Understanding the concept of 2R robotic arm.
- Creating the code for 2R robotic arm in Python.
- Making animation of the robotic arm.
Program
# 2R Robotic Arm

import math
import matplotlib.pyplot as plt
import numpy as np

# Assigning values to the arms
L1 = 2
L2 = 1

"""
(x0,y0) represent the initial position of the arm which is fixed
(x1,y1) represent the other co-ordinate of the first arm which is liked to the second arm
(x2,y2) represent the other end of the second arm
theta1 and theta2 represent the angle made by the arm w.r.t. x-axis
"""

# Assigning values to theta1 and theta2
theta1 = np.linspace(0,math.pi/2,10)
theta2 = np.linspace(0,math.pi/2,10)

# Since (x0,y0) is fixed position, it is assumed to be at the origin
x0 = 0
y0 = 0

# ct is the count of no. of plots
ct = 0

"""
For loop is used for the motion of each link where i represent each position of link 1 and j for link 2
"""
for i in range (0,len(theta1)):
	for j in range (0,len(theta2)):
		x1 = L1*math.cos(theta1[i])
		y1 = L1*math.sin(theta1[i])
		x2 = L2*math.cos(theta2[j]) + x1
		y2 = L2*math.sin(theta2[j]) + y1

		ct = ct+1

		plt.figure()
		plt.xlim([0,3.2])
		plt.ylim([0,3.2])
		plt.xlabel('x-axis')
		plt.ylabel('y-axis')
		plt.title('Forward Kinematics of a 2R Robotic Arm')
		plt.plot([x0,x1],[y0,y1], label = 'Link 1')
		plt.plot([x1,x2],[y1,y2], label = 'Link 2')
		plt.legend(loc='best')
		filename = str(ct)+'.png'
		plt.savefig(filename)
Each step of the program is explained with comment.
The images saved for each iteration of the for loop is saved in corresponding folder as shown below:
These images are stitched together using an external software (here: ergif.com).
Output of the program
The video link for the animation created using modified program is provided below:
https://youtu.be/d1iY8mYV5b4
Conclusion
The animation file of the plot of the 2R Robotic arm has been successfully created.