Vehicle Direction Detection
AIM: TO CREATE A SIMULATION MODEL FOR VEHICLE DIRECTION DETERMINATION
OBJECTIVES OF THE PROJECT:
- Development of MATLAB Simulink model as per requirement.
- Tag the requirements to the simulink model; tagging requirement 1 & requirement 2 to their corresponding subsystems is fine.
- MBD compliant changes, Data Dictionary creation & code generation is added advantage, and that is not scope of this project.
- If choosing code generation, Storage class for Input signals: ImportedExtern; Storage class for Output signal: Export to File; Storage class for local signals: localizable; Storage class for calibration signals: Const.
- Choose sample time for all signals as 0.01s
REQUIREMENT_1:
- Steering wheel input as yaw rate (Signal name: SteeringWheel_YawDegreeInput) is the input for this system.
- This is compared against 3 angular values, one each for left turn, right turn & straight drive (Calibration Values: Right_Turn_AngularLimit, Left_Turn_AngularLimit, Straight_Drive_Steering_Angle) to say which specific direction the steering wheel is turning towards.
- Use switch blocks to compare & develop this requirement. Keep this requirement in a subsystem & output of this requirement is a local signal (Signal Name: Vehicle_Turn_Status).
REQUIREMENT_2:
- Keep this requirement as a separate subsystem. Inputs to this requirement are local signal from requirement 1 (Signal Name: Vehicle_Turn_Status) & an input signal from camera (Signal Name: CameraInput_RoadSign), which confirms the occurrence of a road sign.
- Signal Vehicle_Turn_Status is compared against calibration values (Calibration Values: RightTurn_RoadSign, LeftTurn_RoadSign, Straight_RoadSign), if each of them is found equal, then each of the three corresponding output is compared against the camera input signal,
- Using a logical operator block, only one among them is finally given as output signal (Signal Name: Vehicle_Direction_Indicator).
GENEAL OVERVIEW:
- Identifying the direction of the vehicle is one of the important & diverse features in Autonomous driving & Advanced Driver Assistance Features. This particular sub-feature of identifying the direction of vehicle is basically identifying the direction the vehicle is taking based on the camera input.
- Camera reads the road signs & stores into its memory with unique values for left turn, right turn & straight drive. Depending on the direction it is taking, final indication is given to the driver – as an indication if he is driving in the recommended direction or not.
- Vehicle Direction Determination can also be coupled along - side features like GPS systems to identify whether the vehicle is reaching its destination in an optimized manner. This sub feature can also be used along with Lane Detection, Highway Warning, Ramp Entry / Exit in Wrong Way Detection etc.
SIMULINK MODEL:
MAIN SYSTEM:
>> In the main system, there are two important subsystems i.e., Requirement_1 and Requirement_2, and an optional block called 'Lamp Indicator'.
>> Apart from these subsystems, we have a constant block called 'SteeringWheel_YawDegreeInput' which is the input to the Requirement_1 subsystem. Ususally, we can use a Dynamic or Kinetic or Mapped Steering blocks for higher end models but for the scope of this project, we're just using a constant block.
>> A constant block called 'CameraInput_RoadSign' is given as input to the Requirement_2 block which is an enabled system and is set to ON only when there is a camera input.
>> A display block 'Vehicle_Direction_Indicator' which displays output for Requirement_2 i.e., output of the whole simulation.
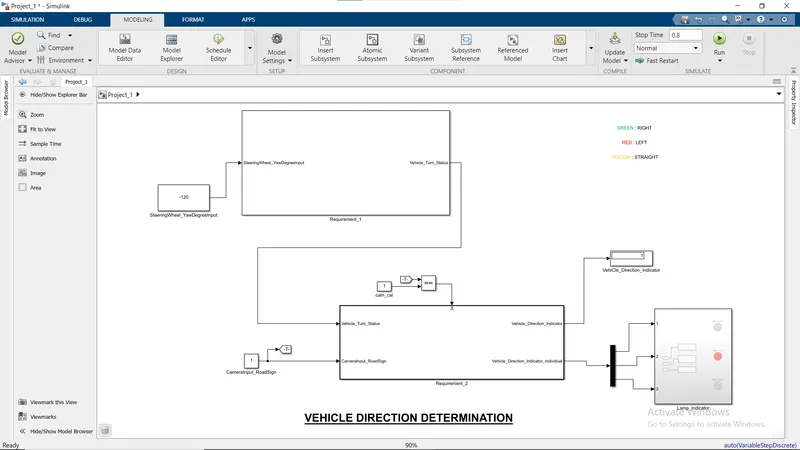
Fig 1: Main Simulation System
REQUIREMENT_1:
>> This subsystem satisfies the first requirement in our objectives.
>> We used switches to to compare the steering input with the callibration values i.e., Right_Turn_AngularLimit, Left_Turn_AngularLimit and Straight_Drive_SteeringAngle, and appropriate output is given out as Vehicle_Turn_Status.
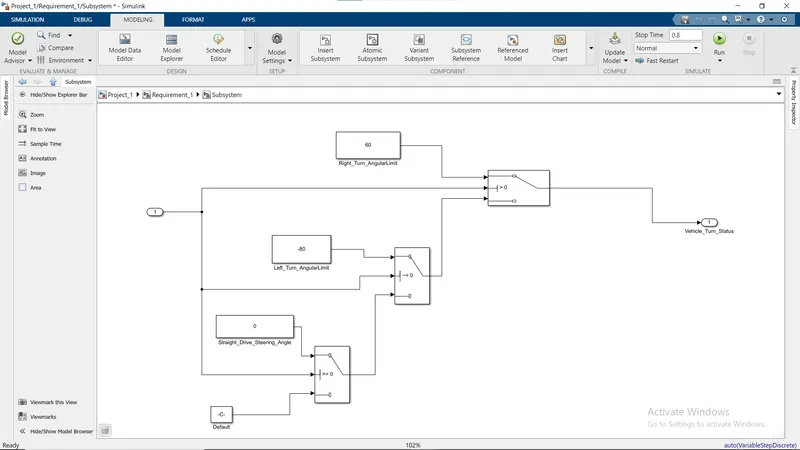
Fig 2: Requirement_1 Subsystem
REQUIREMENT_2:
>>This subsystem satisfies the 2nd requirement conditions from our objective.
>> It consists of three subsystems i.e., 'RightTurn_RoadSign', 'LeftTurn_RoadSign' and 'Straight_RoadSign', which are created with appropriate logics.
>> The input 'Vehicle_Turn_Status' is compared with these three subsystems.
>> These subsystems are connected to a mux block to give an output for our optional 'Vehicle_Direction_indicator_Individual' subsystem.
>> The mux output is also connected to a demux and then to an OR gate logic operator whose output is compared with 'CameraInput_RoadSign' input and given output as 'Vehicle_Direction_Indicator'.
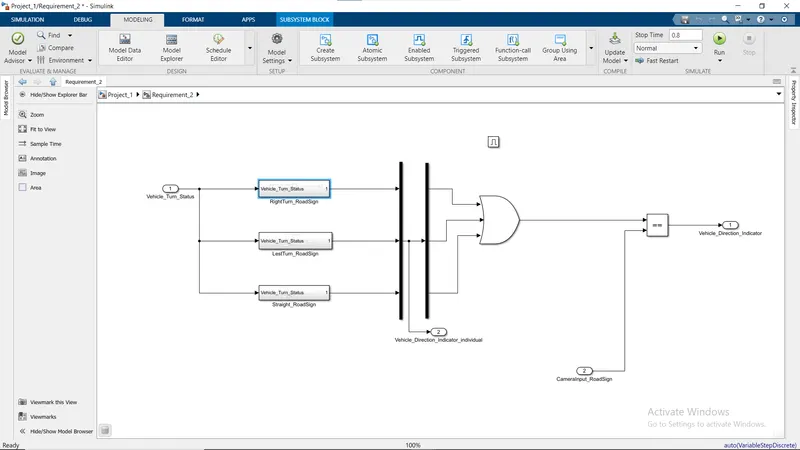
Fig 3: Requirement_2 Subsystem
RightTurn_RoadSign:
>> The following figure shows the logic behind this subsystem.
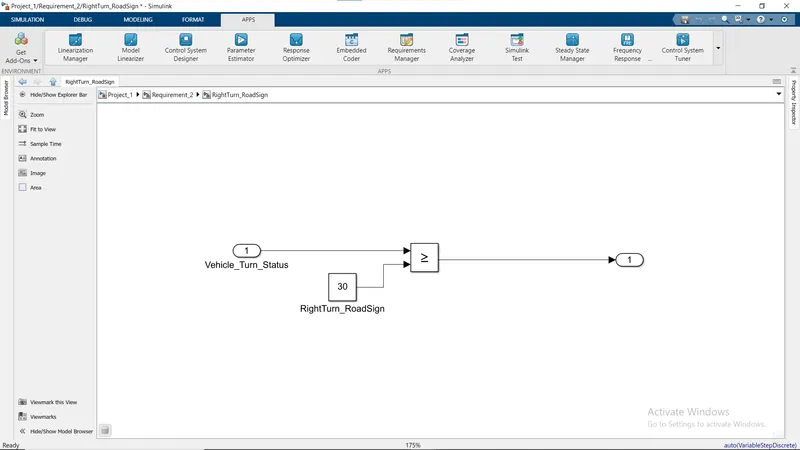
Fig 3(a):RightTurn_RoadSign
LeftTurn_RoadSign:
>>The following figure shows the logic behind this subsystem function.
>> A '<' , '>=' and '==' relational operators are used to create this subsystem. It's aimed for the input value to be restricted only to the negative values.
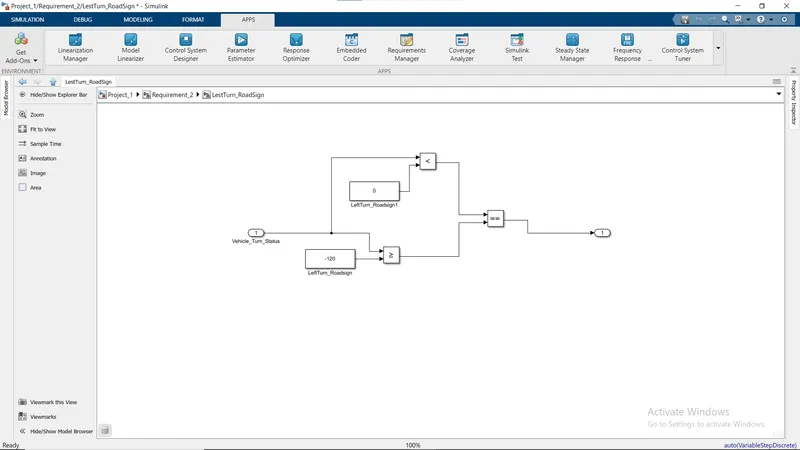
Fig 3(b):LeftTurn_RoadSign
Straight_RoadSign:
>> The following figure shows the logic behind this subsystem.
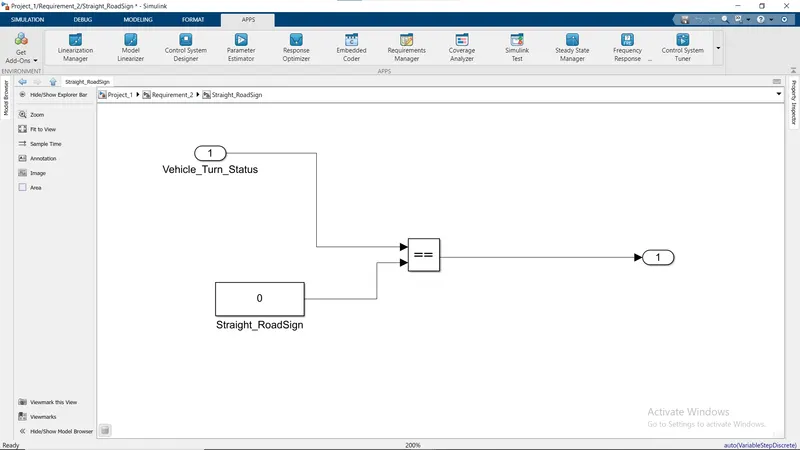
Fig 3(c):Straight_RoadSign
REQUIREMENTS:
>> The following figures shows the requirement files tagged to the subsystem.
>> The requirement files are created by going to 'Requirements Manager' from the APPS menu.
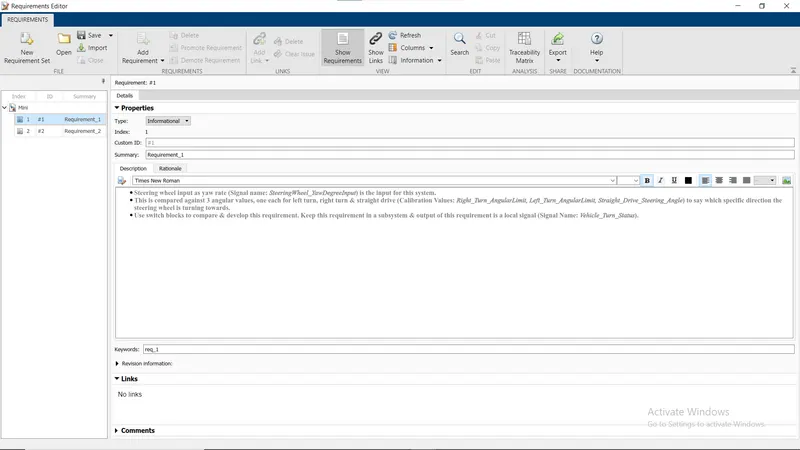
Fig 4(a): Requirements_1 File
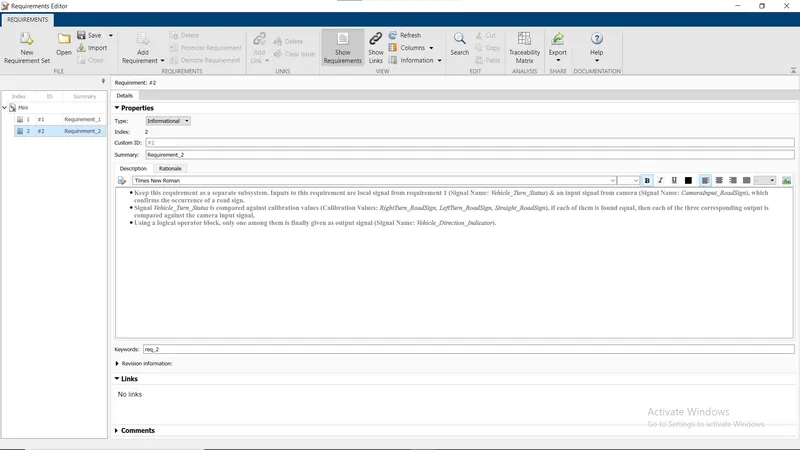
Fig 4(b): Requirements_2 File
LAMP_INDICATOR:
>> This subsystem is optional but quite useful.
>> The second output of requirement 2 is connected top a demux, which splits the single input into 3 inputs and are connected to three individual blocks and are also wirelessly connected to three dashboard lamp block.
>> For Right_Turn, the first display block gives '1' as an output and the first lamp is turned ON and glows in Green colour (user defined setting) while other lamps are in OFF mode.
>> For Left_Turn, the second display block gives '1' as an output and the second lamp is turned ON and glows in Red colour (user defined setting) while other lamps are in OFF mode.
>> For Straight_Drive, the third display block gives '1' as an output and the third lamp is turned ON and glows in Yellow colour (user defined setting) while other lamps being in OFF mode.
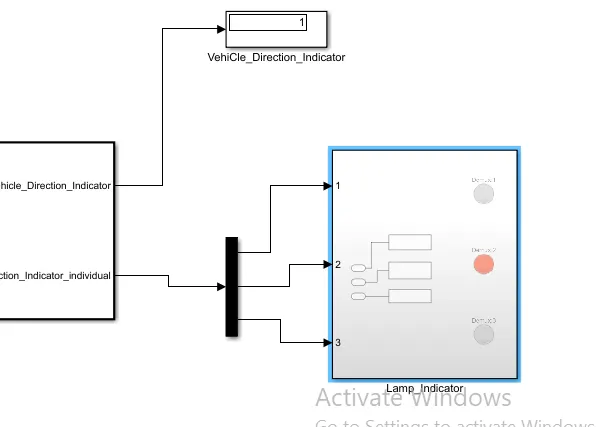
Fig 5(a): Vehicle_Direction_Indicator
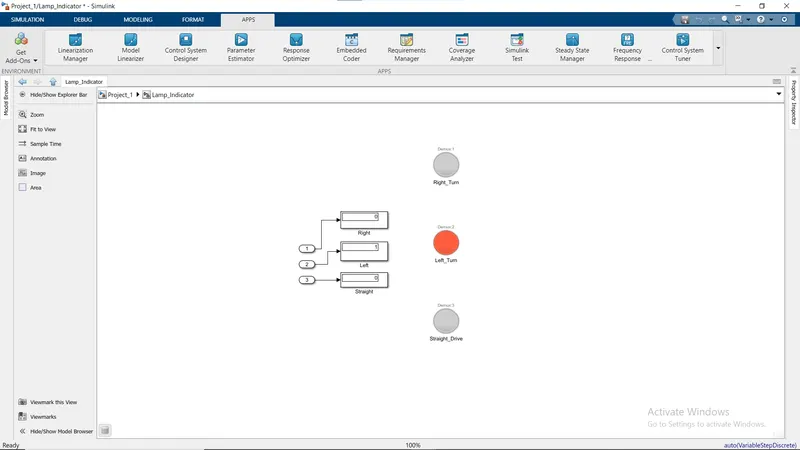
Fig 5(b): Lamp_Indicator Subsystem.
CONCLUSION: A Simulink Model is designed based on the requirements allotted.