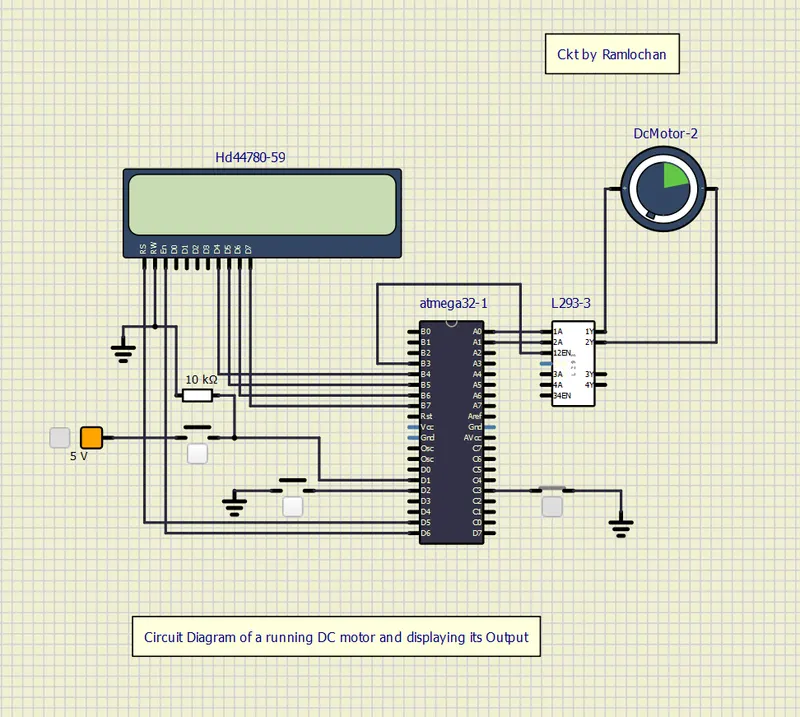
Project 1 - Controlling a DC motor using PWM and monitoring its Running status
Solution:-
Overview:-
Implementing a system on the simulator with the help of Microchip Studio, this is used for making the hex file of the written code. In this system we are controlling a DC motor using L293 motor driver, and monitor its status of running in various directions using a LCD display.
Goals:-
- Implement a simulating system, which is used in various purpose works like tracking the speed of Motor.
- Displaying the current status of the motor on LCD display.
- After successful simulation, implement its physical model.
Key Highlights:-
- Speed of DC motor can be controlled by varying its input voltage, and for varying voltage we use Pulse Width Modulation concept.
- Dc Motor can be controlled by using L293 motor driver.
- Here L293 IC is a typical Motor Driver IC which allows the DC motor to drive on any direction.
- We use Various Pushbuttons for getting various conditions.
Deliverables of this Project:-
- Implementing the system for controlling the DC motor.
- Controlling the speed of the DC motor using PWM method.
- Displaying the running direction of DC motor using LCD.
- Displaying the Status of the DC motor.
Outcomes:
- System implemented on simulator to control a DC motor using PWM method.
- Displaying the running status of DC motor using L293 motor driver, it allows the DC motor to drive on any direction.
- We also observe its running direction that is either it’s moving in Clockwise or anticlockwise direction with the help of LCD display.
Program Code for this Project:-
/*
 * DC Motor.c
 *
 * Created: 04-06-2022 10:21:29
 * Author : Ramlochan
 */

#include <avr/io.h>						// Included header file for input and output operation
#define F_CPU 16000000UL				// defining CPU clock pulse
#include "avr/interrupt.h"				// including interrupt header file
#include <util/delay.h>					// including delay header file
#define sw_dir (PIND&(1<<1))			// defining the direction control push button at PIND for clockwise
#define sw_spd (PIND&(1<<2))			// defining the direction control push button at PIND for Anticlockwise
#define pw (PINC &(1<<3))				// defining the push button as PINC
#define lcd_port PORTB					// defining PORTB as the data lines named as lcd_port
#define RS_high PORTD|=(1<<5)			// define resistor select high by setting the corresponding bit
#define RS_low PORTD|=(1<<5)			// define resistor select low by clearing the corresponding bit
#define En_high PORTD|=(1<<6)			// define enable high by setting the corresponding bit
#define En_low PORTD|=(1<<6)			// define enable low by clearing the corresponding bit
unsigned char i;						// define character type variable i
void lcd_cmd (char cmd)					// create a function for Lcd command
{
	lcd_port=(cmd &0xF0);				// configuring the lcd_port masking 4 bits for 4 bit lcd mode
	RS_low;								// resistor select is initialize as low
	En_high;							// Enable button is high here
	_delay_ms(1);						// providing some delay
	En_high;							// again Enable high
	lcd_port=((cmd<<4)&(0xF0));			// lcd port cursor shifting to 4 bit left
	RS_low;								// resistor select low
	En_low;								// enable low
	_delay_ms(1);						// providing delay
	En_high;							// Enable high
}
void lcd_data(char data)				// create a function to read the data
{
	lcd_port=(data &0xF0);				// masking 4 bits for 4 bit lcd mode
	RS_high;							// resistor select high
	En_low;								// Enable becomes low
	_delay_ms(1);						// providing the delay
	lcd_port=((data<<4)&(0xF0));		// again masking the 4 bits for 4 bit lcd mode
	RS_high;							// RS high
	En_low;								// Enable low
	_delay_ms(1);						// provide delay
	En_high;							// enable high
}
void lcd_init()							// create a function for lcd initializing
{
	lcd_cmd(0x02);_delay_ms(5);			// used for clearing the RAM and again initialize the lcd, 4bit mode
	lcd_cmd(0x01);_delay_ms(5);			// clear lcd display
	lcd_cmd(0x0C);_delay_ms(5);			// display on cursor off
	lcd_cmd(0x06);_delay_ms(5);			// auto increment in cursor position of display
	lcd_cmd(0x10);_delay_ms(5);			// shifting cursor position to left by one character
	lcd_cmd(0x28);_delay_ms(5);			// lcd command is used for 4 bit lcd mode 2 lines
}
void cursorpos(char x, char y)			// create a function to check the cursor position
{
	if ((x<1|x>2)||(y>16||y<1))		// "if" used here to check the condition cursor position,if its true
	{
		x=1;							// x position at 1
		y=1;							// y is also at 1
	}
	if (x==1)							// again if is used to check the position that is 1
	{
		lcd_cmd(0x0F+y);				// interfacing cursor position with input
	}
	else
	{
		lcd_cmd(0x0F+y);				// interfacing cursor position with given input
	}
}
 void lcd_out(char x, char y, char *str)// create a fun to print the data like cursor position
 {
	 cursorpos(x,y);					// checking the cursor position
	 while(*str)						// while used for iteration
	 {
		 lcd_data(*str);				// lcd data get updated
		 str++;							// advancement in str
	 }
 }
int main()								//  Assign main function
{
	DDRB=0xFF;							// Declaring all PORTB pins as output
	DDRA|=((1<<0)|(1<<1));				// Declaring A0 A1 pins as outputs
	DDRD&=~(1<<1);						// configuring D1 pin as input
	DDRD&=~(1<<2);						// Configuring D2 pin as input
	DDRD|=(1<<5);						// Declaring D5 pin as output
	DDRD|=(1<<6);						// configuring D6 pin as output
	DDRC&=~(1<<3);						// Declaring C3 Pin as input
	PORTD|=(1<<2);						// Enabling internal pull up resistor for D2
	PORTC|=(1<<3);						// Enabling internal pull up resistor for C3
	i=64;								// Initialize i=64, because we are running the motor with 25% duty cycle
	TCCR0=0x61;							// Non inverting mode,PWM phase correct mode, No prescalars
	GICR=(1<<INT0);						// using INT0 for interrupt
	MCUCR=0x02;							// make interrupt negative edge triggered
	sei();								// Enable global interrupt
	lcd_init();							// Initialize lcd
	while (1)							// while is used for iteration purpose
	{
		while(pw==0)					// while loop is used to check the condition until the push button is released
		{
			if (sw_dir==0)				// if is used to check the direction control push button is released
			{
			PORTA=0b00000001;			// 1 0 to respective 1A 2A pins to rotate in clockwise direction
			lcd_out(1,1,"Motor is Running");// displaying the message that Motor is running
			lcd_out(2,3,"Clockwise");	// displaying the message that motor is running clockwise
			}
			else
			{
				PORTA=0b00000010;		// 0 1 to respective 1A 2A pins to rotate in anti clockwise direction
				lcd_out(1,1, "Motor is Running");// lcd display message that motor is running
				lcd_out(2,3,"Anticlockwise");	// displaying the direction
			}
			OCR0=i;						// As, i increases in ISR, corresponding value is to be loaded into OCR0
		}
		PORTA=0x00;						// 0 0 to respective 1A 2A pins to stop rotation
		lcd_out(1,1,"Motor is OFF");	// Displaying the message that Motor is Off
		lcd_out(2,3,"!!! CAUTION !!!");	// displaying the message that is Caution
	}
}
ISR(INT0_vect)							// Interrupt service routine is initialize
{
	i=i+20;								// i increases by 20 in each push, so duty cycle also increases
}
Simulide Diagram:-