Project 1_Comparative study of different storey buildings for Seismic forces
PROJECT : 1
PROJECT TITLE :
COMPARATIVE STUDY OF DIFFERENT STORY BUILDINGS FOR SEISMIC FORCES
AIM:
TO MODEL AND ANALYZE MULTIPLE BUILDINGS WITH DIFFERENT FLOOR LEVELS AND DESIGN PARAMETERS USING ETABS SOFTWARE AND COMPARE THE RESULTS TO UNDERSTAND THEIR OVERALL SEISMIC BEHAVIOUR.
INTRODUCTION:
1) ETABS is an engineering software product that caters to multi-story building analysis and design.
2) Modeling tools and templates, code-based load prescriptions, analysis methods and solution techniques, all coordinate with the grid-like geometry unique to this class of structure.
3) Basic or advanced systems under static or dynamic conditions may be evaluated using ETABS.
4) For a sophisticated assessment of seismic performance, modal and direct-integration time-history analysesmay couple with P-Delta and Large Displacement effects.
5) Different building geometries behave differently when induced by the same seismic forces.
6) Hence, it is very important to properly understand the response of buildings related to their structural configurations for a safer design approach.
7) Therefore in this project, we have modeled different buildings with varying geometries using ETABS.
8) Furthermore, their responses are analyzed with the help of the software and the results are then compared to grasp an understanding of the structural behavior of buildings with different storeys.
STRUCTURAL ELEMENT :
* Beams - 300x400 mm
* Columns - 400x400 mm, 550X
* Slab - 150 mm
MATERIAL USED :
* Grade of concrete - M30
* Grade of steel Reinforcement Bars - Fe 415
* Dead Load on beams from infill wall - 10kN/m
* Live load on floor - 3kN/m2 (Assume this live load for same roof floor also)
* Buildings are assumed to be pinned at the base
* All columns in all storey are of the same size
* All beams in all storeys are of the same size
* Building is located on Soil type-II and in Zone-III. Assume other factors if required.
PROCEDURE:
BUILDING A:
STEP 1: Open Etabs:
- click on ETABS SOFTWARE then ul of software is open shown below
STEP 2: Model initialization:
- Click on NEW MODEL then model initialization tab is open
- provide the display units , steel and concrete IS CODE as shown below - click OK
STEP 3: To draw grids and storeys:
- After that NEW MODEL QUICK TEMPLET tab is open
- in that click on CUSTOM GRID SPACING and click on EDIT GRID DATABASE
- In this box we set the 5 no of grids in x direction and 4 no of grids in y direction having distance is 4m. - for adding new grid click on add
- as shown below - click ok
- Click on custom story data
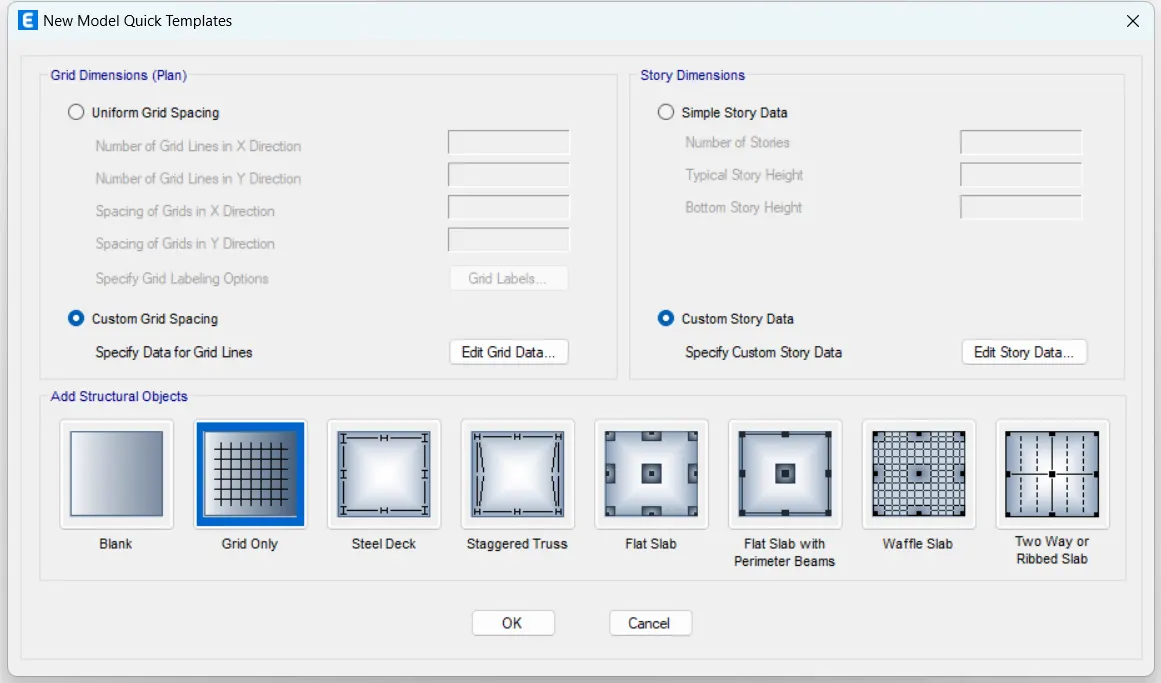
- give the hight of plinth is 1.5 m - right click on arrow and add floors - Provide 3m height of each floor - click ok
- After that plan and eleveation of each story are shown - shown below
STEP 4: Add Materials:
- Applying the material properties to the frame
- so that click on define tab
- then dialogbox is open
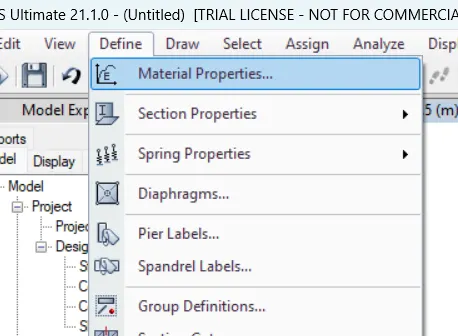
- from that click on material properties
- then click on ADD NEW MATERIAL
a) Add concrete M30:
- click on add new material
- first add concrete material
- click OK
- again click OK
b) Add steel HYSD415:
- after that ADD steel material
- click ok
- Both steel and concrete material is added - Click OK
STEP 5: Add sections property
a) Define beam
- Then go for section properties
- click on frame section and create a new beam section shown below
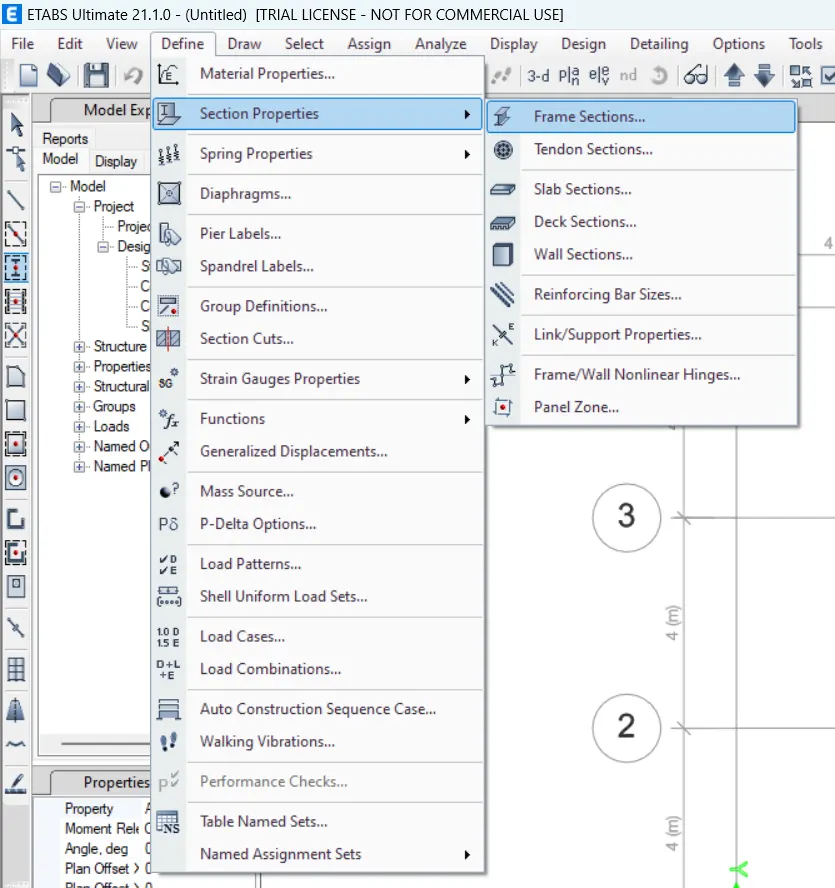
- click on frame section
- then new dialogbox is open shown below
- select the concrete rectangle - click on rectangular section - click ok
- Then new dialogbox is open
- give the name as b300x400
- material as M30
- depth of beam is 400 and width is 300
- from properties modifires
- for MI of the beam we consider only 30 % for earthquake design but that applicable only for ultimate design .
- but here we do only analysis so that we cant change any values .
- click OK
- click on modify show rebar
-new dialogbox is open
- from that change design type
- and also change rebar material as HYSD415 shown below
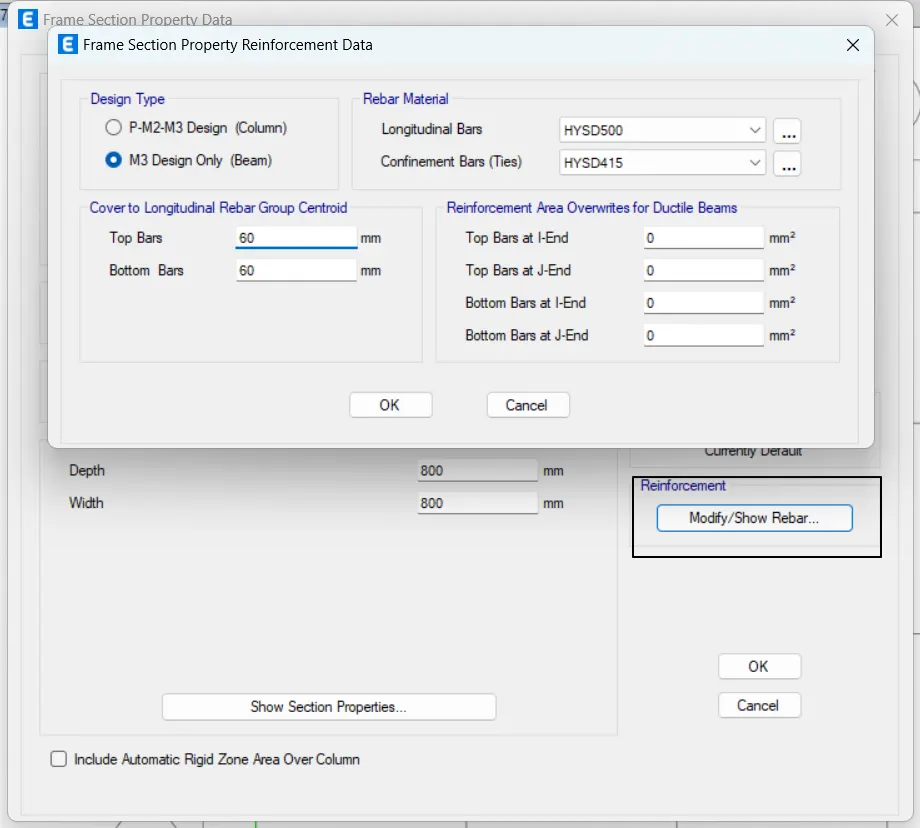
- click ok
b) Define column
- now do same process for column frame shown below
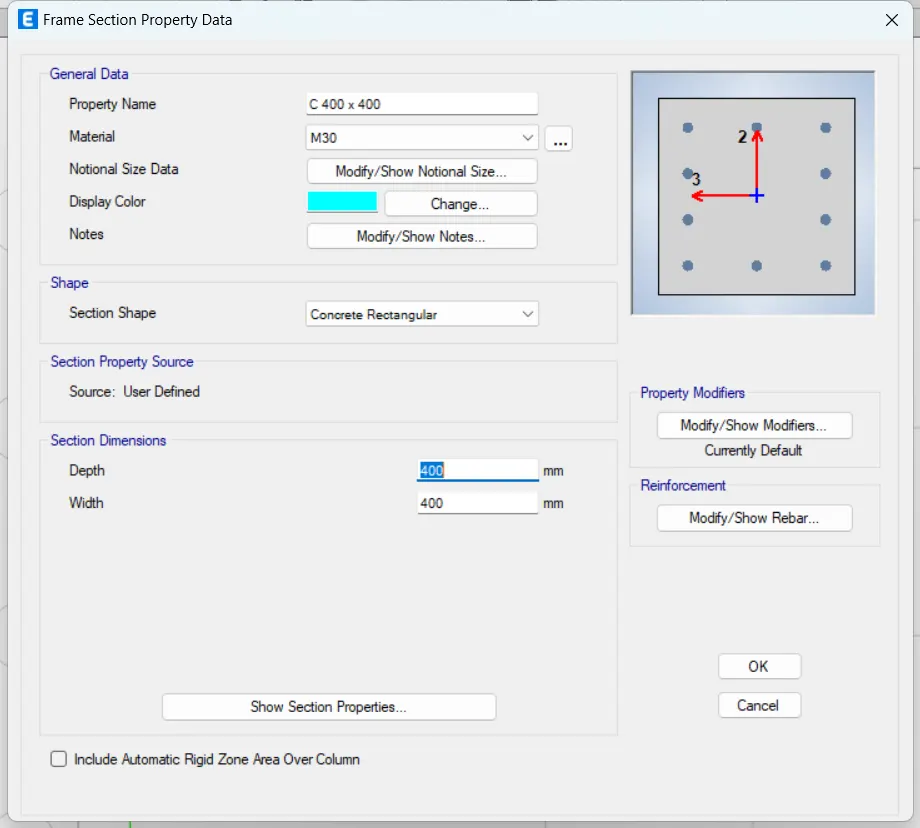
- Add all columnn and slab section
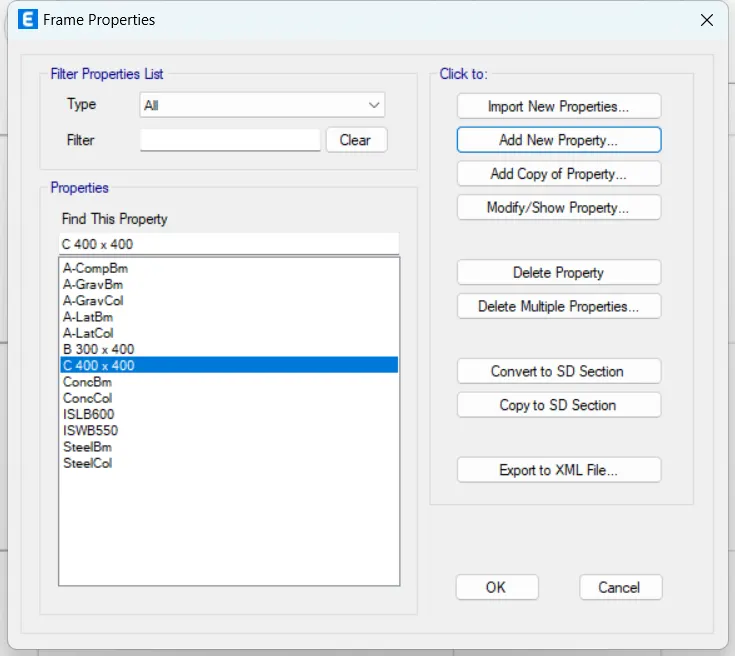
C) Define slab section
- so that go to the define tab
- click on Section properties then click on slab section
- then one dialogbox is open
- click on Add New Properties then give the properties name as Slab150
- give the slab material as M30 and thickness of slab as 150 shown below - click OK
STEP 6: Draw Plan:
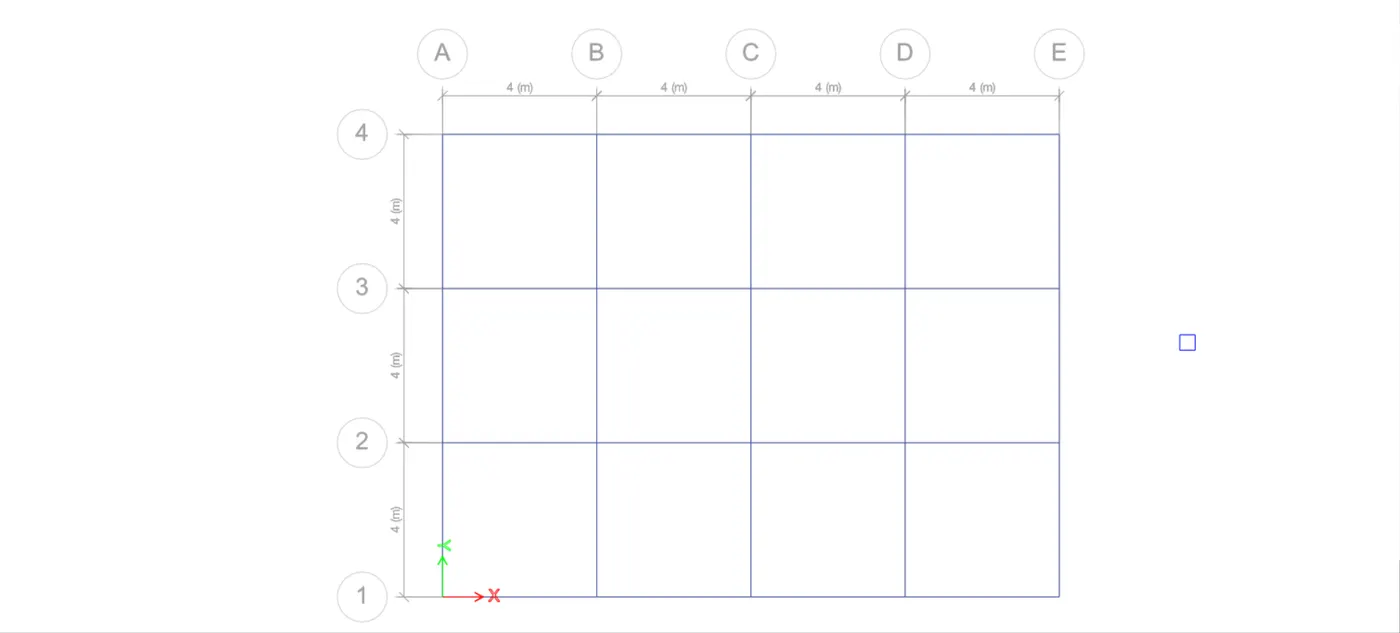
a) Draw beams:
- Change the story type from right hand side at bottom
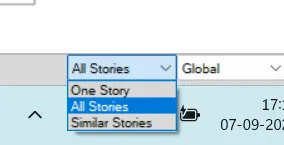
- draw the beam
- so that do to the quick draw
- one properties dialogbox is open
- select the beam as shown below
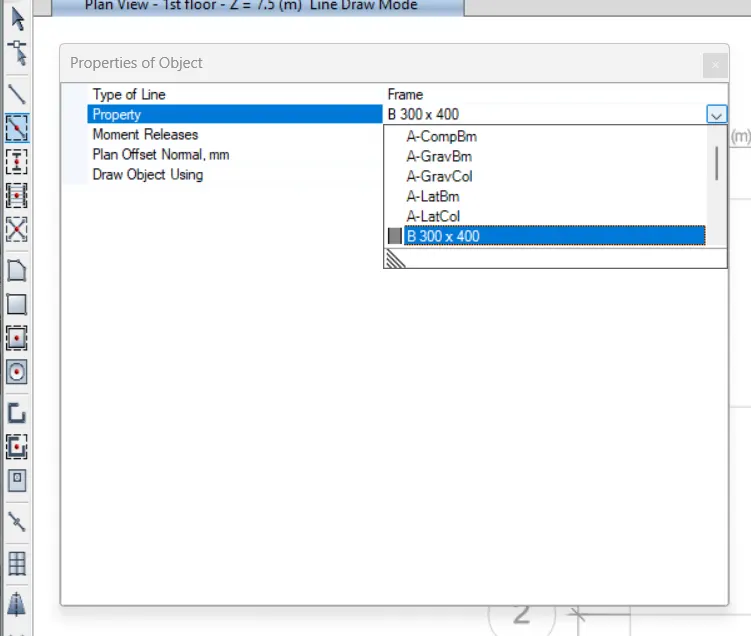
- Select all grids - so draw all beams
b) Draw Column:
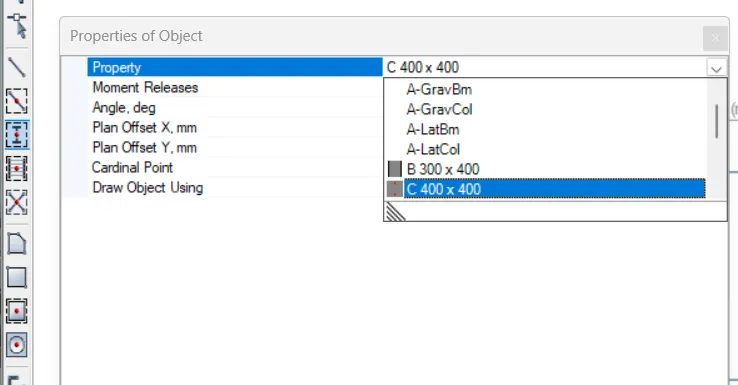
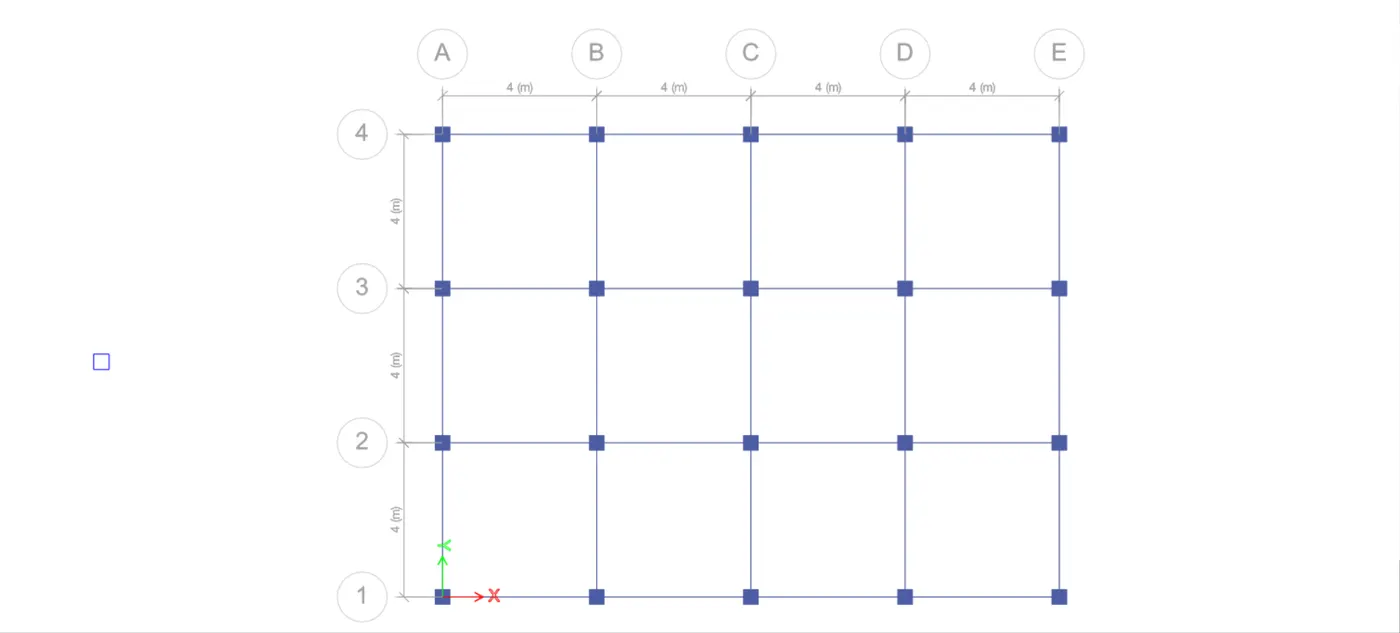
- Draw the column
- so that go to the quick draw column / beam option
- select the C400X400 and draw it shown below
c) Draw Slab:
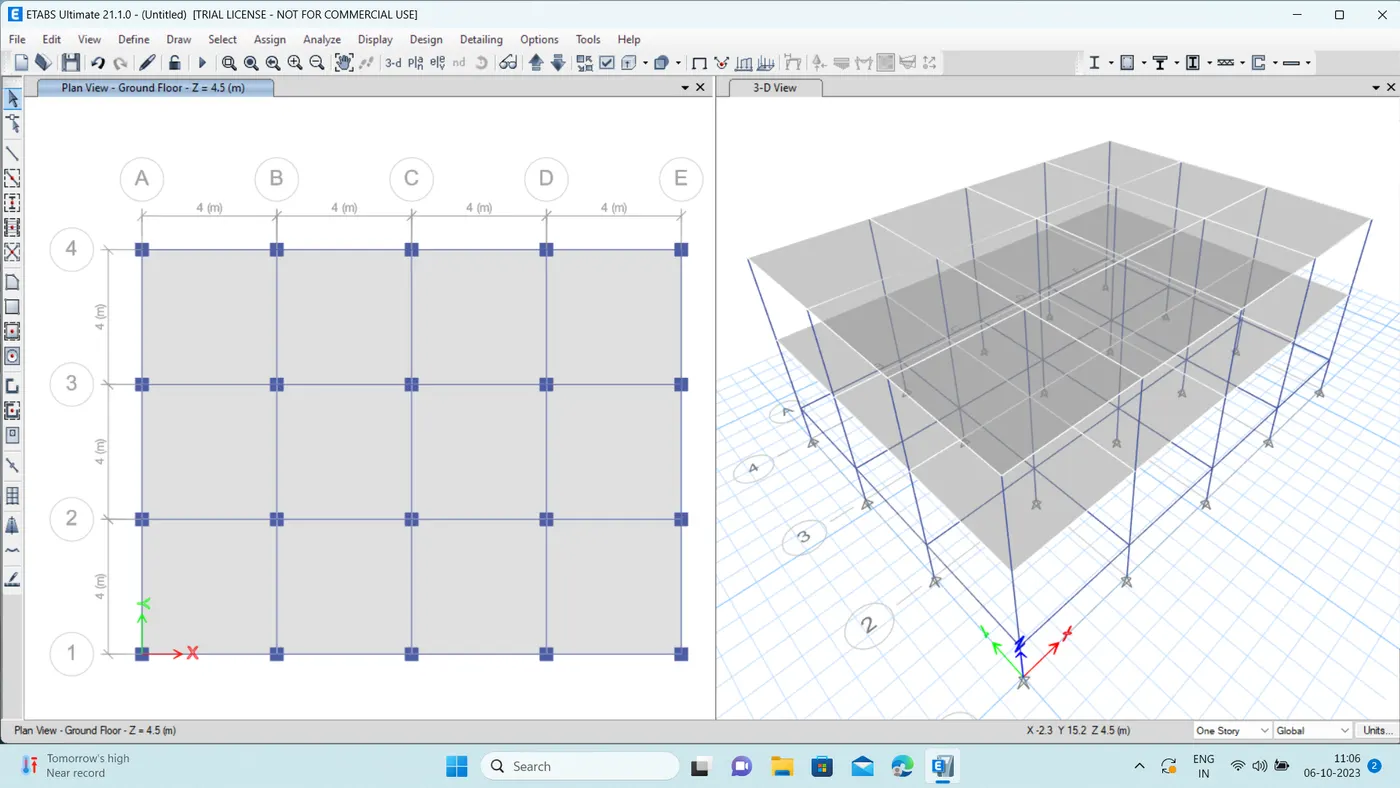
- Draw the slab
- so that click on set plan view
- one dialogbox is open
- select the first story which is master story
- click on apply and then ok
- then go to the quick draw floor option
- selct the slab150
- and then draw the slab
STEP 7: Define Load cases:
- Give the load patterns so that click on define tab
-then click on load pattern
- Then new dialogbox is open
- where dead load and live load alrady there
- then add wall load also add EQX and EQY load shown below
- then click on Modify Lateral Load
- after that new dilogbox is open shown below
- click OK
- again click on EQY then Modify Lateral Load
- click OK
STEP 8: Define mass source:
- Define Mass Source so that go to the define tab - click on mass source
- then new dialogbox is open from that click on
- Add New Mass Source
- Add Dead load ,Live load ,Wall load shown below
- click OK
- Then click OK
STEP 9: Check load cases:
- Check load cases for that click on Define tab
- click on load cases
- click ok
STEP 10: Assign load combination:
- Load combination for that again go to define tab
- click on Load Combination one dialogbox is open
- click on Add Defoult Design Combination
- select Concrete Frame Design Option
- click ok
- click ok
STEP 11:Assign load
a) Assign Brick wall lods:
- Go To The Select Option
- Click on Properties
- select the Frame section
- Select the Beam Properties shown below
- then close it .
-Then go to assign tab
- click on Frame Loads - then click on Distrubited
- from that select the load pattern as wall and give the wall load as 10 kN .
- click on APPLY and OK
b) Assign love loads:
- apply 3 kN live load on slab
- so that Click ON Select Option then properties - slab section
- select it and then close it
- Then go to the Assign tab
- click on Shell Load
- Then Uniform one dialogbox is open as shown below form that select the load pattern as Live load
- give the load as 3 KN
- click on APPLY and then OK
STEP 12:Asign diaphragms
- to calculate center of mass and rigidity of the structure is calculated . so that select the all slab
- go to the select tab
- click on properties then slab section - select the slab
- and then close then go to Assign tab
- Click on Shell option - Click on Diaphragms
- select D1 option
- click on Apply and Then Ok
STEP 13: Check model
- Check the model
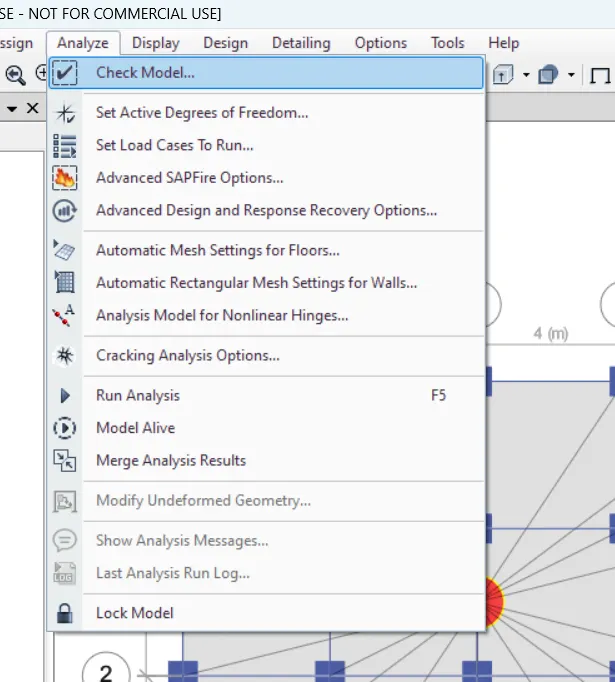
- so that go to the analyze tab click on check model and check it
STEP 14:Run the analysis:
- press F5
BUILDING B G+5:
STEP 1:Modeling building B:
- Now to model building B, we need not create a new ETABS file from scratch.
- Rather we will save a copy of the building A file and do the alterations needed for building B.
- we can increase the number of stories to 5 by editing the story data within the copied file. So, the complete procedure to do so in ETABS is discussed below:
- Click on save
STEP 2: Add storey:
- Insrease the story of the buildig so that ,
- Click on Edit
- edit story on grid one dialogbox is open
- from this dialogbox click on Modify/ Show story data
- one new dialogbox is open
- click on add story add 3 more story
- click OK
- Click ok
- Click ok
STEP 3: Assign load pattern:
- Checked whether load is applyed or not - so that click on Display Shell Load Assign
- one dialogbox is open select the load pattern as live load
- click on apply and then ok
- Then checked the wall load so that click on
- Display Frame Load Assign tab
- select the load pattern as wall load
- click on Apply and then OK
STEP 4: Assign Diaphragms:
- so that first select the slab section -click on Select tab - then properties and then slab section
- click on Select and then close
- then click on Assign tab - click on Shell and then diaphragms
- then click on D1
- Then click on APPLY And then ok
STEP 5: Run analysis:
- Press F5
BUILDING C:
- The story and grid data for building c will remain still.
- we need to change the column size and orient the same in the X-direction.
STEP 1: Change column orientation:
- Change the column size of the building so that , go to Define tab
- Then Section Properties , Then Frame Section - click on c400x400
- then click on Modify/Show Properties
- new dialogbox is open
- From that give the name as C550x300, depth of column is 550 and width of column is 300
- click ok - click ok
STEP 2:Select column:
- select the columns ,for that go to Select tab
- then Properties , then frame section
- click on Select option and then closed .
- Rotate the columns at 90 degree
- so that , Go to the assign tab
- then click on Frame and Then Local Axis
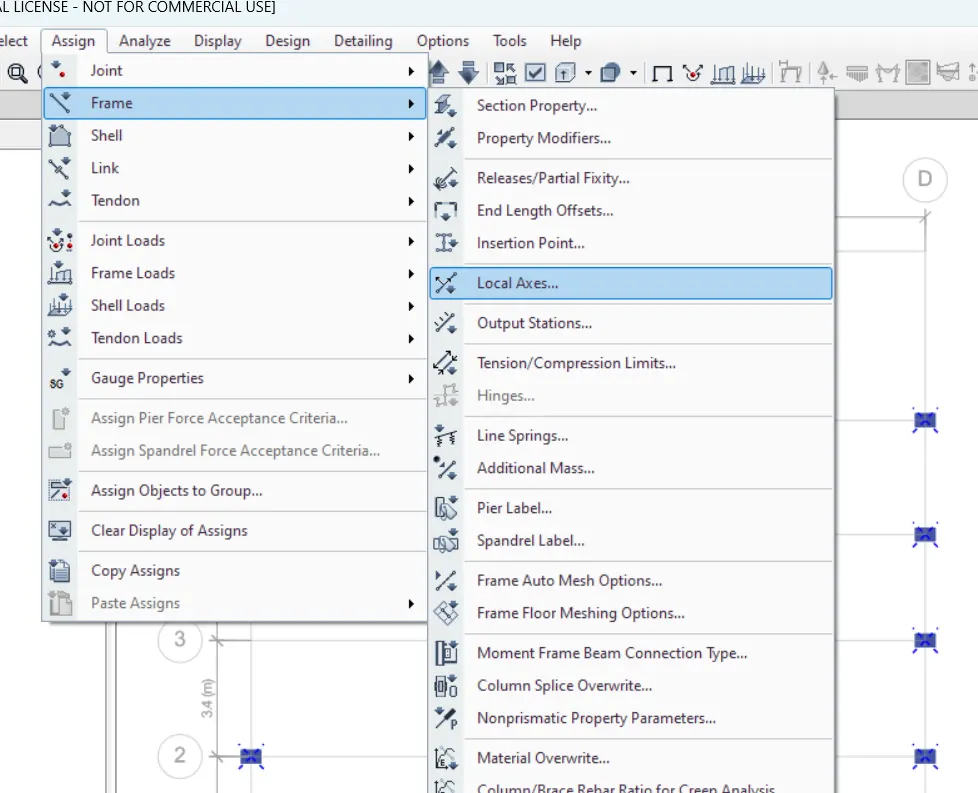
- one dialogbox is open , from that give the angle as 90 degree
- click on Apply and Then OK
STEP 3: Selcect the slab:
- go to the Select tab then Properties Then Slab section
- click on Slab150 and then click ok
STEP 4:Assign diaphragms:
- Select the diaphragms
- go to Assign tab
- click on shell and then diaphragms
- click on Apply and then OK
STEP 5:Run analysis:
- Click on Run Analysis tab
- it takes some time to loft
RESULT:
BUILDING D:
- In this model, we don't need to change anything other than the column orientation.
- The sizes of the column will remain the same .
- we have to shift the column orientation from X to Y direction.
PROCEDURE:
-Click on File tab
-Then click on Save As
-Give the name of the file as Building D
-and then save it
STEP 1: Change column orientation:
- Change the column to Y axis
- so that , first select the column
- click on Selct tab - click on Properties and Frame Section then click on c550x300
- select it and then close it .
STEP 2:Select column:
- Change the direction x to Y Repeat the procedure of change orientation
- so that change the angle 90 degree to 0 degree
- click on APPLY and then ok
STEP 3: Selcect the slab:
- for that select the slab first click on Select tab - properties - Slab section
- select the S150 and then close it.
STEP 4:Assign diaphragms:
-Check for diaphragms
-click on Assign tab - shell option - click on diaphragms
- click on Apply and then OK
STEP 5:Run analysis:
- Run the analysis by clicking F5
RESULTS:
BUILDING E (G +10):
- Column sizes :
for top 5 storeys: C 400X400
for bottom 5 storeys: C600X600
PROCEDURE :
- In this model, we need to add up 5 more storeys to our model.
- In addition, we also need to assign different column sizes on different floors.
- we'll first save the ETABS file for building D as a new model for building E.
- Then, edit the story data as we have done for our previous models in ETABS.
- Then, we need to add two new column sections with the required directions and assign them at appropriate floors in our model as specified.
STEP 1: Add storey:
- Add 5 more story in previous structure so that go to the Edit option
- click on Edit Story And Grid System
- click on Modify Story Data option
- Add 5 story there shown below
- refresh it and then click OK
- click ok
STEP 2: Check loads:
- Check the wall load and floor load of the structure
- click on Display shell load assign
- select the load pattern as live load
- click on APPLY and ok
- again click on Display Frame Load Assign
- select the load pattern as wall load
- Click on Apply and then OK .
STEP 3: Add column section:
-Change the column size as 600x600 ,so that click on Define tab
- then Section properties - Frame section - select the c550x300
- click on Modify section
- one dialogbox is open shown below give the property name as c600x600
- Provide the depth as 600 and width as 600
- click OK .
- Then Add one more new column size 400 by 400
- so that click on Add new proprties ,give the name as c400x400
- then width of column as 400 and depth as 400
- Click OK
STEP 4: Off visisbility of beam and floor:
- Select the column only
- for that hide the beam and floor
- click on set view point tab and unselect the beam and floor and then click ok
- click ok
STEP 5: Set view limit
- Select the column from floor 6 to 10
- so that , click on view tab
- Then click on Set Building view Limits
- one dialogbox is open from that select the Top story as Story 10 and base story as story 6
- click ok .
3D view:
- Select the all columns
- then click on Assign tab - click on Frame and then click on Section Properties
- one dialogbox is open
- select the c400x400 and then click on APPY and then ok
3D view:
STEP 6: Assign diaphragms:
- Then checked for diaphragms
- so that select the slab first
- go to the select option
- then click on properties and slab section
- one dialogbox is open
- click on seect and then close it .
- then click on Assign tab
- click on shell and then diaphragms
- click on Appy and then OK
STEP 7: Run analysis:
- Run analysis press F5
RESULT:
BUILDING F(G+10):
- Throughout the structure having same columns size no need to much editng in the previous structure
- jUst change the column size from story 6 to 10 as 600x600
PROCEDURE :
STEP 1: Check loads:
- Hides the beams and floor
- so that click on Set Display Option and just unselect the Beams and floor
- click on Apply and then OK
3D VIEW :
STEP 2: Check loads:
- Select the columns from story 6 to 10 so that click on View tab
- Set Building LImets then one dialogbox is open from that click on tWo story as 10 story and base story as 6 story
- click on OK
STEP 3: Check loads:
- Change the columns size as 600x600
- so that jast select the columns
- click on Assign tab
- then click on Frame and then Section Properties
- then one dialogbox is open
- from that click on c600x600 columns
- click on APPLY AND THEN OK .
- Then click on view tab
- click on Set Building View Limets
- one dialogbox is open from that select the top story as 10 story and bottom as base
- click ok .
3D view:
STEP 4: Check loads:
- Again select the beams ad floors
- click on Set Display Option
- from that click on Beam and slab and then click ok
3D view:
STEP 5:Check for diaphergram:
- so first select the slab
- click on Select the tab and click on Properties then Slab section
- select the slab150
- and then closed it .
- Then click on Assign tab
- click on Shell and the diaphergrm
- click on D1
- Then click on APPLY and then OK .
STEP 6:Run analysis:
- Press F5
RESULT:
BUILDING G(G+25):
- Columns for top 5 stories: C400X400
- Columns for middle 10 stories: C600x600
- Columns for bottom 10 stories: C800x800
PROCEDURE:
- we need to add 15 new stories and assign different column sizes on different floors.
- We can follow the exact procedure that has already been explained for the previous project to create this model by editing building F. The same
STEP 1:Save File
- Click on File manu
- then click on Save As then give the fine name as BUILDING G
STEP 2:Add storey:
- Add more 15 story in previous story
- so that click on Edit
- then click on Edit Story And Grid System Data option
- from this click on Modify /Show Story data
- add more 15 story
- click ok
- click ok
- click ok .
STEP 3: Check loads:
- check the live load and wall loads of the structure
Check Live load :
- click on Display Shell Load Assign
- select the load pattern as Live load
- click on Apply and then OK .
Check wall load:
- so that click on Display Frame Load Assign tab
- select the load pattern as wall load
- click on Appy and then OK
STEP 4:define columns:
- c400x400 ,c600X600, c800x800 .
- so that click on Define tab - Frame section
- create a new column , c800x800
- click on OK .
STEP 5:
- Apply different size of columns for each story
- so that click first hide the beams and floors of the structure .
- click on Set Display View tab
- unselect the beam and floors option
- click on Apply and then OK .
STEP 6:Select column section
- Click on assign tab
- then click on Frame and then Section Properties
- select the c400x400
- click on Appy and then OK .
3D view:
- Middle 10 story provided with column size as 600x600
- again click on View option
- then click on Set Building Limets option
- one dialogbox is open
- select the top story as story 20 and bottom story as story 11
- click on OK .
- then click on Assign tab
- then click on Frame and then Section Properties
- again click on View Option
- click on set building view limets
- then Make visible beam and slab of the structure
- click on Set Display Views Option
- and select the Beam and Slab Option
- click on OK.
STEP 7:CHECK for diaphragms
- first select the slab
- click on Select tab
- then again click on Select and then properties , next is slab section
- one dialogbox is open from that click on Slab150
- click on Select and then closed it
- click on Assign tab
- the click on Shell and then Diaphragms
- one new dialogbox is open from that select D1
- click on APPLY and the OK
STEP 8: Run analysis:
RESULT:
BUILDING H(G+25):
- All column size is 800x800
PROCEDURE:
- First click on File option
- then click on Save as
- Give the file name as BUILDING H and the save it
STEP 1: Hide beam and floor:
- First hide the Beam and floor and the click on APPLY and the OK
STEP 2:Select all column:
- Assign all columns as 800x800 so that first select the columns
- then click on Assign tab
- then click on Frame and then section properties
- one dialogbox is open
- From that click on c800x800
- click on APPLY and Then OK .
STEP 3: Display geometry:
- Select the beam and slab
- so that click on set display option
- then select the beam , floor and diaphragms option
- click on APPLY and then OK .
STEP 4:Run analysis:
- Run analysis
RESULTS:
BUILDING J(G+25):
- IN THIS CASE INCREATSE THE 10 % IMPOSED LOAD MEANS LIVE LOAD
PROCEDURE:
STEP 1: Select the all the slab section:
- click on Select tab
- then click on select tab then section properties and slab section
- one new dialogbox is open
- from that click on Slab150
- then click on Select and then closed
STEP 2:Assign Load:
- Increase the 10 % of live load
- so that click on Assign tab - shell load - click on Unifom
- one dialogbox is open , give the load as 3.3
- click on APPLY and then ok
STEP 3:Run analysis:
RESULT:
BUILDING K (G+25):
- In this case the increase the mass of the building by 20 persent imposed load means live load .
PROCEDURE :
STEP 1:Save file
- Click on File tab
- click on Save as give the file name as BUILDING k And then save it .
STEP 2:Select slab
- Increase the live load by 20 persent
- click on Select tab
- again click on Select and then properties and slab section .
- select the Slab150
- select it and then closed it .
STEP 3:Assign load:
- click on Assign tab
- click on Shell load
- select Uniform
- one new dialogbox is open , from that select the load pattern as live load
- then give the load 3.6
- click on APPY and then ok
STEP 4:Run analysis:
- Run analysis by pressing F5
RESULT
Results-All the 10 buildings were modelled and analysed successfully.
A] Effect of stiffness on T: Compare fundamental nature periods of building E&F as well as G & H.
Why id there a marginal or significant difference in the fundamental natural periods?
| Model Type | No of Stories | Column configuration | Results | Conclusion |
| Building E | 10 |
Upper 5 stories = 400x400 mm Bottom 5 Stories = 600x600 mm |
As we could see that by changing the column sizes there will not be any effect on Natural period, it remains Same | |
| Building F | 10 |
Column Size = 600x600mm Uniform throught Building |
As we could see that in Building H has uniform column section but it has more natural time period |
|
| Building G | 25 |
Column Sizes Bottom 10 story (800x800 mm) Upper 10 story (600x600 mm) Top upper 5 story (400x400 mm) |
Where as building G has large column at its base and reduces as we go higher level. But it has less natural time period as compared to H = ___ |
|
| Building H | 25 |
Column size = 800x800 mm Uniform throught Building |
So we can conclude that providing larger size of column at base and reducing the size at higher level will reduces the Natural time period |
B] Effect of mass on T: Compare fundamental natural periods of buildings H,J and K. Have the buildings become more flexible or stiff due to change in mass
| Model Type | No of stories | Percentage increase in Load (Mass) | Result | Conclusion |
| Building H | 25 | Load is taken as 3KN/m2 | As we could see that time period is increase as we increase the load or mass | |
| Building J | 25 | Load Increase by 10% (3.3kn/m2) | Therefore time period is directly proportional to the mass of the building | |
| Building K | 25 | Load Increase by 20% (3.6kn/m2) |
C] Effect of building Height on T: How does the fundamental natural periods of Buildings A,B,F and H change with change in building height?
| Model Type | No of stories | Height of Building | Results | Conclusion |
| Building | 2 | 7.5 m |
As we could see that the height of the building increases the natural time period is also increases Therefore, the natural period 'T' is also directly proportional to the building height |
|
| Building B | 5 | 16.5 m | ||
| Building F | 10 | 31.5 m | ||
| Building H | 25 | 46.5 m |
D] Effect of column orientation on T: How does the fundamental natural periods of building B, C and D change with change in column orientation?
| Model Type | No of dtories | Column orientation | Results | Conclusion |
| Building B | 5 |
Equal in Both Direction 400x400 mm |
As we could see that when column is orientad in X and Y direction in Time period | |
| Building C | 5 |
In X direction 550x300 mm |
So we can say that in Y direction Lateral Displacement is more as compared to X direction | |
| Building D | 5 |
In Y direction 300x550 mm |
E] Effect of flexural stiffness of structural elements on mode shapes: Compare fundamental mode
shape of building B in two situations when the flexural stiffness of beams relative to that of adjoining columns is very small versus it is large
| Model Type | No of stories | Flexural stiffness of beam | Results | Conclusion |
| Building B | 5 | 100% | If you decrease the flexural stiffness of beams,the overall flexural strenght of the beam is also going to reduce which increase the Natural period of time | |
| 10% |
F] Effect of Axial Stiffness of vertical Members on mode shapes: Compare the fundamental mode shape of building H in two situations when the axial cross-sectional area of columns is very small versus when it is large.
| Model Type | No of stories | Axial Stiffness of Columns | Results | Conclusion |
| Building H | 25 | 100% | As we axial stiffness of columns decrease, the fundamental natural period of the building increases regardless of its structural geometry | |
| 10% |
G] Effect of degree of fixity at column bases on mode shape: Compare the fundamental mode shape of Building B in two dituations when the base of columns is pinned versus when it is fixed.
| Model Type | No of stories | Base support | Result | Conclusion |
| Building B | 5 | Pinned |
As we can see that in pinned support natural time period is more as compared to fixed support. Therefore fixed support will provide more resistance as compared to pinned support |
|
|
Fixed
|
BUILDING A
BUILDING B
BUILDING C
BUILDING D
BUILDING E
BUILDING F
BUILDING G
BUILDING H
BUILDING J
BUILDING K