Project 1 - 2D meshing on the instrumental Panel
AIM: - To perform the 2-D Mesh on the given Instrumental Panel Model (Automotive component) using ANSA.
OBJECTIVE: -
- To perform Topological clean-up.
- To Extract Mid surface.
- To perform 2-D Mesh and fix the quality failure Element.
THEORY: - The instrument panel is the portion of the dashboard which sits behind the steering wheel. It houses various gauges and lights which update the driver on the vehicle's status. in other word we can say dashboards include the speedometer, tachometer, odometer, engine coolant temperature gauge, and fuel gauge, turn indicators, gearshift position indicator, seat belt warning light, parking-brake warning light, engine-malfunction lights, etc.
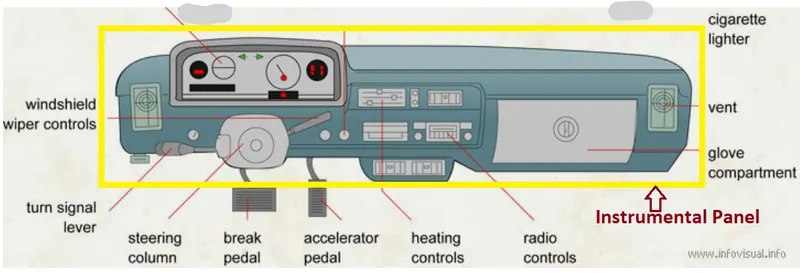
PROCEDURE/STEPS:
- Importing the CAD model
Command: File >> Open >> Project_1_Ip_Console_Half_22dec
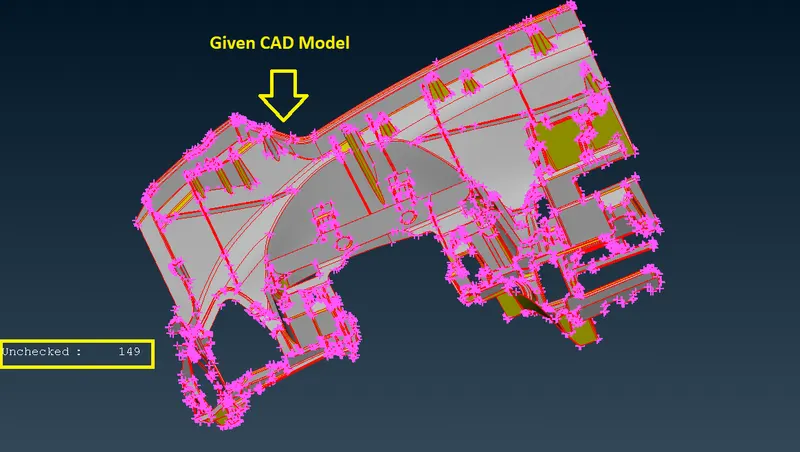
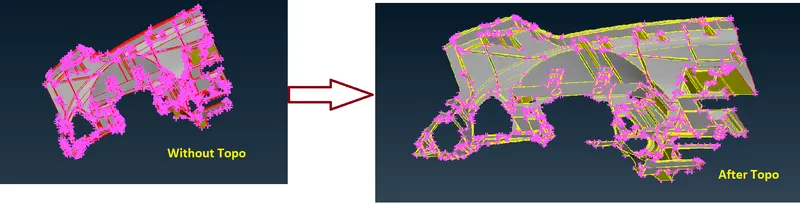
- Topological clean-up
This model requires a topological clean-up for removing unwanted single Cons, Unwanted Hot points and Unchecked Surfaces.
For this we use Command: Topo (deck) >> Faces >> Topo >> window selection the component >> hit middle.
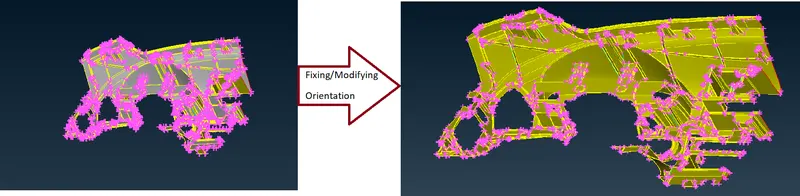
- Fixing/Modifying Orientation
Command: Topo >> Faces >> Orient >> Visible.
- Geometry Clean up
We Observe whenever CAD model is imported into the ANSA, there might be several geometrical errors like intersecting surfaces, missing/distorted surfaces etc. due to the format conversion process or inherent bad model. And, it is important to clear all these errors before starting meshing.
Command: Tools >> Checks >> Geometry >> Execute.
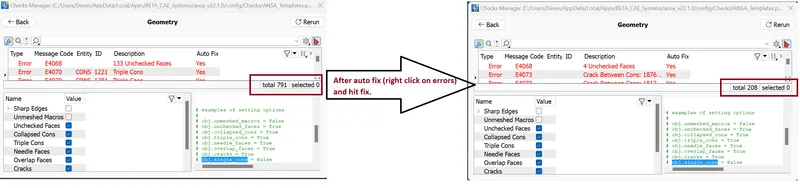
Here we have mostly Two types of Geometrical Errors
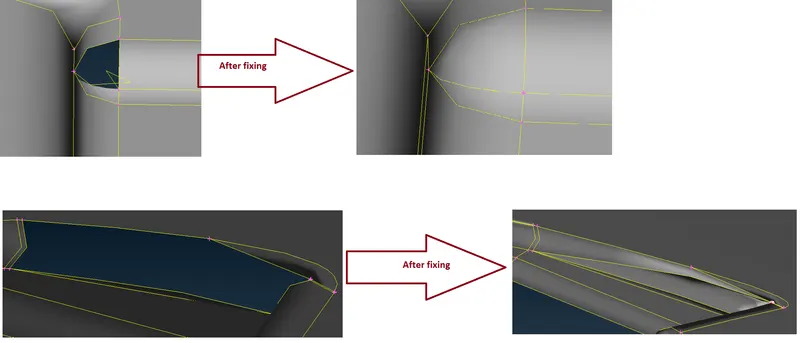
Error due to Unchecked Faces
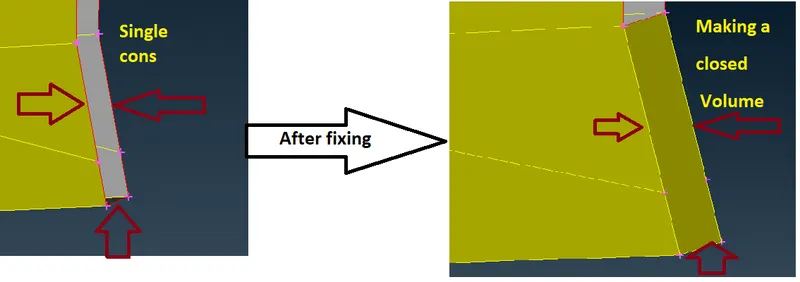
Error due to Singal Cons
Here we observe this CAD model is not a closed Volume that’s way lots of single cons present in Error side. So, performing Casting option (Mid surface) we require Closed volume so we need to fix this by using Command: Topo >> Faces >> New >> Select COONS Option >> Selecting the signal Cons on the parent geometry >> hit Middle mouse click
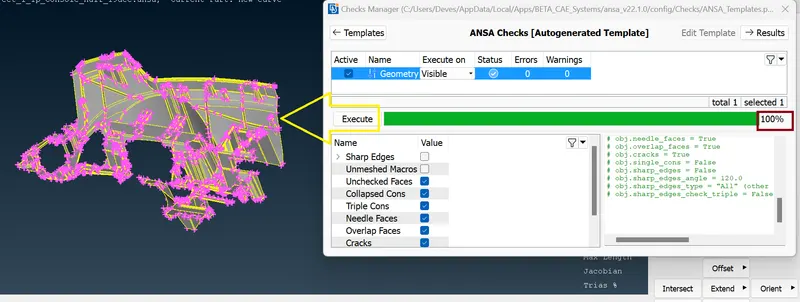
Some more types of Error present like Crack Between Cons, Needle Face etc. we fix most of the error Manually.
Finally, we have
Mid-surface:
Before mid-surface extraction we need to Measure thickness of the component at different location. We can create different PIDs for different thickness or for using casting option for mid surface we require minimum thickness of the Component.
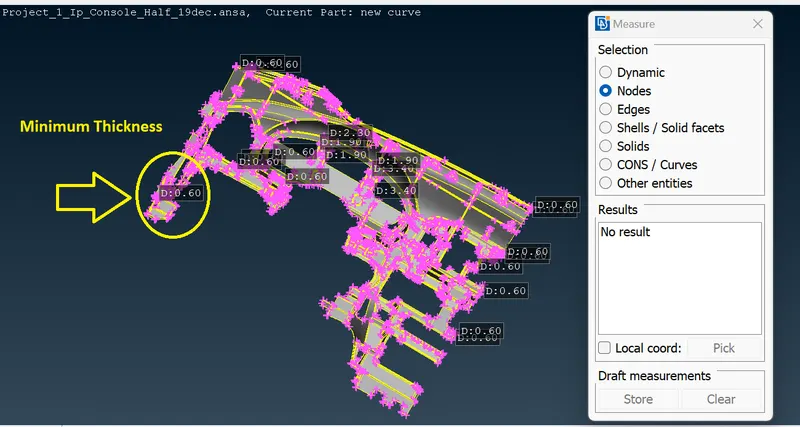
Here we use automatic method for Mid surface and 2D meshing
Casting/Extrusion Method:
Casting method of mesh generation is used for casted components. This Method is generally used for cast iron, Aluminium, and Plastic Component. `Or` the Component which is having non uniform thickness.
Before using auto mid option we need to set Quality Criteria and Mesh Parameters.
Given Quality Criteria:
|
S. No. |
Quality Criteria |
Value |
|
1. |
Target/Average length |
4 |
|
2. |
Minimum Length |
2 |
|
3. |
Maximum Length |
6 |
|
4. |
Aspect |
3 |
|
5. |
Warpage |
15 |
|
6. |
Skewness |
45 |
|
7. |
Jacobian |
0.7 |
|
8. |
Minimum Quad Angle |
45 |
|
9. |
Maximum Quad Angle |
135 |
|
10. |
Minimum Tria Angle |
30 |
|
11. |
Maximum Tria Angle |
120 |
|
12. |
Tria Percentage |
15 |
Setting Quality Parameters: The quality parameters are given, we put this value as per given figure.
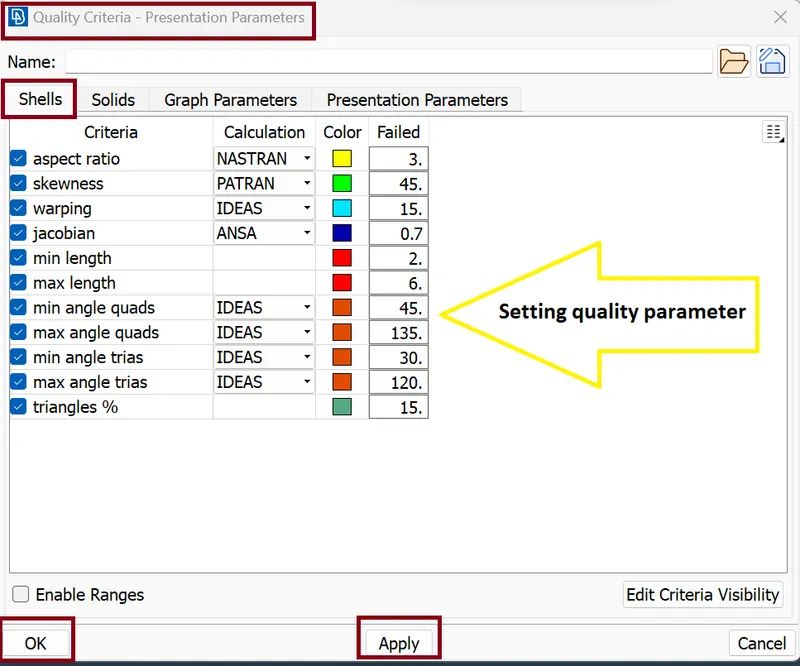
Setting mesh parameters:
Here we edit target length would be 4mm, mesh type would be 'mixed' & the minimum lengths would be 2mm.
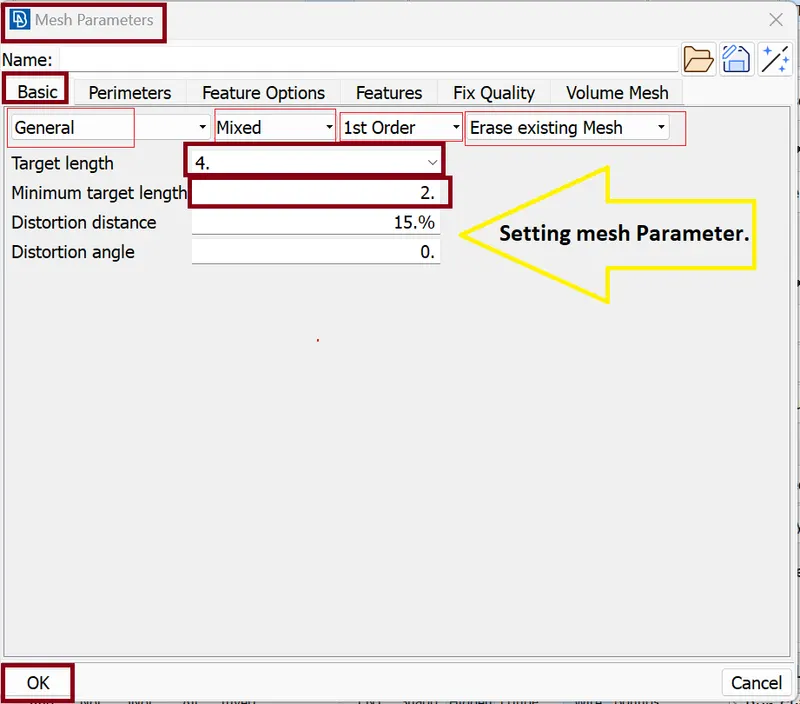
Now we go for the Auto mid
In casting option for Auto Mid we get best result when we put 0.1 (or less than 0.1) value but Computation time will increase drastically and ANSA crash several times. So, for this Model we take 0.6 (because 0.6 is the minimum thickness of the Component).
Command: Topo >> Faces >> Mid. Surface >> Casting/Extrusion >> Edit some value >> hit OK.
We Edit some value which are Represented in Red Box.
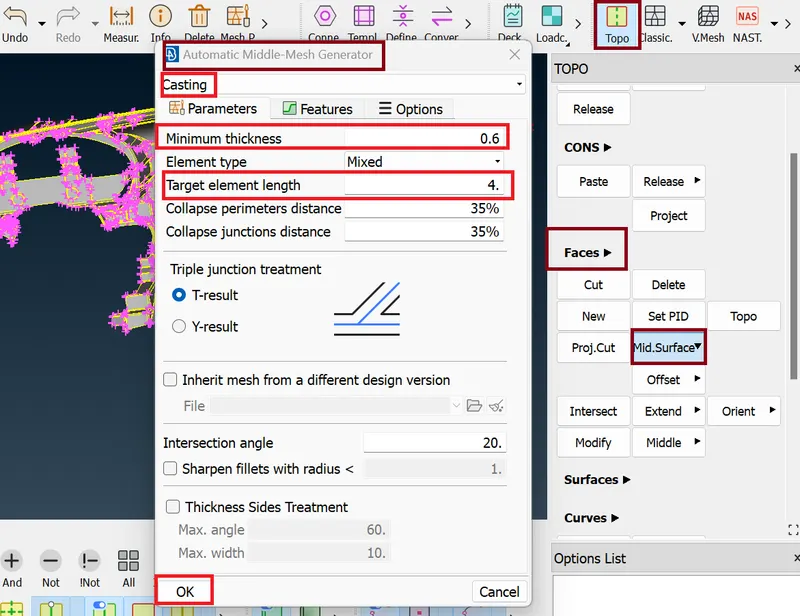
Now we get mid surface along with 2D mesh
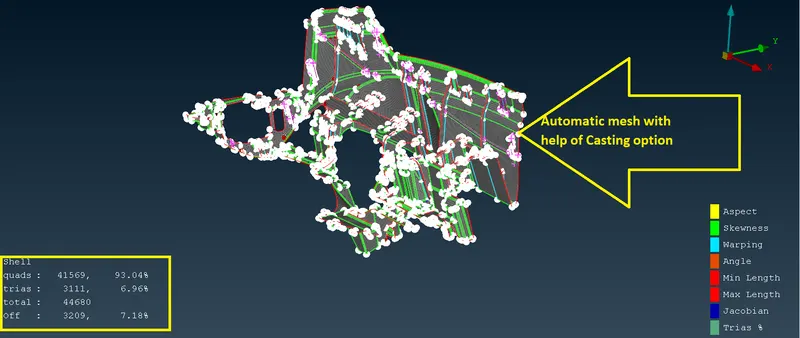
The mesh flow is good but some features are not taken properly specially DOG HOUSE.
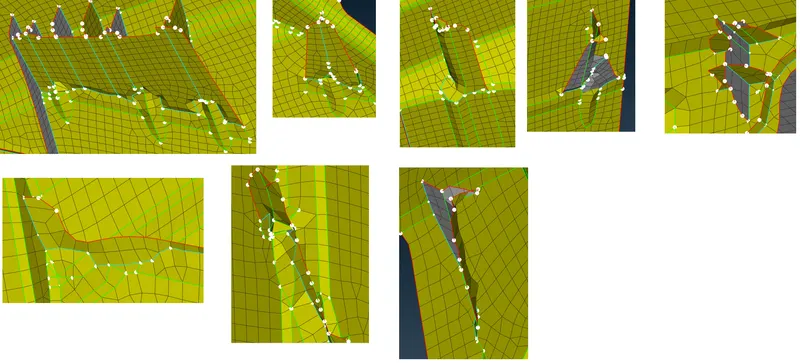
So, we need to work on these area Manually.
For this we follow some steps
Step1: Delete that area
We use Element delete option to delete that area.
Step2: Clean the Base surface
Sometime some unnecessary feature line disturbs mesh flow or generate duplicate surface. We need to supress them as per our requirement.
Step:3 Align the Base surface
sometime Base surface Alignment is not proper. To fix this we use (classic mesh >> Grids >> Align).
Step4: Capture that feature Manually
For capturing feature, we use Curves (<< Topo) and Fill (<< Shell mesh << classic mesh).
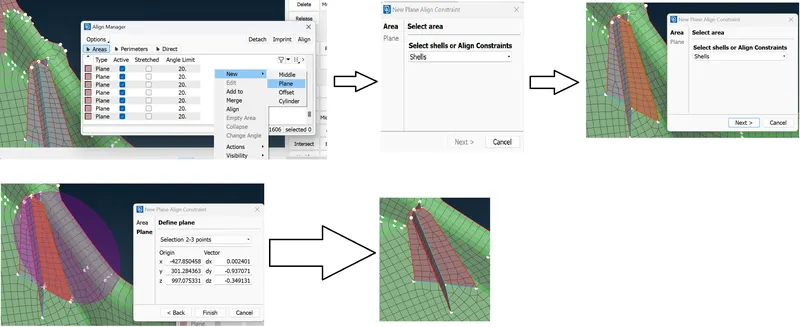
Step5: use Align Manager to store this feature data into the main casting data.

Align Manager:
Command: Topo >> Faces >> Mid. Surface >> Align Manager >> Align Manager Card will Open >> Right click on white space >> New >> Plane >> Select Shell >> Selecting 2 - 3 Point ( x-y-z axes) >> finish.
Similarly we work on all the Dog house and fix them
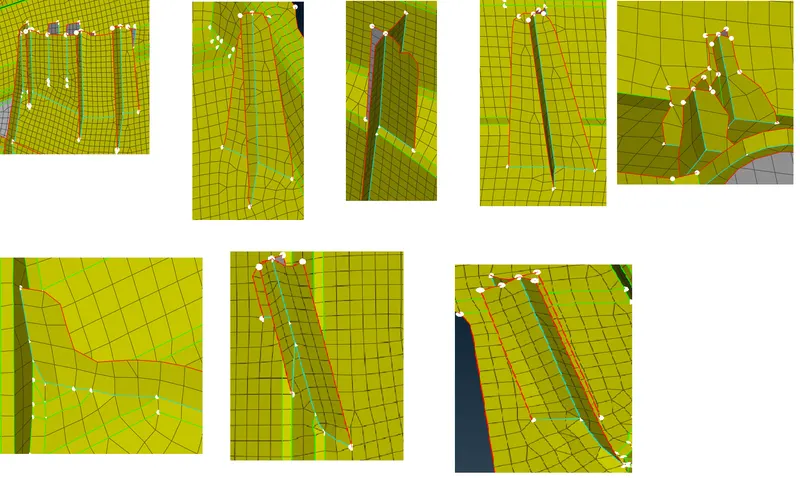
Automated mesh is refined by using command Shell Mesh >> Reconstruct. It is ensured that there are no rotating quads. Also, trias are kept as low as possible.
Things need to be ensured while meshing
- Avoid back-to-back triangle.
- Avoid opposite trias.
- Avoid triangle element at the edges.
- To fix Elements quality Criteria and trias are removed using >>Split, >>Swap, >>Join (Elements Tab), >>Smooth (Shell mesh tab), >>Paste (Grids), and >> Num +/- (perimeter tab).
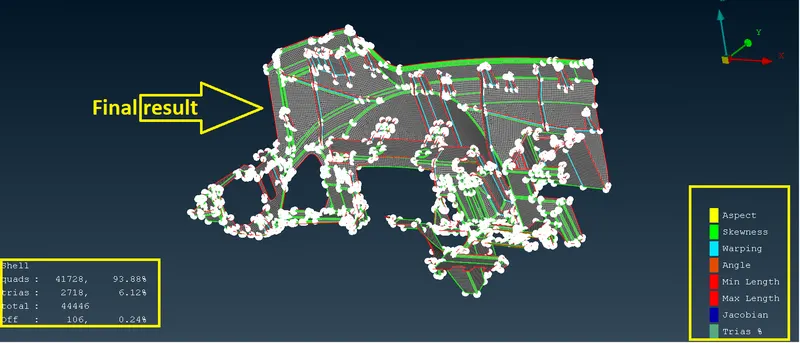
Final result:
Assigning Thickness:
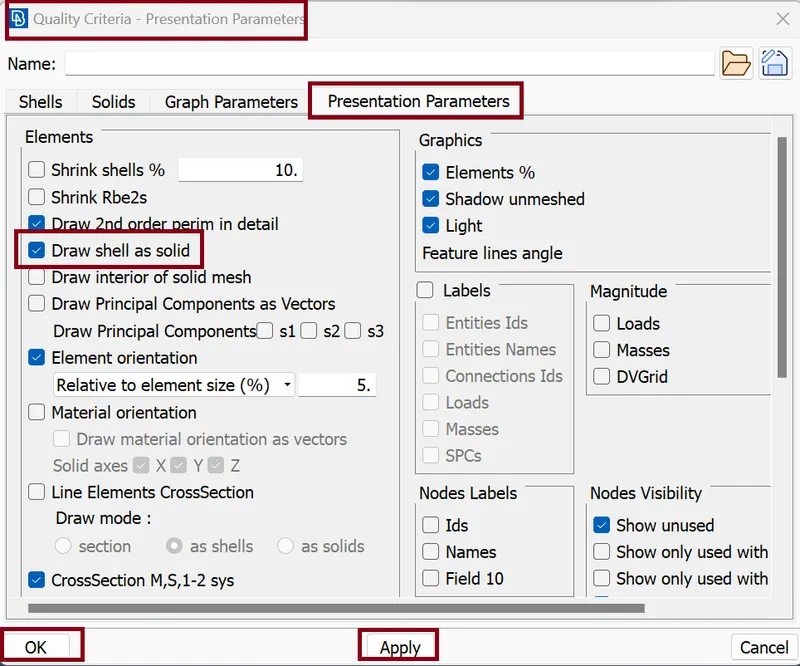
The Thickness is been assigned to the component by using Command: Utilities >> Quality Criteria >> Presentation Parameters >> tick the option Draw shell as Solid.
CONCLUSION:
- Here we Observe quality failures are reduced from 3209 (7.18%) to 106 (0.24%). The off elements could not be removed completely due to the close-lying triple cons and single cons. The triangle percentage is approx. 6 % which is Approximate the permissible limit.
- The 2-D Meshing on the given Instrumental Panel of an Automotive component has been performed using ANSA.
Learning Outcomes:
- How to fix Geometry Problem for Complex/ large Model.
- How to use Casting method for Mid surface and 2D meshing.
- How to use Align Manager.
- Tools like faces middle and curve middle been an exposure to extract mid-surface.
- Clearing the Off elements.
Model Drive Link:
https://drive.google.com/file/d/1dGJfAYxvfo_uiyNskaneVLM7EwTSD-mz/view?usp=sharing
******************************************************************************************************************************************************************************************************************************************************************************************************END