Project 1
CAR BACK DOOR WIRING HARNESS DESIGN- PROJECT 2
AIM
To route the Wiring harness on given car body front door and prepare flatten view drawing in CATIA V5.
INTRODUCTION
A wire harness, also commonly referred to as a wiring harness, is an exterior sheath used to cover some types of electronic wires. Generally, wiring harnesses are made of thermoplastic or thermoset materials that can help protect the cables from the environment.
Automobiles today come with some great features. Their design, though, calls for deft wiring considerations. An automotive wiring harness is an assembly of wires, connectors, and other electrical parts. You use it in a vehicle for the transmission of signals.
Design of Wire Harness
The design of the harness comprising of the interconnected mesh of wires is crucial. Select the important components like connectors, fuses, and sensors. Ensure their reliability.
Study the schematic circuit diagram. Divide the entire vehicle into detachable parts like chassis, body, and engine. Then design the wiring harness that suits the requirements. Ensure that it fits the customer requirements, shape, and size of the vehicle. Chalk out electrical routing in a way that reduces complexity and uses minimal space.
There are three types of engine wire harnesses based on the vehicle part you are looking at. The engine wire harness is a set of wires, connectors, and terminals to relay the signal to and from the engine. It also communicates messages from all sensors within the engine.
The body wiring harness routes electrical and electronic bits of information. It’s what keeps the major components of the automobile working. The body wiring takes care of power windows, lighting, and other accessories. And then, you need a chassis wiring harness for connecting the components.
Door Wiring Harness
Door locks and latches
Most vehicle doors are secured closed to the vehicle body with latches that may be locked to prevent unauthorized access from the exterior. There are a variety of car door locking systems. Door locks may be manually, or automatically operated, and may be centrally or individually operated. Also, they may be operated by remote control, with the transmitter often integrated into the main vehicle access and a key for the ignition.
Additionally, rear passenger doors are frequently fitted with child safety locks to prevent children from exiting the vehicle unless the door is opened from the exterior. These are also frequently used on police cars, to prevent suspect criminals from escaping whilst in police custody.
Vehicle door latches on practically all vehicles today are usually operated by use of a handle which requires the user to pull, lift, or tug - with some force towards themselves rather than push. There is a reason for this. As late as the 1970s, some vehicles used exposed push buttons to operate the door latch, such as certain Opel models. The unfortunate side effect of this design was that external objects which touched a vehicle during a spinout could trigger the latch; the door would pop open and eject the vehicle occupants. A death that occurred exactly that way led to the landmark legal case of Daly v. General Motors Corp., 20 Cal. 3d 725 (1978), in which the Supreme Court of California merged strict product liability with comparative fault, and thereby affirmed the right of General Motors to introduce evidence that decedent Kirk Daly flew out of his Opel not only because the door popped open, but because he was intoxicated and not wearing a seat belt.
Door switch
Door switches are simple on/off mechanisms connected to the interior light (dome light), and may also be connected to a warning light, speaker, or other devices, to inform the driver when the door is not closed. The door light is standard equipment on all cars. In American cars from the 1950s-1990s, they had buzzers or "door dingers" that sounded, along with the check light, whenever any door is open.
Windows
Most vehicle doors have windows, and most of these may be opened to various extents. Most car door windows retract downwards into the body of the doors and are opened either with a manual crank, or switchable electrical motor (electric car windows other than the driver's window can usually be controlled at both the door itself and centrally by an additional control at the driver's position). In the past, certain retracting windows were operated by direct (up or down) pressure, and were held in the up position by friction instead of by an internal lift mechanism.
Other cars, particularly older US-manufactured vans, have hinged windows with a folded lever mechanism to push and hold the window out from its closed position.
Door brakes or stays
Vehicle doors often include brakes, or 'stays', that slow the door down just before it closes, and also prevent the door from opening further than its design specification. The current trend is to have a three-stage door brake.
Door brakes exist because the doors on the first vehicles were heavy, so they had to be pushed hard to make them close. Soon after, automotive manufacturers managed to construct lighter doors, but users were used to closing doors with significant force; therefore doors could become damaged. Door brakes were then introduced to slow down the door just before the door closed to prevent damage; these soon became standard
types
There are many different types of vehicle doors, including the following:
Conventional
A conventional door, also known as a regular door is hinged at the front-facing edge of the door, and so allows the door to swing outward from the body of the car. These doors are relatively safe, in that if they are opened during forward motion of the vehicle, the wind resistance will work against the opening door, and will effectively force its closure.
Suicide
A suicide door is hinged on its trailing edge. The term "suicide door" was coined due to the potential for the door to fly open when the latch was released while the car was in motion.
Scissor
Scissor doors rotate vertically upward and are hinged at or near the end of the windshield. They are used in Lamborghinis, Alfa Romeos, and other brands.
Butterfly
Butterfly doors are similar to scissor doors, but while scissor doors move up, butterfly doors also move outwards, which makes for easier entry/exit, and saves space.
Gull-wing
Gull-wing doors are hinged on their uppermost edge, at the roof rather than the side. They are so named because, when opened, the doors evoke the image of a seagull opening its wings.
Sliding
Sliding doors open by sliding horizontally or vertically, whereby the door is either mounted on or suspended from a track. They are commonly used on the sides of minivans, leisure activity vehicles, light commercial vehicles, minibuses, and some buses as this allows a large opening for equipment to be loaded and unloaded without obstructing access.
Canopy
A canopy door sits on top of a car and lifts up in some way, to provide access for passengers. It is similar to an aircraft canopy. There are no set standards to canopies, so they can be hinged at the front, side or back - although hinging at the front is most common. Canopy doors are rarely used on production cars, but are frequently used on the 'closed' variants of Le Mans Prototype endurance race cars. They are also sometimes used on concept cars.
Disappearing
A disappearing door slides down and under the vehicle. This type makes the whole side of the passenger compartment open, and only leaves a threshold to step over to get in and out. Also called the Jatech rotary drop door, or disappearing car door. One example of a car with disappearing doors is the Lincoln Mark VIII concept car.
Vehicle regulations
Various countries have their own regulations for vehicle doors.
Global Technical Regulation No. 1, Door locks, is one of the few global regulations. Various countries are members of these regulations, for instance, Australia, Canada, European Union, Japan, Russia, and the United States. China and India are not members.[8]
Another international doors regulation is regulation #11: door latches and door retention components. Application of this requirement is done for instance by the European Union, Russia, Japan, New Zealand and Egypt.
OBJECTIVE
- Define all the mechanical connectors electrically and save it in the Catalogue.
- Place required Connecters on the Back door CAD data.
- Place Fir Tree clips at the required position by following the packaging rules.
- Create the Wiring Harness Routing with all the electrically defined connectors and mounting equipments.
- Create branching points at required locations to create sub branches and connect to various connectors in the geometrical bundle.
- Apply Protection coverings as required.
- Create Wiring harness flattening for the final geometrical bundle.
- Using the drafting workbench, create a drawing sheet with the flattened wiring harness.
DESIGN METHODOLOGY
Some important packaging rules and best practices to be considered during wire harness routing and placing of the clips and clamps are as follows –
- Distance between two clamps on a straight branch should be maximum of 200mm.
- The minimum branch length should be 50mm.
- Minimum distance between clip and nearest branching point should be 25mm.
- The minimum distance between two straight connection points should be 200mm.
- The minimum distance between two breakout points should be 50mm.
- To limit the number of branches from a single branch point to 4.
- Enough clips clamps shall be provided to ensure positive clearance with surroundings and safety of wiring harness.
- Fir tree clips and other clips can be added to the Geometric bundle as they are electrically defined and are part of the Wire harness routing and should be provided with the Wire bundle package.
- Enough slack should be provided to the wiring harness which help not to get damaged during the opening and closing of Back Door.
- Easy manufacturing, installation, removal and maintenance have to be considered while designing the wire harness.
- The wire routing should be done keeping in mind the cost effectiveness of the bundle package.
- To avoid the harness routing and clipping in blind zones of the operator during the assembly and the service.
- To provide proper slack at end connectors so that there will be no tension on the wire bundle.
- To avoid sharp edges on the sheet metal parts and if it is not possible then provide protection parts to prevent damage of the wire bundle.
- Routing through small structural holes and openings shall be avoided. To minimize chaffing and handling of the wiring harness during installation.
- To provide separate branch points for separate connectors to ensure Poka-Yoke.
- The bend ratio for all the bundle segment is considered to be 1.4
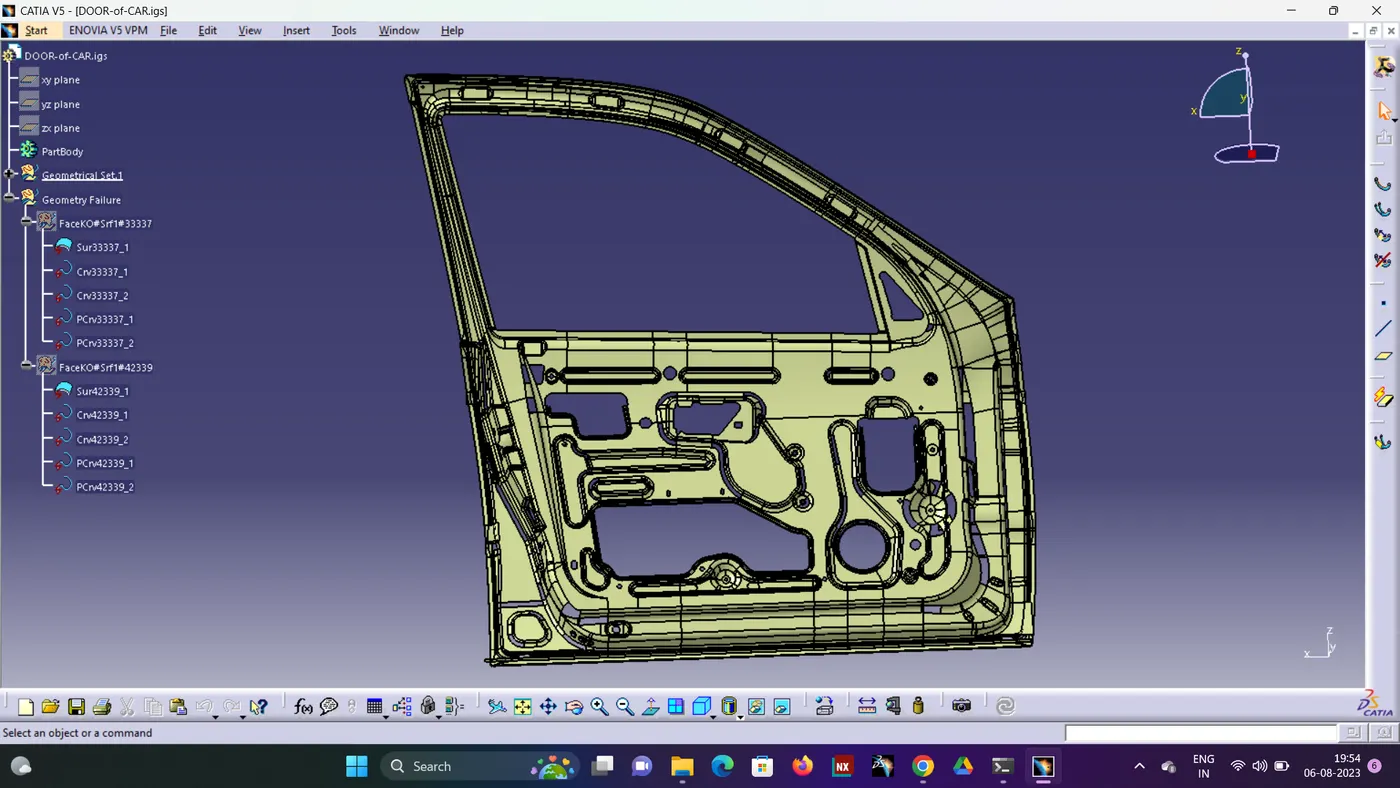
Step 1- download the front Door CAD data from the given source.
STEP 2 – Creating the context assembly
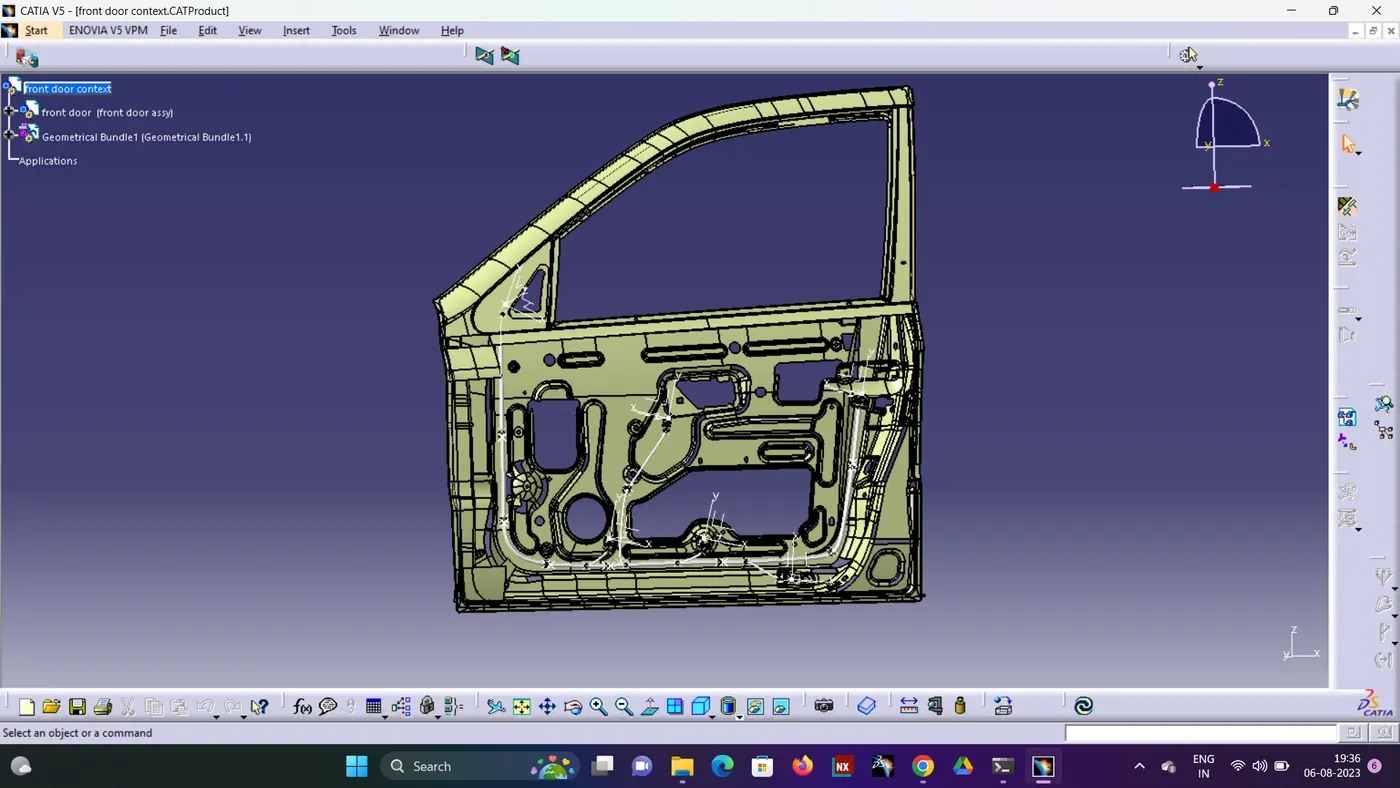
Context assembly is nothing but the product file which contains the back door 3D-CAD data and the back door geometrical bundle. Here the geometrical bundle product contains all the connectors and clips which are electrically defined for the assembly.
- Create new product file and rename it as Back door harness assembly context.
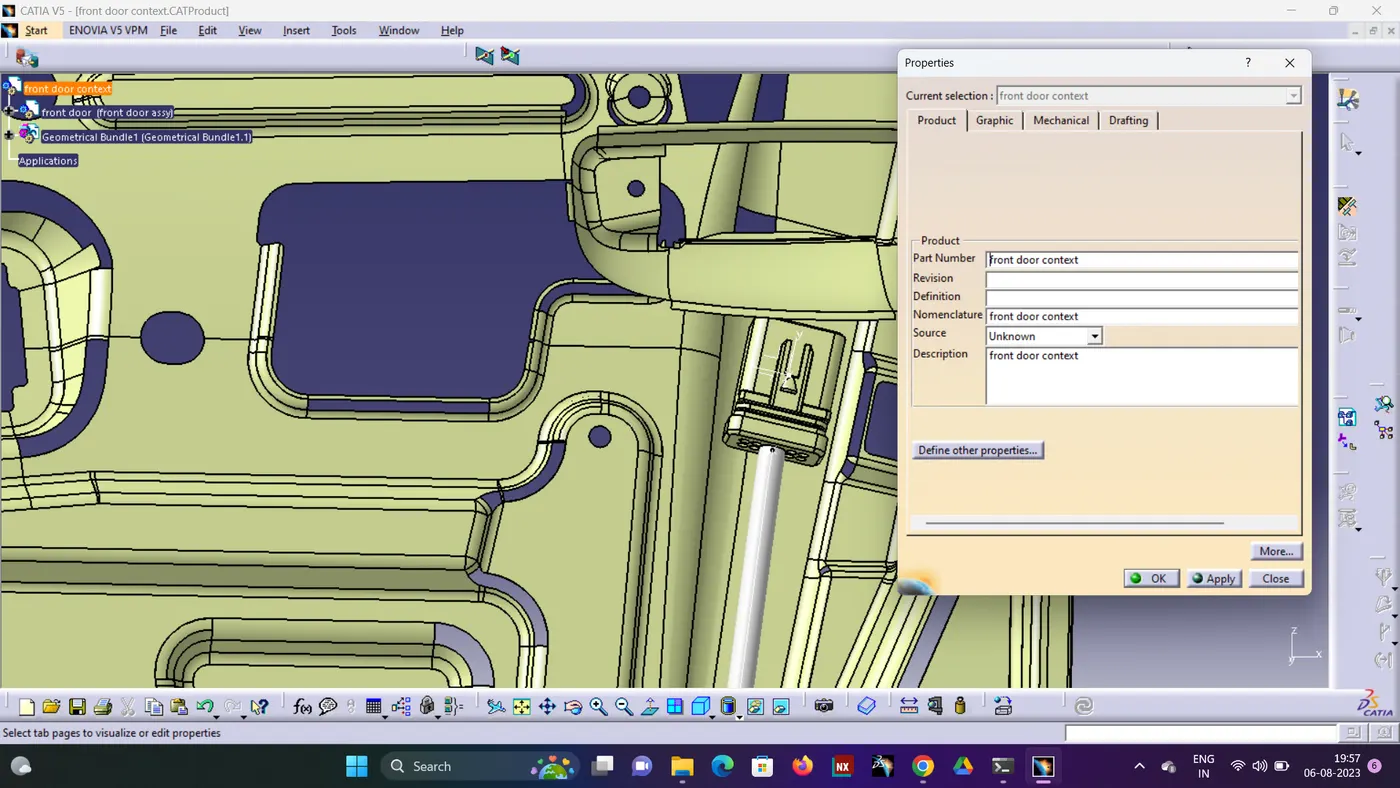
-
Now add the back door CAD data into the context assembly and also creating the geometrical bundle product file inside the context assembly.
-
Define the geometrical bundle product file electrically using the geometrical bundle command.
STEP 4 – Add required suitable Connectors from the Connectors Catalogue.
Back Door Harness Assembly requires the following connection connectors
- Inter connection Connector – 1
- Top mounted stop light connector – 1
- Defogger connectors – 2
- Brake Light Assembly Connections – 2(LH and RH)
- Number plate Light Connections – 2
- Wiper motor Connection - 1
Connectors selected for the cack door harness assembly are as follows
- Interconnection Connector C-776438-4
- C-1563689-1 used for Brake Light assembly connections and Wiper motor connection
- C-282080-1 used for defogger and numberplate connections
- C-173090-1 for high Mount stop Light
STEP 5 – Placing fir tree clips to the required locations to ensure proper harness routing throughout the Assembly.
- Ensure no fouling of harness to the back door sheet metal components.
- Enough clamps shall be provided to ensure the positive clearance with surrounding and safety of wiring harness. Distance between two clamps/clips on a straight branch should be maximum of 200mm. However clamping requirements should be decided based on the harness bending and mounting arrangements.
- Distance measurements between clips provided in the assembly
STEP 6 - Wiring Harness Routing
- Add branch points at minimum of 25mm distance from clips and clamps to create new sub branches connecting various connectors.
- Minimum length of bundle should be 50mm.
- Now, the car tail gate assembly is ready for the bundle routing as shown in below image
- We have activated Geometrical bundle product file from the context assembly to create new multi-branchables.
- First, we have started bundle routing from interconnection connector to the nearest Mounting clip available and the continue to add multibranchabe bundles to achieve the required harness bundle. Main bundle harness diameter is considered as 15mm.
- Now create branch point to route sub bundle to the Top mount brake light connector. Fir tree clips are added in between the branch point and top mount brake light connector to ensure proper and safe routing. Bundle diameter s considered as 5 mm.
- Add branch point to create bundle connection towards the defogger connector
- Now add branch point for creating sub bundle connection for Wiper motor and number plate connectors.
- Add sub bundle segments with bundle diameter 5 mm.
- Add clip on the sheet metal in between the main harness bundle and number plate connector connections. This will improve the routing and prevent the bundle from unwanted fouling with sheet metal component.
- Now from rh defogger branch point, create gh brake light bundle and create new branck point for LH brake light assembly and create bundles with diameter 5mm each.
Final geometrical bundle
STEP 7 – Applying Protective Cover
After bundle routing, we have to add protective covering to the harness bundle so that it will get protected from the damage.
- Harness bundle should be protected with flexible rubber cover at the interconnection region where it is a critical place and subjected to opening and closing of door. There are more possibilities to damage the wiring harness if no proper protection covering is provided.
- Corrugated conduits and protective hoses with various properties, from heat resistance through abrasion protection and impact strength to noise reduction, protect valuable cables against all unfavourable external influences.
- Slit COT tubes are provided for protecting the harness from physical and other environmental damages that can occur in the long run.
- Start or End Extrimities at the Connector bundle entry side should be given a gap of 30mm
- Selection of corrugated tubes are mainly driven by the wiring harness bundle diameter and temperature resistance requirements.
STEP 8 - ELECTRICAL CONTINUITY CHECK
We need to ensure that the entire bundle is fully connected.
- Go to edit and then click on search command.
- Go to advanced
- Select workbench as electrical, type as bundle segment and attribute as Fully connected
- The select result should be as TRUE or FALSE and the click search to see the connectivity analysis result
- For now, we will select "TRUE" and search for results. All the bundle segments are highlighted and found showing that all the bundle segments are electrically connected.
Step 9 - WIRING HARNESS FLATTENING
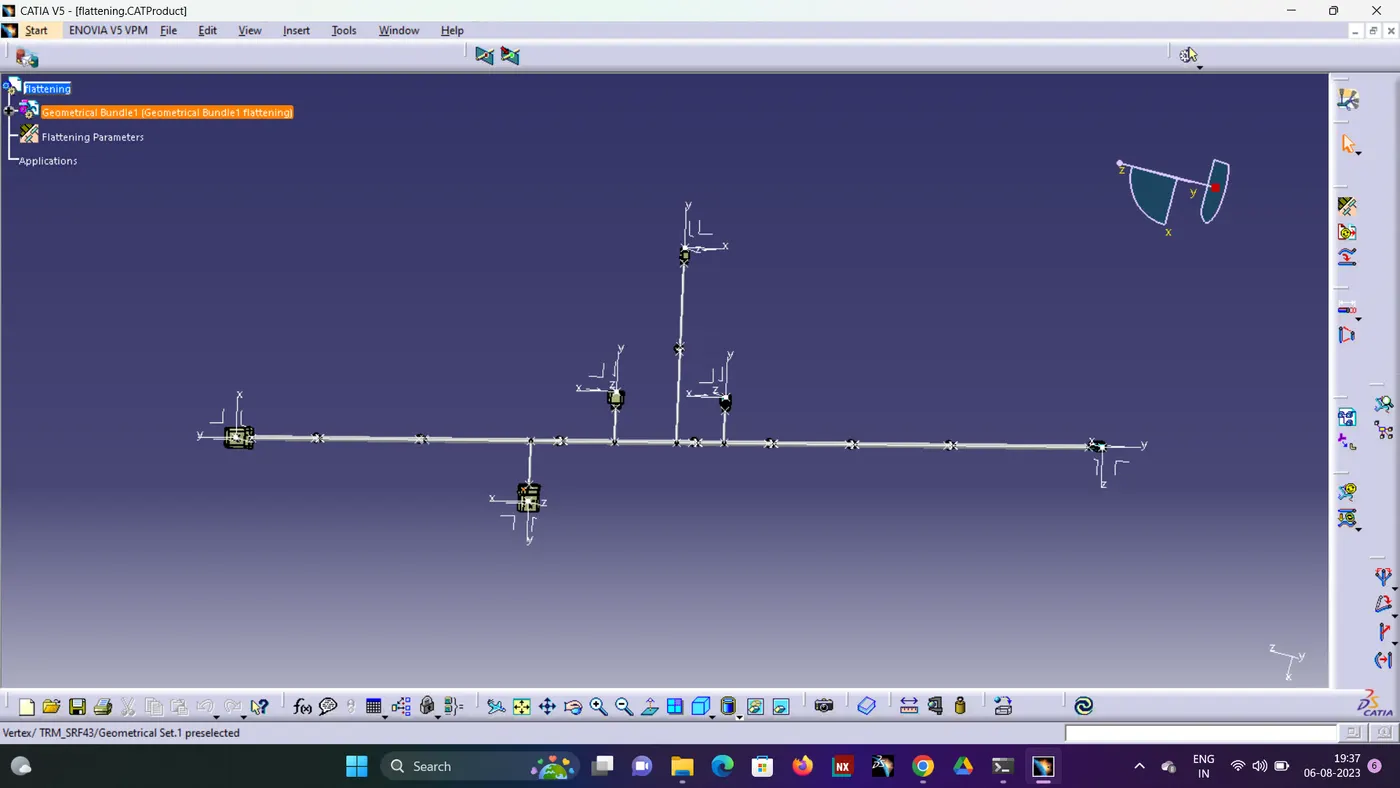
Wiring harness Bundle packaging process is done. Now we need to convert the geometrical bundle into a flattened wiring harness in the Electrical Harness Flattening Workbench.
- To create theFlattened Harness, we need to create a new product file and switch into the electrical harness flattening workbench.
- Now we need to define the Harness Flattening Parameters, save it in the same folder with all other files of back door harness project and then Extract the geometric bundle from the wiring harness context product file.
Final Flattened Harness
- Insert the flattened harness product into the drawing sheet using view option and selecting the front view command.
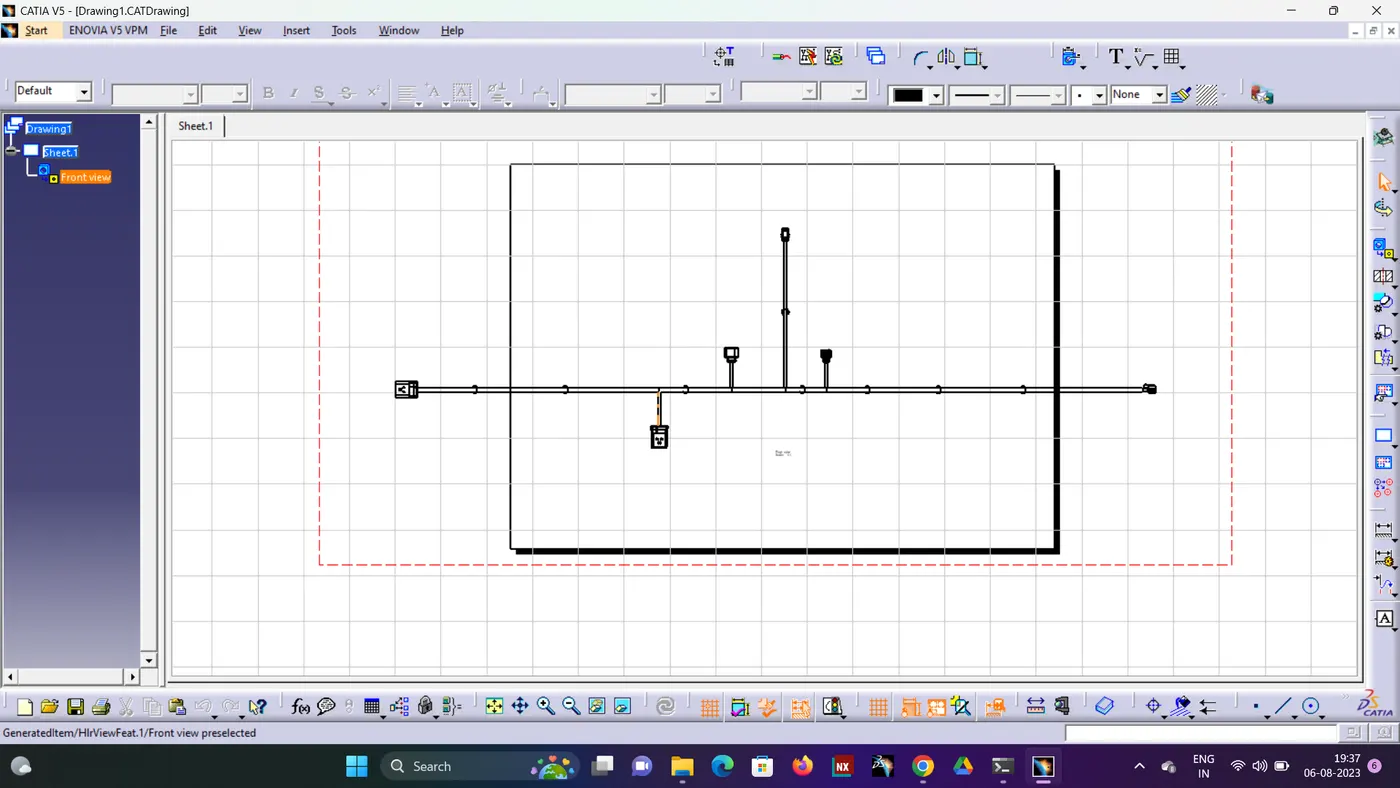
- Modify the drawing sheet view with required parameters.
Final Back Door Flattened Harness Drawing
Conclusion
CAR front door wiring harness assembly has been successfully completed considering all the packaging rules and industry standards, Wiring harness flattening and Flattened view drawing preparations are also done using CATIA v5 software.