Preparing Schedule & Cost Estimation for a building using REVIT
Preparing Schedule & Cost Estimation for a building using REVIT
INTRODUTION:
Schedules: A schedule is a tabular display of information, exctracted from the properties of the elements in a project. A schedule can list every instance of the type of elements you are scheduling, or it can collapse multiple instances onto a single row, based on the schedules groupign criteria.
The schedule can be created at any point in the design process. If any changes are made in the model taht affects the schedules. It automatically updates to reflect those changes.
Using revit software cost estimates can also be developed.By providing the unit cost of materials, total cost can be derived.
The other concept coming under this section is visual programming .Here the visual programming tool is dynamo.It is an open source visual programming language for revit, written by designer and construction professionals.It is a programming language that allows to type lines of codes: While also creating an alogrothim that consists of nodes.
Dynamo and revit can be utilised to model and analyse complex geometries, automate repetative processes, minimise human error, export data to excel files and other files types not typically supported by revit. Dynamo can make design process mmore efficient, with an intuitive interface and pre-made scripting libraries available as well.
1) Use the shortcut keys in Revit discussed in class to complete the following tasks and list them below
a. Using 3D model create a section box
b. To create similar doors and windows in a floor plan layout
c. To reduce the thickness of lines visible in plan views
d. To apply override settings to a floor in the model section view
e. To increase the range of visibility in a plan view
f. To select the previously selected items
g. To add annotations to the model views
h. To bring the model elements in line
i. To rotate the model elements
j. To move an object to another location
k. To copy a model element
l. To mirror an element about an axis
m. To create an array of model elements
ANSWER:
Aim:
To list the shortcuts keys for the following.
a. Using 3D model create a section box
b. To create similar doors and windows in a floor plan layout
c. To reduce the thickness of lines visible in plan views
d. To apply override settings to a floor in the model section view
e. To increase the range of visibility in a plan view
f. To select the previously selected items
g. To add annotations to the model views
h. To bring the model elements in line
i. To rotate the model elements
j. To move an object to another location
k. To copy a model element
l. To mirror an element about an axis
m. To create an array of model elements
Procedure:
a. Using 3D model create a section box
Short cut key used: Section box-BX
b. To create similar doors and windows in a floor plan layout
Short cut key used: create similar-CS
c. To reduce the thickness of lines visible in plan views
Short cut key used: Thin line-TL
d. To apply override settings to a floor in the model section view
Short cut key used: Visibility graphics and override settings-VG
e. To increase the range of visibility in a plan view
Short cut key used: View Range-VR
f. To select the previously selected items
Short cut key used:Reselect- Ctrl+<
g. To add annotations to the model views
Short cut key used: Dimension-Dl
h. To bring the model elements in line
Short cut key used:Align-AL
i. To rotate the model elements
Short cut key used:Rotate-R
j. To move an object to another location
Short cut key used: Move-MV
k. To copy a model element
Short cut key used: Copy-CO
l. To mirror an element about an axis
Short cut key used: Mirror- MM
m. To create an array of model elements
Short cut key used: Array -AR
2) Using Revit and the project used from week 6 to 8 prepare a schedule for the following
a. Walls
b. Doors
c. Windows
d. Material – Concrete/Wood
ANSWER:
AIM:
To prepare a schedule for the following
a. Walls
b. Doors
c. Windows
d. Material – Concrete/Wood
Procedure:
- Initially oprn the architctural model created previosly.
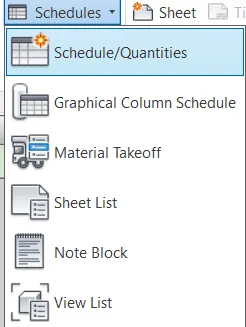
- Then Go to view tab---> schedules---> Equipments/ Quantites.
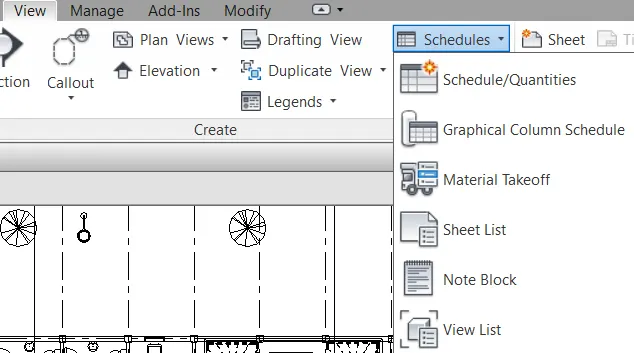
- Now, select the required fileds.
a. Walls schedule:
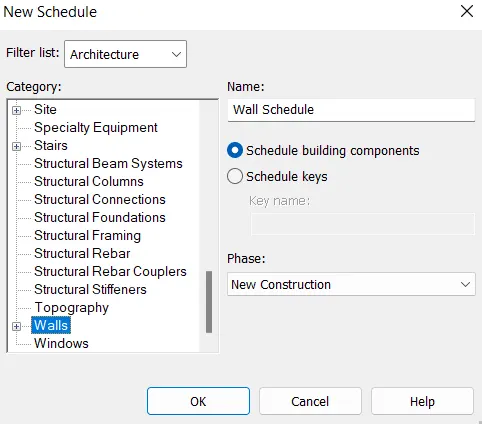
- Now, we have for the wall Schedule choose parameters for scheduling and then click ok.
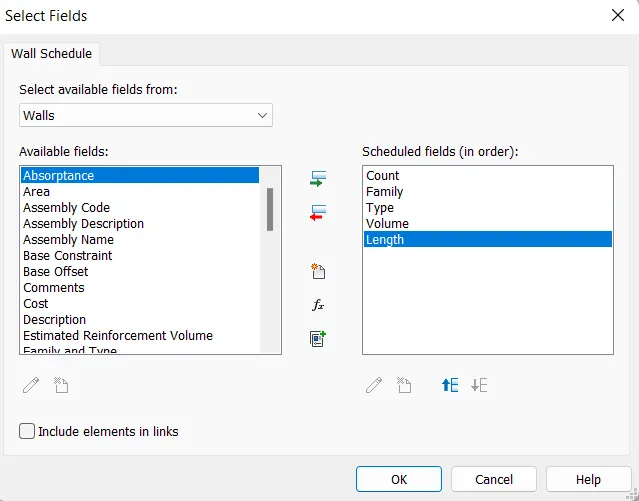
- The wall schedule is prepared as given below
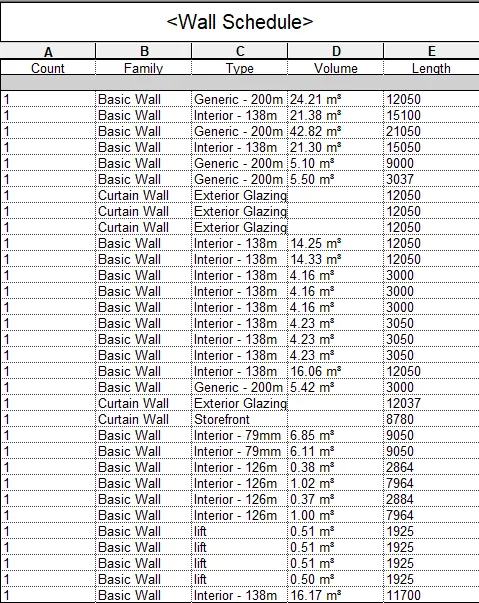
- Hence, the wall scheduled is prepared.
- Similarly, preapre the door schedule, Window schedule and material concrete/ Wood schedule.
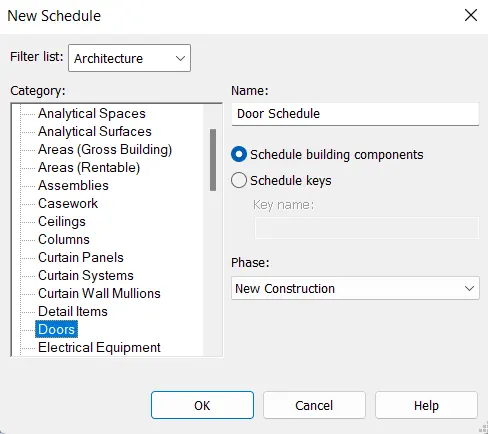
b. Doors schedule:
- view--> Schedule-->schedule/Quantities.
- Select door.
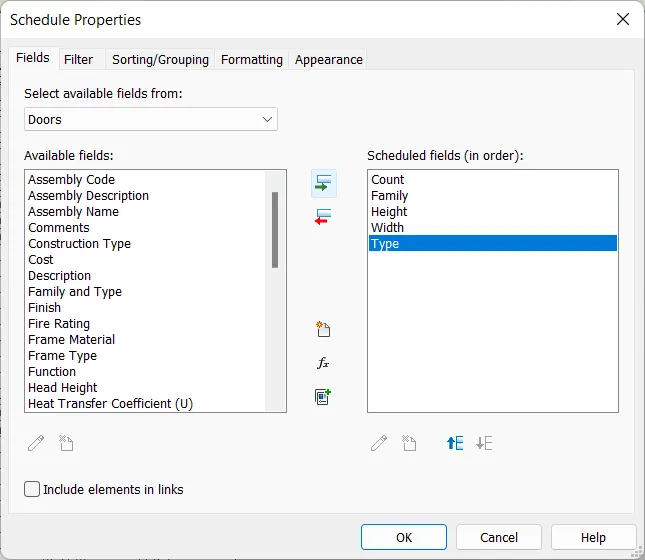
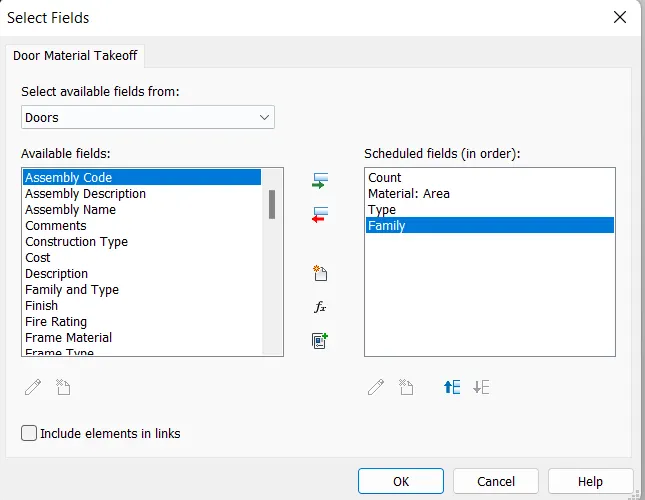
- Now, select the parameters to be considered for doors.
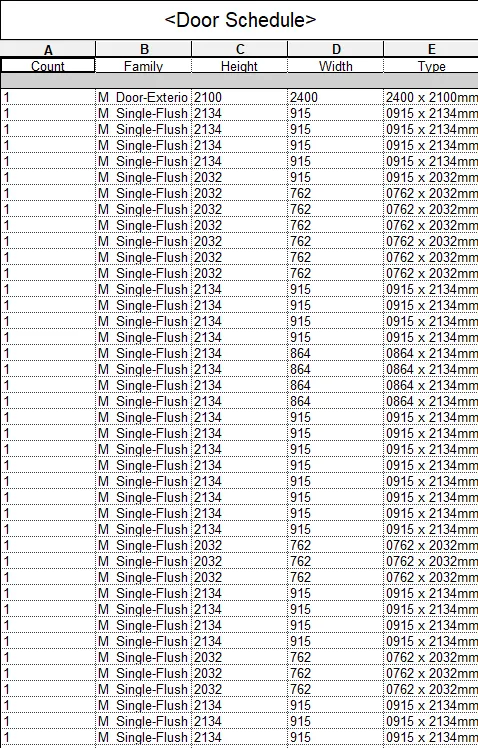
- Door Schedule is given as :
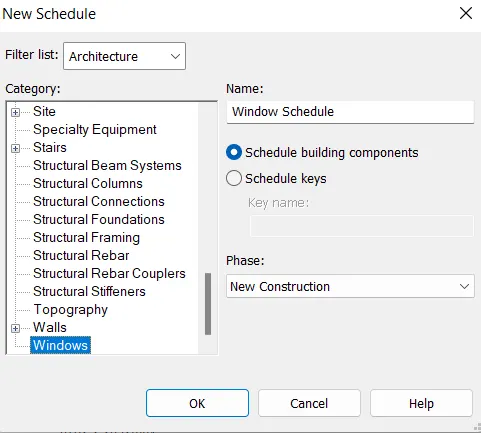
c. Windows schedule:
- view--> Schedule-->schedule/Quantities.
- Now, select the category as window.
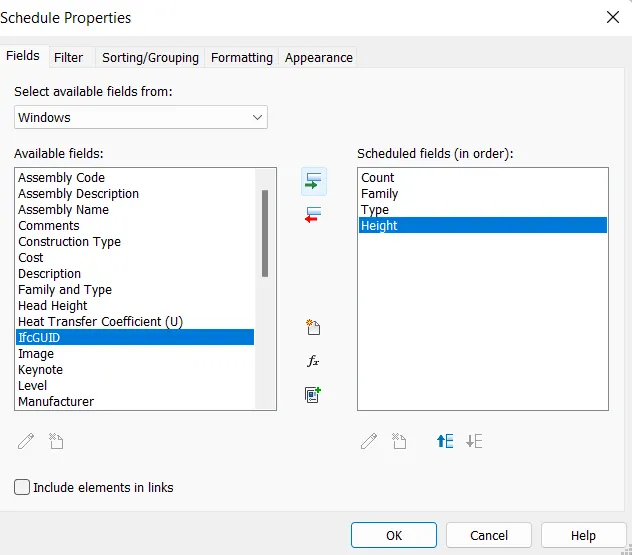
- Now, select the parameters to be considered for Windows.
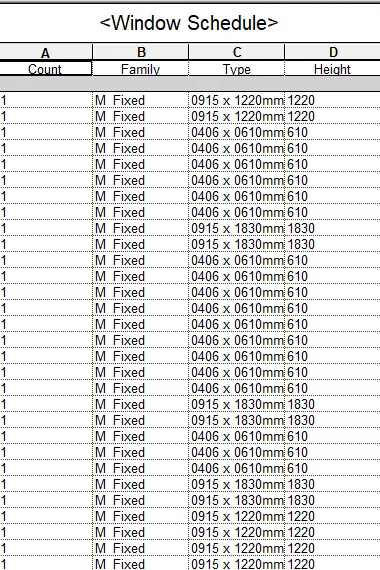
- The window Schedule prepared as given below.
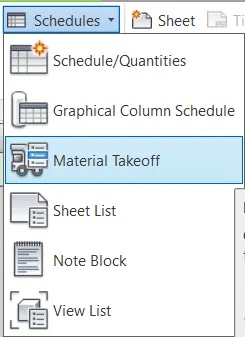
d. Material – Concrete/Wood:
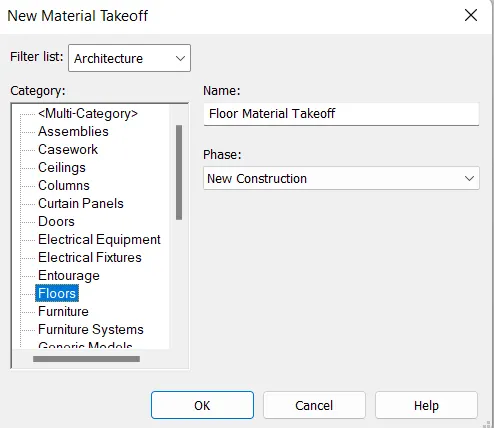
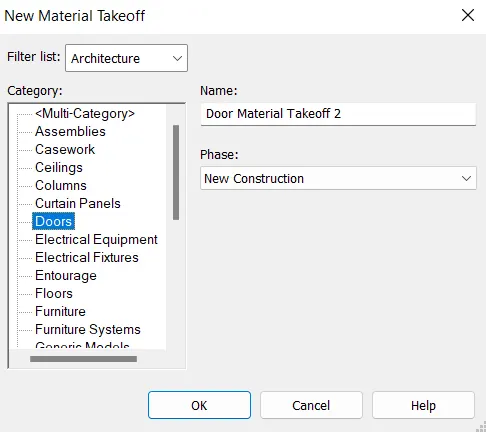
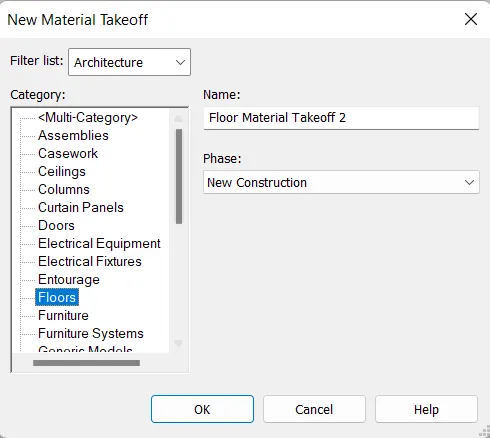
- view--> Schedule-->Material takeoff
- Now, select the category as floors.
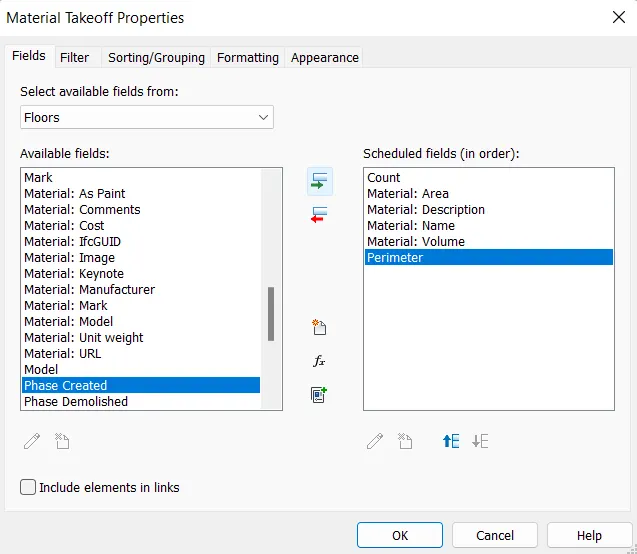
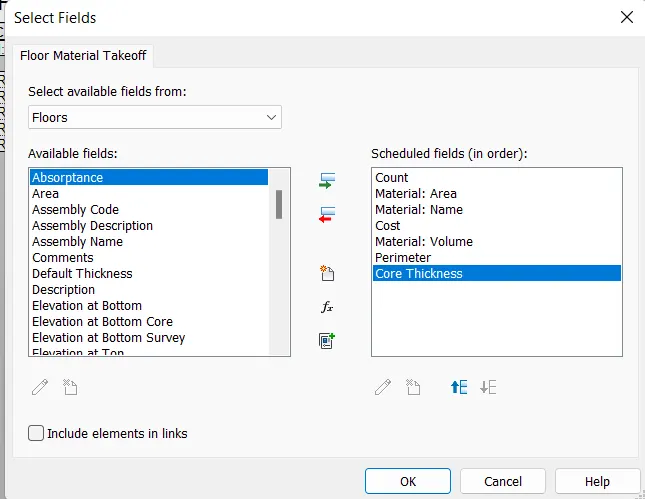
- Now, select the parameters to be considered for Floor material.
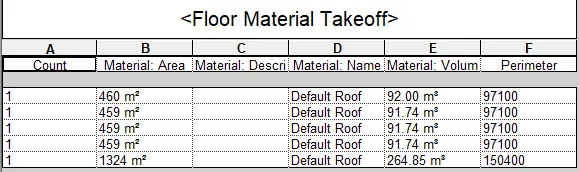
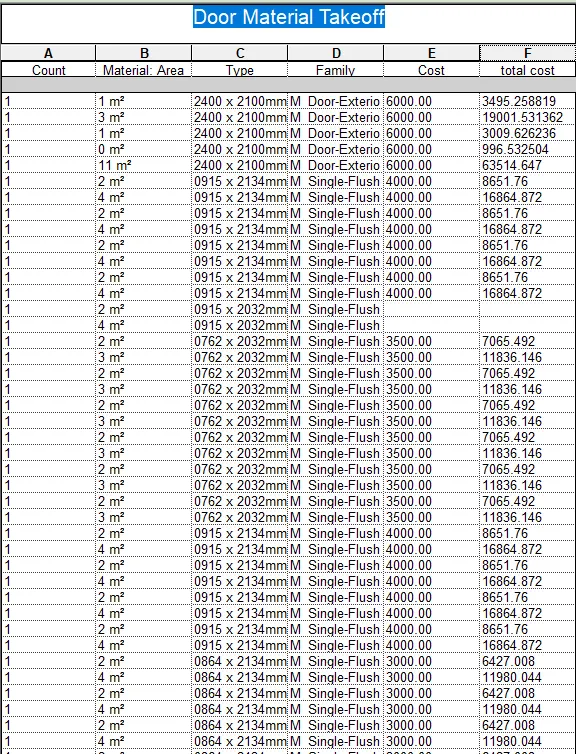
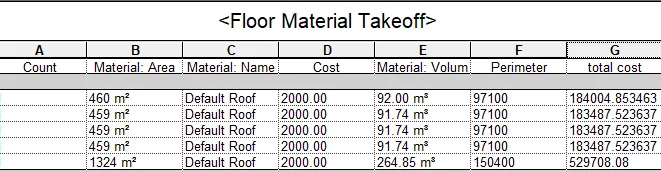
- Material takeoff schedule is given by.
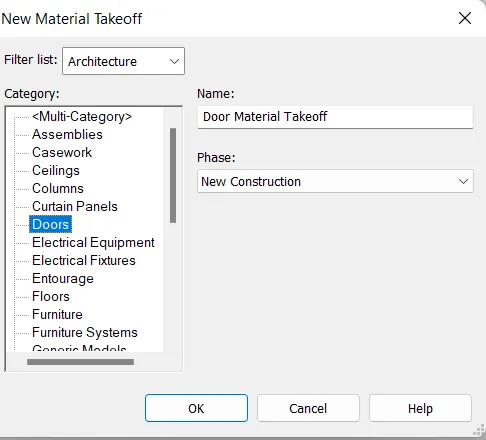
- Similarly, material takeoff doors is also developed.
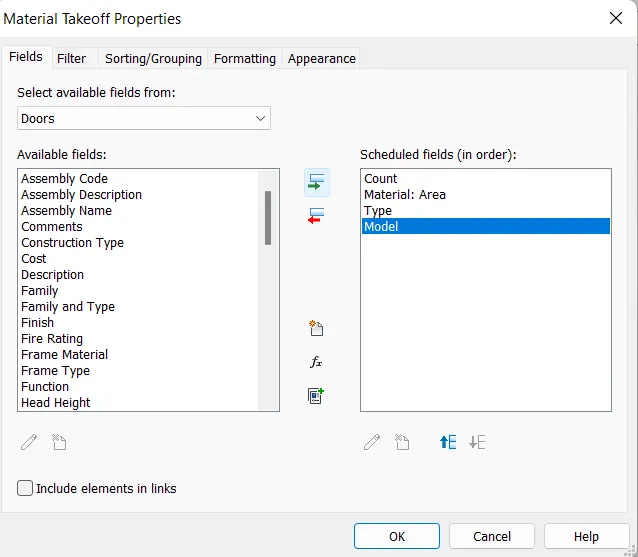
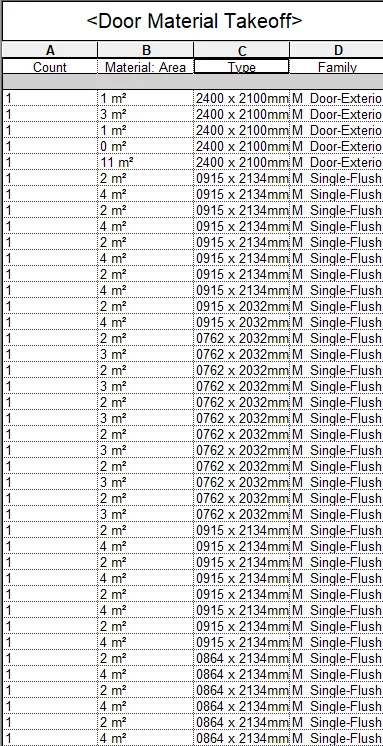
- Hence completed.
RESULT:
The wall, door, window and material schedules have been prepared.
3) Using Revit Calculate area and volume of each room in the model with appropriate room tags applied to each room. Prepare a schedule report for area and volume of each room.
ANSWER:
AIM:
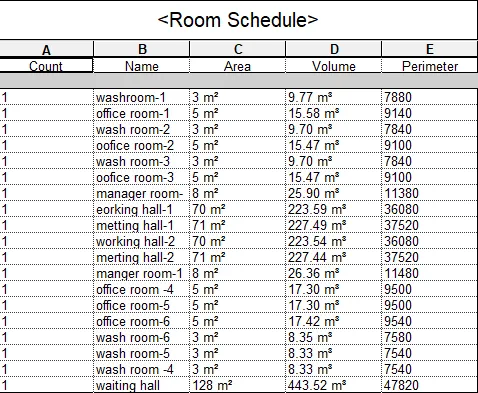
To Prepare a schedule report for area and volume of each room.
Procedure: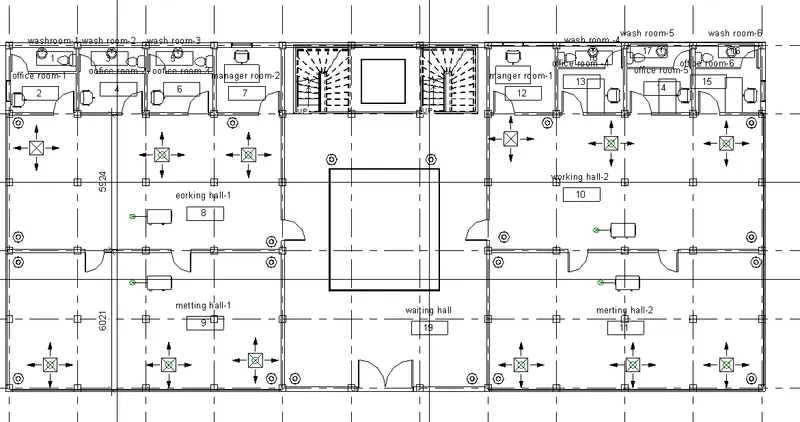
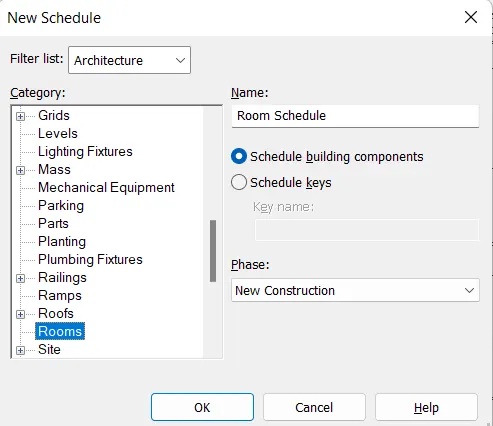
- view--> Schedule-->schedule/Quantities
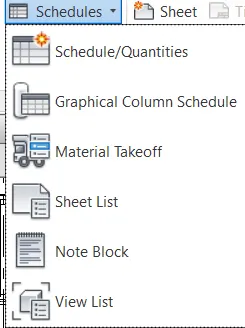
- Now, select the category as Rooms.
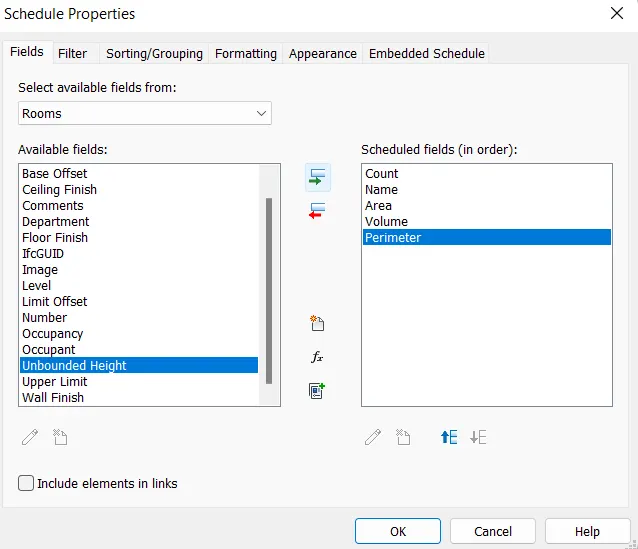
- Now, select the parametrs to be considered for room.
- The Room area schdule is given as:
RESULT:
Hence, room are schedule is preapred.
4) Using the same schedule using the unit cost rate for materials available in the internet, prepare total cost of materials used in the project
a. Total Cost of Materials
b. Individual Material Take off
ANSWER:
AIM:
To prepare total cost of materials.
PROCEDURE:
1.For walls:
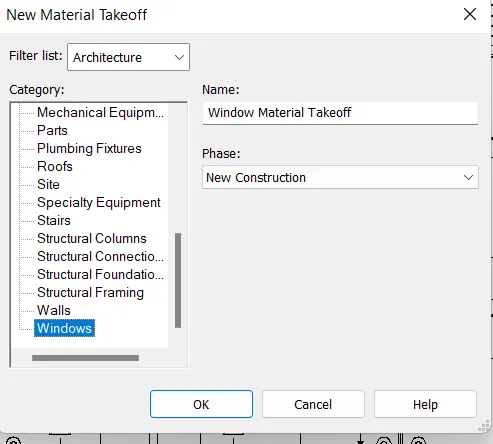
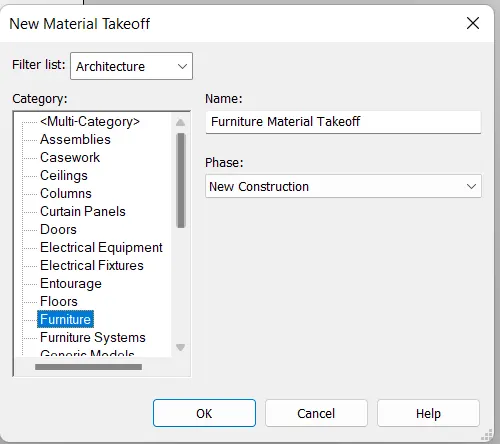
- Go to view tab ---> schedules---> Material takeoff.
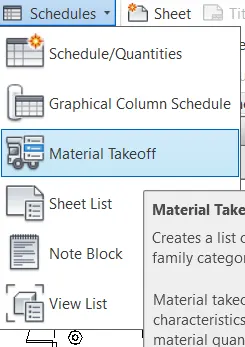
- Slect the category as well
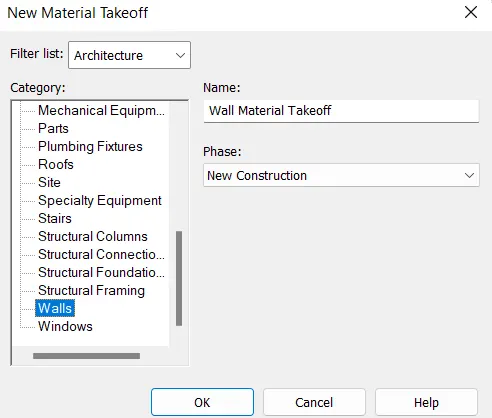
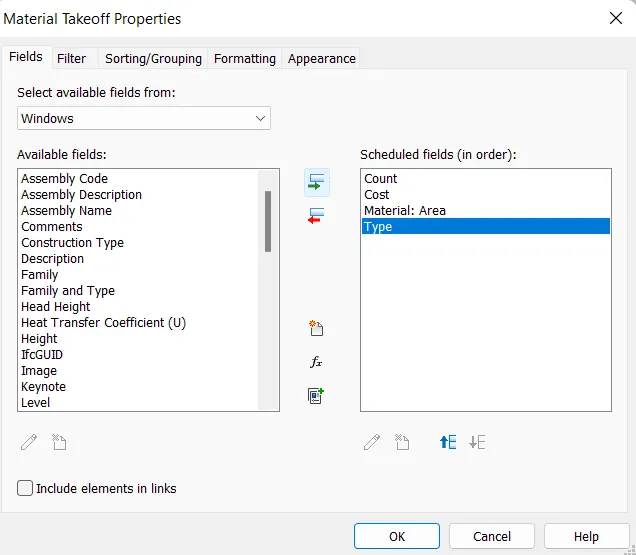
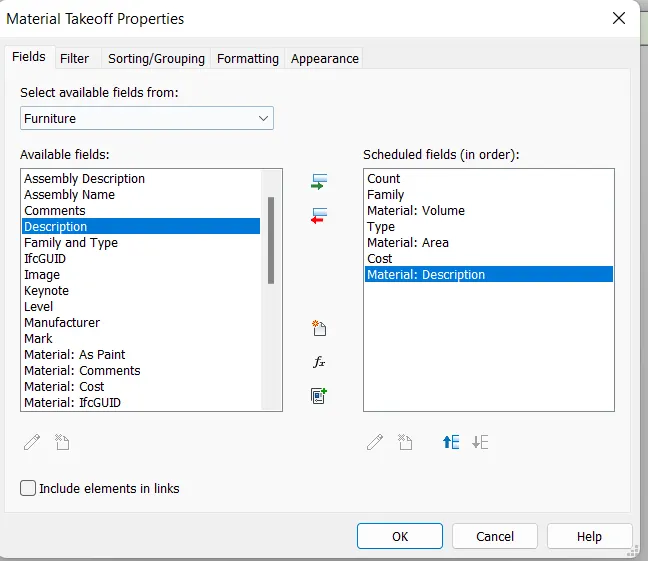
- Now, Select the Parameters for walls.
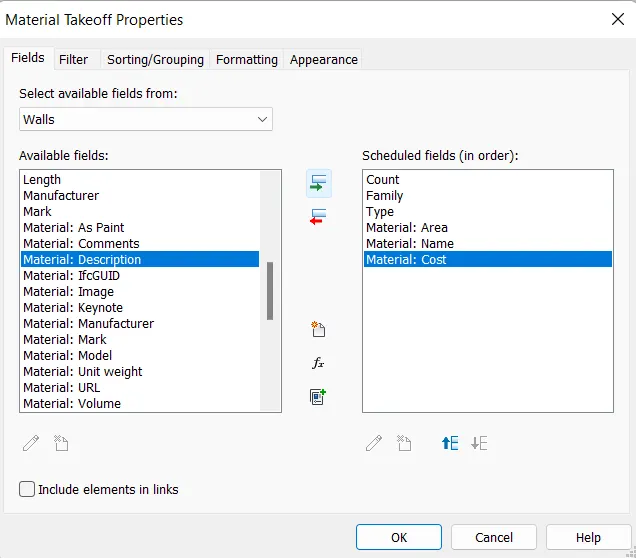
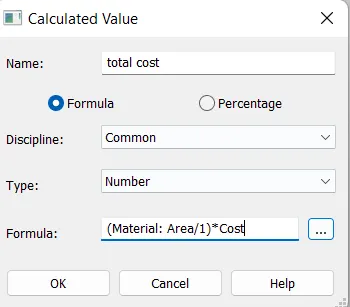
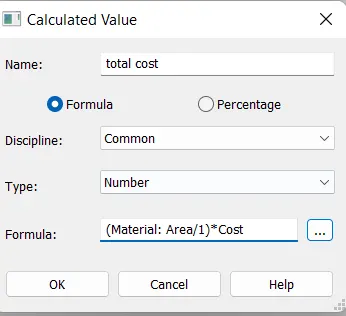
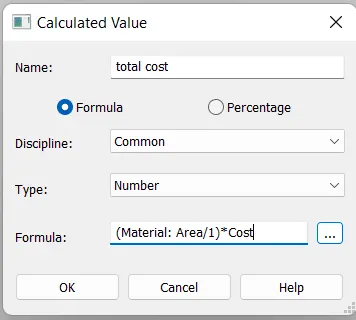
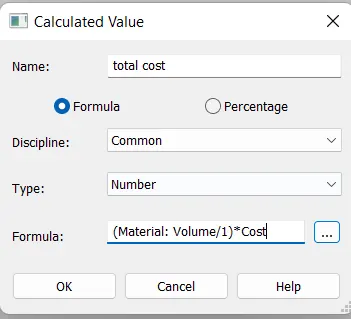
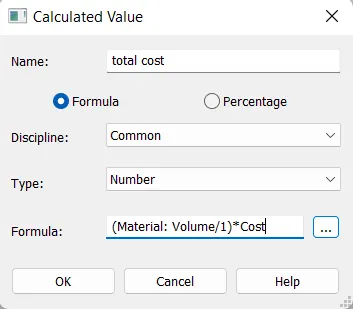
- Now, we have included the total cost parameter which is a calculated quantity.
- For this go to add calculated quantity.
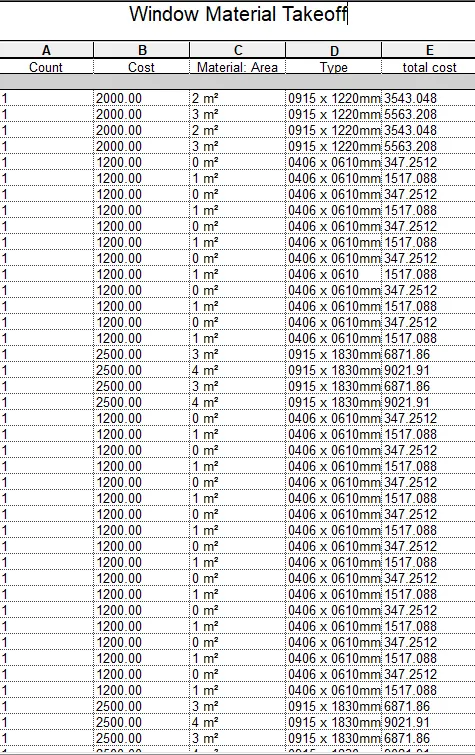
- The wall material takeoff is given as.
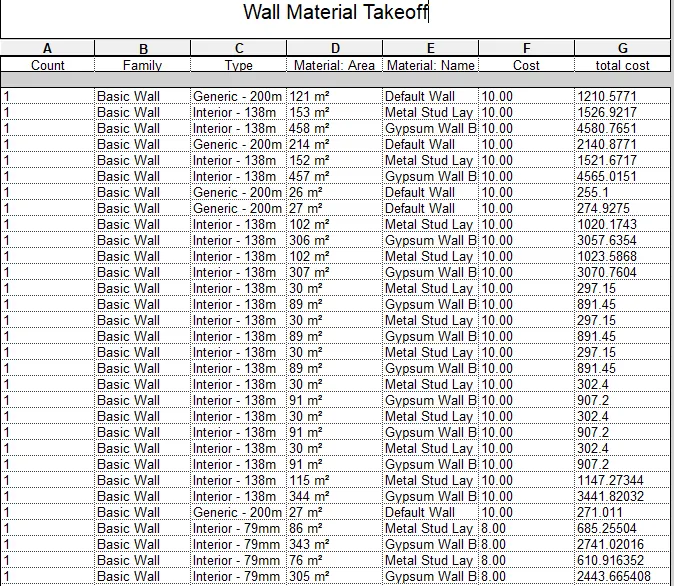
- Similarly, prepare for the doors, windows, floor and furnitures material takke off schedules.
- Windows material takeoff schedule
- Door material takeoff schedule
- Floor material takeoff schedule
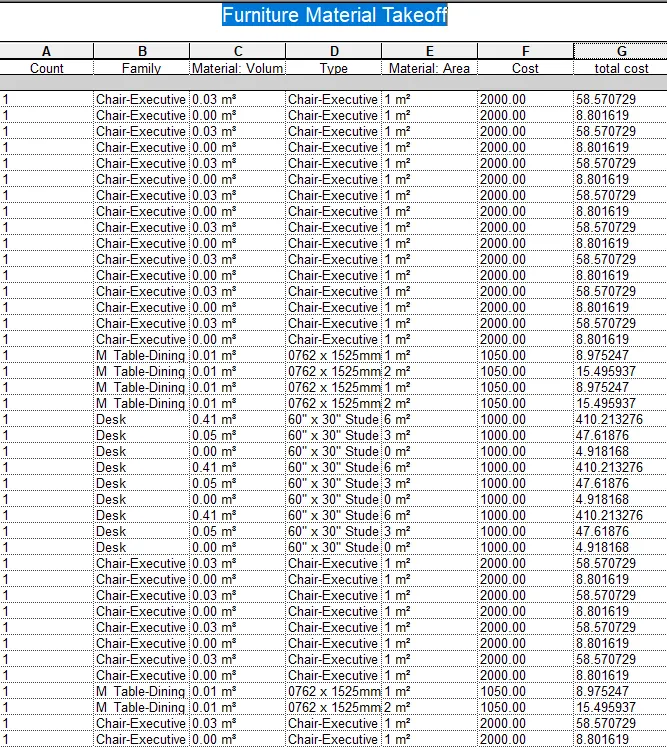
- Furniture material takeoff schedule:
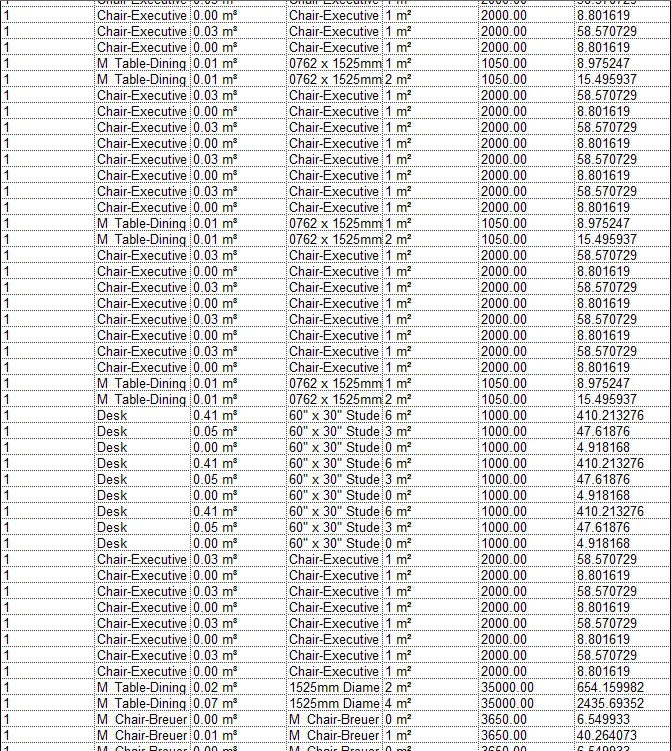
RESULT:
Hence, the total cost and indivodual materials takeoff schdule has been prepared.
5) Using the concept of Visual Programming discussed in class, list a flowchart for the following scenario
a. How to decide framings for a structure using Dynamo ?
b. If there is no water coming from the pipes
c. If request for money from client has been declined for the project
ANSWER:
a. How to decide framings for a structure using Dynamo 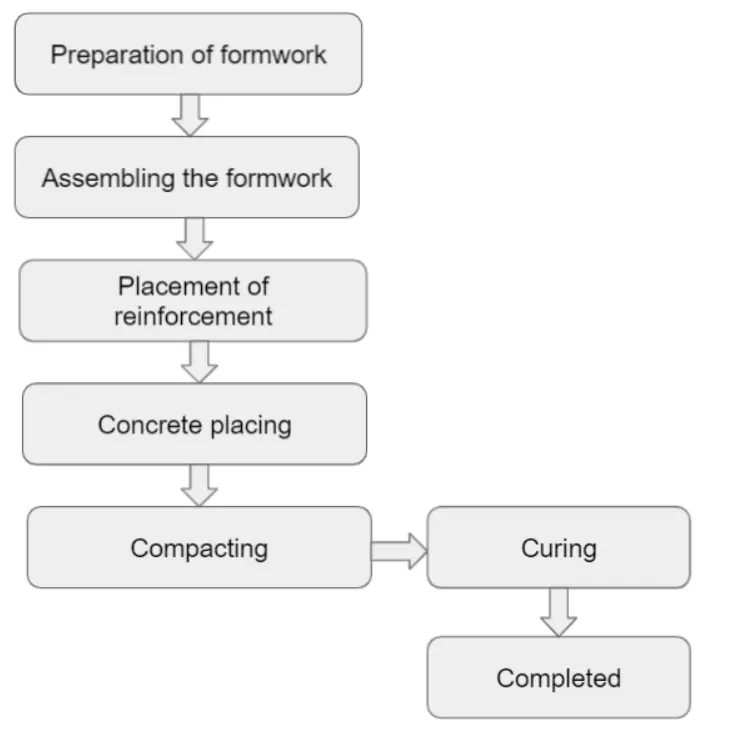
b. If there is no water coming from the pipes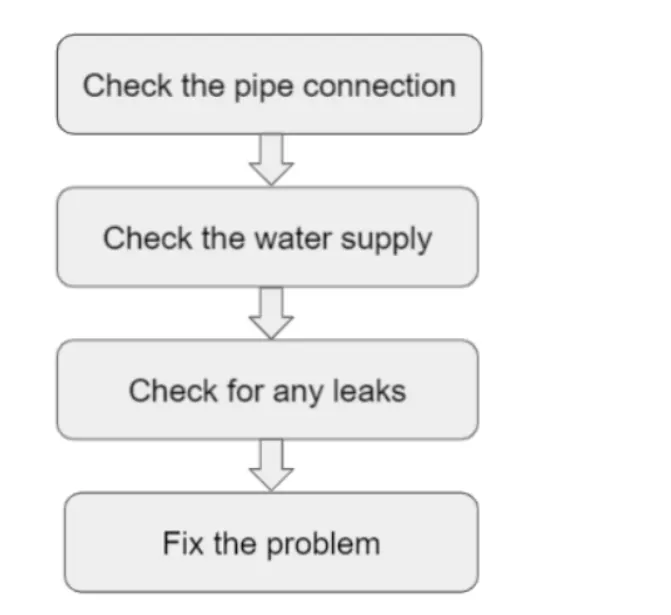
c. If request for money from client has been declined for the project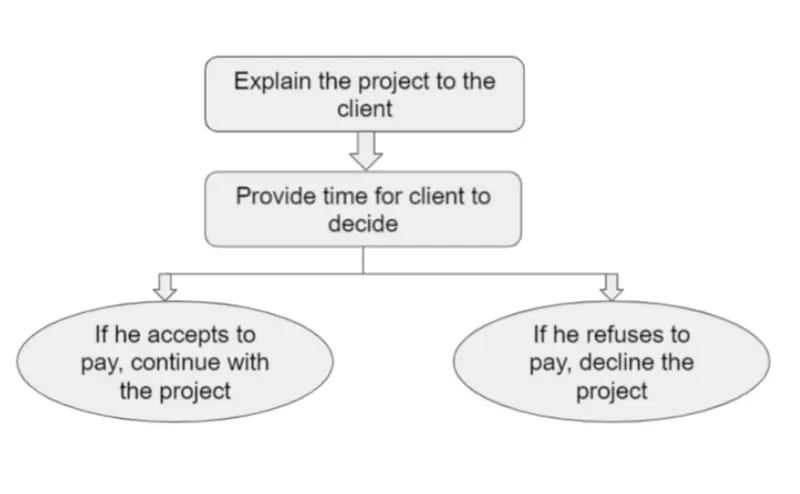
6) List the parameters associated with each model element
a. Wall
b. Floor
c. Door
d. Window
e. Table
f. Building
ANSWER:
a. Wall
- Wall type
- Wall description
- wall length
- wall thickness
- wall height
- wall materials
- Wall location
- material cost.
b. Floor
- Floor type
- Floor description.
- Floor area
- Floor thickness
- Floor material
- Material cost
c. Door
- Door type
- Door description
- Door height
- Door width
- Door material
- Material cost.
d. Window
- Window type
- Window description
- Window height
- Window width
- Window material
- Material cost.
e. Table
- Table type
- Table length
- Table height
- Table width
- Table material
- Table cost.
f. Building
- Building type
- Building floor area
- Building perimeter
- Building location
- Building height
- Material
- Possible loads on building