Drafting of various geometries using Chamfer, Fillet tool in AutoCad
Aim: Drafting various geometries using Chamfer, Fillet tool in AutoCAD.
Introduction:
Chamfer- Bevels or chamfers the edges of two 2D objects or the adjacent faces of a 3D solid. A bevel or chamfer is
- an angled line that meets the endpoints of two straight 2D objects.
- a sloped transition between two surfaces or adjacent faces on a 3D solid.
The distances and angles that you specify are applied in the order that you select the objects. A bevel or chamfer can be defined by selecting two objects of the same or different object types: lines, polylines, rays, and xlines. If the two selected objects are on the same layer, the line defined is created on that layer. Otherwise, the line is created on the current layer. The layer affects object properties including color and line type. The following prompts are displayed when creating a 2D chamfer.
Fillet- Rounds or fillets the edges of two 2D objects or the adjacent faces of a 3D solid. A round or fillet is
- an arc that is created tangent between two 2D objects.
- a curved transition between two surfaces or adjacent faces on a 3D solid.
In this example, an arc is created tangent to the selected lines, which are trimmed to meet the endpoints of the arc. A round or fillet can be created between two objects of the same or different object types: 2D polylines, arcs, circles, ellipses, elliptical arcs, lines, rays, splines, and xlines. If the two selected objects are on the same layer, the arc defined is created on that layer. Otherwise, the arc is created on the current layer. The layer affects object properties including color and line type. The following prompts are displayed when creating a 2D fillet.
Procedure:
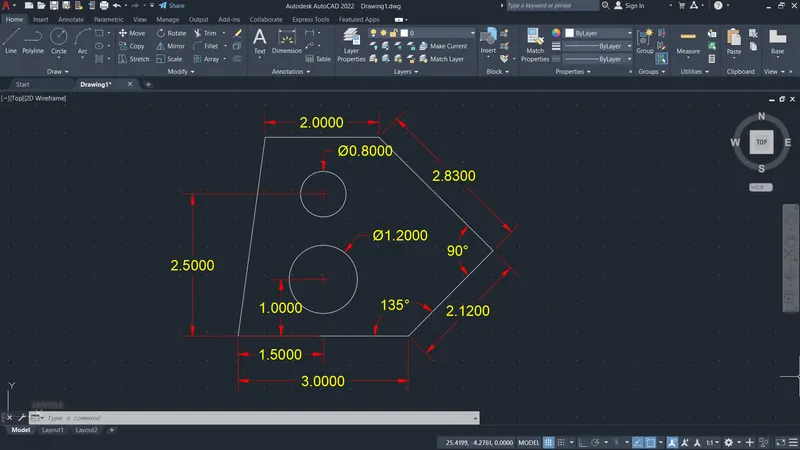
Drawing 1:
- Open new file and set decimal and precision to 0.00.
- line: From random point draw 3.00 m line and @2.12<45, @2.83<135 then 2.00m line and close.
- offset: Offset 3.00m line to 1.00m and 2.50m.
- circle: From midpoint of 3.00m line at 2.50m and 1.00m draw a circle of diameter of 1.20 at 1.00m and 0.80 at 2.50m.
- erase: Erase the offsets.
Drawing 2:
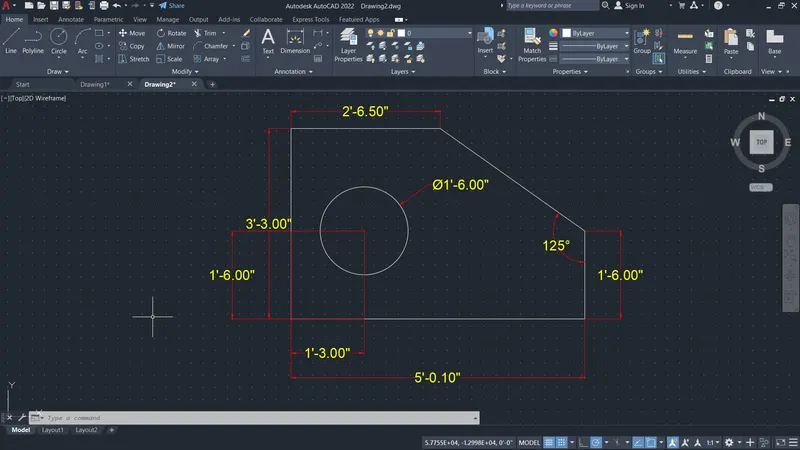
1.Open new file and set engineering and precision to 0'-0.0"
- line: 2-6.5" in -ve X-axis, 3-3" in -ve Y-axis, 5-0.1" in +ve X-axis, 1-6.0" in +ve Y-axis and close. 3. offset: offset 3-3" line at a distance of 1-3.0" and 5'-0.1" at a distance of 1-6.0"
- circle: draw a circle of diameter of 1'-6.0" from the centre of offsetted lines.
- erase: Erase the offsets.
Drawing 3:
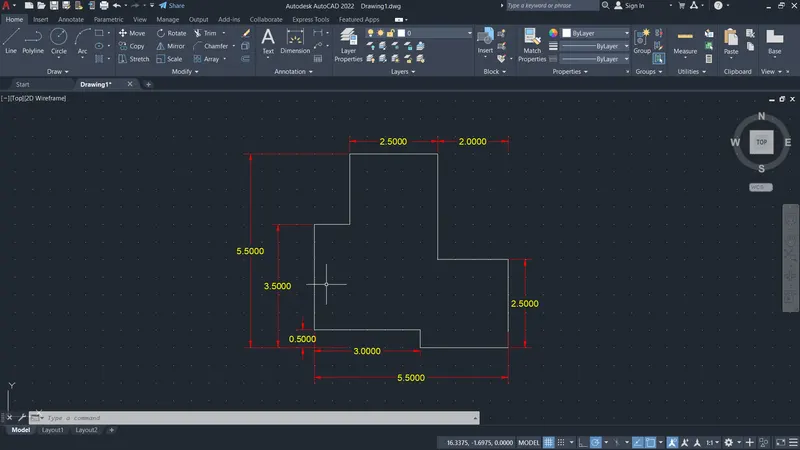
1.New page and select decimals with precision 0.00 while keeping ortho on.
- line: Draw 3.00m line in +ve X axis 3.0.50 In -ve Y axis, 2.50m in +ve X axis, 2.50m in +ve Y axis, 2.00m in -ve X axis, 3.00m in +ve Y axis, 2.50m in -ve X axis, 2.00m in -ve Y axis, 3.00m in -ve Y axis and close.
DRAWING 4:
- New page select decimal and precision 0.00 while keeping ortho on.
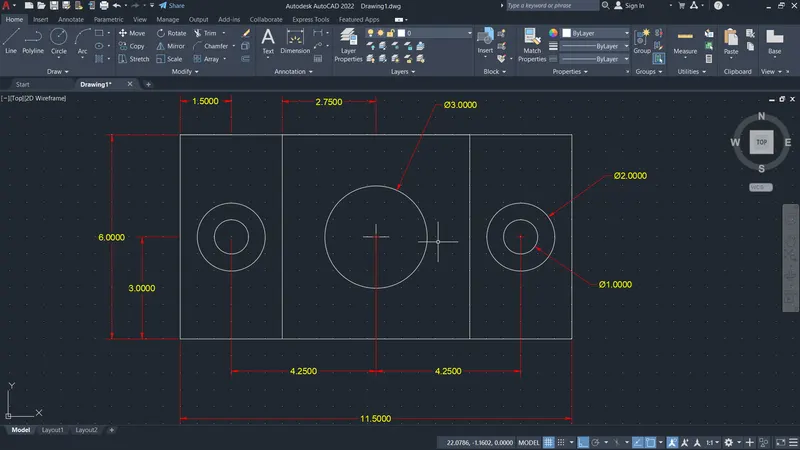
- line: 6.00m vertical. 11.50m horizontal and 6.00m vertical and 11.50m horizontal.
3.In object snap setting keep midpoint, centre, intersection, and geometric centre on.
- Circle: Draw circle at the centre with diameter 3.00m
- offset: offset 6.00m line at a distance of 3.00m on both sides and offset the 11.50m line at a distance of 3m on both sides and offset the 11.5m line at a distance of 3m.
- Draw concentric circles at the intersection of the offsetted line of diameter 1m and 2m on both sides.
- Erase the offsets.
Drawing 5:
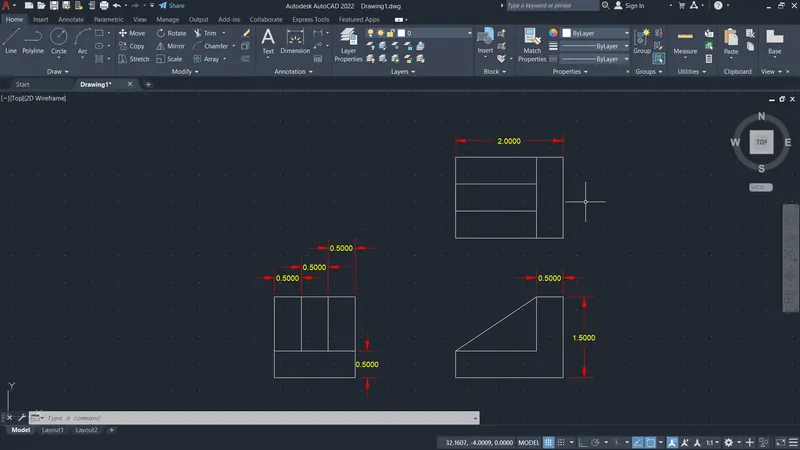
1.New page select decimal with precision 0.0.
- line:1.5m horizontal and 1.5m vertical on both sides.
- offset 1.5m line to 0.5m.
- divide: Divide 1.5m line into 3 segments.
- line-: Join the divided lines. 6.in object snap setting keep the Extension on
- line: Draw 2.0m line and 1.5m line and 0.5m horizontal on top and in vertical and 1.5m horizontal and 0.5m vertical and join the slant line.
- line:2.0m horizontal and 1.5m vertical on both sides.
- offset: offset 1.5m line to 0.5m.
- divide: Divide 1.5m line into 3 segments.
- line: Join the divided lines.
Drawing 6:
1.New page and set decimal and precision to O
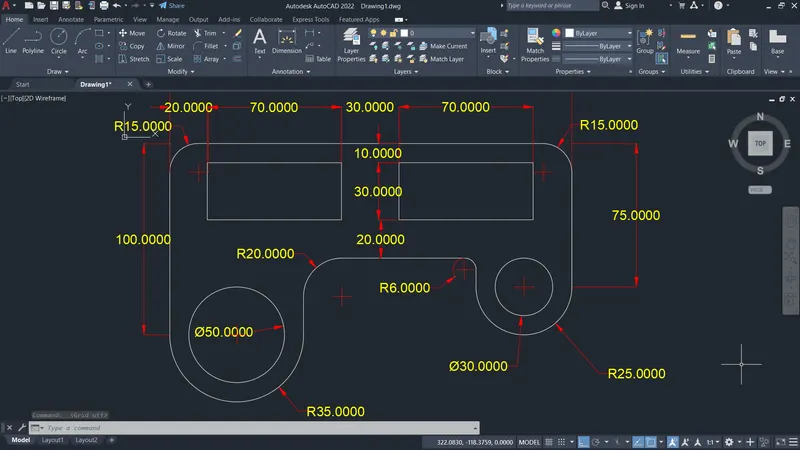
- line: Drawing 210m horizontal line and 100m vertical line on left side and 75m vertical line on right side since arc has radius of 35m drawing a line of 70m on left side and has a radius of 25m drawing a line of 50m on right side.
- Arc: From start, end and radius draw an arc of radius 35m on right side and an arc of radius 25m on left side.
- Circle: From midpoint of 70m line on left side draw a circle of diameter of 50m and 30m on right side.
- offset 210m line at a distance of 60m.
- fillet: Filleting to radius 15m on top right and left and radius of 20m on inner left and radius of 6m on inner right.
- offset: offsetting 210m line to 10m and 100m and 75m line to 20m.
- rectangle:70m length and width of 30m from off setted line on both sides.
- erase: Erasing the offsetted line and unwanted lines.
Drawing 7:
- New page set decimal and precision to 0.00
- circle: Draw concentric circles of diameter 5.00m and 4.00m
- line: From the centre point of circle draw 4.275m line on both sides.
- circle: Drawing a circle of diameter 0.90m on both sides.
- arc: from start, end and radius draw an arc of radius 0.90 on both sides
- line: Join the lines to the arc.
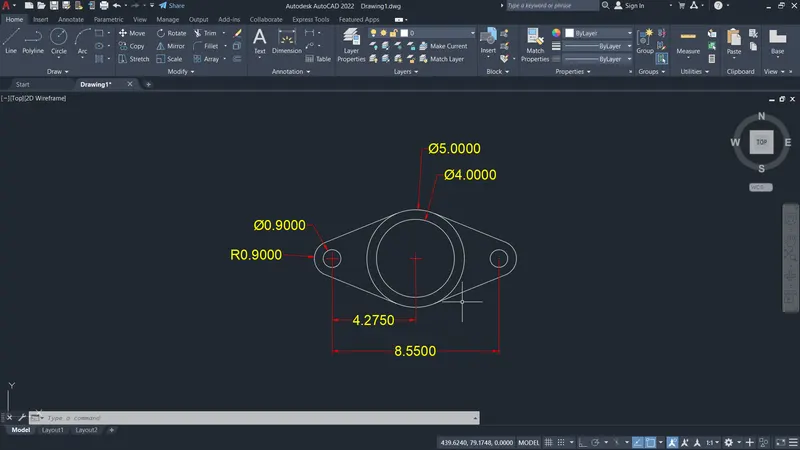
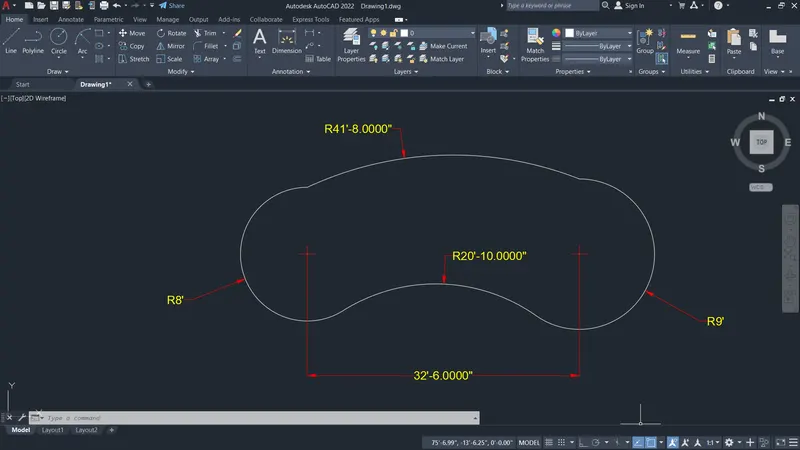
Diagram 8:
- New page and set Engineering and precision to 0'-0"
- Line: Draw a 32-6" horizontal line.
- circle: Draw a circle of radius 8' on left side of line and radius of 9' on right side of line.
- Arc: From start, end and radius drawing an arc of 41-8" on top and 20'10" on bottom.
- trim: trim the unwanted line and curves.
Drawing 9:
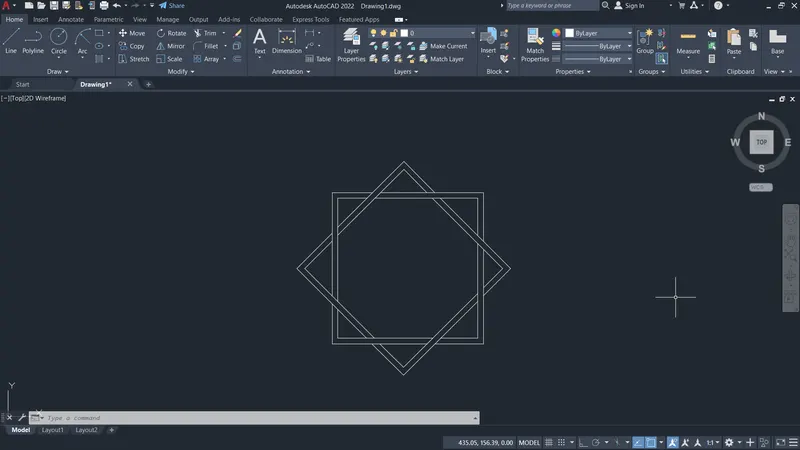
- rectangle: Draw a rectangle of same length and same width of one smaller size and another slightly bigger one from common centre.
- Rotate: Rotating the drawn squares by 45 degrees keeping the copy
- trim: Trim the crossing lines according to the figure.
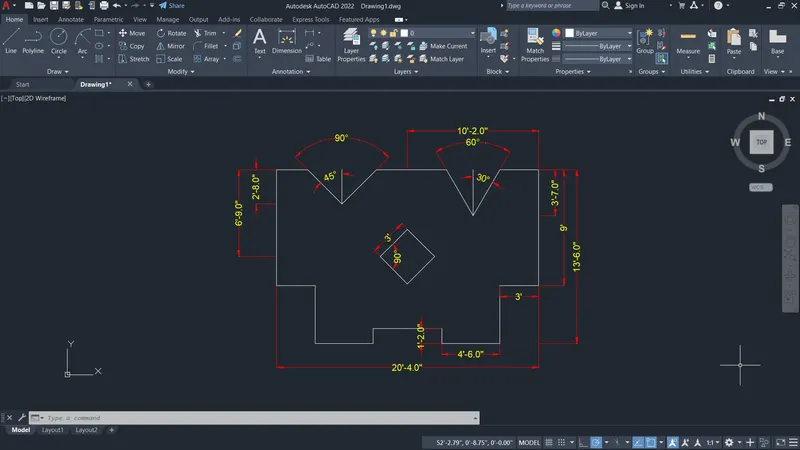
Drawing 10:
- New page and set engineering and precision 0'0"
- line: Draw 10'-2" horizontal line, 9' vertical line, 3' horizontal line, 4'-6" vertical and horizontal line and 1-2" vertical line.
- mirror: Mirror the above lines at centre axis.
- offset: offset the 20'-4" to a distance of 6'-9" and 13'-6" to a distance of 10'-2".
- Rectangle: Draw a rectangle of length and width 3' from the centre point of off setted line.
- Move: moving the centre of rectangle to the centre of offsetted line.
- rotate: Rotating the Rectangle by 45 degrees
- offset: Offsetting 20-4" to a distance of 2-8" with polar tracking on draw an angle of 90 degrees. Offset 20-4" to a distance of 3'-7' with polar tracking on draw an angle of 60 degrees.
- erase: Erase the unwanted lines.