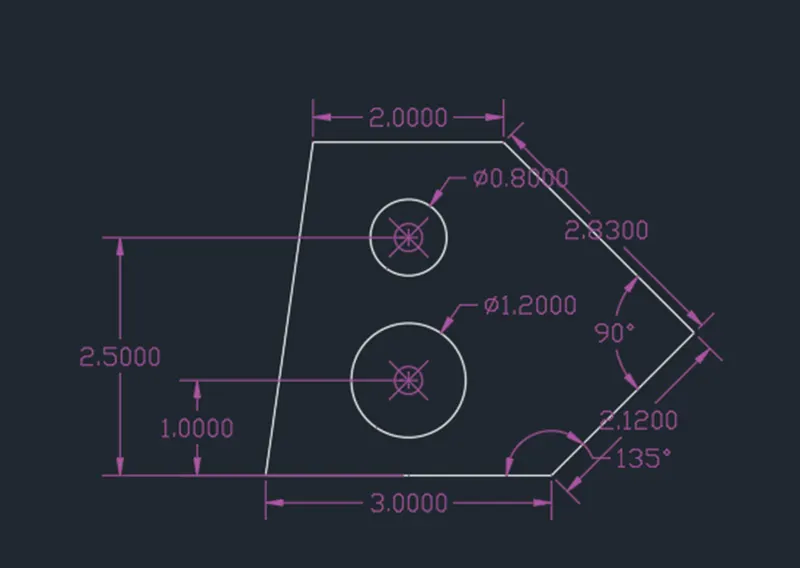
Drafting of various geometries using Chamfer, Fillet tool in AutoCad
Aim - Drafting of various geometries using chamfer,fillet tool in AutoCad
Procedure -
Step 1 - Open new file and set decimal and precision to 0.00
Step 2 - Use "line" command- from random point draw 3.00 line and @2.12<45,@2.83<135 then 2.00 line and close.
Step 3 - Use "offset"command - offset 3.00 line to 1.00 and 2.50
Step 4 - Use "circle" command - from midpoint of 3.00 at 2.50 and 1.00 draw a circle of diameter of 1.20 at 1.00 and 0.80 at
2.50
Step 5 - Use "Erase" command - Erase the offset.
Result -
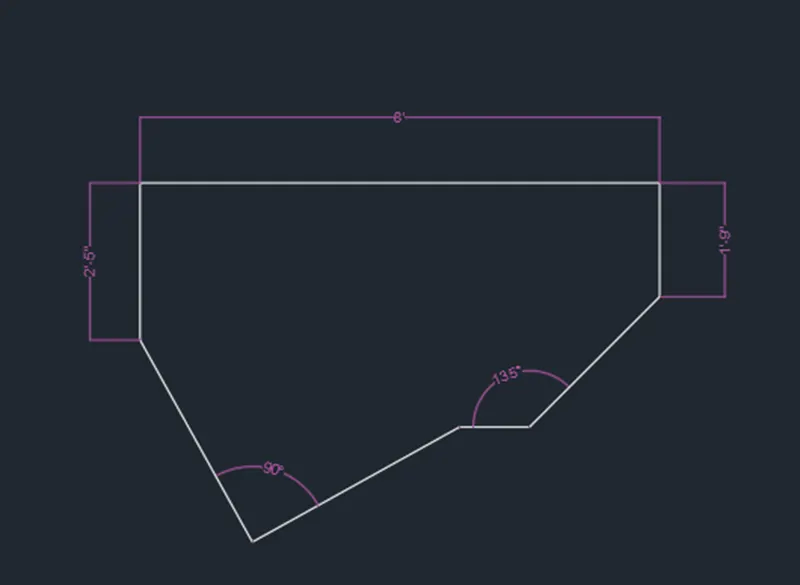
Aim - Drafting of various geometries using chamfer,fillet tool in AutoCad
Procedure -
Step 1 - Select architectural and polar tracking for angles 15,30,45,60 and so on.
Step 2 - Use "line" command- Draw a horizontal line and draw 2'6" line at 225 degree,3' line perpendicular to it,2'5" vertical
line and 8' horizontal line,1'9" vertical line and 2'10" @225 degree and close.
Result -
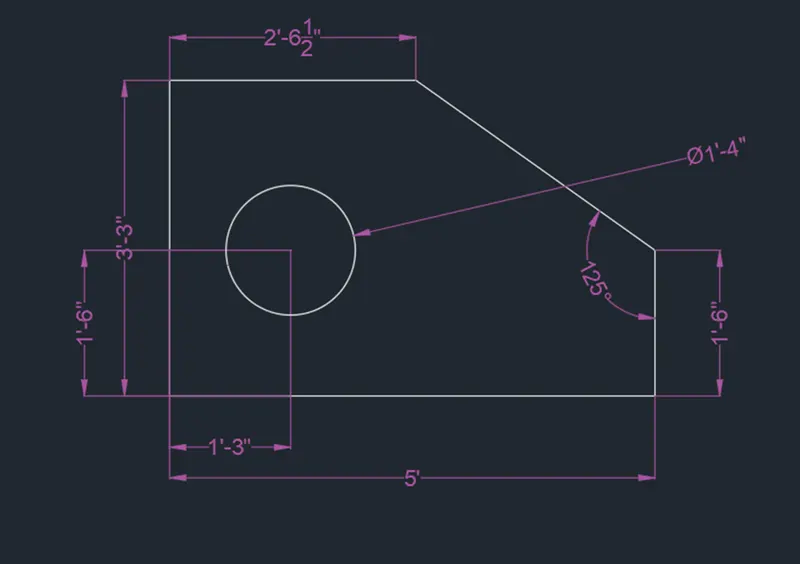
Aim - Drafting of various geometries using chamfer,fillet tool in AutoCad
Procedure -
Step 1 - Open new file and set engineering and precision to 0'-0.0"
Step 2 - Use "line" command- 2'6.5" in -ve x-axis , 3'3" in -ve y-axis, 5'01" in +ve x-axis, 1'6" in +ve y-axis and close.
Step 3 - Use "offset" command - 3'3" line at a distance of 1'3" and 5'01" at a distance of 1'6"
Step 4 - Use "circle" command - draw a circle of diameter of 1'6" from the centre of offset line .
Step 5 - Use "Erase" command - Erase the offset.
Result -
Aim - Drafting of various geometries using chamfer,fillet tool in AutoCad
Procedure -
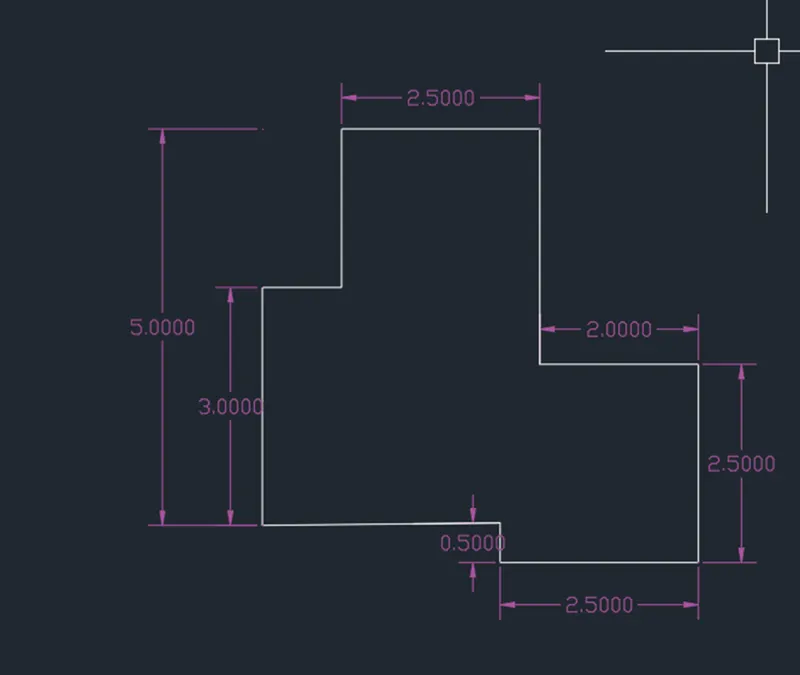
Step 1 - New page and select decimal with precision 0.00 while keeping ortho on.
Step 2 - Use "line" command - Draw 3.00 line in +ve x-axis
Step 3 - 0.50 in -ve y-axis, 2.50 in +ve x-axis, 2.50 in +ve y-axis, 2.00 in -ve x-axis, 3.00 in +ve y-axis, 2.50 in -ve x-axis,
2.00 in -ve y-axis, 3.00 in -ve y-axis and close.
Result -
Aim - Drafting of various geometries using chamfer,fillet tool in AutoCad
Procedure -
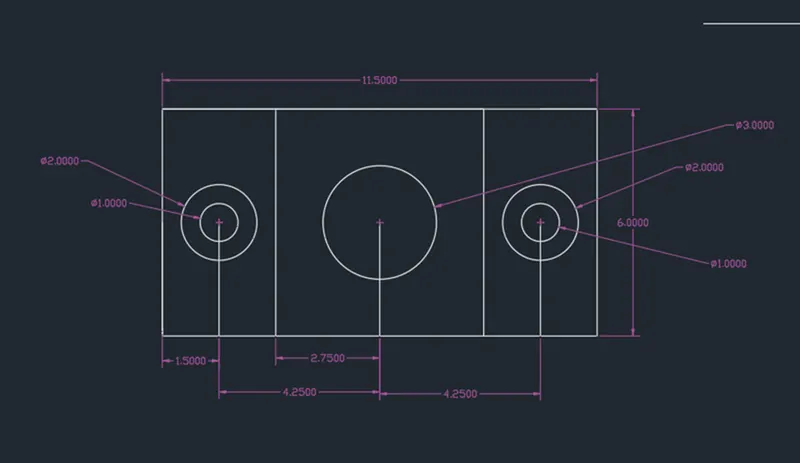
Step 1 - New page and select decimal with precision 0.00 while keeping ortho on.
Step 2 - Use "line" command - 6.00 vertical and 11.50 horizontal and 6.00 vertical and 11.50 horizontal
Step 3 - In object snap setting keep midpoint,centre,intersection and geometric centre on.
Step 4 - Use "circle" command - Draw a circle at centre with diameter 3.00
Step 5 - Use "offset" command - offset 6.00 at a distance of 3.00 on both sides and offset 11.50 at a distance of 3.00
Step 6 - Use "circle" command - Draw a concentric circles at a intersection of the offset line od diameter 1.00 and 2.00 on
both sides.
Step 7 - Use "Erase" command - Erase the offset.
Result -
Aim - Drafting of various geometries using chamfer,fillet tool in AutoCad
Procedure -
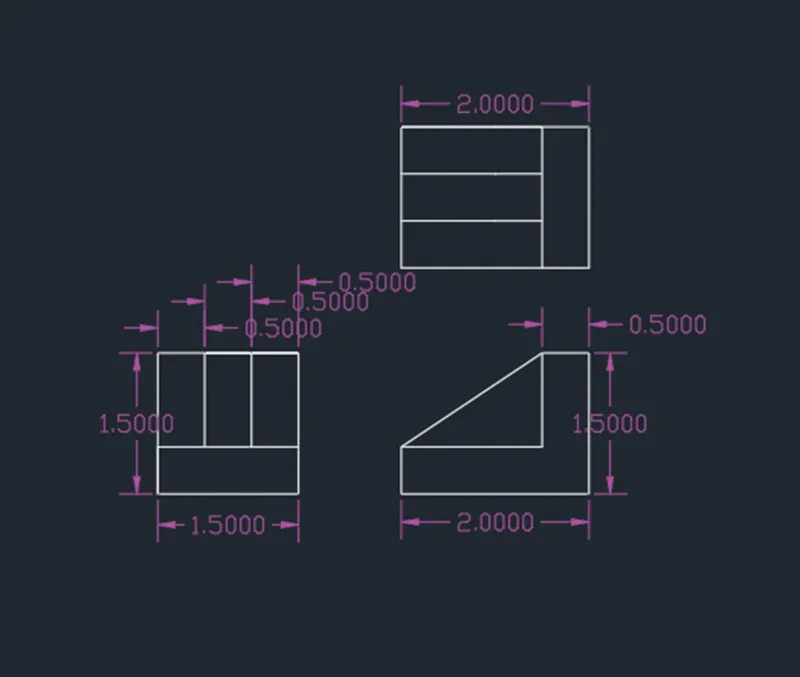
Step 1 - Select new page ,decimal with precision 0.0
Step 2 - Use "line command" - 1.5 horizontal line and 1.5 vertical on both sides
step 3 - Use" offset" command - offset 1.5 line to 0.5
Step 4 - Use "Divide" command - Divide 1.5 line into 3 segments
Step 5 - Use "line" command - join the divided line
Step 6 - In object snap setting keep the extension ON
Step 7 - Use "line " command - draw 2.0 line and 1.5 line and 0.5 horizontal on top and in vertical and 1.5 horizontal and 0.5
vertical and join the slant line.
Step 8 - Use "line" command - 2.0 horizontal and 1.5 vertical on both sides
Step 9 - Use "offset" command - offset 1.5 line to 0.5
Step 10 - Divide 1.5 line into 3 segments
Step 11 - Use "line" command - join the divided line.
Result -
Aim - Drafting of various geometries using chamfer,fillet tool in AutoCad
Procedure -
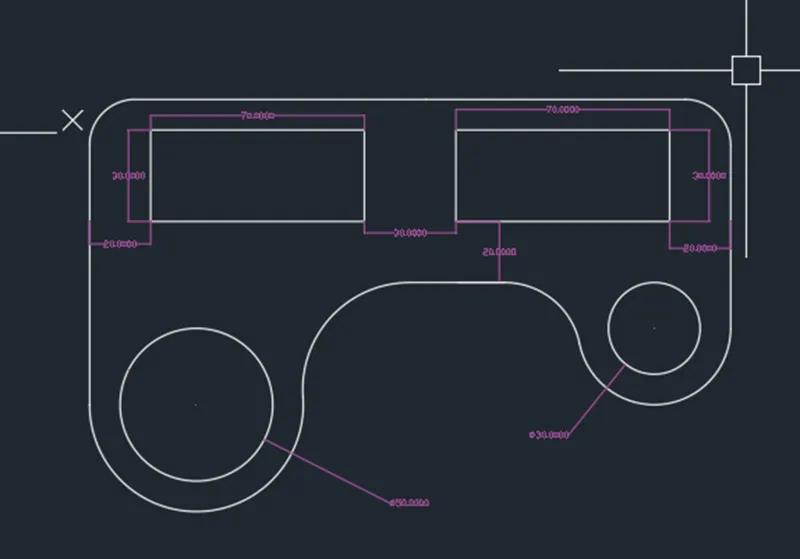
Step 1 - New page and select decimal with precision 0.00 while keeping ortho on.
Step 2 - Use "line" command - draw 210 horizontal line and 100 vertical line on left side and 75 vertical line on roght side,
since arc has radius 35 and line of 70 on left side and has a radius of 25 and draw a line of 50 on right side.
Step 3 - Use "Arc" command - from start,end and radius draw an arc of radius 35 on roght side and arc of radius of 25 on left side
Step 4 - Use "circle" command - from midpoint of 70 line on left side draw a circle of diameter of 50 and 30 on right side.
Step 5 - Use "offset" command - offset 210 at a distance of 60
Step 6 - Filleting to radius 15 on top right and left and radius 20 on inner left and radius of 6 on inner right .
Step 7 - Use "offset" command - offset of 210 and 100 and 75 to 20
Step 8 - Use "Rectangle" command - 70 length and width of 30 from offset line on both sides
Srep 9 - Use"Erase" command - Erase the remaining line and offset.
Result -
Aim - Drafting of various geometries using chamfer,fillet tool in AutoCad
Procedure -
Step 1 - New page and select decimal with precision 0.00 while keeping ortho on.
Step 2 - Use "circle" command - Draw concentric circles of diameter 5.00 and 4.00
Step 3 - Use "line" command - From centre point of circle daw 4.275 on both sides
Step 4 - Use"circle" command - Draw a circle of diameter 0.90 on both sides
Step 5 - Use "Arc" command - from start,end and radius draw an arc of radius 0.90 on both sides
Step 6 - Use"line" command - join the line to arc.
Result -
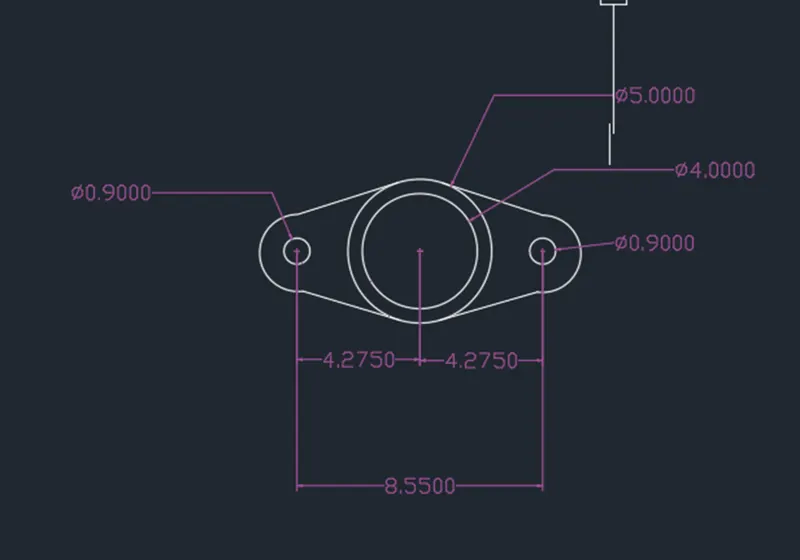
Aim - Drafting of various geometries using chamfer,fillet tool in AutoCad
Procedure -
Step 1 - New page and set engineering and precision to 0'-0"
Step 2 - Use "line" command - Draw a 32'6"mhorizontal line
Step 3 - Use "circle" command - Draw a circle of radius 8' on left side of line and radius of 9' on right side of line
Step 4 - Use"Arc" command - From start,end and radius draw a arc of 41'8" on top and 20'10" on bottom
Step 5 - Use "Trim" command -trim the remaining line and curve.
Result -
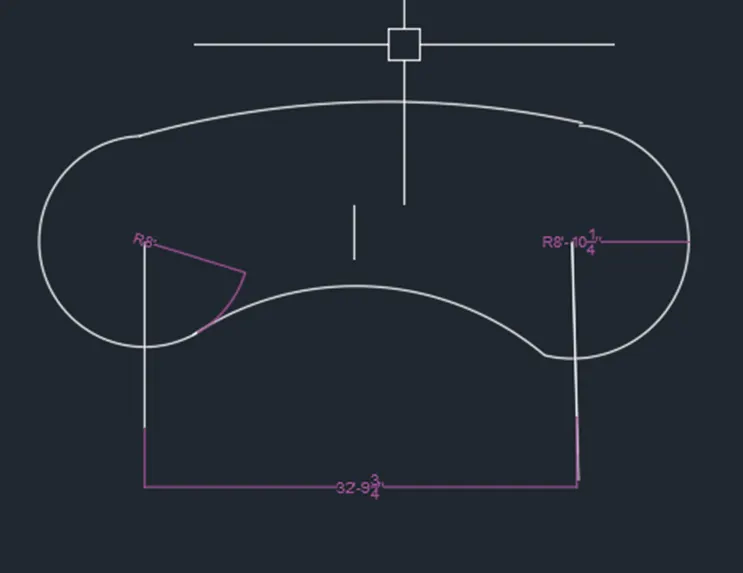
Aim - Drafting of various geometries using chamfer,fillet tool in AutoCad
Procedure -
Step 1 - Use "Rectangle" command - draw a rectangle of same length and same width of one smaller size and another
slightly bigger one from common centre.
Step 2 - Use"Rotate" command - Rotating the drawn square by 45 degree keeping the copy
Step 3 - Use "Trim" command - Trim the crossing line according to figure.
Result -
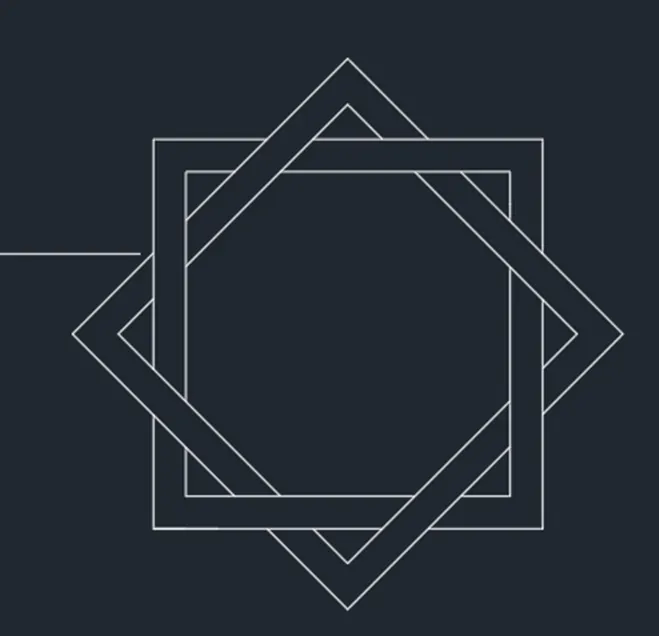
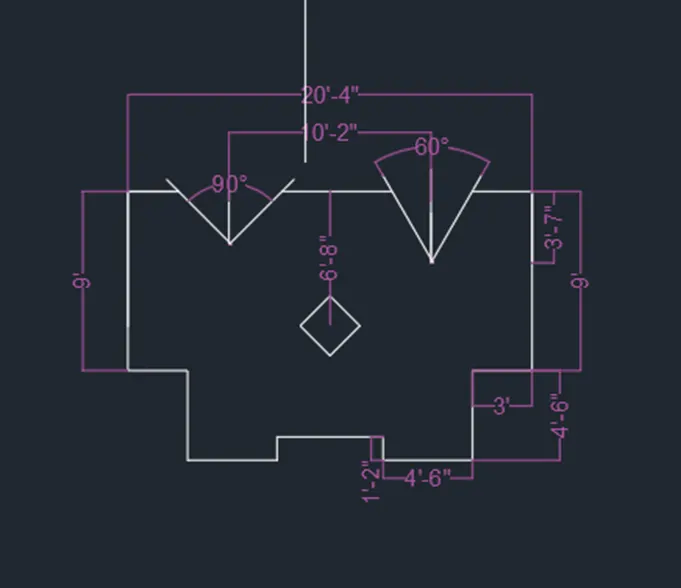
Aim - Drafting of various geometries using chamfer,fillet tool in AutoCad
Procedure -
Step 1 - New page and set engineering and precision to 0'-0"
Step 2 - Use " line" command - Draw 10'2" horizontal line, 9' vertical line, 3' horizontal line, 4'6" vertical line and horizontal
line and 1'2" vertical line.
Step 3 - Use "Mirror" command - Mirror the above lines at centre axis
Step 4 - Use "offset" command - offset the 20'4" to a distance of 6'9" and 13'6" to a distance of 10'2"
Step 5 - Draw a rectangle of length and width 3' from centre point of offseted line
Step 6 - Use"Move" command - Moving the centre of rectangle to centre of offsetted line
Step 7 - Use"Rotate" command - rotataing the rectangle by 45 degree
step 8 - Use "offset" command - offset of 20'4" to a distance of 2'8" with polar tracking on draw a angle of 90 degree.offset
20'4" to a distance of 3'7" with plar tracking on draw an angle of 60 degree.
step 9 - Use "Erase" command - erase the remaining line .
Result -