Creating a Residence Layout, Seating plan, Toilet and Utility room plan using AutoCad
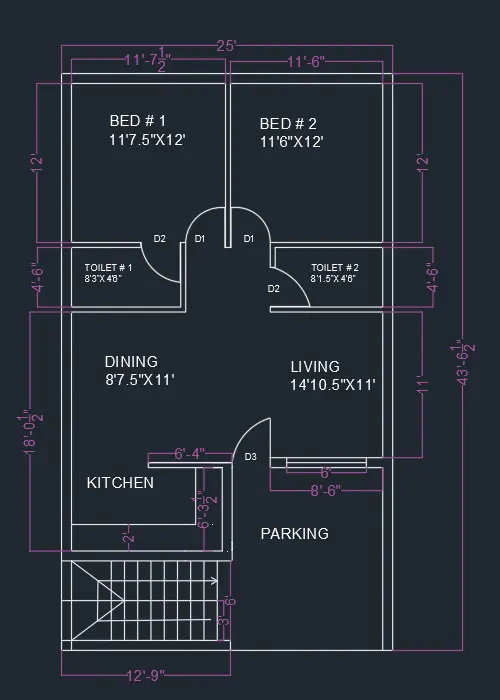
Aim - To sketch the layout of residence plan as per given diagram using AutoCad
Procedure -
- First set the unit by typing command "UN" in command box and press enter.
- Select - Engineering ,precision - 0'-0.00" then inches and click OK.
- Next set the limit by typing command "limmax"in command box and press enter and specify the maximum limit as 100,100
- Press Z enter and A enter for zoom all
- Now read the plan carefully and start the work from left to right and bottom to top.
Step 1 - Type "XL" in command boxand press enter for construction line.
- select vertical and click on screen anywhera.
- Type "XL" in command box and press enter for construction line.
- Select horizontal and click on screen anywhere.
- Type "TR" for trim command and trim the extra line to create bottom left border of plan.
- Type the command "O" for offset and take the offset distance of 9" from both construction line.
- Type command "O" for offset and take offset distance of 6' from top horizontal line.
- Type command "O" for offset and take offset distance of 9" from offsetted line.
- Type command "O" for offset and take offset distance of 6'8" from the top horizontal line.
- Type command "O" for offset and take offset distance of 4.5" from offsetted line.
- Type command "O" for offset and take offset distance of 11' from top horizontal line.
- Type command "O" for offset and take offset distance of 4.5" from offsetted line.
- Type command "O" for offset and take offset distance of 12' from the top horizontal line.
- Type command "O" for offset and take offset distance of 9" from offsetted line.
- Type command "O" for offset and take offset distance of 6'8" from the top horizontal line.
- Type command "O" for offset and take offset distance of 4.5" from offsetted line.
- Type command "O" for offset and take offset distance of 11' from top horizontal line.
- Type command "O" for offset and take offset distance of 4.5" from offsetted line.
- Type command "O" for offset and take offset distance of 12' from the top horizontal line.
- Type command "O" for offset and take offset distance of 9" from offsetted line
- Type command "O" for offset and take offset distance of 11'7.5" from vertical line.
- Type command "O" for offset and take offset distance of 4.5" from offsetted line.
- Type command "O" for offset and take offset distance of 11' 6" from vertical line line.
- Type command "O" for offset and take offset distance of 9" from offsetted line.
- Type command "O" for offset and take offset distance of 11' from vertical line.
- Type command "O" for offset and take offset distance of 9" from offsetted line.
- Now type the command "TR" and trim all remaining line.
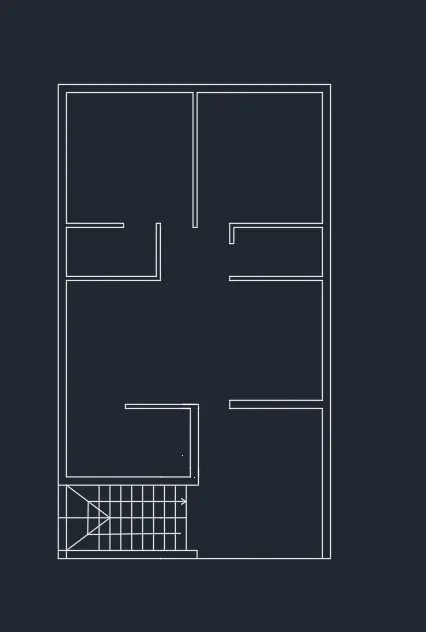
Step 2 - To create staircase -
- Type the command "O" for offset and take offset distance of 3' from vertical external line.
- Type the command "O" for offset and take offset distance of 1' from offsetted line for 8 times in +ve x-direction for creating steps of stairs.
- Type the command "O" for offset and take offset distance of 3' from horizontal external line for railing of stairs.
- Tye "L" for line command then press enter and join the corners to railing point.
- Tye "L" for line command then press enter and make the path with arrows in end to show the direction of stairs.
- Now type "TR" command and trim all extra line.
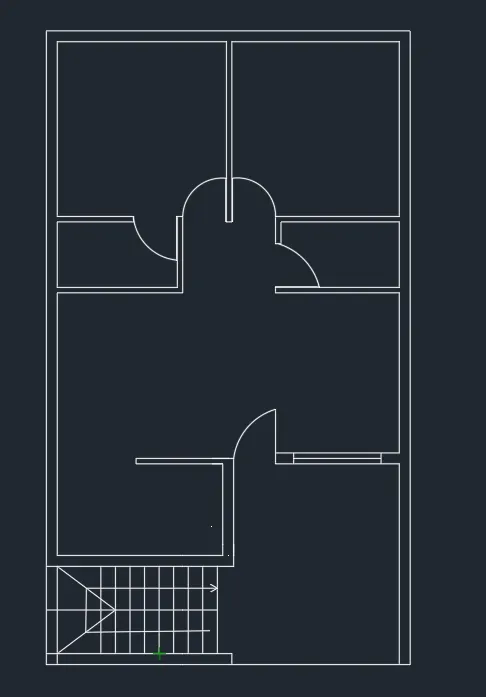
Step 3 - To create Doors -
- Type "L" for line command then press enter and anywhere on screen make a line in -ve x-direction of length 5" and specify next point of length 3' in +ve y-direction.
- Type "A" for arc and specify bottom of 3' line as center and top of that line as a first point and then specify the arc angle as 90 degree.
- now select the whole door and type "MO"for move command and place it where the gap for door is 3'.
- Use "RO" command for rotation to fix the door in proper alignment.
- Now type "TR" command and trim all the extra lines.
- Now repeat the above steps for creating doors of size 2'6" and 3'3".
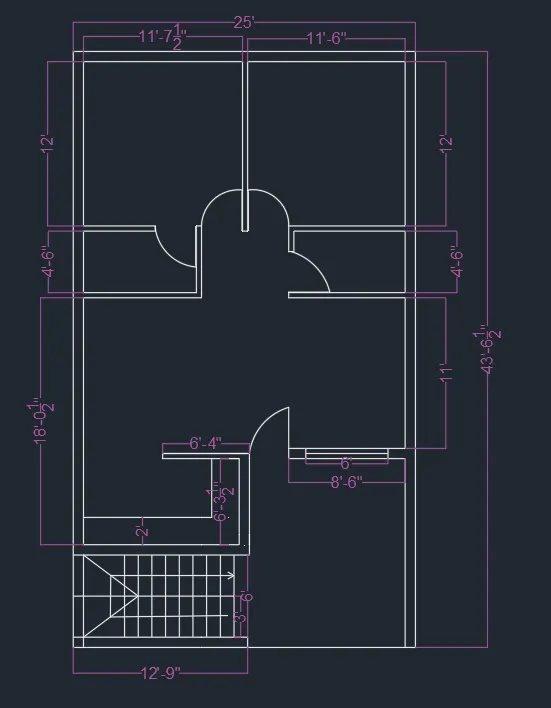
Step 4 - To give dimensions-
- Type "D" and then press enter for dimension style management.
- Set the dimension properties as per requirement.
- Type "DIM" in command box for dimension.
- Specify start and end points of objects whose dimension is to measure and then click to mouse botton.
Step 5 - To create text -
- Select "TEXT"command from ribbon to create text.
- Specify first and last corner.
- Type the text on box and click anywhere in screen to exit the command.
- Edit the geight of text by selecting the text and by right clicking and selecting the properties option.
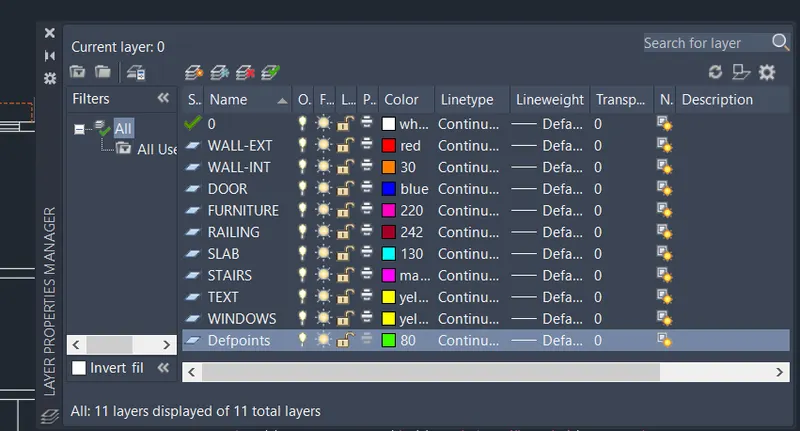
Step 6 - Creating layers -
- type "LA" and press enter to open layer property manager box.
- Create new layer by clicking on new layer icon or right click on and existing layer and select new layer.
- Give name to the layers and assign different colours and line type (if required)
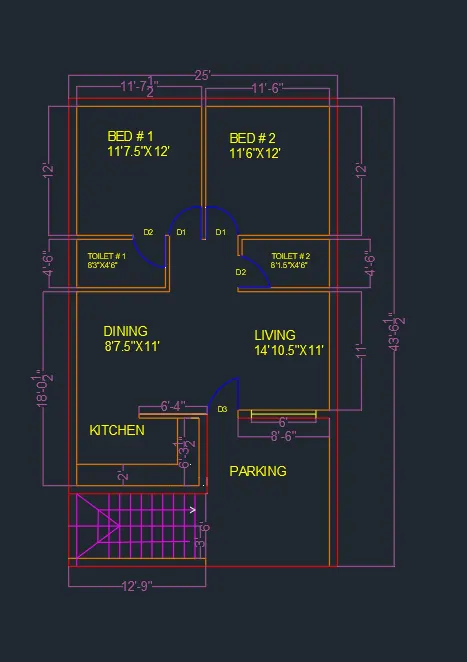
- select the different component fo drawingand assign the layer to them.
Result -
Aim - To sketch the seating plan for an outdoor canopy using AutoCad.
Procedure -
step 1 - Type "UN" in command box and press enter.
- Select the type as "Decimal" and scale inserted content as "Milimeters".
- Click OK.
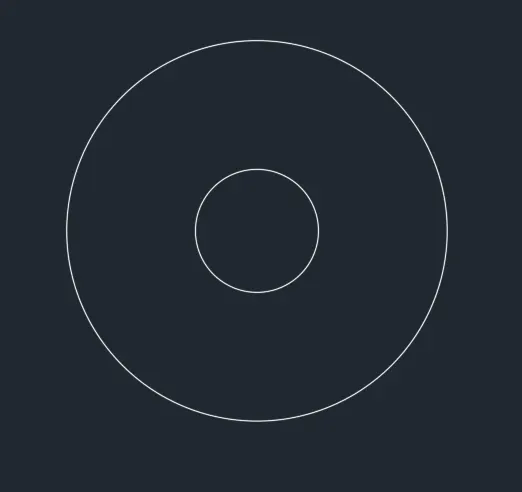
Step 2 - Drawing circles -
- Type "C" for circle and press enter.
- specify any point on screen as center and specify radius as 452mm and press enter.
- Again type "C" for circle and press enter.
- specify same center and specify radius as 1398mm and press enter.
Step 3 - drawing chairs -
- Type "L" for line command box and press enter.
- Draw a horizontal line of 450mm.
- Type "L" for line in command box and press enter and draw vertical lines in upward direction from both ends of horizontal line drawn.
- Type "F" for fillet command and click on radius and type 40mm and select multiple.
- Now fillet both the joins made by three lines.
- type "A" in command box for arc and select both openings ends points of vertical lines as first and end point of arc and draw arc in upward direction the press ESC.
- Type "O" for offset and specify offset distance 10mm and take the offset of arc and press ESC.
- Type "O" for offset and specify offset distance 50mm and take the offset of offsetted arc and press ESC.
- Join the two offsetted arc with lines by typing "L" in command box and press enter.
- Type "O" for offset and specify offset distance 10mm and take the offset of last arc joining lines and press ESC.
- Type "O" for offset and specify offset distance 100mm and take the offset of offsetted lines and press ESC.
- Now join the lines by typing "L" in command box and form rectangle.
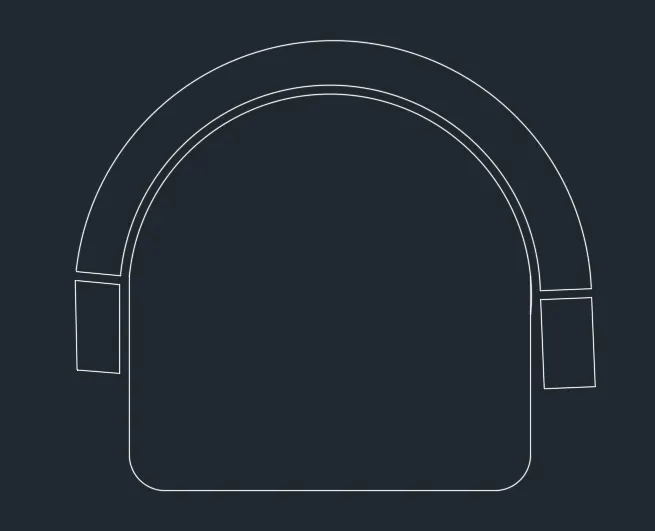
Step 4- Placing chairs -
- Type "MOVE" in command box and select the created chairs and then place the chairs inside the 1329mm radius circle and align it properly according to sketch.
- Type "CO" command for copy the chair and place it in other 3 places.
- Use "RO" command for rotating the chair for proper placement.
- Use "MOVE" command for proper alignment of chairs.
Result -
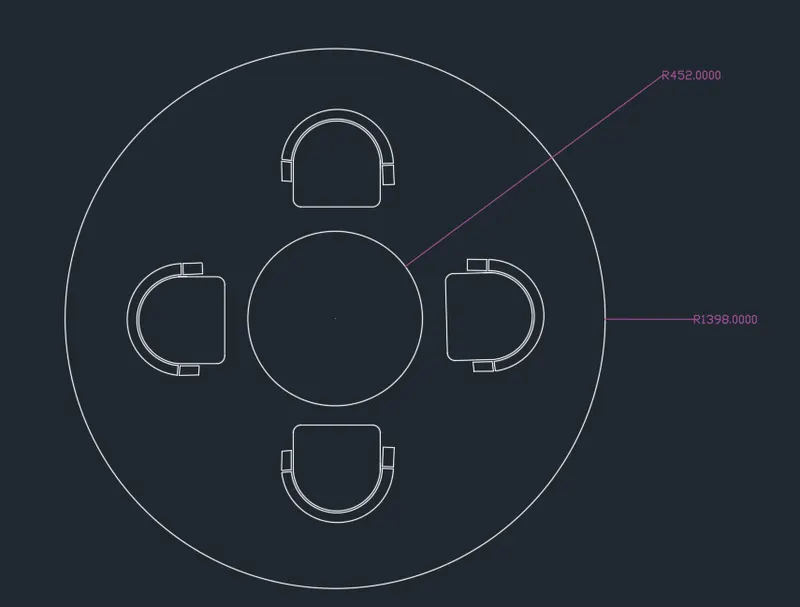
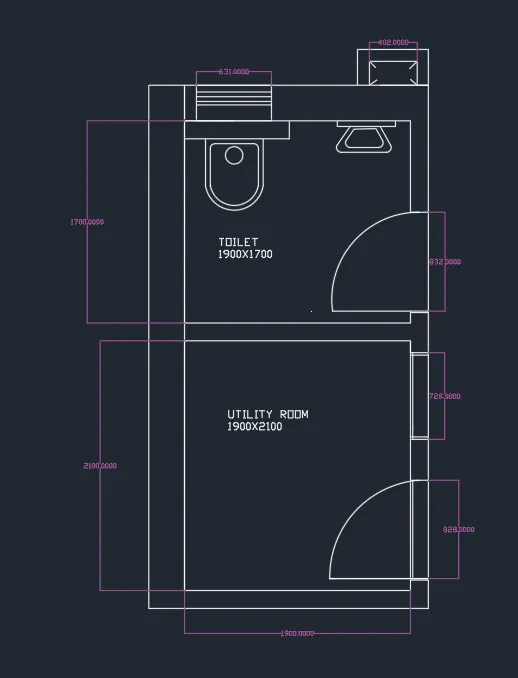
Aim - To sketch the part plan for the toilets and utilities room using AutoCad
procedure -
Step 1 - Type "UN" in command box and press enter.
- Select the type as "Decimal" and scale inserted content as "Milimeter" and click OK.
Step 2 - Type "XL" in command box and press enter for construction line.
- Select vertical and horizontal line one by one and click on screen anywhere.
- Type "TR" for trim command and trim the extra line to create bottom left border of plan.
- Type "O" command for offset and specify offset distance of 300mm and select the vertical xline and click the cursor on right side.
- Type "O" command for offset and specify offset distance of 150mm and select the horizontal xline and click the cursor on right side.
- Type "O" command for offset and specify offset distance of 1900mm and select the vertical xline and click the cursor on right side.
- Type "O" command for offset and specify offset distance of 150mm and select the vertical xline and click the cursor on right side.
- Type "O" command for offset and specify offset distance of 2100mm and select the horizontal xline and click the cursor on upward direction.
- Type "O" command for offset and specify offset distance of 150mm and select the horizontal xline and click the cursor on upward direction.
- Type "O" command for offset and specify offset distance of 1700mm and select the horizontal xline and click the cursor on upward direction.
- Type "O" command for offset and specify offset distance of 300mm and select the horizontal xline and click the cursor on upward direction.
- Type "TR" in command box and trim the extra line.
Step 3 -
- Select rectangle from ribbon tab.
- specify starting point of rectangle as internal top left corner point.
- select dimension from command box and specify length as 402 and 201 and press enter.
- Type the command "O" for offset and specify distance of 150mm and select the rectangle and click the cursor on outward direction.
- Press "ESC"
- Type "TR" in command box and trim the extra line.
Step 4 -
- Type the "O" command for offset and specify the offset distance of 100mm and select the upper room mid horizontal line and click the cursor on upward direction just for reference.
- Extend that line into thickness of right side wall and trim the previous line.
- Type "O" command and specify the offset distance of 832mm and select the previous line and move the cursor in upward direction and click then press enter.
- Use trim command and trim the line.
- Draw the door of width 832mm using rectangle command.
- Select arc tool from ribbon tab and specify the start point,end point and direction as specify in sketch.
- repeat the above same procedure to draw the next door of length 828mm.
Step 5 -
- Type the "O" command for offset and specify the offset distance of 100mm and select the top left line and click the cursor on right side and press ESC.
- Type the "O" command for offset and specify the offset distance of 631mm and select the last offsetted line and click the cursor on right side and press ESC.
- Select rectanlge tool from ribbon tab and draw small rectangle of random size inside the offsetted lines and join the edges of rectangle by using line command.
- Type "O" command and make two more offset in between at equal distance and press ESC.
- Type the "O" command for offset and specify the offset distance of 728mm and select the line and click the cursor on downward direction and press ESC.
- Use "L" command and draw a line between window and draw small rectangle at each ends of line by using "rec" command.
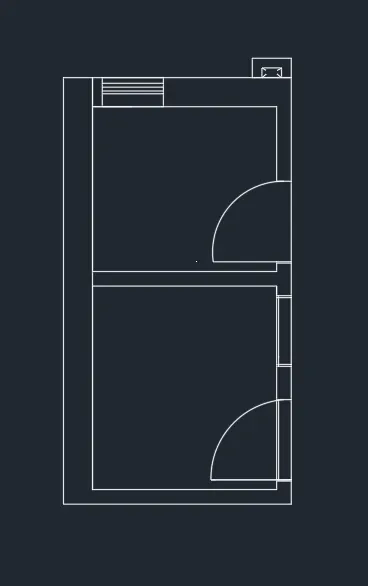
Step 6 -
- Draw the toilet and washbasin as given in the sketch by using line,fillet anf circle command.
- Type "TR" for trim and press enter and then trim remaining line and components.
Result -