Creation of geometries by Coordinate system methods using AutoCad
1)
Aim - Creation of geometries by coordinate system method using AutoCad
The coordinate system are-
1) Absolute coordinate system
2) Relative coordinate system
a) Realative rectangular coordinate system
b) Relative polar coordinate system
3) Direct distance entry
Procedure -
1) Absolute coordinate system -
First click on AutoCad application and open this.
type QNEW in command bar and enter.
Select the default setting as Imperial in feet and inches.
In advance setting set unit as a engineering and precision as 0.00000 and the angle is in decimal degree and direction should
be in Counter Clockwise.
Set angle measire by East and press NEXT
Select the area 10as length and 10 as width
From Home tab click on line command
Origin as a 0,0
Then the command bar ask specify first point then we have to put 2,1
Specify next point or undo press 8,1
Specify next point or undo press 8,2
Specify next point or undo press 3,2
Specify next point or undo press 3,6
Specify next point or undo press 8,6
Specify next point or undo press 8,7
Specify next point or undo press 2,7
In last,specify next point press 2,1
The geometry is done
2) Relative Rectangular coordinate system -
First click on AutoCad application and open this
Type QNEW in command bar and enter
Select default setting as a Imperial in feet and inches
In advance setting set unit as a engineering and precision as 0.0000 and set angle as a decimal degree and angle direction
as East and Counter direction Clockwise
From Home tab click on line
Then command bar ask to specify first point
Origin as 0,0
In specify next point or undo press 2,1
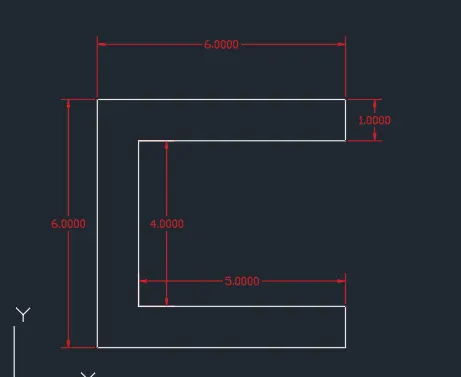
Specify next point or undo press @ 6,0 ( Dx = 6 and Dy = 0)
Specify next point or undo press @ 0,1
Specify next point or undo press @ -5,0
Specify next point or undo press @ 0,4
Specify next point or undo press @ 5,0
Specify next point or undo press @ 0,1
Specify next point or undo press @ -6,0
In last ,specify next point press @ 0,-6
The geometry is ready
3) Relative polar coordinate system -
First click on AutoCad application and open this
Type QNEW in command bar and enter
Select default setting as a Imperial in feet and inches
In advance setting set unit as a engineering and precision as 0.0000 and set angle as a decimal degree and angle direction
as East and Counter direction Clockwise
From Home tab click on line
Then command bar ask to specify first point
Origin as 0,0
In front of specify next point press 2,1
Specify next point or undo press @6<0
Specify next point or undo press @ 1<90
Specify next point or undo press @ 5<180
Specify next point or undo press @ 4<90
Specify next point or undo pres @5<0
Specify next point or undo press @ 1<90
Specify next point or undo press @ 6,180
Specify next point or undo @ 6<270
The geometry is done
4) Direct distance entry -
First click on AutoCad application and open this
Type QNEW in command bar and enter
Select default setting as a Imperial in feet and inches
In advance setting set unit as a engineering and precision as 0.0000 and set angle as a decimal degree and angle direction
as East and Counter direction Clockwise
From Home tab click on line
Then command bar ask to specify first point
Origin as 0,0
In front of specify next point press 2,1
Specify next point or undo press 6 ,keep the curser towards East
Specify next point press 1 ,keep curser towards North
Specify next point press 5 ,keep curser towards West
Specify next point press 4 ,keep curser towards North
Specify next point press 5 ,keep curser towards East
Specify next point press 1 ,keep curser towards North
Specify next point press 6 ,keep curser towards West
then in last,specify next point press 6 keep the curser towards origin
The geometry is done.
Result -
2)
Aim - Creation of geometries by coordinate system method using AutoCad
1) Absolute coordinate system -
Procedure -
First click on AutoCad application and open this.
type QNEW in command bar and enter.
Select the default setting as Imperial in feet and inches.
In advance setting set unit as a engineering and precision as 0.00000 and the angle is in decimal degree and direction should
be in Counter Clockwise.
Set angle measire by East and press NEXT
Select the area 10as length and 10 as width
From Home tab click on line command
Origin as a 0,0
Then the command bar ask specify first point then we have to put 2,1
Specify next point or undo press 5,1
Specify next point or undo press 5,5
Specify next point or undo press 6,5
Specify next point or undo press 6,1
Specify next point or undo press 9,1
Specify next point or undo press 7,8
Specify next point or undo press 4,8
In last,specify next point press 2,1
The geometry is done
2) Relative Rectangular coordinate system -
First click on AutoCad application and open this
Type QNEW in command bar and enter
Select default setting as a Imperial in feet and inches
In advance setting set unit as a engineering and precision as 0.0000 and set angle as a decimal degree and angle direction
as East and Counter direction Clockwise
From Home tab click on line
Then command bar ask to specify first point
Origin as 0,0
In specify next point or undo press 2,1
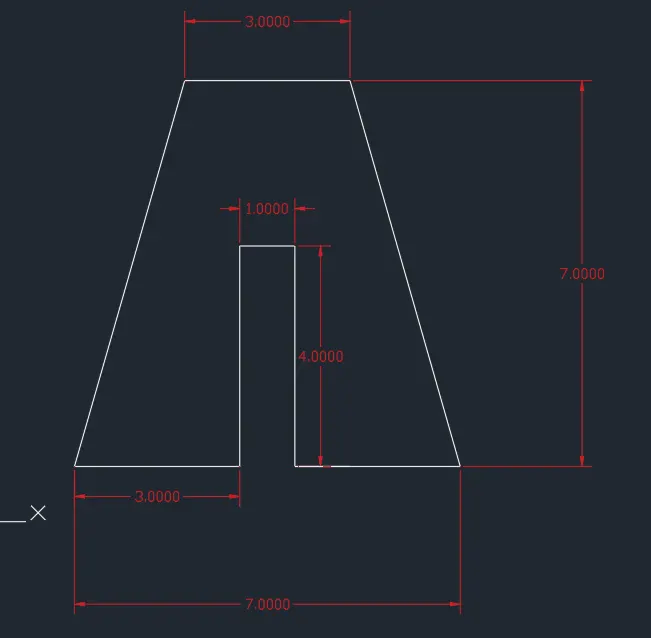
Specify next point or undo press @ 3,0 ( Dx = 3 and Dy = 0)
Specify next point or undo press @ 0,4
Specify next point or undo press @ 1,0
Specify next point or undo press @ 0,-4
Specify next point or undo press @ 3,0
Specify next point or undo press @ -2,7
Specify next point or undo press @ -3,0
In last ,specify next point press @ -2,-7
The geometry is ready
3) Relative polar coordinate system -
First click on AutoCad application and open this
Type QNEW in command bar and enter
Select default setting as a Imperial in feet and inches
In advance setting set unit as a engineering and precision as 0.0000 and set angle as a decimal degree and angle direction
as East and Counter direction Clockwise
From Home tab click on line
Then command bar ask to specify first point
Origin as 0,0
In front of specify next point press 2,1
Specify next point or undo press @ 3<0
Specify next point or undo press @ 4<90
Specify next point or undo press @ 1<0
Specify next point or undo press @ 4<270
Specify next point or undo pres @ 3<0
Specify next point or undo press @ 7<90
Specify next point or undo press @ 2<180
Specify next point or undo @ 3<180
The geometry is done
4) Direct distance entry -
First click on AutoCad application and open this
Type QNEW in command bar and enter
Select default setting as a Imperial in feet and inches
In advance setting set unit as a engineering and precision as 0.0000 and set angle as a decimal degree and angle direction
as East and Counter direction Clockwise
From Home tab click on line
Then command bar ask to specify first point
Origin as 0,0
In front of specify next point press 2,1
Specify next point or undo press 3 ,keep the curser towards East
Specify next point press 4,keep curser towards North
Specify next point press 1 ,keep curser towards East
Specify next point press 4,keep curser towards North
Specify next point press 3 ,keep curser towards East
Specify next point press 7,keep curser towards North
Specify next point press 2 ,keep curser towards West
Join points by line and erase the other line
then in last,specify next point press 3 keep the curser towards West
The geometry is done.
Result -
3)
Aim - Creation of geometries by coordinate system method using AutoCad
Absolute coordinate system -
Procedure -
First click on AutoCad application and open this.
Type QNEW in command bar and enter.
Select the default setting as Imperial in feet and inches.
In advance setting set unit as a engineering and precision as 0.00000 and the angle is in decimal degree and direction should
be in Counter Clockwise.
Set angle measured by East and press NEXT
Select the area 10 as length and 10 as width
From Home tab click on line command
Origin as a 0,0
Then the command bar ask specify first point then we have to put 2,1
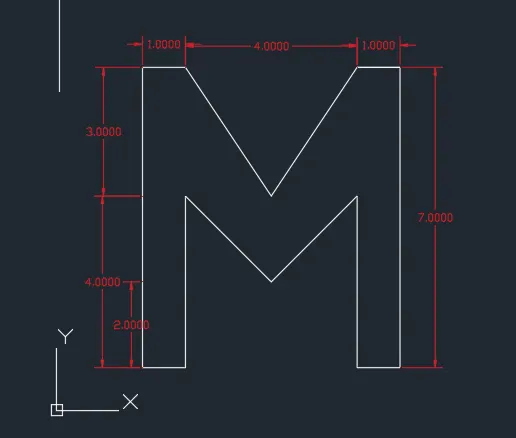
Specify next point or undo press 3,1
Specify next point or undo press 3,5
Specify next point or undo press 5,3
Specify next point or undo press 7,5
Specify next point or undo press 7,1
Specify next point or undo press 8,1
Specify next point or undo press 8,8
Specify next point or undo press 7,8
Specify next point press 5,5
Specify next point or undo press 3,8
Specify next point or undo press 2,8
then last specify next point or undo press 2,1
The geometry is done
Result -
4)
Aim - Creation of geometries by coordinate system method using AutoCad
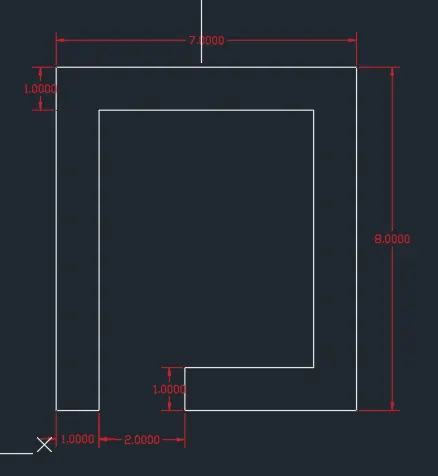
Relative Rectangular coordinate system -
Procedure -
First click on AutoCad application and open this
Type QNEW in command bar and enter
Select default setting as a Imperial in feet and inches
In advance setting set unit as a engineering and precision as 0.0000 and set angle as a decimal degree and angle direction
as East and Counter direction Clockwise
From Home tab click on line
Then command bar ask to specify first point
Origin as 0,0
In specify next point or undo press 2,1
Specify next point or undo press @ 1,0 ( Dx = 1 and Dy = 0)
Specify next point or undo press @ 0,7
Specify next point or undo press @ 5,0
Specify next point or undo press @ 0,-6
Specify next point or undo press @ -3,0
Specify next point or undo press @ 0,-1
Specify next point or undo press @ 4,0
Specify next point or undo press @ 0,8
Specify next point or undo press @ -7,0
In last ,specify next point press @ 0,-8
The geometry is ready
Result -
5)
Aim - Creation of geometries by coordinate system method using AutoCad
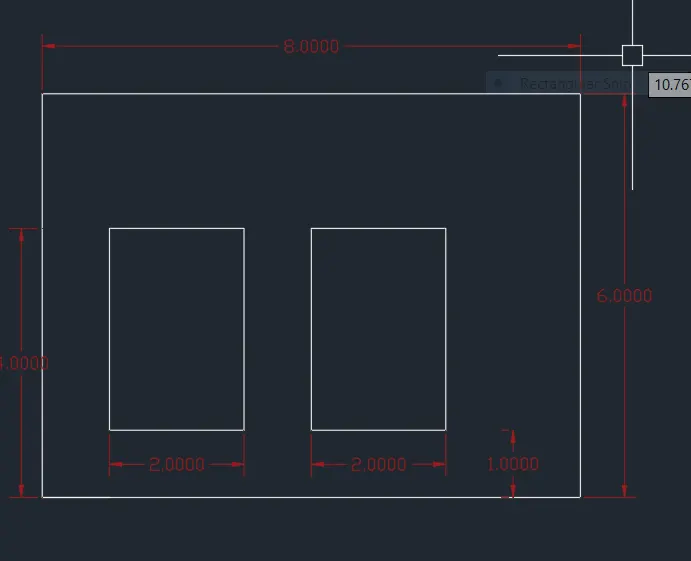
Relative polar coordinate system -
Procedure -
First click on AutoCad application and open this
Type QNEW in command bar and enter
Select default setting as a Imperial in feet and inches
In advance setting set unit as a engineering and precision as 0.0000 and set angle as a decimal degree and angle direction
as East and Counter direction Clockwise
From Home tab click on line
Then command bar ask to specify first point
Origin as 0,0
In front of specify next point press 2,1
Specify next point or undo press @ 8<0
Specify next point or undo press @ 6<90
Specify next point or undo press @ 8<180
Specify next point or undo press @ 2<0
Specify next point or undo pres @ 3<90
Specify next point or undo press @ 2<180
Specify next point or undo press @ 2<0
Specify next point or undo @ 3<90
Specify next point press @ 2<180
The geometry is done
Result -
6)
Aim - Creation of geometries by coordinate system method using AutoCad
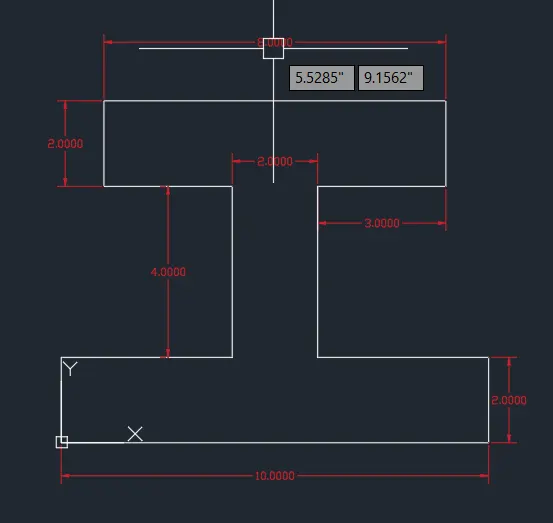
Direct distance entry -
Procedure -
First click on AutoCad application and open this
Type QNEW in command bar and enter
Select default setting as a Imperial in feet and inches
In advance setting set unit as a engineering and precision as 0.0000 and set angle as a decimal degree and angle direction
as East and Counter direction Clockwise
From Home tab click on line
Then command bar ask to specify first point
Origin as 0,0
In front of specify first point press 0,0
Specify next point or undo press 10, keep the curser towards East
Specify next point press 2,keep curser towards North
Specify next point press 4 ,keep curser towards West
Specify next point press 4,keep curser towards North
Specify next point press 3,keep curser towards East
Specify next point press 2,keep curser towards North
Specify next point press 8,keep curser towards West
Specify next point press 2,keep curser towards South
Specify next point press 3,keep curser towards East
Specify next point press 4,keep curser towards South
specify next point press 4 keep the curser towards West
Specify next point press Close to the origin
The geometry is done.
Result -
7)
Aim - Creation of geometries by coordinate system method using AutoCad
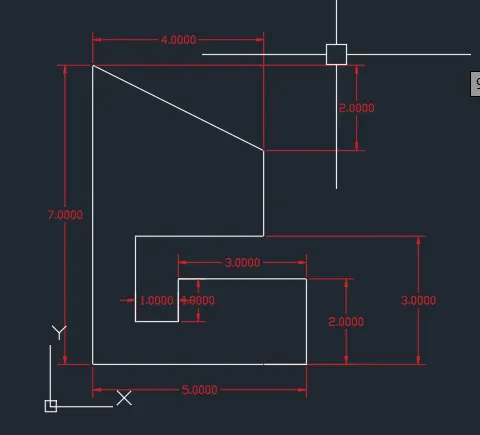
Absolute coordinate system -
Procedure -
First click on AutoCad application and open this.
Type QNEW in command bar and enter.
Select the default setting as Imperial in feet and inches.
In advance setting set unit as a engineering and precision as 0.00000 and the angle is in decimal degree and direction should
be in Counter Clockwise.
Set angle measured by East and press NEXT
Select the area 10 as length and 10 as width
From Home tab click on line command
Origin as a 0,0
Then the command bar ask specify first point then we have to put 1,1
Specify next point or undo press 6,1
Specify next point or undo press 6,3
Specify next point or undo press 3,3
Specify next point or undo press 3,2
Specify next point or undo press 2,2
Specify next point or undo press 2,4
Specify next point or undo press 5,4
Specify next point or undo press 5,6
Specify next point or undo press 1,8
then last specify next point or undo press 1,1
The geometry is done
Result -
8)
Aim - Creation of geometries by coordinate system method using AutoCad
Relative Rectangular coordinate system -
Procedure -
First click on AutoCad application and open this
Type QNEW in command bar and enter
Select default setting as a Imperial in feet and inches
In advance setting set unit as a engineering and precision as 0.0000 and set angle as a decimal degree and angle direction
as East and Counter direction Clockwise
From Home tab click on line
Then command bar ask to specify first point
Origin as 0,0
In specify first point press 1,1
Specify next point or undo press @ 2,0 ( Dx = 2 and Dy = 0)
Specify next point or undo press @ 0,3
Specify next point or undo press @ 3,0
Specify next point or undo press @ 0,4
Specify next point or undo press @ -5,0
Specify next point or undo press @ 3,0
Specify next point or undo press @ 0,2
Specify next point or undo press @ -3,0
In last ,specify next point press Close
The geometry is ready
Result -
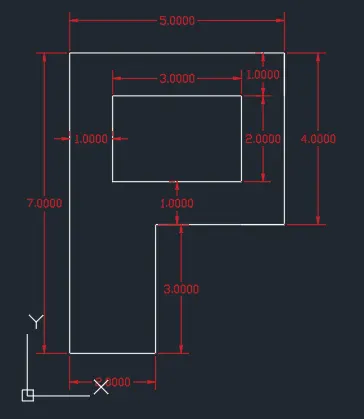
9)
Aim - Creation of geometries by coordinate system method using AutoCad
Absolute coordinate system -
Procedure -
First click on AutoCad application and open this.
Type QNEW in command bar and enter.
Select the default setting as Imperial in feet and inches.
In advance setting set unit as a engineering and precision as 0.00000 and the angle is in decimal degree and direction should
be in Counter Clockwise.
Set angle measured by East and press NEXT
Select the area 10 as length and 10 as width
From Home tab click on line command
Origin as a 0,0
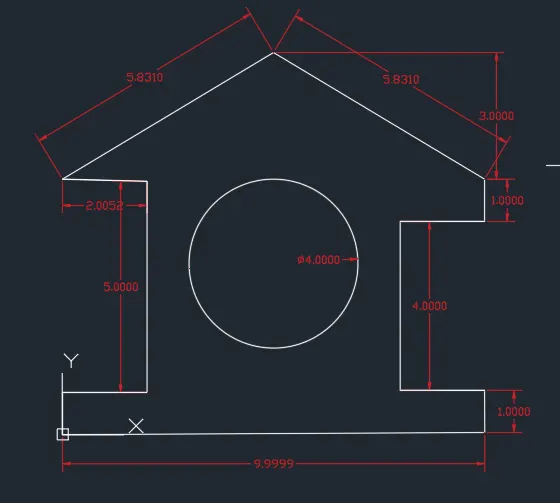
Then the command bar ask specify first point then we have to put 0,0
Specify next point or undo press 10,0
Specify next point or undo press 10,1
Specify next point or undo press 8,1
Specify next point or undo press 8,5
Specify next point or undo press 10,5
Specify next point or undo press 10,6
Specify next point or undo press 5,9
Specify next point or undo press 0,6
Specify next point or undo press 2,6
Specify next point or undo press 2,1
Specify next point or undo press 0,1
then last specify next point or undo press close
From Home tab click on circle (centre and radius)
Then command bar ask to specify center point of circle
Specify center point of circle 5,4
Then bar ask to specify radius of circle press 2 and enter
The geometry is done
Result -
10)
Aim - Creation of geometries by coordinate system method using AutoCad
Relative polar coordinate system -
Procedure -
First click on AutoCad application and open this
Type QNEW in command bar and enter
Select default setting as a Imperial in feet and inches
In advance setting set unit as a engineering and precision as 0.0000 and set angle as a decimal degree and angle direction
as East and Counter direction Clockwise
From Home tab click on line
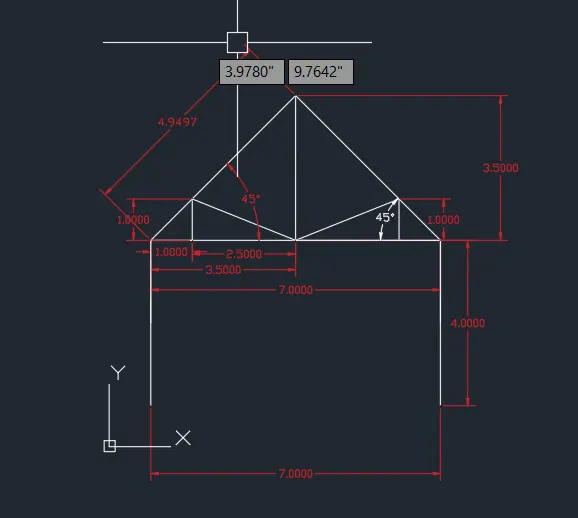
Then command bar ask to specify first point 1,1
Origin as 0,0
In front of specify next point press @ 7<0
Specify next point or undo press @ 4<270
Press enter,again take line command
Specify first point as 1,5
Specify next point or undo press @ 5<45
Press enter,again take line command
Specify first point 8,5
Specify next point or undo pres @ 5<135
Specify next point or undo press @ 3.5<270
Press enter,again take line command
Specify first point 1,5
Specify next point or undo @ 1<0
Specify next point press @ 1<90
Join the line
Press enter,again take line command
Specify first point 8,5
Specify next point or undo @ 1<180
Specify next point press @ 1<90
Join line
The geometry is done
Result -
11)
Aim - Creation of geometries by coordinate system method using AutoCad
Absolute coordinate system -
Procedure -
First click on AutoCad application and open this.
Type QNEW in command bar and enter.
Select the default setting as Imperial in feet and inches.
In advance setting set unit as a engineering and precision as 0.00000 and the angle is in decimal degree and direction should
be in Counter Clockwise.
Set angle measured by East and press NEXT
Select the area 10 as length and 10 as width
From Home tab click on line command
Origin as a 0,0
Then the command bar ask specify first point then we have to put 1,1
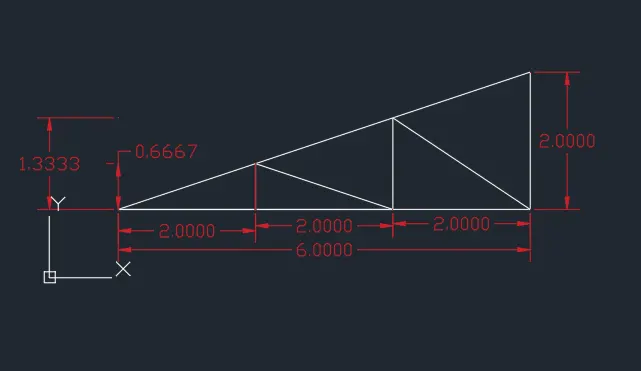
Specify next point or undo press 3,1
Specify next point or undo press 5,1
Specify next point or undo press 7,1
Specify next point or undo press 7,3
Specify next point press close
From Home tab click on line command
then Specify first point 3,1
Specify next point or undo press 3,1.667
Specify next point or undo press 5,1
Specify next point or undo press 5,2.33
Specify next point or undo press 7,1
Press enter
The geometry is done
Result -