Design of backdoor
Aim
Design the Back Door Assembly with the help of provided styling surface, use appropriate design methodologies, and provide the necessary reinforcements and embosses.
Software Used: Siemens NX CAD
Introduction
- Back Door can be termed as the rear-hinged component of a car, it completes the enclosing of the passenger compartment.
- Back door gives access to boot space for caring luggage or in some cases to provide entry and exit for rear-seat passengers.
- Back door carriers various functional and non-functional components such as the Wiper mechanism, Tail light, High mounted stop lamp, Rear windshield, Latch mechanism, Registration number plate, Vehicle model name, Brand Logo, Rear spoiler, and in some cars, Spare wheel is also mounted in Back door, this makes back door heavy component to operate.
- Usually back doors are hinged on top, and gas stays are fitted on both sides to provide assistance to lift and hold the back door in its position, some cars have back doors hinged on the side.
Types of Back Door
- Side Mounted
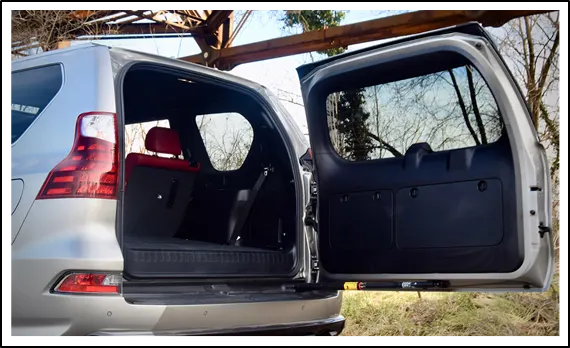
- As the name suggests door is hinged on side, generally SUVs, MPVs and Vans have such kind of mechanism.
- It makes lot easier for entry and exit of rear seat passengers, and also it elements the risk of accidental head impact.
- A single gas stay may be mounted at the bottom to allow smooth and controlled operation in case of side-mounted back door.
- Top Mounted
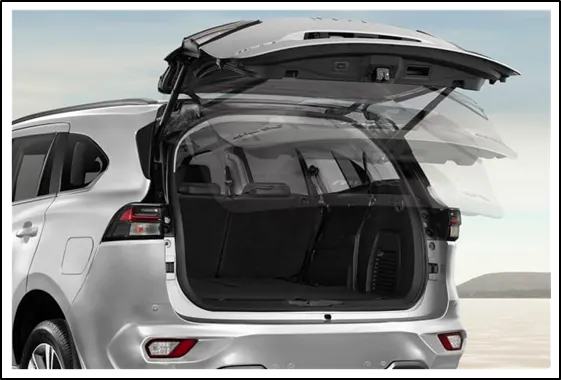
- Top-mounted back doors are more common as compared to any other type. It is widely used on Hatchback, SUVs, and MPVs.
- Top-mounted backdoor is also referred to as lift gate, these doors can be simply supported by gas stays on both sides, in some cars it can be operated (Open and Close) using an electric motor.
- This type of arrangement of the back door makes it lot more convenient to access the rear compartment as we can load, unload, enter, and exit from three directions (ie. Right side, Left side, and Centre).
- Split-type or Bottom mounted
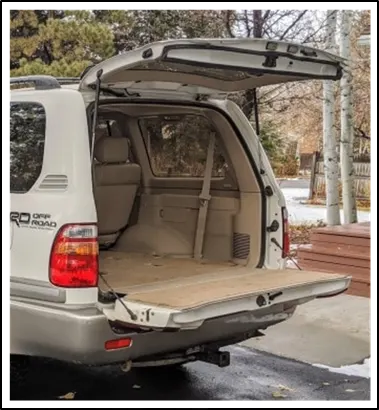
- Station Wagons, Pick-up Trucks, and some luxury SUVs use such kinds of back doors.
- In the case of pickup trucks, it gets convenient to carry long-length goods when the back door (tailgate) is kept open.
- Whereas in the case of SUVs and Station wagons, it acts as a comfort feature, as the upper half of the back door is hinged on top which carries the windshield, and the bottom half is hinged on the bottom which may have a cushioning on the inner side.
Components of Back Door
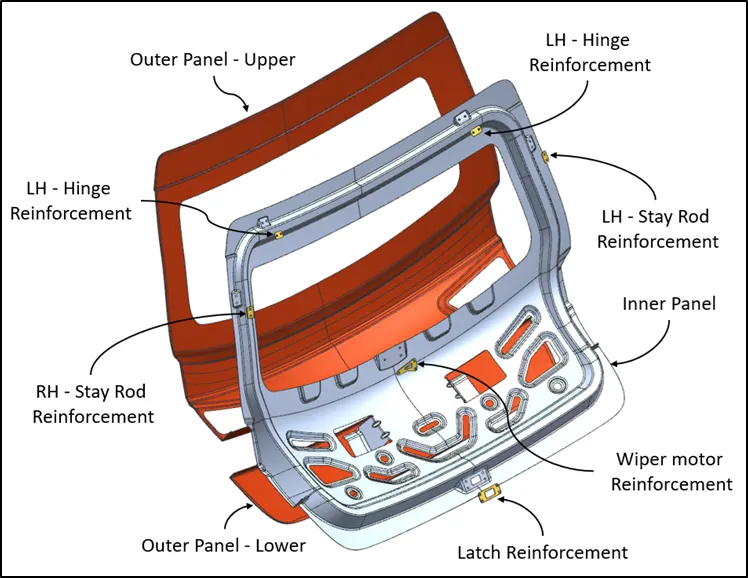
Sheet Metal Components
- Outer Panel
- The outer Panel of back door is a styling feature made up of Outer Panel - Upper & Outer Panel - Lower having 0.75mm thickness.
- Inner Panel
- Inner panel acts as a strengthening component of the back door, it carries load of various components mounted on back door such as Hinges, Gas stay, Wiper motor, etc.
- The thickness of inner panel is 0.75mm.
- Reinforcements
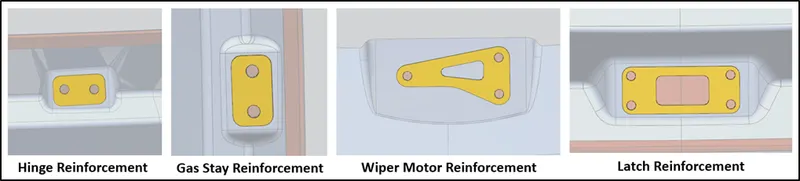
- Reinforcements are additional materials having more thickness jointed to the structure to provide extra strength in particular regions, such as Hinge reinforcement, Gas stay reinforcement, Latch reinforcement, and Wiper motor mounting reinforcement.
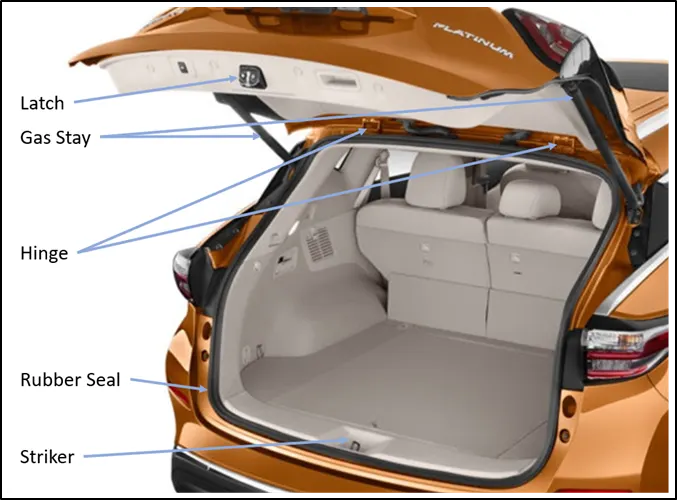
- Gas Stay
- A gas stay, also known as a gas spring is a mechanical component that uses compressed nitrogen gas to force a precision rod attached to a piston back and forth within an enclosed metal cylinder.
- Gas struts are primarily designed as a direct support mechanism for safely lifting, positioning, lowering, and counterbalancing different weights.
- Hinges
- Back door is attached to the car body using hinges at top/side.
- Hinges provide doors pivot points for opening and closing while rotating around hinge axis.
- Latch & Striker
- Latch is located inside the door assembly, it engages striker that is attached to the body of the vehicle, to keep the door closed.
- Spring loaded arm is attached to door handle, when pressed releases the latch from the anchor, allowing the door to open.
- Rubber Seal
- Rubber seal generally called as rubber beading is placed/ fitted around the opening of car door.
- Profile consists of a tube-like structure at top and slot at the bottom with steel beading so that it can be fitted on car door frame.
- Rubber seals maintain the comfort factor of the vehicle keeping the vibrations, noise, and harshness down inside the cabin. It also prevents the cabin from dust and rainwater.
Design Consideration of Back Door
- Rear Visibility Criteria
- Drivers must be aware of their surroundings so that he/she can drive its vehicle in a more safe and responsible manner.
- Windshields are placed all around the passenger cabin, also at the back door of car so that driver can observe the rear incoming traffic.
- Hence a cut-out for the windshield is provided, which may lead to reduced strength of back door.
- To improve the strength of back door additional reinforcements and strengthening features are provided on the back door inner panel.
- Latch Trajectory
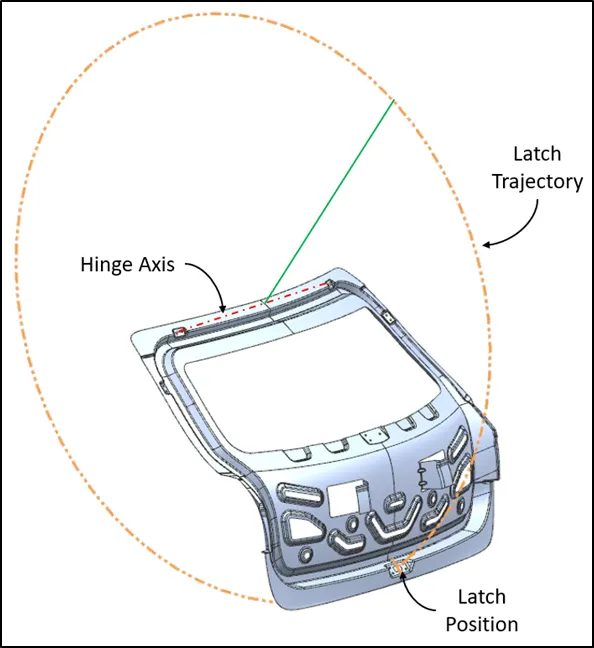
- Back door is usually hinged on upper side at two pivot points on the same plane, and if we draw straight line from centre of both pivot points we will have hinge axis along which back door will rotate.
- In order to open, close and Lock back door, Latch and Striker mechanism is provided.
- Latch is attached at bottom centre of Back door and Striker is placed at other end on car body.
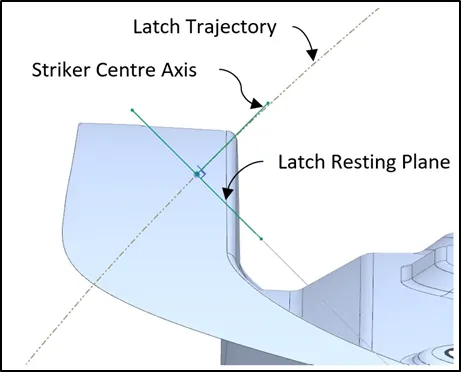
- In order to achieve smooth operation of Latch and striker, they must be aligned in such way that Striker centre axis must be tangentially perpendicular to circle formed by latch trajectory (Refer image below).
- Rear impact force Distribution
- While designing any vehicle is it important for any manufacturer to consider the safety of passengers as a priority.
- The body of vehicle is made in such a way that it will absorb any external impact in case of accident/ Collision.
- Back door is made by joining two sheets of uniform thickness called as Back door Outer Panel and Back Door Inner Panel.
- Back door Outer Panel is a styling commodity and Back Door inner panel is used as a strengthening commodity of Back door.
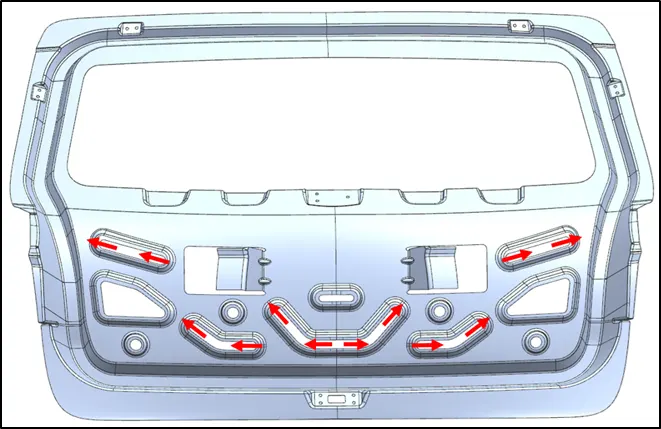
- Embosses and cut-outs on inner panel are provided in such a way that force from impact will be distributed towards the sides of the car and will not reach into the passenger cabin to ensure the safety of passengers.
- Image below demonstrates force distribution along the back door inner panel.
- Weatherproof sealing
- Passenger compartments including boot of the vehicle must be protected against the surrounding environment so that passengers, luggage, and goods can be carried from one place to another under any weather conditions.
- Doors and openings of the passenger compartment are fitted with rubber seals which create insulation from outer environments and don’t allow water and dust to enter inside the cabin.
Sheet Metal Working
- Stamping Process
- Stamping is a type of forming process in which external force is applied to metal sheet with the help of a die and press to produce a part with desired shape and size.
- It is high-speed and low-cost manufacturing technique to generate a high volume of identical sheet metal components.
- One of the first steps in sheet metal forming is to get a metal sheet into a piece form by cutting it using one of the various methods like shearing, cutting, sawing, or slitting.
- The piece of metal formed can then be converted into various shapes by a variety of complex processes. Some of these are blanking, punching, stamping, embossing, bending, forming, and deep drawing.
- Strengthening features
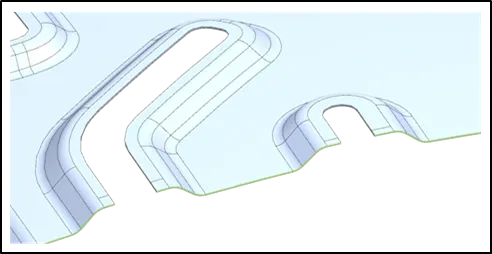
- Emboss
- Embossing is a forming operation used to create indentations in the sheet, such as raised lettering or strengthening ribs.
- This method is effective to increase the strength and rigidity of sheet metal without using additional material.
- Stiffening Drat
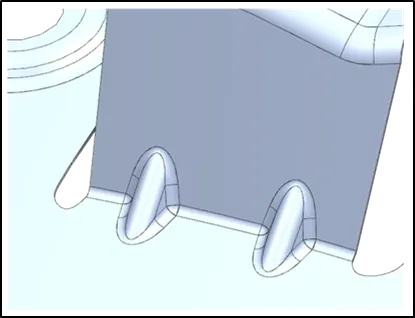
- Stiffening darts are commonly added in angle brackets to enhance the bending stiffness of the components.
- It also helps to reduce spring-back of the flange.
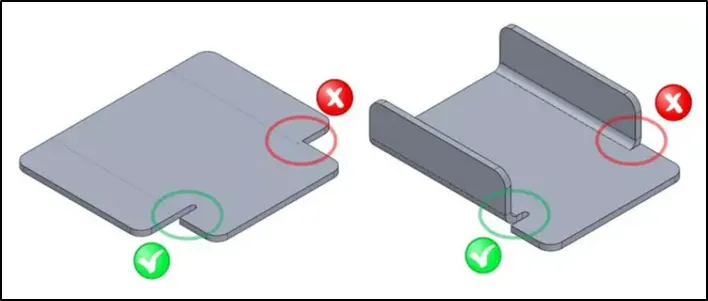
- Bend relief
- A Bend Relief avoids the sheet metal tearing or unwanted deformation if the bend is made at the edge of the material.
- It is a cut along the sides of the bend. This cut creates free space between the bent and unbent surfaces of the sheet metal.
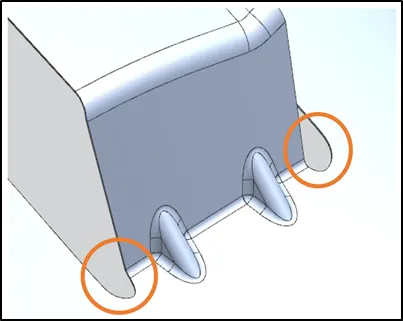
- The Bend Relief Depth must be greater than the bend radius and the Bend Relief Width must be greater than or equal to the thickness of the sheet metal.
Draft Analysis and Tooling Direction
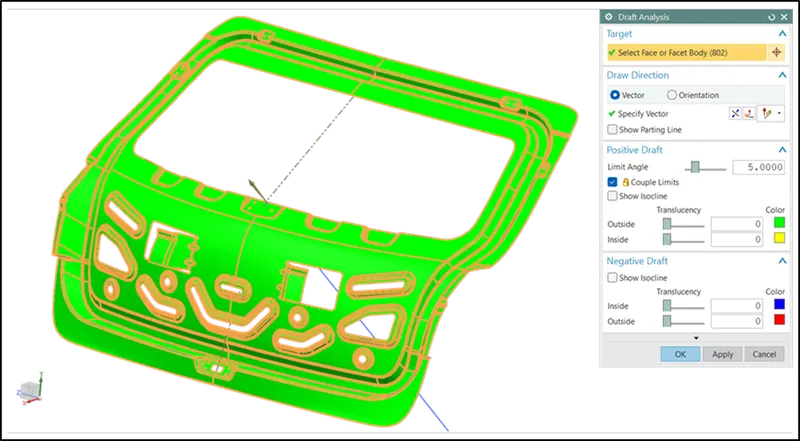
- Draft analysis is a method to virtually inspect the manufacturability of a part.
- Here in the case of Sheet metal component (Back Door Inner Panel), a Plane sheet of uniform thickness is pressed in between Upper Die and Lower Die.
- The lower Die is fixed to the ground and the Upper die moves in a linear direction (Up and Down) which is the tooling direction.
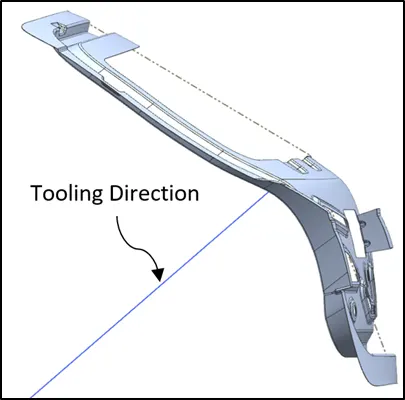
- Hence part must be designed in such a way that it can clear both dies by providing optimal draft.
- Below images refers to the result of Draft analysis performed on the inner panel of Back door, where the Green colour indicates that the part can be manufactured along the tooling direction.
Joining Inner and Outer Panel
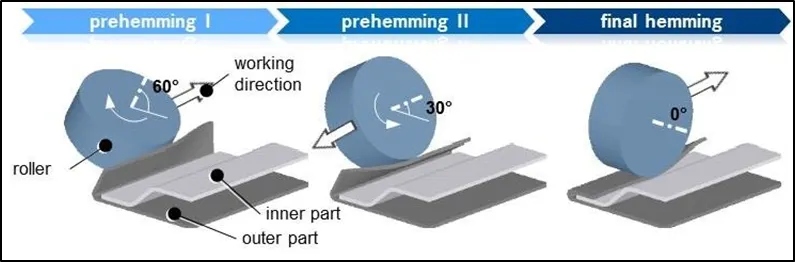
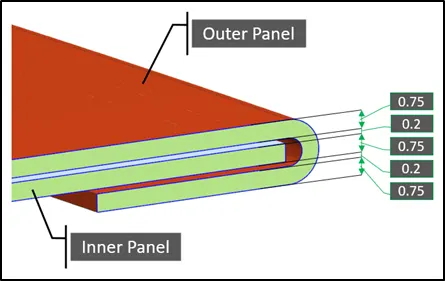
- Hemming
- Hemming is a forming operation in which the edges of the sheet are folded or folded over another part in order to achieve a tight fit.
- Normally hemming operations are used to connect sheet metal parts together, improve the appearance of a part, and reinforce part edges.
- Hemming sealant is applied in between the outer and inner panel to prevent the entry of dust or moisture between gaps and avoid rusting of sheet metal.
- Corner Relief
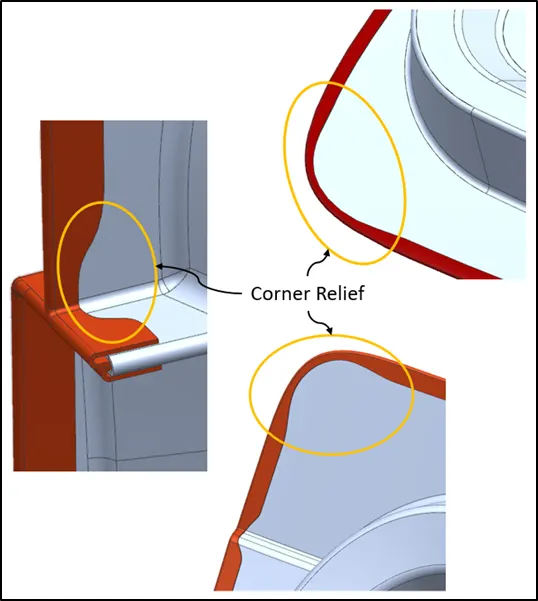
- When bending operation such as hemming is performed on sheet metal parts it produces unwanted deformation such as splits or wrinkles in the flange, material overlaps in the corner areas, hence to avoid such defects Corner reliefs are provided.
- Mastic Sealant
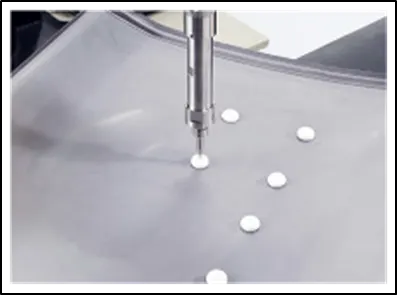
- Mastic sealant is applied on the inner panel of back door at flanged portion and is pressed against the outer panel to prevent distortion of the outer panel.
- The sealant also acts as an adhesive to join the inner and outer panels, after curing it forms a rubber-like structure which helps to reduce NVH levels.
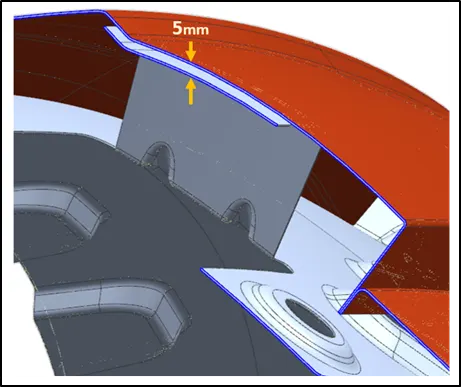
- A minimum gap of 5mm is maintained at the sealing area between the inner panel and outer panel.
- Spot Welding
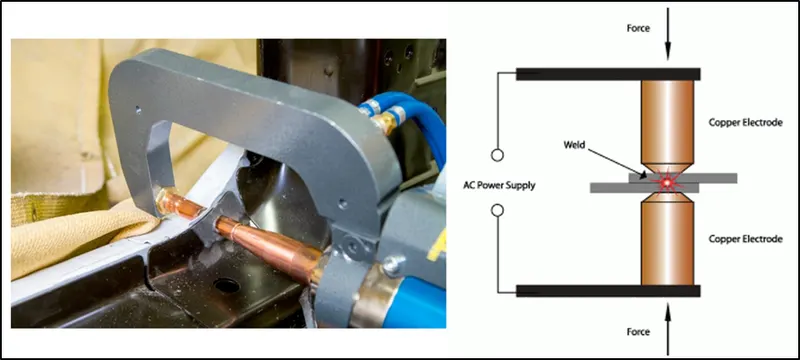
- Spot welding is a resistance welding process used primarily to weld two or more metal sheets together.
- The electric current and pressure are applied by copper alloy electrodes whose tips are placed on the opposite sides of the metal pieces.
- The generated heat melts the metal while the pressure from the electrodes squeezes the molten metal to form a weld.
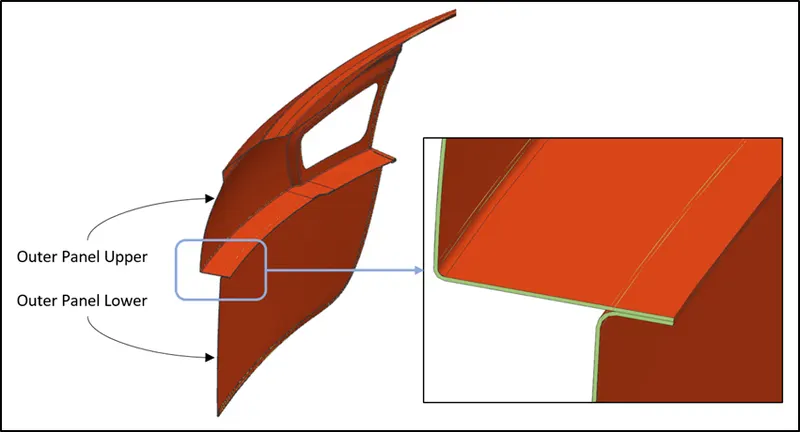
- The back door outer panel consists of Upper and lower Panel, which are joined together using spot welding
- Flanged portions of Upper and lower panel are placed one above the other having at least 10mm flat surface in contact to achieve proper spot weld.
Tests performed on Back Door
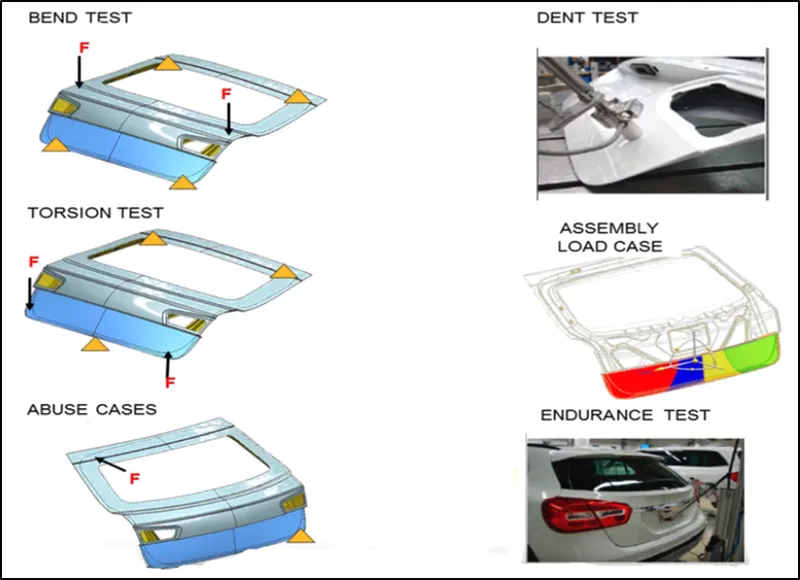
- Bent test
- Torsion test
- Abuse cases
- Dent test
- Assembly load case
- Endurance test
Design methodology
- Eliminating surface irregularities from given Class A surface
- The back door consists of various components assembled together, where they can be designed separately one by one and then assembled together which is the Bottom-Up assembly design approach, or can be designed all at once in an assembly using the Top-Down approach.
- We have considered Top-Down approach to make the Back Door assembly.
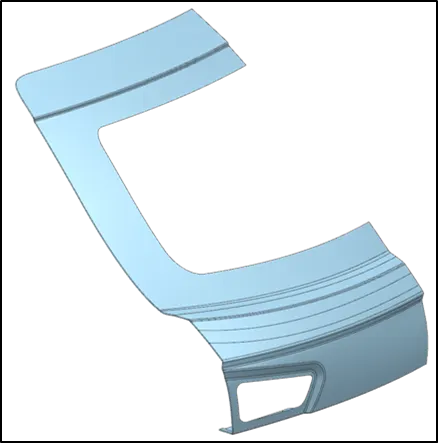
- A surface model of back door outer panel is received from the styling team.
- Back door surface model may have irregularities that need to be corrected before moving forward.
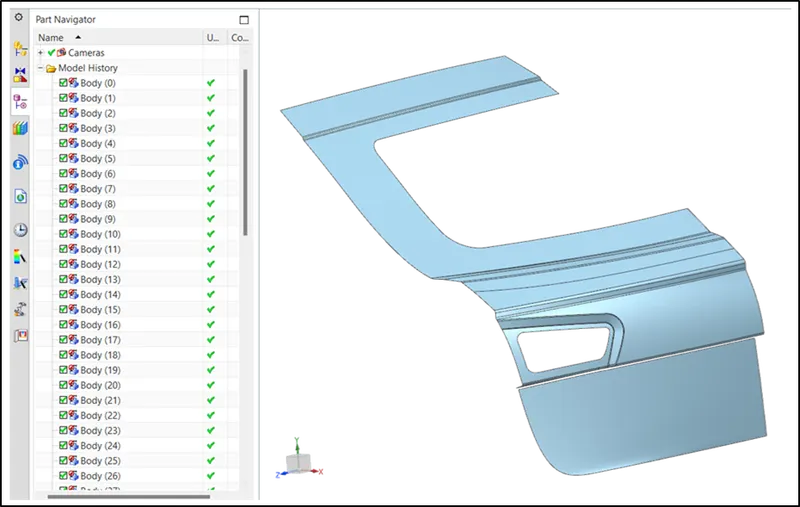
- Back door Outer panel consist of two separate components which are,
- Back Door Outer Panel Upper
- Back Door Outer Panel Lower
- Using various commands of NX Cad we will remove irregular surfaces and join them together to create a smooth back door outer panel design without disturbing the original shape and form provided by the styling team.
- Commands used:
- Bridge Curve
- Through Curve Mesh
- Offset Curve in Face
- Trim Sheet
- Blend Corner
- Sew
- We have received back door outer panel lower without a flanged section, hence needs to be created.
- Back door outer panel lower is joined with back door outer panel upper using the spot welding technique at flanged section which are placed just one above other.
- A minimum 10mm overlap is kept between both flanges.
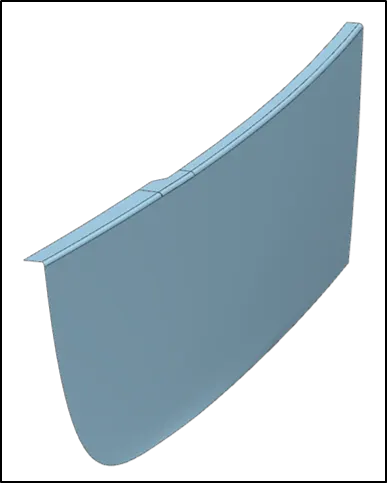
- Commands used:
- Extract Surface
- Extend Sheet
- Offset Curve in Face
- Trim Sheet
- Face Blend
- At last 0.75mm thickness towards the inside is applied to both the Upper and Lower Panel using Thicken command.
Designing Back door inner panel
- Back door inner panel is used to strengthen back door
- Inner panel is design in such a way that it will sustain and distribute rear impact face and carry load of various components mounted on back door.
Creating tooling direction
- Before designing the Back Door Inner Panel it is necessary to decide its tooling direction so that it can be manufactured using forming operations on Press and Die.
- By extracting the surface of back door outer panel, two lines L1, & L2 are created along the curved surface using three points P1, P2, and P3 as mentioned in below image.
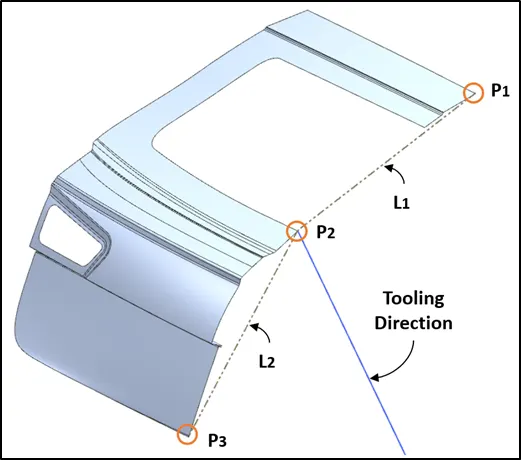
- A bisecting line is created by using Derived lines command which is considered as tooling direction for an inner panel.
Creation of Sealing Flange
- Sealing Flange is a raised surface of back door inner panel which will come I contact with rubber seal to from a weather proof packing of rear end opening of vehicle.
- Outer Panel Upper and Lower is extracted, then by using Offset Curve in Face command a strip of around 30mm width is Trimmed.
- This strip is then offset by 30mm on direction away from Outer Panel to make outer most surface of Sealing Flange.
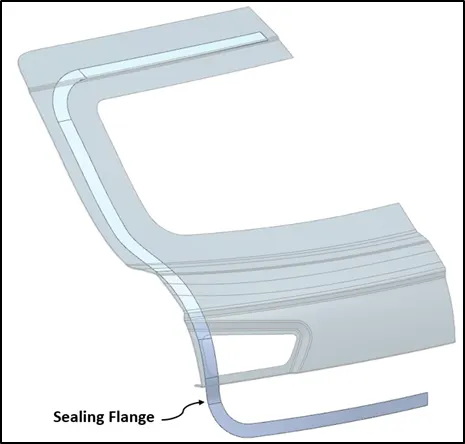
- An offset of 1.75mm (i.e 0.75mm x2 + 0.2mm Gap) from Extracted Surface is made to create the external boundary of inner panel.
- Using Law Extension command on the edges of Sealing flange, Connecting flange is made.
- The sealing flange is joined to the external boundary through connecting the flange using Face Blend command.
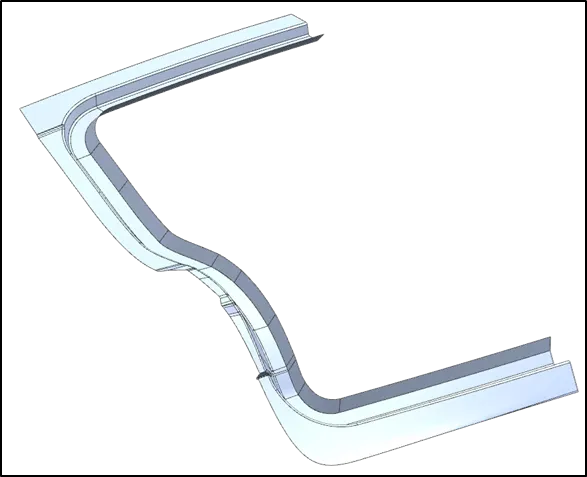
Completing the basic structure of the back door inner panel
- The windshield portion is extracted from the offset surface and joined with a sealing flange.
- The lower portion is then created using Bridge curve and Studio Surface Command, keeping a significant gap from Back Door Outer panel.
- Finally, all surfaces are trimmed together to form a single body.
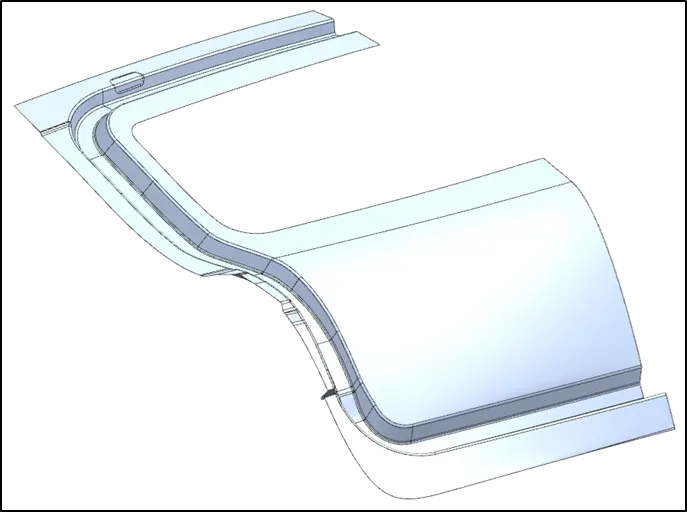
Creation of Flange
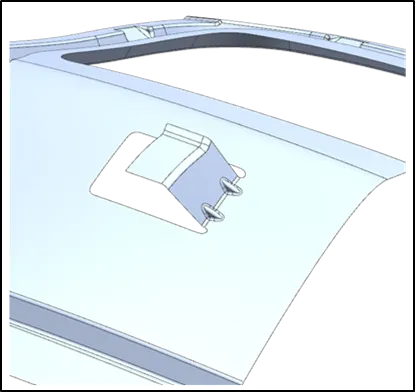
- Flange is made to join inner and outer panels using mastic sealant and provide strength, a minimum 5mm gap is maintained between flange and outer panel.
- Commands Used:
- Project Curve
- Trim Sheet
- Law Extension
- Face Blend
- Offset Curve in Surface
- Curve on Surface
- Dart
- Creating emboss to improve rigidity and improve rear impact distribution from center to side of the vehicle.
- A Sketch is made on a Datum Plane and is projected on the curved surface of inner panel to achieve the required shape of Emboss.
- Cut-out is provided to access tail-light and its accessories and also it helps to reduce overall weight.
- Commands Used:
- Project Sketch
- Emboss
- Trim Sheet
- Using Mirror Geometry and Sew command complete inner panel is created.
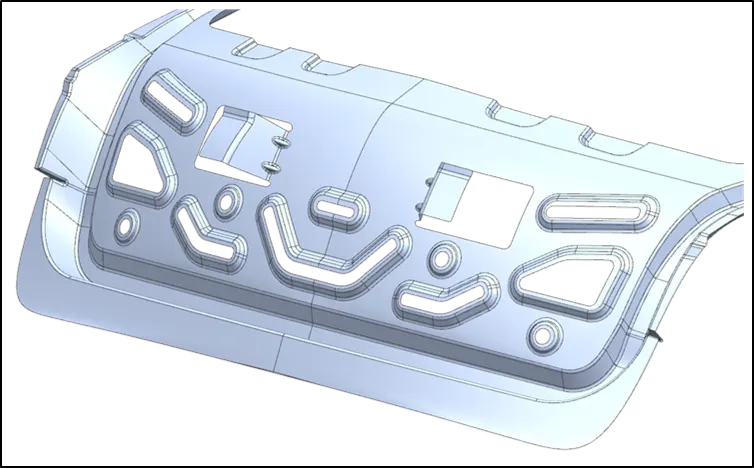
- Creation of emboss for various components mounted on back door inner panel
- Command Used:
- Offset Surface
- Project Curve
- Law extension
- Trim Sheet
- Face Blend
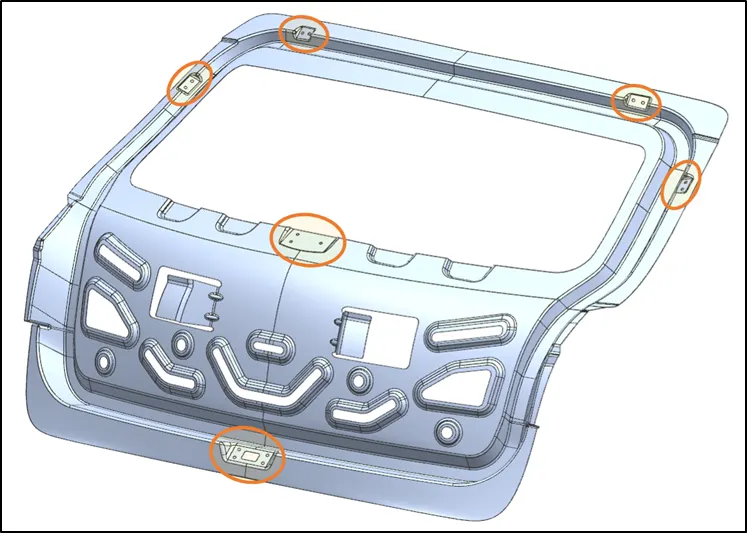
- At last 0.75mm thickness towards Outer Panel (Outside) is applied using Thicken command to complete the body.
Creating Reinforcement components
- Required Sketches of Reinforcing components are made on respective Datum Planes.
- Sketches are projected on the Extracted surface by taking reference of the Embossed surface on Back door inner panel
- Thickness of 2mm is provided for Reinforcing components.
Joining Back door Inner Panel with Back door Outer Panel
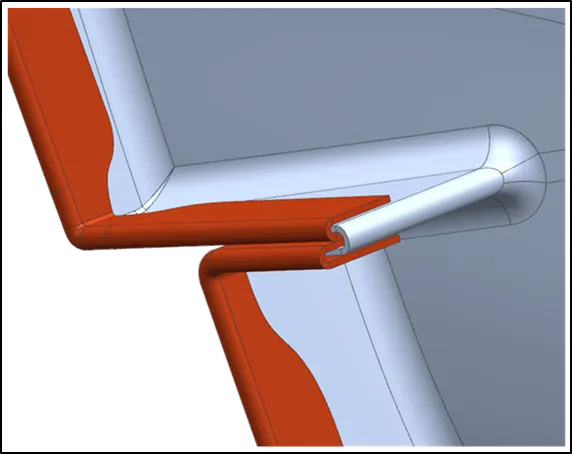
- Back door outer panel consists of two components Outer Panel Lower and Outer Panel Upper which need to be joined with the Back door inner panel
- The arrangement on inner panel is made in such a way that it holds both flanges of Upper Panel and Lower panel together (Refer Image Below)
- Sheets arranged one above the other are then spot welded to make a strong joining between the Outer and the Inner panel.
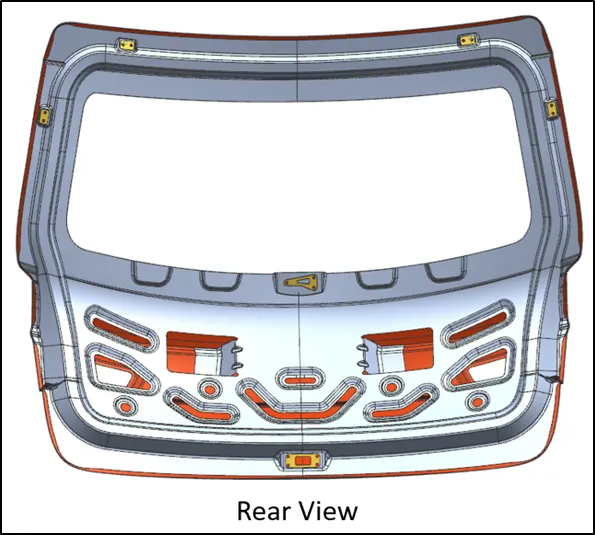
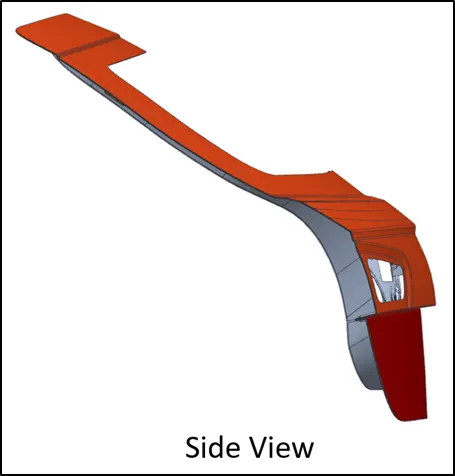
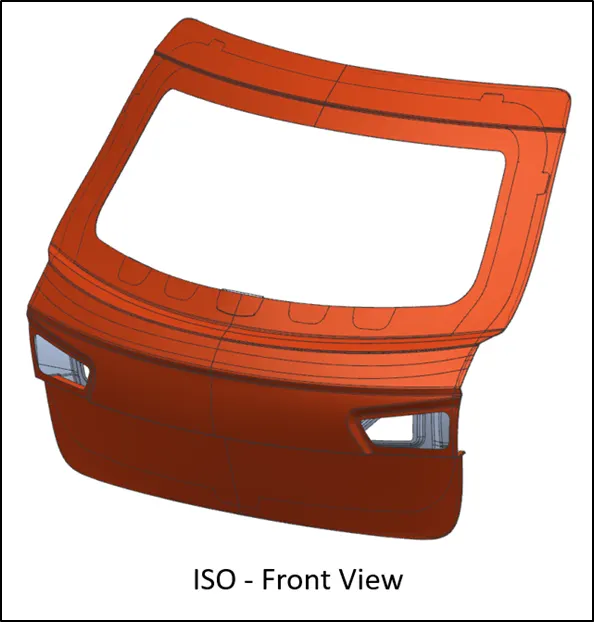
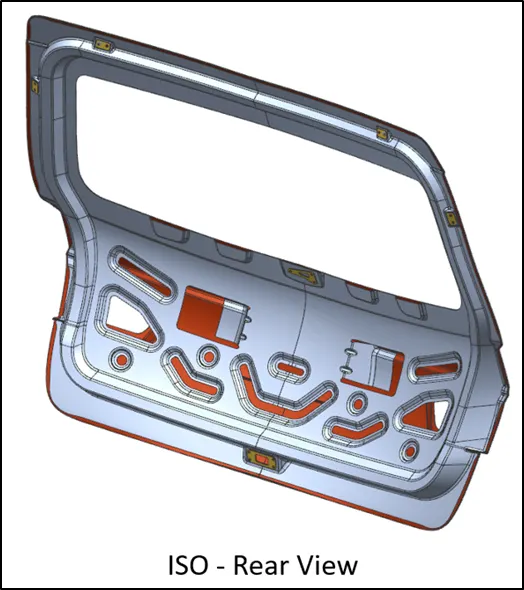
CAD Images – Back Door
*** End Of Report***