Creation of geometries by Coordinate system methods using AutoCad
ANS 1
AIM:
- To create the geometrics using all the coordinates system methods.
- To use the LINE tool to create the geometrics.
PROCEDURE:
A.)ABSOLUTE CO-ORDINATE SYSTEM:
- Select the tool from the ribbon tab,thus the command prompt showing "specify the first point".
- In the command prompt enter the first point as (2,1).
- Then the command prompt asks to enter the next point.
- Specify the next point as (2,7)
- Specify the next point as (8,7)
- Specify the next point as (8,6)
- Specify the next point as (3,6)
- Specify the next point as (3,2)
- Specify the next point as (8,2)
- Specify the next point as (8,1)
- Specify the next point as (8,1) ,else click on the "close" from the command prompt.
B.)RELATIVE RECTANGULAR CO-ORDINATE:
- Select the tool from the ribbon tab,thus the command prompt showing "specify the first point".
- In the command prompt enter the first point as (2,1).
- Then the command prompt asks to enter the next point.
- Specify the next point as (@0,6)
- Specify the next point as (@6,0)
- Specify the next point as (@0,-1)
- Specify the next point as (@-5,0)
- Specify the next point as (@0,-4)
- Specify the next point as (@5,0)
- Specify the next point as (@0,-1)
- Specify the next point as (@-6,0) or click on the "CLOSE" from the command prompt.
C.)POLAR CO-ORDINATES:
- Select the tool from the ribbon tab,thus the command prompt showing "specify the first point".
- In the command prompt enter the first point as (2,1).
- Then the command prompt asks to enter the next point.
- Specify the next point as (@6<90)
- Specify the next point as (@6<0)
- Specify the next point as (@1<270)
- Specify the next point as (@5<180)
- Specify the next point as (@4<270)
- Specify the next point as (@5<0)
- Specify the next point as (@1<270)
- Specify the next point as (@6<180)
D.)DIRECT DISTANT METHOD:
- In the command prompt type "L" enter now the line command is activated.
- Click on the workspace to specify the starting point.
- Enter the length as "6" and press enter keeping the cursor pointing towards upwards or 0 Y direction.
- Enter the length as "6" and press enter keeping the cursor pointing towards 0 right side direction.
- Enter the length as "1" and press enter keeping the cursor pointing towards downward Y direction.
- Enter the length as "5" and press enter keeping the cursor pointing towards left X direction.
- Enter the length as "4" and press enter keeping the cursor pointing towards downward Y direction.
- Enter the length as "5" and press enter keeping the cursor pointing towards right X direction.
- Enter the length as "1" and press enter keeping the cursor pointing towards downwards Y direction.
- Enter the length as "6" and press enter keeping the cursor pointing towards left side X direction.

ANS 2
AIM:
- o create the geometrics using all the coordinates system methods.
- To use the LINE tool to create the geometrics.
PROCEDURE:
A.)ABSOLUTE CO-ORDINATE SYSTEM:
- Select the tool from the ribbon tab,thus the command prompt showing "specify the first point".
- In the command prompt enter the first point as (2,1).
- Then the command prompt asks to enter the next point.
- Specify the next point as (4,8)
- Specify the next point as (7,8)
- Specify the next point as (9,1)
- Specify the next point as (6,1)
- Specify the next point as (6,5)
- Specify the next point as (5,5)
- Specify the next point as (5,1)
- Specify the next point as (2,1) or else click CLOSE in the command prompt.
B.)RELATIVE RECTANGULAR CO-ORDINATE SYSTEM:
- Select the tool from the ribbon tab,thus the command prompt showing "specify the first point".
- In the command prompt enter the first point as (2,1).
- Then the command prompt asks to enter the next point.
- Specify the next point as (@2,7)
- Specify the next point as (@3,0)
- Specify the next point as (@2,-7)
- Specify the next point as (@-3,0)
- Specify the next point as (@0,4)
- Specify the next point as (@-1,0)
- Specify the next point as (@0,-4)
- Specify the next point as (@-3,0) else click CLOSE in the command prompt.
C.)POLAR CO-ORDINATE SYSTEM:
- Select the tool from the ribbon tab,thus the command prompt showing "specify the first point".
- In the command prompt enter the first point as (2,1).
- Then the command prompt asks to enter the next point.
- Specify the next point as (@7<74.05)
- Specify the next point as (@3<0)
- Specify the next point as (@7<285.95)
- Specify the next point as (@3<180)
- Specify the next point as (@4<90)
- Specify the next point as (@1<180)
- Specify the next point as (@4<270)
- Specify the next point as (@3<180)
D.)DIRECT DISTANT METHOD:
- In the command prompt type "L" enter now the line command is activated.
- Click on the workspace to specify the starting point.
- Enter the length as "7" and press enter keeping the cursor pointing between X and Y direction at an angle of 74.05.
- Enter the length as "3" and press enter keeping the cursor pointing right X side direction.
- Enter the length as "7" and press enter keeping the cursor pointing between X and Y direction at an angle of 285.95.
- Enter the length as "3" and press enter keeping the cursor pointing towards negative X direction.
- Enter the length as "4" and press enter keeping the cursor pointing towards upward Y direction.
- Enter the length as "1" and press enter keeping the cursor pointing left X direction.
- Enter the length as "4" and press enter keeping the cursor pointing towards downward Y direction.
- Enter the length as "3" and press enter keeping the cursor pointing towards left X direction.

ANS 4.
AIM:
- To create the geometrics using all the coordinates system methods.
- To use the LINE tool to create the geometrics.
PROCEDURE:
A.)ABSOLUTE CO-ORDINATE SYSTEM:
- Select the tool from the ribbon tab,thus the command prompt showing "specify the first point".
- In the command prompt enter the first point as (2,1).
- Then the command prompt asks to enter the next point.
- Specify the next point as (3,1)
- Specify the next point as (3,5)
- Specify the next point as (5,3)
- Specify the next point as (7,5)
- Specify the next point as (7,1)
- Specify the next point as (8,1)
- Specify the next point as (8,8)
- Specify the next point as (7,8)
- Specify the next point as (5,5)
- Specify the next point as (3,8)
- Specify the next point as (2,8)
- Specify the next point as (2,1)or else click CLOSE in the command prompt.

ANS 5.
AIM:
- To create the geometrics using all the coordinates system methods.
- To use the LINE tool to create the geometrics.
PROCEDURE:
A.)ABSOLUTE CO-ORDINATE SYSTEM:
- Select the tool from the ribbon tab,thus the command prompt showing "specify the first point".
- In the command prompt enter the first point as (2,1).
- Then the command prompt asks to enter the next point.
- Specify the next point as (3,1)
- Specify the next point as (3,8)
- Specify the next point as (8,8)
- Specify the next point as (8,2)
- Specify the next point as (5,2)
- Specify the next point as (5,1)
- Specify the next point as (9,1)
- Specify the next point as (9,9)
- Specify the next point as (2,9)
- Specify the next point as (2,1)or else click CLOSE in the command prompt.

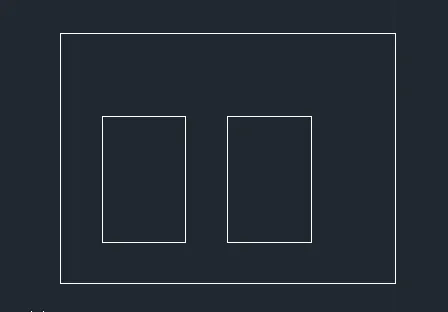
ANS 7.
AIM:
- To create the geometrics using all the coordinates system methods.
- To use the LINE tool to create the geometrics.
PROCEDURE:
A.)ABSOLUTE CO-ORDINATE SYSTEM:
- Select the tool from the ribbon tab,thus the command prompt showing "specify the first point".
- In the command prompt enter the first point as (2,1).
- Then the command prompt asks to enter the next point.
- Specify the next point as (10,1)
- Specify the next point as (10,7)
- Specify the next point as (2,8)
- Specify the next point as (2,1)or else click CLOSE in the command prompt.
- Specify the next point as (3,2)
- Specify the next point as (5,2)
- Specify the next point as (5,5)
- Specify the next point as (3,5)
- Specify the next point as (3,2)or else click CLOSE in the command prompt.
- Specify the next point as (6,2)
- Specify the next point as (8,2)
- Specify the next point as (8,5)
- Specify the next point as (6,5)
- Specify the next point as (6,2) or else click CLOSE in the command prompt.
ANS 8.
AIM:
- To create the geometrics using all the coordinates system methods.
- To use the LINE tool to create the geometrics.
PROCEDURE:
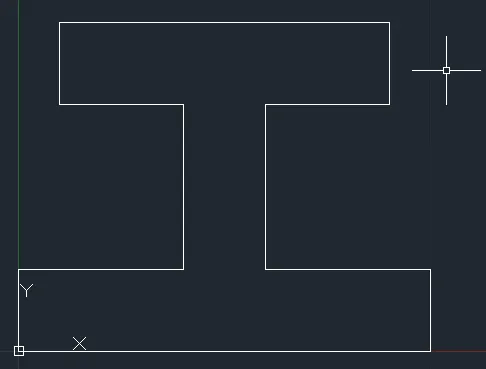
RELATIVE RECTANGULAR CO-ORDINATE SYSTEM:
- Select the tool from the ribbon tab,thus the command prompt showing "specify the first point".
- In the command prompt enter the first point as (0,0).
- Then the command prompt asks to enter the next point.
- Specify the next point as (@0,2)
- Specify the next point as (@4,0)
- Specify the next point as (@0,4)
- Specify the next point as (@-3,0)
- Specify the next point as (@0,2)
- Specify the next point as (@8,0)
- Specify the next point as (@0,-2)
- Specify the next point as (@-3,0)
- Specify the next point as (@0,-4)
- Specify the next point as (@4,0)
- Specify the next point as (@0,-2)
- Specify the next point as (@-10,0) or else click CLOSE in the command prompt.
ANS 9.
AIM:
- To create the geometrics using all the coordinates system methods.
- To use the LINE tool to create the geometrics.
PROCEDURE:
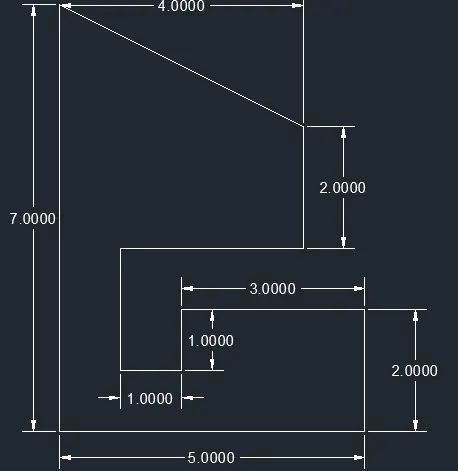
RELATIVE RECTANGULAR CO-ORDINATE SYSTEM:
- Select the tool from the ribbon tab,thus the command prompt showing "specify the first point".
- In the command prompt enter the first point as (1,1).
- Then the command prompt asks to enter the next point.
- Specify the next point as (@5,0)
- Specify the next point as (@0,2)
- Specify the next point as (@-3,0)
- Specify the next point as (@0,-1)
- Specify the next point as (@-1,0)
- Specify the next point as (@3,0)
- Specify the next point as (@0,2)
- Specify the next point as (@-4,2) or else click CLOSE in the command prompt.
ANS 10.
AIM:
- To create the geometrics using all the coordinates system methods.
- To use the LINE tool to create the geometrics.
PROCEDURE:
RELATIVE RECTANGULAR CO-ORDINATE SYSTEM:
- Select the tool from the ribbon tab,thus the command prompt showing "specify the first point".
- In the command prompt enter the first point as (1,1).
- Then the command prompt asks to enter the next point.
- Specify the next point as (@2,0)
- Specify the next point as (@0,3)
- Specify the next point as (@3,0)
- Specify the next point as (@0,4)
- Specify the next point as (@-5,0)
- Specify the next point as (@0,-7)or else click CLOSE in the command prompt.
- Use the LINE tool in the command prompt.
- Specify the next point as (2,5)
- Specify the next point as (@3,0)
- Specify the next point as (@0,2)
- Specify the next point as (@-3,0)
- Specify the next point as (@0,-2) or else click CLOSE in the command prompt.

ANS.)
AIM:
- To create the geometrics using all the coordinates system methods.
- To use the LINE tool to create the geometrics and use the circle tool when required.
PROCEDURE:
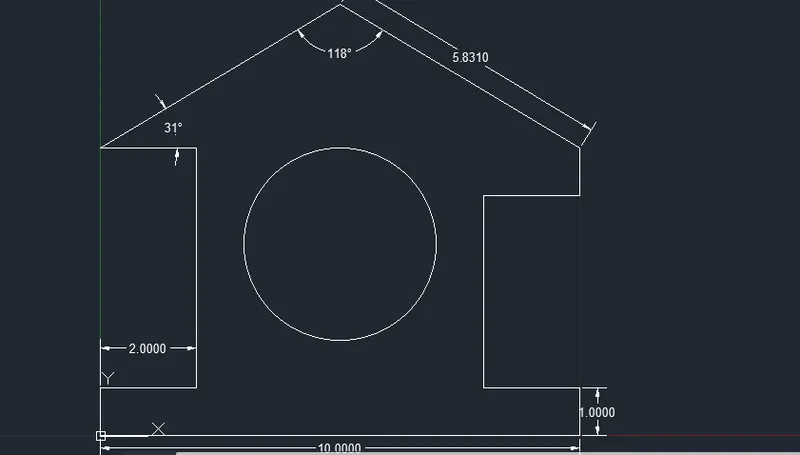
RELATIVE RECTANGULAR CO-ORDINATE SYSTEM:
- Select the tool from the ribbon tab,thus the command prompt showing "specify the first point".
- In the command prompt enter the first point as (0,0).
- Then the command prompt asks to enter the next point.
- Specify the next point as (@0,1)
- Specify the next point as (@2,0)
- Specify the next point as (@0,5)
- Specify the next point as (@-2,0)
- Specify the next point as (@5.831<31)
- Specify the next point as (@10,0)
- Specify the next point as (@0,1)
- Specify the next point as (@-2,0)
- Specify the next point as (@0,4)
- Specify the next point as (@2,0)
- Specify the next point as (@0,1)
- Enter the length as "5.831" and press enter keeping the cursor pointing between X and Y in left upward direction.
- Enter the circle command in the command prompt.
- Enter the centre of the circle with respect to origin (5,4)
- Enter the radius of the circle 2.
PROFILE WOOD
ANS.)
AIM:
- To create the geometrics using all the coordinates system methods.
- To use the LINE tool to create the geometrics and use the circle tool when required.
PROCEDURE:
RELATIVE RECTANGULAR CO-ORDINATE SYSTEM:
- Select the tool from the ribbon tab,thus the command prompt showing "specify the first point".
- In the command prompt enter the first point as (1,1).
- Then the command prompt asks to enter the next point.
- Specify the next point as (@0,4)
- Specify the next point as (@5<45)
- Specify the next point as (@5<-45)
- Specify the next point as (@1,0)
- Specify the next point as (@0,1)
- Specify the next point as (@2.53,0)
- Specify the next point as (@2.53,0)
- Specify the next point as (@0,1)
- Specify the next point as (@1,0)
- Specify the next point as (@0,-4) or else click CLOSE in the command prompt.
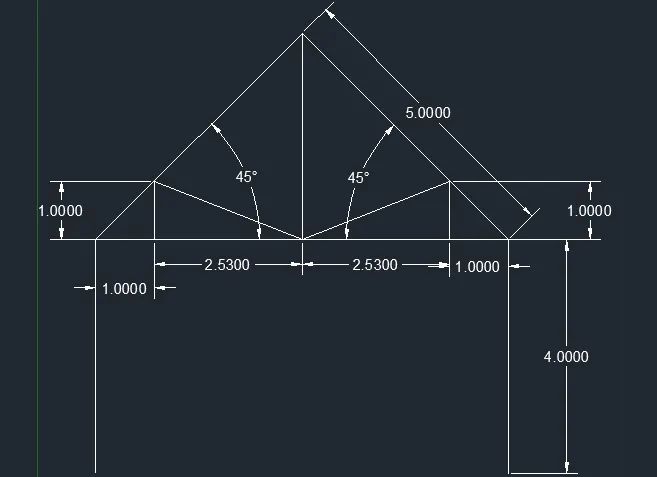
QUEEN POST TRUSS
ANS.)
AIM:
- To create the geometrics using all the coordinates system methods.
- To use the LINE tool to create the geometrics and use the circle tool when required.
PROCEDURE:
RELATIVE RECTANGULAR AND POLAR CO-ORDINATE SYSTEM:
- Select the tool from the ribbon tab,thus the command prompt showing "specify the first point".
- In the command prompt enter the first point as (1,1).
- Then the command prompt asks to enter the next point.
- Specify the next point as (@2.10<18.440)
- Specify the next point as (@2.10<18.44)
- Specify the next point as (@2.10<18.44)
- Specify the next point as (@0,-2)
- Specify the next point as (@-2.4<-33.62)
- Specify the next point as (@0,-1.33)
- Specify the next point as (@-2.10<-18.44)
- Specify the next point as (@0<-0.667)
- Specify the next point as (@-2,0)
- Specify the next point as (@6,0)
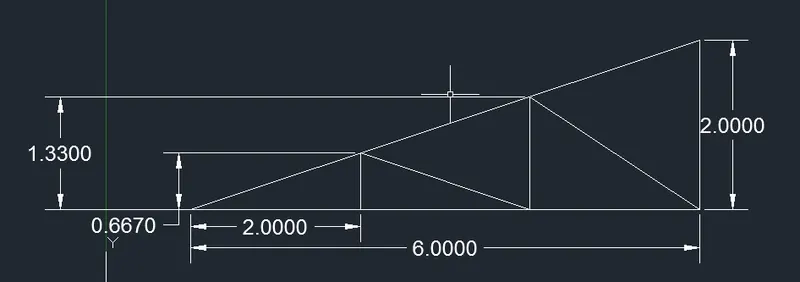
MONOPITCH