Creating a Residence Layout, Seating plan, Toilet and Utility room plan using AutoCad
Q.1.)
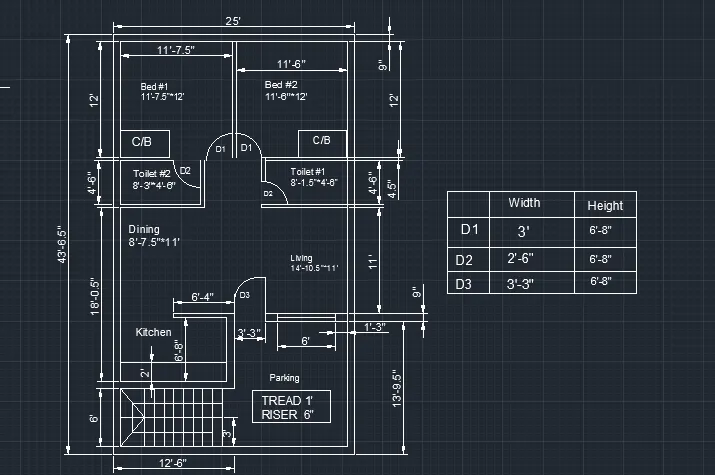
AIM: To sketch the residence layout using AUTOCAD.
PROCEDURE:
STEP 1:
- Type "units" in the command prompt and press enter.
- Select the type "engineering" and insertion scale as "Inches". click OK.
- Type "Limits" in the command prompt; specify the lower limit as (0,0) and upper limit as (100,100).
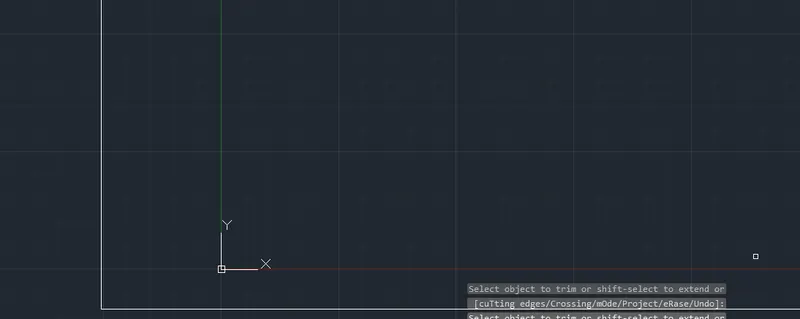
- Type XLINE in the command prompt and press enter.
- Type "V" to activate vertical Xline. Place it in the left of the workspace and press esc.
- Type XLINE in the command prompt and press enter.
- Type "H" to activate horizontal Xline. Place it in the workspace such that it forms the corner point and press esc.
- Type "Trim" in the command prompt and press enter.
- Click the corner lines to trim.
- Enter the offset distance as 6'.
- Apply offset to horizontal line in the positive Y direction. press esc.
- Enter the offset distance as 9".
- Apply offset to previously created line in the positive Y direction. Press "ESC".
- Type OFFSET in the command prompt and press enter.
- Apply offset distance as 6'8".
- Apply offset to the previously created line in the positive Y-direction. Press esc.
- Type "offset" in the command prompt and press enter.
- Enter the offset distance as 4.5"
- Apply offset to the previously created line in the positive Y-direction. Press esc.
- Type "offset" in the command prompt and press enter.
- Enter the offset distance as 11'.
- Apply offset to the previously created line in the posiyive Y diection. Press esc.
- Type "offset" in the command prompt and press enter.
- Enter the offset distance as 4.5"
- Apply offset to the previously created line in the positive Y-direction. Press esc.
- Type "offset" in the command prompt and press enter.
- Enter the offset distance as 4.5"
- Apply offset to the previously created line in the positive Y-direction. Press esc.
- Type "offset" in the command prompt and press enter.
- Enter the offset distance as 4'6"
- Apply offset to the previously created line in the positive Y-direction. Press esc.
- Type "offset" in the command prompt and press enter.
- Enter the offset distance as 4.5"
- Apply offset to the previously created line in the positive Y-direction. Press esc.
- Type "offset" in the command prompt and press enter.
- Enter the offset distance as 12'
- Apply offset to the previously created line in the positive Y-direction. Press esc.
- use "fillet" tool from the ribbon tab.
- Use the fillet tool in suitable place to join two intersecting lines.
- Type "trim" in the command prompt and press enter.
- Use the trim command to remove unwanted lines.
- Press esc.
- Type "offset" in the command prompt and press enter.
- Enter the offset distance as 11'6"
- Apply offset to the previously created line in the positive Y-direction. Press esc.
- Type "offset" in the command prompt and press enter.
- Enter the offset distance as 9".
- Apply offset to the previously created line in the positive Y-direction. Press esc.
STEP 2:
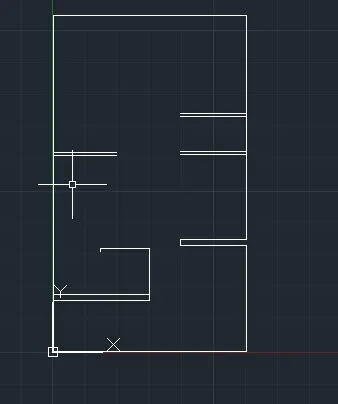
- Type Xline in the command prompt and press enter.
- Type "V" to activate vertical line.
- Draw a line of random length opposite to the orientation.
- Offset the line to the distance of 3'3".
- Use "trim" command to remove between the lines.
- Use circle tool from the ribbon tab,use the corner point as the centre and draw a circle according to the door dimension.
- Use trim command to remove the unneccesary circle.
- To draw a window of 6' length,offset the line upto a distance of 1'3".
- Then offset the line to a distance of 6'.
- Use "line" command to join the centre of offsetted lines.
Q.2)
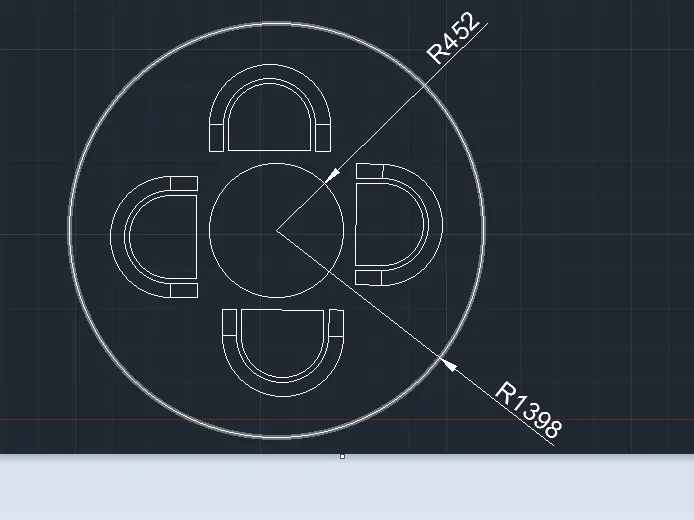
AIM: To sketch seating plan for an outdoor canopy using AUTOCAD.
PROCEDURE:
STEP 1:
- Type "Units" in the command prompt and press enter.
- Select the type as "Decimal" and insertion scale as " MILIMITERES". click Ok.
- Type "Limits" in the command prompt. Press enter.
- Select the circle tool from the ribbon tab.
- From the drop down list select "Centre radius".
- Take any point and enter the radius as 1398 in the command prompt and press enter.
- A circle with radius 1398 is created.
STEP 2:
- Select the "circle" tool from the ribbon.
- From the drop down list ,select "Centre radius".
- Take any point and enter the radius as 452 in the command prompt and press enter.
- A circle is then created.
STEP 3: Creation of chairs
- Select line tool from ribbon tab.
- Draw a horizontal line of length 42.4 mm.
- Draw a vertical line of length 200 mm from starting and ending point of previously created line in positive Y-direction.
- Select " arc" from the ribbon tab.
- From the drop down list,select "start,end,direction".
- Select the start and end point from the end point of previously created line.
- Select the direction according to the requirement.
- Type "offset " in the command prompt and press enter.
- Type the offset distance as 12mm and select the previously created line. press OK.
- Type "offset" in the command prompt and press enter.
- Type the offset distance as 50 mm and select the previously created arc.
- Join the ends of the arc using line command.
STEP 4:
- Type "array" in the command prompt and press enter.
- Select the points and draw accordingly.
- Adjust the direction such that required objects created as per the requirement.
Q.)3.
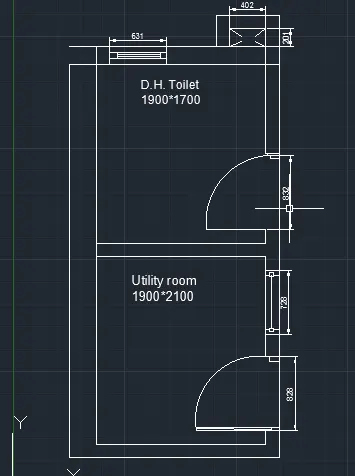
AIM:To sketch the part plan for the toilers and utility rooms using AUTOCAD.
PROCEDURE:
STEP 1:
- Type "Units" in the command prompt and press enter.
- Select the type as "DECIMAL" and insertion scale as "Millimeters".
- Type "Limits" in the command prompt; in the command prompt pres "off" and press enter.
- Type XLINE in the command prompt and press enter.
- Type "V" to activate vertical Xline.
- Select the vertical Xline and click by keeping the cursor on the right side.
- Type "H" to activate horizontal Xline.
- Place it in the workspace such that it forms the corner point and press esc.
- Type "Trim" in the command prompt and press enter.
- Click the corner lines to trim.
STEP 2:
- Type "offset" in the command prompt and enter the offset distance as 150 mm in the command prompt.
- Select the horizontal Xline and click by keeping the cursor in upward direction.
STEP 3:
- Type "offset" in the command prompt and press enter.
- Enter the offset distance as 1900 mm in the command prompt.
- Select the vertical Xline and click by keeping the cursor on right side.
- Again type "offset" and enter the distance as 150mm in the command prompt and press enter.
- Select the vertical Xline and click by keeping the cursor on the right side.
STEP 4:
- Type "offset" in the command prompt and press enter.
- Enter the offset distance as 2100 mm in the command prompt.
- Select the vertical Xline and click by keeping the cursor in the upward direction.
- Again type "offset" in the command prompt and press enter.
- Enter the offset distance as 150 mm in the command prompt.
- Select the vertical Xline and click by keeping the cursor in the upward direction.
STEP 5:
- Enter the offset distance as 1700 mm in the command prompt.
- Select the vertical Xline and click by keeping the cursor in upward direction.
- Again type "offset" in the command prompt and press enter.
- Enter the offset distance as 300 mm in the command prompt.
- Select the vertical Xline and click by keeping the cursor in the upward direction.
STEP 6:
- Type "trim" in the command prompt and press enter.
- TRIM command is activated.
- As per the sketch given the intersections,corners and the unnecessary lines are trimmed out.
STEP 7:
- Type "offset" in the command prompt and press enter.
- Enter the breadth as "201" and press enter.
- Type "offset" in the command prompt.
- Type the offset distance as 150 and select the rectangle. Press esc.
- Type "trim" in the command prompt and press enter.
STEP 8:
- Use line tool from the ribbon tab.
- Draw a line of random length for reference purpose.
- Type "offset" in the command prompt and press enter.
- Specify the offset distance as "150" and select the line.Press "esc".
- Again type "offset" in the command prompt and press enter.
- Specify the offset distance as "832" and select the line.Press esc.
- Use "trim" command from the ribbon tab.
- Turn off the unnecessary lines.
STEP 9:
Draw a door of length "832" using line command from the ribbon tab.
Select "arc" tool from ribbon tab.
Select "start,end,angle" from the draw down list.
Specify the points and draw according to the sketches.
Use "trim" tool from ribbon tab and remove the unwanted lines.
STEP 10:
- Draw a door of length "828" using line command from the ribbon tab.
- Select "arc" tool from ribbon tab.
- Select "start,end,angle" from the draw down list.
- Specify the points and draw according to the sketches.
- Use "trim" tool from ribbon tab and remove the unwanted lines.
STEP 11:
- Using line tool from the ribbon tab,draw a line at left top corner.
- Type "offset" in the command prompt and press enter.Enter the offset distance as "150" and press enter.Select the line to offset.Type "offset" in the command prompt and press enter.
- Enter the offset distance as "631" and Press enter.
- Select the line to offset.
- Draw a small rectangle using rectangle tool on both sides.
- Draw a line connecting bottom of rectangle.
- Using the offset command, offset the line 3*times.