Creation of geometries by Coordinate system methods using AutoCad
AIM
- Create the geometries from P1 to P2 using all the coordinates system methods.
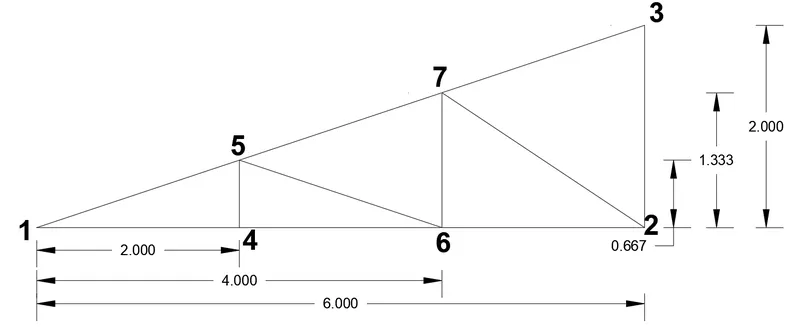
- Civil Related Problems: Draw the profile and the trusses using any coordinate system methods.
(Use the Imperial Template and the Decimal Units to draft the features).
INTRODUCTION
There are mainly two types of coordinate system in Auto CAD. They are,
1. Absolute coordinate system
It is distance or angle of axes relative to the origin of the coordinates. All input points specify in the drawing using standard Cartesian coordinates x and y. Using absolute coordinate, points are entered by typing x,y [Enter].
Eg.
(1,2), (3,4)
2. Relative coordinate system
It is the distance or angle of axes relative to the last point, not related to origin(0,0). It is classified as,
a) Relative Rectangular coordinates:
After first point is entered, the next point is entered relative to the first point. The relative coordinate started with symbol “@” in AutoCAD. Using relative coordinate, points entered by typing @x,y [Enter].
Eg. @5,0, @4,5.
b) Relative Polar coordinates:
Polar coordinates are used when you need to draw the next points at specify angle. Polar coordinate system in AutoCAD specifies distance and its angle. Using polar coordinate, points are entered by typing @distance.
There's another way to define points in Auto CAD. It's called Direct distance entry.
Direct distance entry
This is the most common and easiest system used for drafting in Autocad. Values are provided through keyboard and direction is guided through the mouse.
COMMANDS USED
1. LINE command
2. DIMLINEAR command
3. MTEXT command
4. CIRCLE command
5. MLEADER command
PROCEDURE
1. First Open Auto CAD Application and select Start Drawing.
2. Then set Drawing Limits and Units from Format menu.
Q:1- Create the geometries from P1 to P2 using all the coordinates system methods.
1.
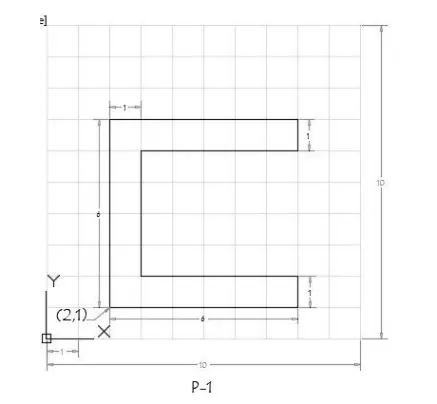
a) Absolute Coordinate System:
- Select the Line tool from the ribbon tab or enter the 'LINE' command in the command tab.
-
Specify the starting coordinate of point 1 as 2,1.
-
Specify the next coordinate of point 2 as 8,1.
-
Specify the next coordinate of point 3 as 8,2.
-
Specify the next coordinate of point 4 as 3,2.
-
Specify the next coordinate of point 5 as 3,6.
-
Specify the next coordinate of point 6 as 8,6.
-
Specify the next coordinate of point 7 as 8,7.
-
Specify the next coordinate of point 8 as 2,7.
-
Then for the last point, enter 'CLOSE' on the Command Line.
b) Relative Rectangular Coordinate System:
- Select the Line tool from the ribbon tab or enter the 'LINE' command in the command tab.
2. Specify the starting coordinate of point 1 as 2,1.
3. Specify the next coordinate of point 2 as @6,0.
4. Specify the next coordinate of point 3 as @0,1.
5. Specify the next coordinate of point 4 as @-5,0.
6. Specify the next coordinate of point 5 as @0,4.
7. Specify the next coordinate of point 6 as @5,0.
8. Specify the next coordinate of point 7 as @0,1.
9. Specify the next coordinate of point 8 as @-6,0.
10. Then for the last point, enter 'CLOSE' on the Command Line.
c) Relative Polar Coordinate System:
- Select the Line tool from the ribbon tab or enter the 'LINE' command in the command tab.
2. Specify the starting coordinate of point 1 as 2,1.
3. Specify the next coordinate of point 2 as @6<0.
4. Specify the next coordinate of point 3 as @1<90.
5. Specify the next coordinate of point 4 as @5<180.
6. Specify the next coordinate of point 5 as @4<90.
7. Specify the next coordinate of point 6 as @5<0.
8. Specify the next coordinate of point 7 as @1<90.
9. Specify the next coordinate of point 8 as @6<180.
10. Then for the last point, enter 'CLOSE' on the Command Line.
d) Direct Distance Entry method:
1. Select the Line tool from the ribbon tab or enter the 'LINE' command in the command tab.
2. Specify the starting coordinate of point 1 as 2,1 in the command line and Turn on Ortho mode.
3. Enter the length of point 2 as 6 in the command line towards the +ve x-axis.
4. Enter the length of point 3 as 1 in the command line towards the +ve y-axis.
5. Enter the length of point 4 as 5 in the command line towards the -ve x-axis.
6. Enter the length of point 5 as 4 in the command line towards the +ve y-axis.
7. Enter the length of point 6 as 5 in the command line towards the +ve x-axis.
8. Enter the length of point 7 as 1 in the command line towards the +ve y-axis.
9. Enter the length of point 8 as 6 in the command line towards the -ve x-axis.
10. Then for the last point, enter 'CLOSE' on the command line.
Result
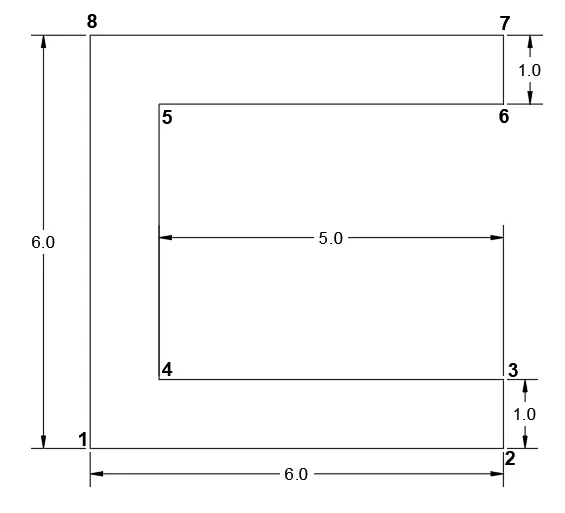
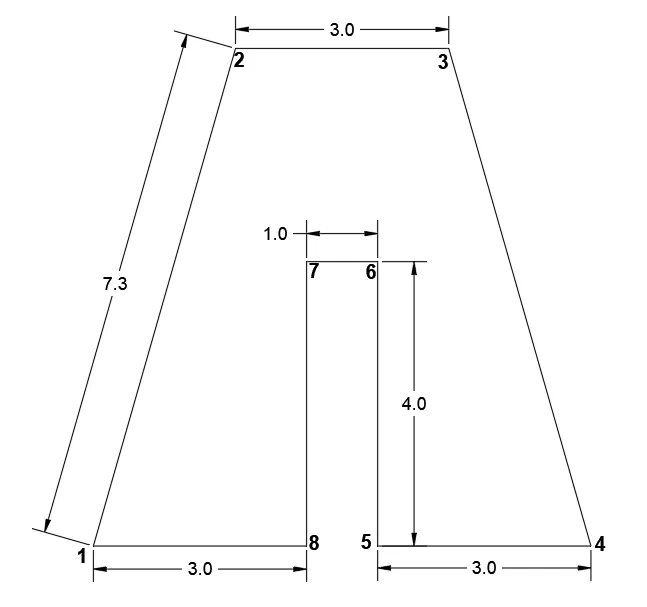
2.
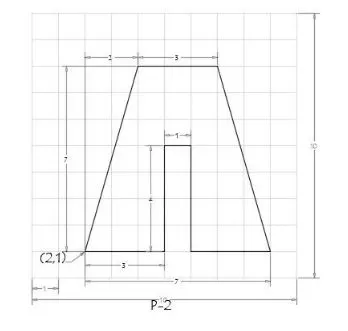
a) Absolute Coordinate System:
1. Select the Line tool from the ribbon tab or enter the 'LINE' command in the command tab.
2. Specify the starting coordinate of point 1 as 2,1.
3. Specify the next coordinate of point 2 as 4,8.
4. Specify the next coordinate of point 3 as 7,8.
5. Specify the next coordinate of point 4 as 9,1.
6. Specify the next coordinate of point 5 as 6,1.
7. Specify the next coordinate of point 6 as 6,5.
8. Specify the next coordinate of point 7 as 5,5.
9. Specify the next coordinate of point 8 as 5,1.
10. Then for the last point, Click 'CLOSE' on the Command Line.
b) Relative Rectangular Coordinate System:
1. Select the Line tool from the ribbon tab or enter the 'LINE' command in the command tab.
2. Specify the starting coordinate of point 1 as 2,1.
3. Specify the next coordinate of point 2 as @2,7.
4. Specify the next coordinate of point 3 as @3,0.
5. Specify the next coordinate of point 4 as @2,-7.
6. Specify the next coordinate of point 5 as @-3,0.
7. Specify the next coordinate of point 6 as @0,4.
8. Specify the next coordinate of point 7 as @-1,0.
9. Specify the next coordinate of point 8 as @0,-4.
10. Then for the last point, Click 'CLOSE' on the Command Line.
c) Relative Polar Coordinate System:
1. Select the Line tool from the ribbon tab or enter the 'LINE' command in the command tab.
2. Specify the starting coordinate of point 1 as 2,1.
3. Specify the next coordinate of point 2 as @7.3<74.
4. Specify the next coordinate of point 3 as @3<0.
5. Specify the next coordinate of point 4 as @7.3<286.
6. Specify the next coordinate of point 5 as @3<180.
7. Specify the next coordinate of point 6 as @4<90.
8. Specify the next coordinate of point 7 as @1<180.
9. Specify the next coordinate of point 8 as @4<270.
10. Then for the last point, Click 'CLOSE' on the Command Line.
d) Direct Distance Entry method:
1. Select the Line tool from the ribbon tab or enter the 'LINE' command in the command tab.
2. Specify the starting coordinate of point 1 as 2,1 in the command line.
3. Enter the length of point 2 as 7.3 in the command line towards the +ve y-axis at 74°.
4. Enter the length of point 3 as 3 in the command line towards the +ve x-axis.
5. Enter the length of point 4 as 7.3 in the command line towards the -ve y-axis at 74°.
6. Enter the length of point 5 as 3 in the command line towards the -ve x-axis.
7. Enter the length of point 6 as 4 in the command line towards the +ve y-axis.
8. Enter the length of point 7 as 1 in the command line towards the -ve x-axis.
9. Enter the length of point 8 as 4 in the command line towards the -ve y-axis.
10. Then for the last point, Click 'CLOSE' on the command line.
Result
3.
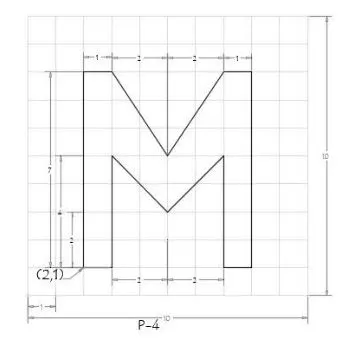
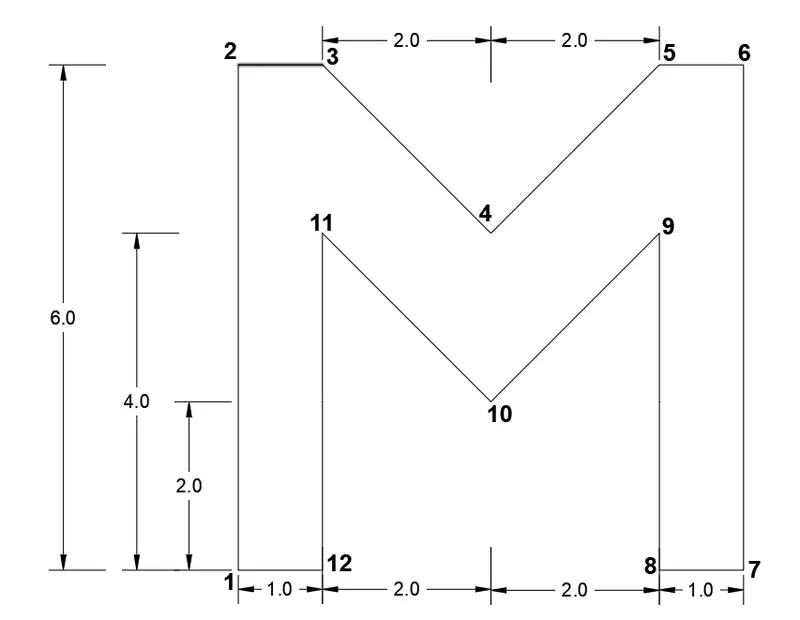
Absolute Coordinate System:
1. Select the Line tool from the ribbon tab or enter the 'LINE' command in the command tab.
2. Specify the starting coordinate of point 1 as 2,1.
3. Specify the next coordinate of point 2 as 2,7.
4. Specify the next coordinate of point 3 as 3,7.
5. Specify the next coordinate of point 4 as 5,5.
6. Specify the next coordinate of point 5 as 7,7.
7. Specify the next coordinate of point 6 as 8,7.
8. Specify the next coordinate of point 7 as 8,1.
9. Specify the next coordinate of point 8 as 7,1.
10. Specify the next coordinate of point 9 as 7,5.
11. Specify the next coordinate of point 10 as 5,3.
12. Specify the next coordinate of point 11 as 3,5.
13. Specify the next coordinate of point 12 as 3,1.
14. Then for the last point, Click 'CLOSE' on the Command Line.
Result
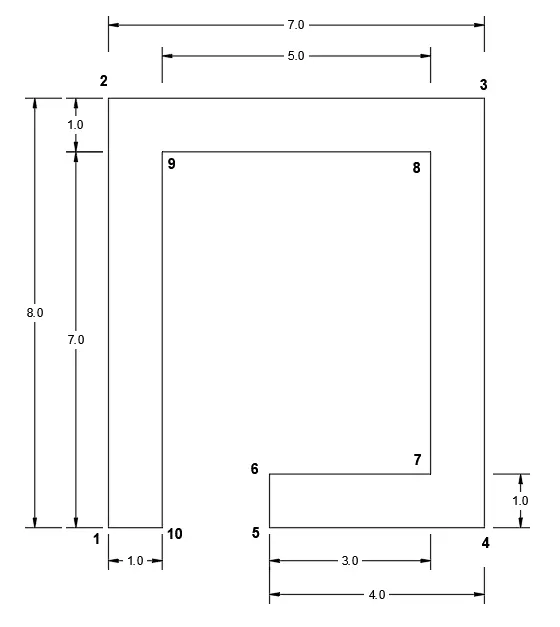
4.
Direct Distance Entry method:
1. Select the Line tool from the ribbon tab or enter the 'LINE' command in the command tab.
2. Specify the starting coordinate of point 1 as 2,1 in the command line.
3. Enter the length of point 2 as 8 in the command line towards the +ve y-axis.
4. Enter the length of point 3 as 7 in the command line towards the +ve x-axis.
5. Enter the length of point 4 as 8 in the command line towards the -ve y-axis.
6. Enter the length of point 5 as 4 in the command line towards the -ve x-axis.
7. Enter the length of point 6 as 1 in the command line towards the +ve y-axis.
8. Enter the length of point 7 as 3 in the command line towards the +ve x-axis.
9. Enter the length of point 8 as 6 in the command line towards the +ve y-axis.
10. Enter the length of point 9 as 5 in the command line towards the -ve x-axis.
11. Enter the length of point 10 as 7 in the command line towards the -ve y-axis.
12. Then for the last point, Click 'CLOSE' on the Command Line.
Result
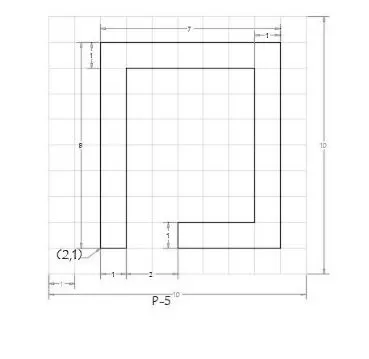
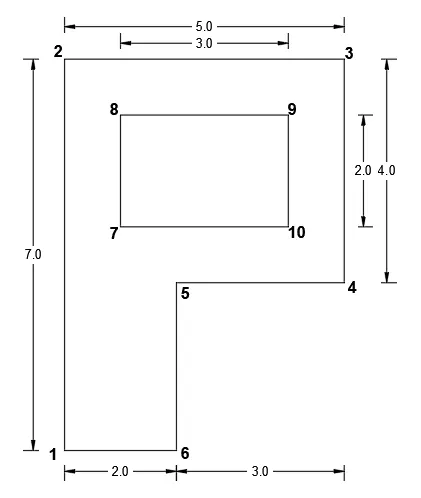
5.
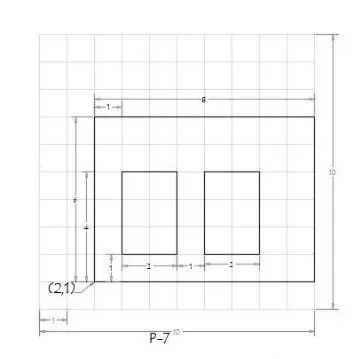
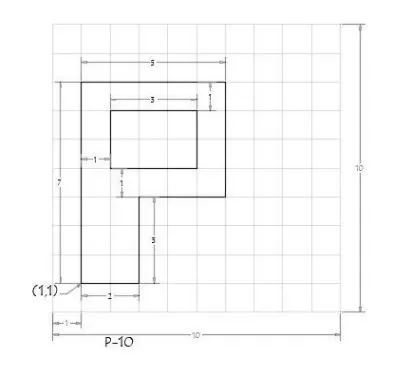
Absolute Coordinate System:
1. Select the Line tool from the ribbon tab or enter the 'LINE' command in the command tab.
2. Specify the starting coordinate of point 1 as 2,1.
3. Specify the next coordinate of point 2 as 2,7.
4. Specify the next coordinate of point 3 as 10,7.
5. Specify the next coordinate of point 4 as 10,1.
6. Then enter 'CLOSE' on the Command Line.
7. Specify the next coordinate of point 5 as 3,2.
8. Specify the next coordinate of point 6 as 3,5.
9. Specify the next coordinate of point 7 as 5,5.
10. Specify the next coordinate of point 8 as 5,2.
11. Then close it to point 5.
12. Specify the next coordinate of point 9 as 6,2.
13. Specify the next coordinate of point 10 as 6,5.
14. Specify the next coordinate of point 11 as 8,5.
15. Specify the next coordinate of point 12 as 8,2.
16. Then close it to point 9.
Result
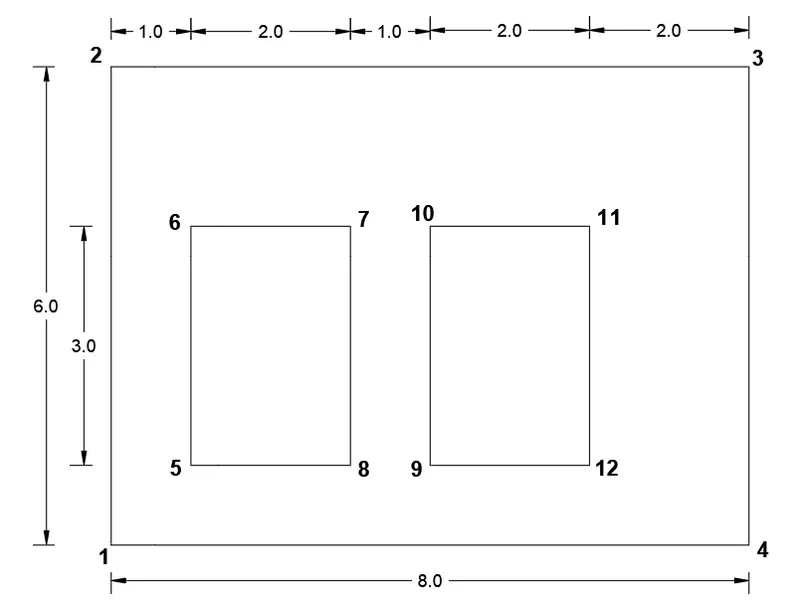
6.
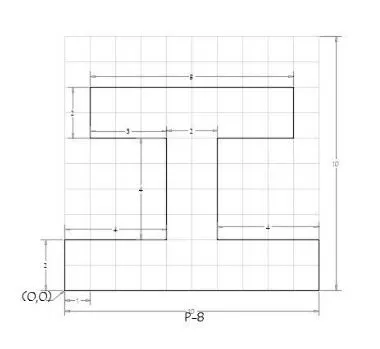
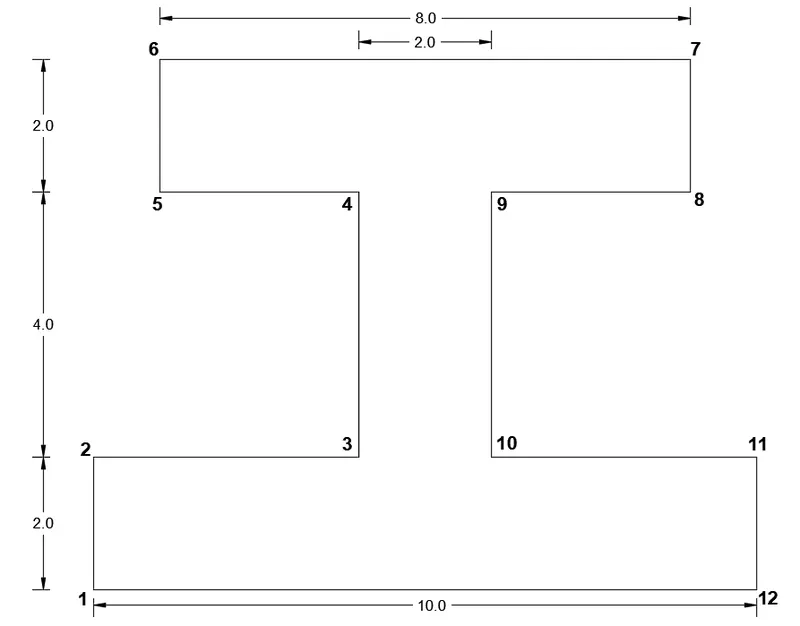
Relative Rectangular Coordinate System:
1. Select the Line tool from the ribbon tab or enter the 'LINE' command in the command tab.
2. Specify the starting coordinate of point 1 as 0,0.
3. Specify the next coordinate of point 2 as @0,2.
4. Specify the next coordinate of point 3 as @4,0.
5. Specify the next coordinate of point 4 as @0,4.
6. Specify the next coordinate of point 5 as @-3,0.
7. Specify the next coordinate of point 6 as @0,2.
8. Specify the next coordinate of point 7 as @8,0.
9. Specify the next coordinate of point 8 as @0,-2.
10. Specify the next coordinate of point 9 as @-3,0.
11. Specify the next coordinate of point 10 as @0,-4.
12. Specify the next coordinate of point 11 as @4,0.
13. Specify the next coordinate of point 12 as @0,-2.
14. Then close it to the first point.
Result
7.
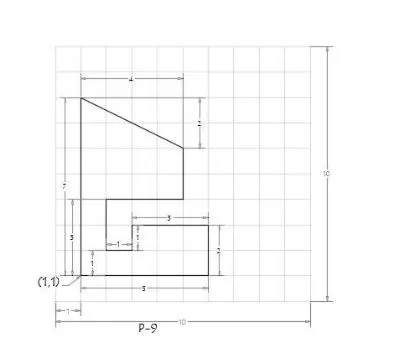
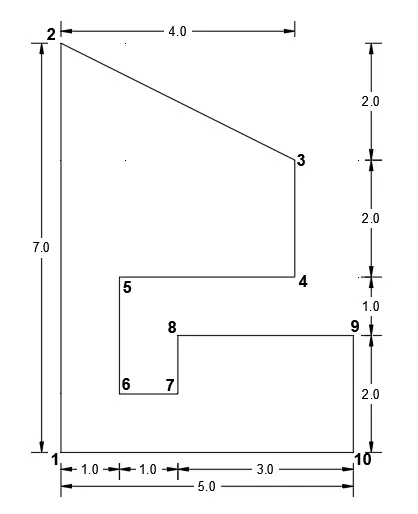
Relative Rectangular Coordinate System:
1. Select the Line tool from the ribbon tab or enter the 'LINE' command in the command tab.
2. Specify the starting coordinate of point 1 as 1,1.
3. Specify the next coordinate of point 2 as @0,7.
4. Specify the next coordinate of point 3 as @4,-2.
5. Specify the next coordinate of point 4 as @0,4.
6. Specify the next coordinate of point 5 as @0,-2.
7. Specify the next coordinate of point 6 as @-3,0.
8. Specify the next coordinate of point 7 as @0,-2.
9. Specify the next coordinate of point 8 as @1,0.
10. Specify the next coordinate of point 9 as @0,1.
11. Specify the next coordinate of point 10 as @3,0.
12. Specify the next coordinate of point 11 as @0,-2.
13. Then for the last point, enter 'CLOSE' on the Command Line.
Result
8.
Relative Polar Coordinate System:
1. Select the Line tool from the ribbon tab or enter the 'LINE' command in the command tab.
2. Specify the starting coordinate of point 1 as 1,1.
3. Specify the next coordinate of point 2 as @7<90.
4. Specify the next coordinate of point 3 as @5<0.
5. Specify the next coordinate of point 4 as @4<270.
6. Specify the next coordinate of point 5 as @3<180.
7. Specify the next coordinate of point 6 as @3<270.
8. Then enter 'CLOSE' on the Command Line.
9. Specify the next coordinate of point 7 as 2,5.
10. Specify the next coordinate of point 8 as @2<90.
11. Specify the next coordinate of point 9 as @3<0.
12. Specify the next coordinate of point 10 as @2<270.
13. Then for the last point, Click 'CLOSE' on the Command Line.
Result
Q:2- Civil Related Problems: Draw the profile and the trusses using any coordinate system methods.
1.
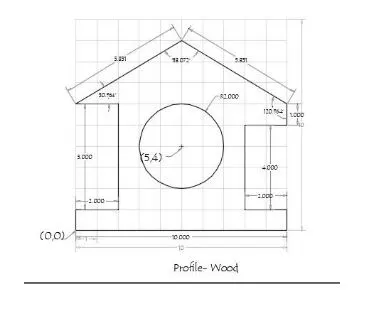
Relative Polar Coordinate System:
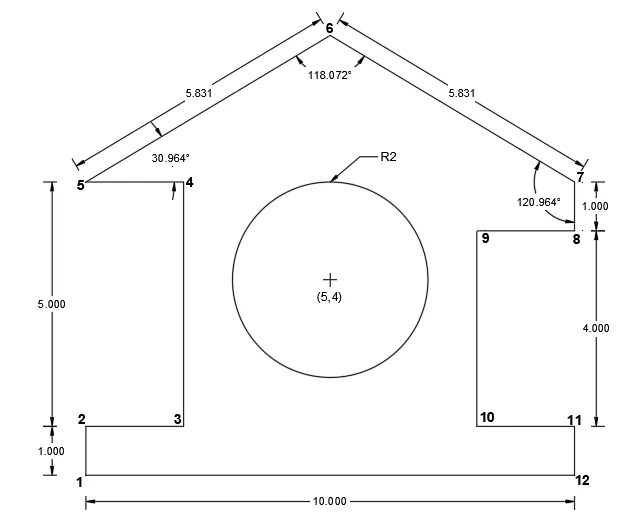
1. Select the Line tool from the ribbon tab or enter the 'LINE' command in the command tab.
2. Specify the starting coordinate of point 1 as 0,0.
3. Specify the next coordinate of point 2 as @1<90.
4. Specify the next coordinate of point 3 as @2<0.
5. Specify the next coordinate of point 4 as @5<90.
6. Specify the next coordinate of point 5 as @2<180.
7. Specify the next coordinate of point 6 as @5.831<30.964.
8. Specify the next coordinate of point 7 as @5.831<329.036.
9. Specify the next coordinate of point 8 as @1<270.
10. Specify the next coordinate of point 9 as @2<180.
11. Specify the next coordinate of point 10 as @4<90.
12. Specify the next coordinate of point 11 as @2<0.
13. Specify the next coordinate of point 12 as @1<270.
14. Then close it to the first point.
15. Specify the next coordinate as 5,4.
16. Draw a circle by typing CIRCLE command. Specify the centre as 5,4 and radius as 2.
Result
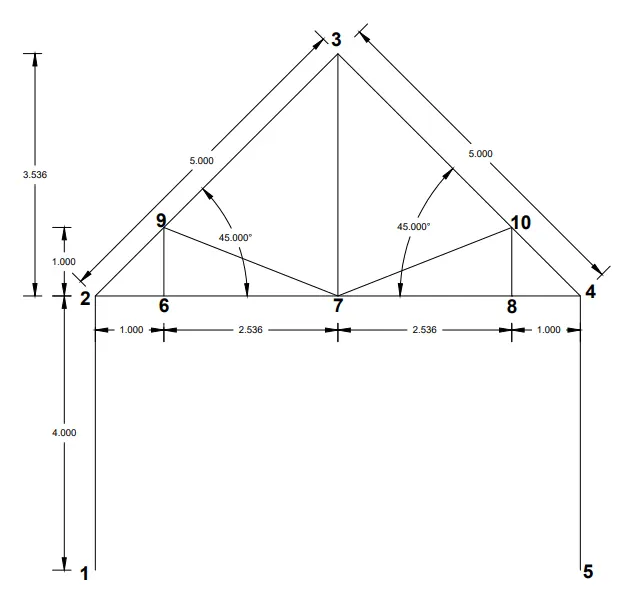
2.
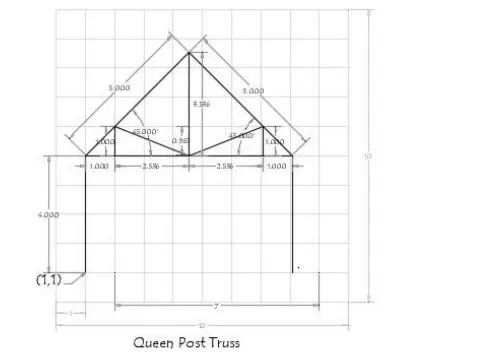
Relative Polar Coordinate System:
1. Select the line tool from the ribbon tab or by entering the 'LINE' command in the command tab.
2. Specify the starting coordinate of point 1 as 1,1.
3. Specify the next coordinate of point 2 as @4<90.
4. Specify the next coordinate of point 3 as @5<45.
5. Specify the next coordinate of point 4 as @5<315.
6. Specify the next coordinate of point 5 as @4<270.
7. Press 'Enter' to stop the Line Command.
8. Select the line tool again from the ribbon tab or by entering the 'LINE' command in the command tab.
9. Specify the starting coordinate of point 2 as 1,5.
10. Specify the next coordinate of point 6 as @1<0.
11. Specify the next coordinate of point 7 as @2.536<0.
12. Specify the next coordinate of point 8 as @2.536<0.
13. Specify the next coordinate of point 4 as @1<0.
14. Press 'Enter' to stop the Line Command.
15. Select the line tool again from the ribbon tab or by entering the 'LINE' command in the command tab.
16. Specify the starting coordinate of point 6 as 2,5.
17. Specify the next coordinate of point 9 as @1<90.
18. Specify the next coordinate of point 7 as @2.726<338.479.
19. Specify the next coordinate of point 10 as @2.726<21.52.
20. Specify the next coordinate of point 8 as @1<270.
21. Press 'Enter' to stop the Line Command.
22. Select the line tool again from the ribbon tab or by entering the 'LINE' command in the command tab.
23. Specify the starting coordinate of point 7 as 4.5,5.
24. Specify the next coordinate of point 3 as @3.536<90.
25. Press 'Enter' to stop the Line Command.
Result
3.
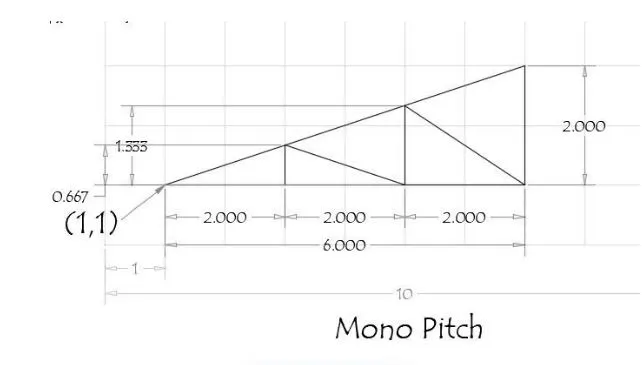
Absolute Coordinate System:
1. Select the Line tool from the ribbon tab or enter the 'LINE' command in the command tab.
2. Specify the starting coordinate of point 1 as 1,1.
3. Specify the next coordinate of point 2 as 7,1.
4. Specify the next coordinate of point 3 as 7,3.
5. Then enter 'CLOSE' on the Command Line.
6. Specify the next coordinate of point 4 as 3,1.
7. Specify the next coordinate of point 5 as 3,1.667.
8. Specify the next coordinate of point 6 as 5,1.
9. Specify the next coordinate of point 7 as 5,2.333.
10. Then close it to point 2.
Result