Creation of geometries by Coordinate system methods using AutoCad
Q) Create the geometries from P1 to P2 using all the coordinates system methods. You need to use the Line tool to create the geometries. Where required you need to use the circle tool.
Please read the drawings and find out the missing dimensions before working on the sketches.
Note: Use the Imperial Template and the Decimal Units to draft the features. Dimensions are there for
references.
Ans :
AIM :
1. To create the geometrics from P1 to P2 using all the coordinates system methods and from P3 to P10 by any one coordinate system method.
2. To draw the profile and trusses using any coordinate system methods. The dimensions are there for reference.
INTRODUCTION :
Now the first thing that we to understand before we are going to draft and sketch something in AutoCAD. We should know about the coordinates system.
AutoCAD provides the user with an infinite two dimensional area to work with. Any entities placed placed in that area can be defined relative to the Cartesian Coordinate System. The Caretesian Coordinate System divides a two dimensional plane with two perpendicular axis. The X axis runs horizontal across the bottom of the screen. The Y axis runs vertically along the left side of the screen. These two axis intersect at the bottom left corner of the screen. Each of these axis is further divided into segments.
In AutoCAD there are three types of coordinate systems. They are :
- Absolute Coordinate System : This method is similar to working on graph and time consuming as well. So Absolute Coordinate System is whenever you mention any point with respect to the origin that is (0,0) and all points are established at some distance in the X & Y-axis or sometimes Z-axis. Type x,y coordinate when AutoCAD asks for a point.
- Relative Coordinate System : The name relative means relative to certain point like for example. If you have one point you can basically take another point reffered another point with respect to the last point. So relative means not respect to the origin but with respect to the last point. Again relative coordinate system is further classified as
- Relative Rectangular Coordinate System : In order to draw type @x,y coordinate when AutoCAD asks for a point @ is symbol signifies that the drawing will starts from the specified point instead of the origin.
- Relative Polar Coordinate System : In order to draw type @distance < angle when AutoCAD asks for a point this method helps in easy drafting of lines/shapes in angles.
- Direct Distance Entry Method : This method is very simple and it is another popular method used for drawing different shapes and geometrics in AutoCAD. First you have to put the line tool and enables you to draw an object such as line by pointing in a particular direction in which you are putting the mouse cursor at which the direction is created. After enter a distance in the command line.
COMMANDS USED :
- Line command
- Dimlinear command
- Text command
- Circle command
PROCEDURE :
1) To create the geometrics from P1 to P2 using all the coordinate system methods and P3 to P10 by any one coordinate system methods :
P-1
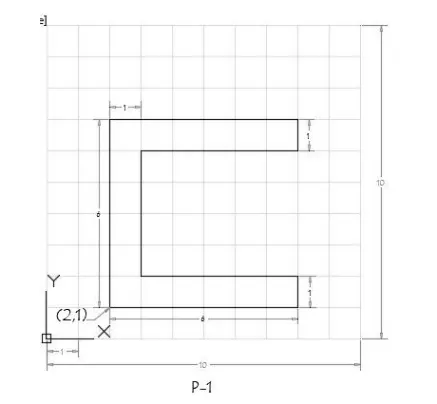
a)Absolute Coordinate System for P-1 :
- First select line tool from the ribbon tab or type LINE in the command box then it shows "specify the first point".
- Specify the coordinate of first point in command line as : (2,1) it means X=2 ; Y=1 and click on ENTER
- Specify the coordinate of next point-2 in command line as : (8,1) that is X=8 ; Y=1 and click on ENTER
- Specify the coordinate of next point-3 in command line as : (8,2) that is X=8 ; Y=2 and click on ENTER
- Specify the coordinate of next point-4 in command line as : (3,2) that is X=3 ; Y=2 and click on ENTER
- Specify the coordinate of next point-5 in command line as : (3,6) that is X=3 ; Y=6 and click on ENTER
- Specify the coordinate of next point-6 in command line as : (8,6) that is X=8 ; Y=6 and click on ENTER
- Specify the coordinate of next point-7 in command line as : (8,7) that is X=8 ; Y=7 and click on ENTER
- Specify the coordinate of next point-8 in command line as : (2,7) that is X=2 ; Y=7 and click on ENTER
- Then finally type the "close" in command line and click on ENTER.
RESULT :
The P-1 diagram is drawn by using Absolute Coordinate System.
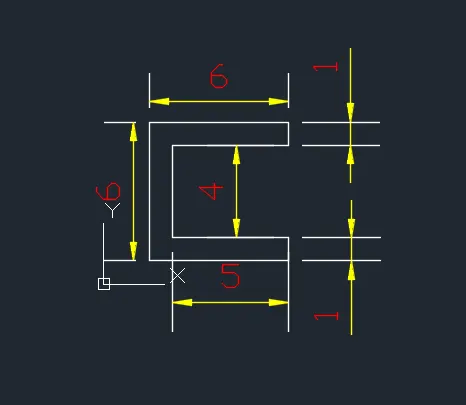
b)Relative Rectangular Coordinate System for P-1 :
- First select the line tool from the ribbon tab or type LINE in command box then it shows "specify the first point"
- Specify the coordinate of first point in command line as : (2,1) it means X=2 ; Y=1 and click on ENTER
- Specify the coordinate of next point-2 in command line as : (@6,0) X=6 ; Y=0 and click on ENTER
- Specify the coordinate of next point-3 in command line as : (@0,1) X=0 ; Y=1 and click on ENTER
- Specify the coordinate of next point-4 in command line as : (@-5,0) X=-5 ; Y=0 and click on ENTER
- Specify the coordinate of next point-5 in command line as : (@0,4) X=0 ; Y=4 and click on ENTER
- Specify the coordinate of next point-6 in command line as : (@5,0) X=5 ; Y=0 and click on ENTER
- Specify the coordinate of next point-7 in command line as : (@0,1) X=0 ; Y=1 and click on ENTER
- Specify the coordinate of next point-8 in command line as : (@-6,0) X=-6 ; Y=0 and click on ENTER
- Then finally type the "close" in command line and click on ENTER.
RESULT :
The P-1 diagram is drawn by using Relative Rectangular Coordinate System.
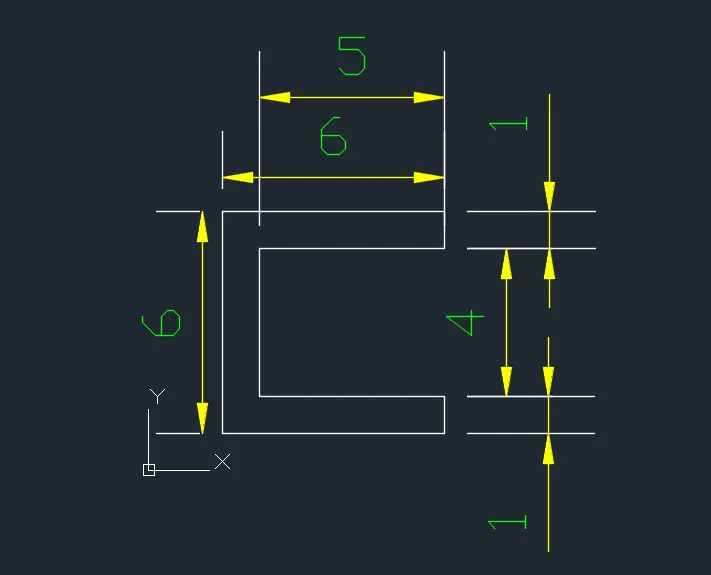
c)Relative Polar Coordinate System for P-1 :
- First select the line tool from the ribbon tab or type LINE in command box then it shows "specify the first point"
- Specify the coordinate of first point in command line as : (2,1) it means X=2 ; Y=1 and click: ENTER
- Specify the coordinate of next point-2 in command line as : (@6<0) it means 6 is the distance ; 0 is the angle and click on ENTER
- Specify the coordinate of next point-3 in command line as : (@1<90) 1 is the distance ; 90 is the angle and click on ENTER
- Specify the coordinate of next point-4 in command line as : (@5<180) 5 is the distance ; 180 is the angle and click on ENTER
- Specify the coordinate of next point-5 in command line as : (@4<90) 4 is the distance ; 90 is the angle and click on ENTER
- Specify the coordinate of next point-6 in command line as : (@5<0) 5 is the distance ; 0 is the angle and click on ENTER
- Specify the coordinate of next point-7 in command line as : (@1<90) 1 is the distance ; 90 is the angle and click on ENTER
- Specify the coordinate of next point-8 in command line as : (@6<180) 6 is the distance ; 180 is the angle and click on ENTER
- Then finally type the "close" in command line and click on ENTER.
RESULT :
The P-1 diagram is drawn by using Relative Polar Coordinate System.
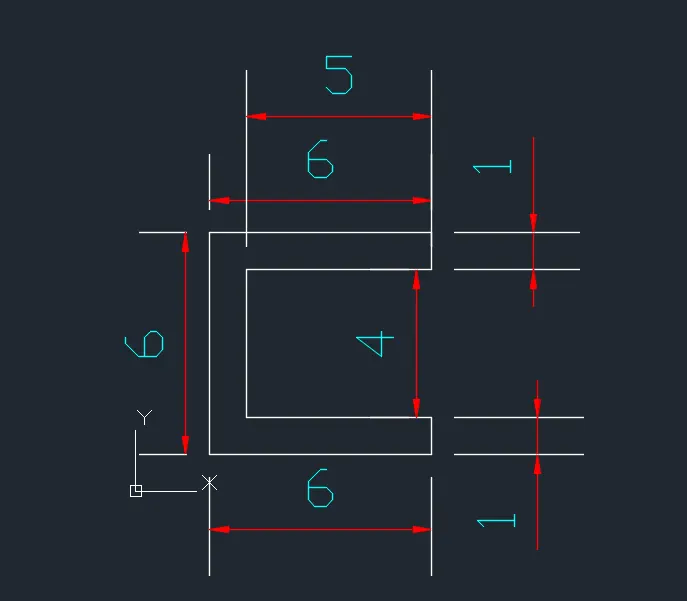
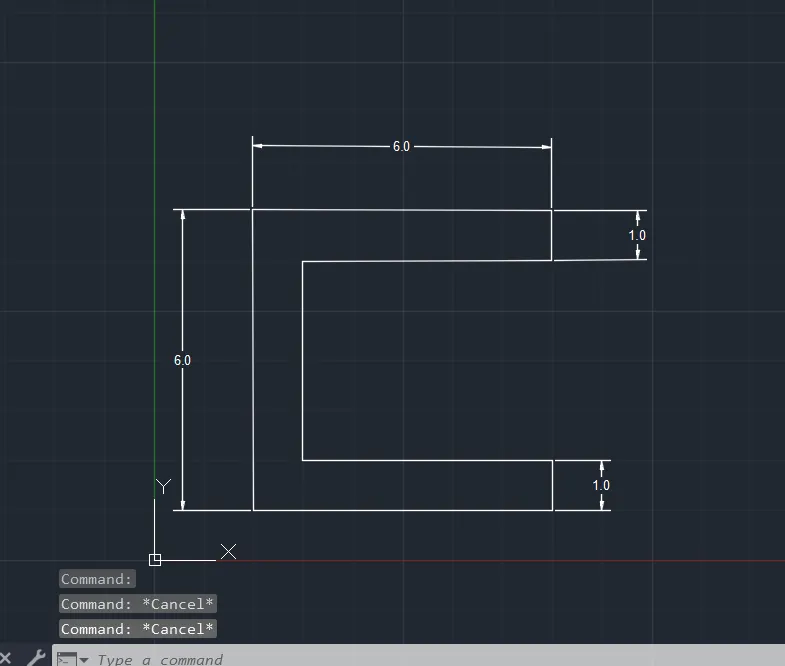
d)Direct Distance Entry Method for P-1 :
- First select the Line tool from the ribbon tab or type the line in command box then it shows "specify the first point"
- Specify the first point in command line as : (2,1) it means X=2 ; Y=1 and click on ENTER
- Enter the length of point-2 in command line as : 6 towards the +ve X-axis and click on ENTER
- Enter the length of point-3 in command line as : 1 towards the +ve Y-axis and click on ENTER
- Enter the length of point-4 in command line as : 5 towards the -ve X-axis and click on ENTER
- Enter the length of point-5 in command line as : 4 towards the +ve Y-axis and click on ENTER
- Enter the length of point-6 in command line as : 5 towards the +ve X-axis and click on ENTER
- Enter the length of point-7 in command line as : 1 towards the +ve Y-axis and click on ENTER
- Enter the length of point-8 in command line as : 6 towards the -ve X-axis and click on ENTER
- Then finally type the "close" in command line and click on ENTER.
RESULT :
The P-1 diagram is drawn by using Direct Distance Entry Method.
P-2
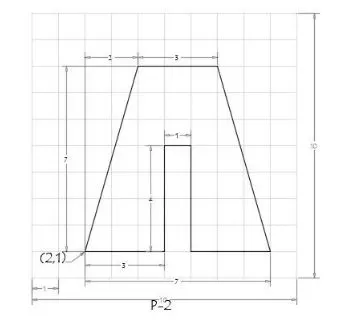
a)Absolute Coordinate System for P-2 :
- First select the line tool from the ribbon tab or type the LINE in command box then it shows "specify the first point"
- Specify the coordinate of first point in command line as : (2,1) it means X=2 ; Y=1 and click on ENTER
- Specify the coordinate of next point-2 in command line as : (5,1) that is X=5 ; Y=1 and click on ENTER
- Specify the coordinate of next point-3 in command line as : (5,5) that is X=5 ; Y=5 and click on ENTER
- Specify the coordinate of next point-4 in command line as : (6,5) that is X=6 ; Y=5 and click on ENTER
- Specify the coordinate of next point-5 in command line as : (6,1) that is X=6 ; Y=1 and click on ENTER
- Specify the coordinate of next point-6 in command line as : (9,1) that is X=9 ; Y=1 and click on ENTER
- Specify the coordinate of next point-7 in command line as : (7,8) that is X=7 ; Y=8 and click on ENTER
- Specify the coordinate of next point-8 in command line as : (4,8) that is X=4 ; Y=8 and click on ENTER
- Then finally type the "close" in command line and click on ENTER.
RESULT :
Then finally P-2 diagram is drawn by using Absolute Coordinate System.
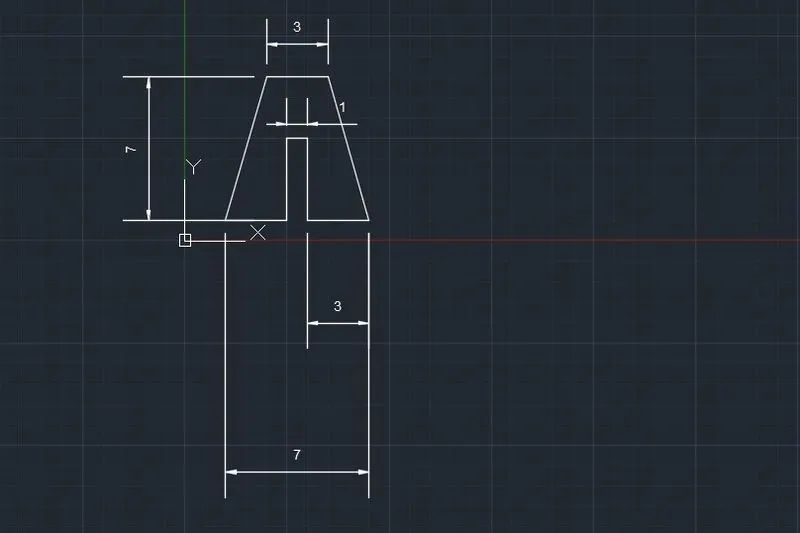
b)Relative Rectangular Coordinate System P-2 :
- First select the line tool from the ribbon tab or type LINE in command box then it shows "specify the first point"
- Specify the coordinate of first point in command line as : (2,1) it means X=2 ; Y=1 and click on ENTER
- Specify the coordinate of next point-2 in command line as : (@3,0) X=3 ; Y=0 and click on ENTER
- Specify the coordinate of next point-3 in command line as : (@0,4) X=0 ; Y=4 and click on ENTER
- Specify the coordinate of next point-4 in command line as : (@1,0) X=1 ; Y=0 and click on ENTER
- Specify the coordinate of next point-5 in command line as : (@0,-4) X= 0 ; Y=-4 and click on ENTER
- Specify the coordinate of next point-6 in command line as : (@3,0) X= 3 ; Y=0 and click on ENTER
- Specify the coordinate of next point-7 in command line as : (@-2,7) X= -2 ; Y = 7 and click on ENTER
- Specify the coordinate of next point-8 in command line as : (@-3,0) X= -3 ; Y = 0 and click on ENTER
- Then finally type the "close" in command line and click on ENTER.
RESULT :
Then finally P-2 diagram is drawn by using Relative Rectangular Coordinate System.
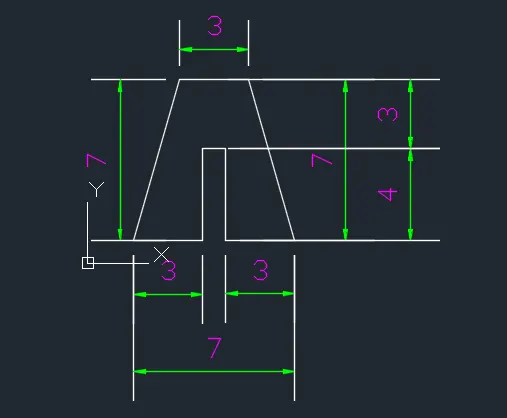
c)Relative Polar Coordinate System for P-2 :
- First select the line tool from the ribbon tab or type LINE in the command box then it shows "specify the first point"
- Specify the coordinate of first point in command line as : (2,1) it means X=2 ; Y=1 and click on ENTER
- Specify the coordinate of next point-2 in command line as : (@3<0) it means 3 is the distance ; 0 is the angle and click on ENTER
- Specify the coordinate of next point-3 in command line as : (@4<90) 4 is the distance ; 90 is the angle and click on ENTER
- Specify the coordinate of next point-4 in command line as : (@1<0) 1 is the distance ; 0 is the angle and click on ENTER
- Specify the coordinate of next point-5 in command line as : (@4<270) 4 is the distance ; 270 is the angle and click on ENTER
- Specify the coordinate of next point-6 in command line as : (@3<0) 3 is the distance ; 0 is the angle and click on ENTER
- Specify the coordinate of next point-7 in command line as : (@7<106) 7 is the distance ; 106 is the angle and click on ENTER
- Specify the coordinate of next point-8 in command line as : (@3<180) 3 is the distance ; 180 is the angle and click on ENTER
- Then finally type the "close" in command line and click on ENTER.
RESULT :
Then finally P-2 diagram is drawn by using Relative Polar Coordinate System.
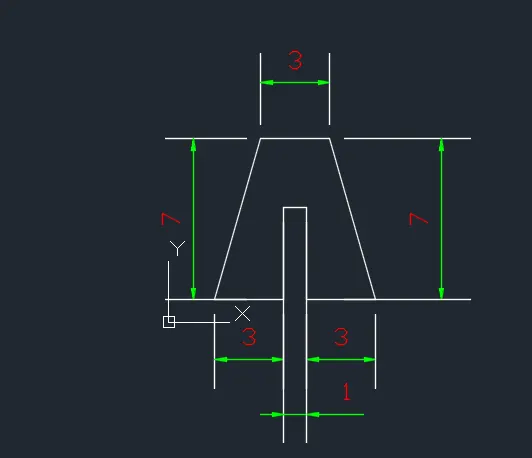
d)Direct Distance Entry Method for P-2 :
- First select the Line tool from the ribbon tab or type the LINE in command box then it shows " specify the first point"
- Specify the first point in command line as : (2,1) it means X=2 ; Y =1 and click on ENTER.
- Enter the length of point-2 in command line as : 3 towards the +ve x-axis and click on ENTER
- Enter the length of point-3 in command line as : 4 towards the +ve y-axis and click on ENTER
- Enter the length of point-4 in command line as : 1 towards the +ve x-axis and click on ENTER
- Enter the length of point-5 in command line as : 4 towards the -ve y-axis and click on ENTER
- Enter the length of point-6 in command line as : 3 towards the +ve x-axis and click on ENTER
- Enter the length of point-7 in command line as : 7 at an angle of <106 from +ve x-axis when keeping polar tracking on and click on ENTER
- Enter the length of point-8 in command line as : 3 towards the -ve x-axis and click on ENTER
- Then finally type the "close" in command line and click on ENTER
RESULT :
Then finally P-2 diagram is drawn by using Direct Distance Entry Method.
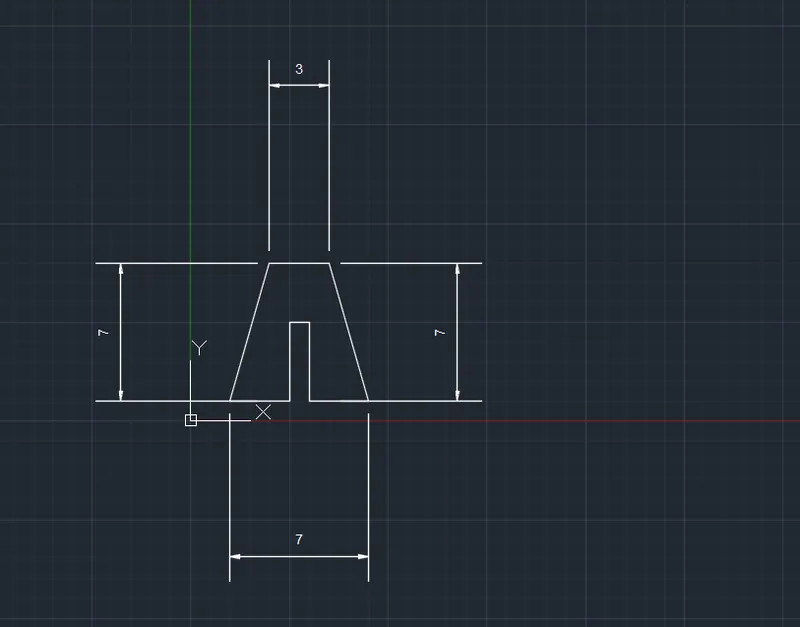
P-3
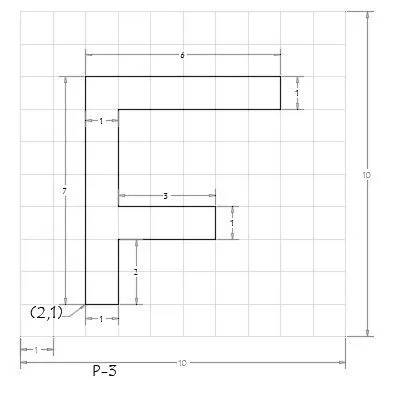
Relative Rectangular Coordinate System for P-3 :
- First select the line tool from the ribbon tab or type LINE in command box then it shows "specify the first point"
- Specify the coordinate of first point in command line as : (2,1) it means X=2 ; Y=1 and click on ENTER
- Specify the coordinate of next point-2 in command line as : (@1,0) X=1 ; Y=0 and click on ENTER
- Specify the coordinate of next point-3 in command line as : (@0,2) X=0 ; Y=2 and click on ENTER
- Specify the coordinate of next point-4 in command line as : (@3,0) X=3 ; Y=0 and click on ENTER
- Specify the coordinate of next point-5 in command line as : (@0,1) X=0 ; Y=1 and click on ENTER
- Specify the coordinate of next point-6 in command line as : (@-3,0) X=-3 ; Y=0 and click on ENTER
- Specify the coordinate of next point-7 in command line as : (@0,3) X=0 ; Y=3 and click on ENTER
- Specify the coordinate of next point-8 in command line as : (@5,0) X=5 ; Y=0 and click on ENTER
- Specify the coordinate of next point-9 in command line as : (@0,1) X=0 ; Y=1 and click on ENTER
- Specify the coordinate of next point-10 in command line as : (@-6,0) X=-6 ; Y=0 and click on ENTER
- Then finally type the "close" in command line and click on ENTER
RESULT :
Then finally P-3 diagram is drawn by using Relative Rectangular Coordinate System.
P-4
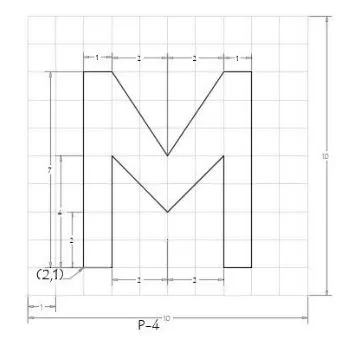
Absolute Coordinate System for P-4 :
- First select the line tool from the ribbon tab or type LINE in command box then it shows "specify the first point"
- Specify the coordinate of first point in command line as : (2,1) it means X=2 ; Y=1 and click on ENTER
- Specify the coordinate of next point-2 in command line as : (3,1) X=3 ; Y=1 and click on ENTER
- Specify the coordinate of next point-3 in command line as : (3,5) X=3 ; Y=5 and click on ENTER
- Specify the coordinate of next point-4 in command line as : (5,3) X=5 ; Y=3 and click on ENTER
- Specify the coordinate of next point-5 in command line as : (7,5) X=7 ; Y=5 and click on ENTER
- Specify the coordinate of next point-6 in command line as : (7,1) X=7 ; Y=1 and click on ENTER
- Specify the coordinate of next point-7 in command line as : (8,1) X=8 ; Y=1 and click on ENTER
- Specify the coordinate of next point-8 in command line as : (8,8) X=8 ; Y=8 and click on ENTER
- Specify the coordinate of next point-9 in command line as : (7,8) X=7 ; Y=8 and click on ENTER
- Specify the coordinate of next point-10 in command line as : (5,5) X=5 ; Y=5 and click on ENTER
- Specify the coordinate of next point-11 in command line as : (3,8) X=3 ; Y=8 and click on ENTER
- Specify the coordinate of next point-12 in command line as : (2,8) X=2 ; Y=8 and click on ENTER
- Then finally type the "close" in command line and click on ENTER.
RESULT :
Then finally P-4 diagram is drawn by using Absolute Coordinate System.
P-5
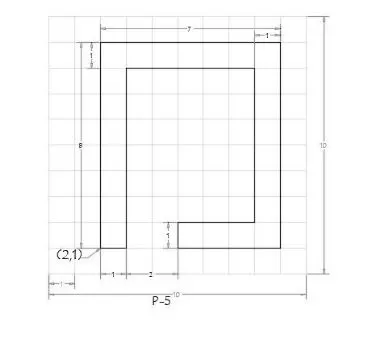
Relative Polar Coordinate System for P-5 :
- First select the line tool from the ribbon tab or type LINE in command box then it shows "specify the first point"
- Specify the coordinate of first point in command line as : (2,1) it means X=2 ; Y=1 and click on ENTER
- Specify the coordinate of next point-2 in command line as : (@8<90) it means 8 is the distance ; 90 is the angle and click on ENTER
- Specify the coordinate of next point-3 in command line as : (@7<0) 7 is the distance ; 0 is the angle and click on ENTER
- Specify the coordinate of next point-4 in command line as : (@8<270) 8 is the distance ; 270 is the angle and click on ENTER
- Specify the coordinate of next point-5 in command line as : (@4<180) 4 is the distance ; 180 is the angle and click on ENTER
- Specify the coordinate of next point-6 in command line as : (@1<90) 1 is the distance ; 90 is the angle and click on ENTER
- Specify the coordinate of next point-7 in command line as : (@3<0) 3 is the distance ; 0 is the angle and click on ENTER
- Specify the coordinate of next point-8 in command line as : (@6<90) 6 is the distance ; 90 is the angle and click on ENTER
- Specify the coordinate of next point-9 in command line as : (@5<180) 5 is the distance ; 180 is the angle and click on ENTER
- Specify the coordinate of next point-10 in command line as : (@7<270) 7 is the distance ; 270 is the angle and click on ENTER
- Then finally type the "close" in command line and click on ENTER.
RESULT :
Then finally P-5 is drawn by using Relative Polar Coordinate System.
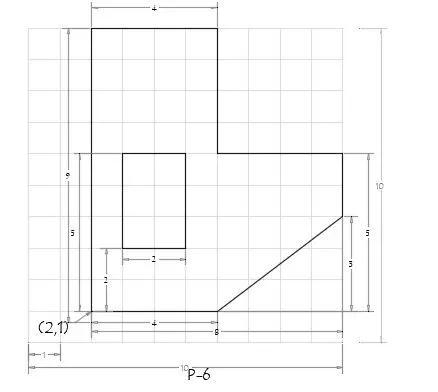
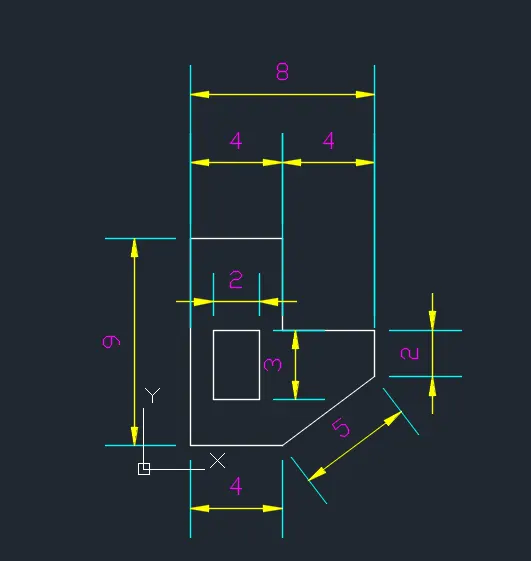
Relative Rectangular Coordinate System for P-6 :
- First select the line tool from the ribbon tab or type LINE in command box it shows "specify the first point"
- Specify the coordinate of first point in command line as : (2,1) it means X=2 ; Y=1 and click on ENTER
- Specify the coordinate of point-2 in command line as : (@4,0) X=4 ; Y=0 and click on ENTER
- Specify the coordinate of point-3 in command line as : (@4,3) X=4 ; Y=3 and click on ENTER
- Specify the coordinate of point-4 in command line as : (@0,2) X=0 ; Y=3 and click on ENTER
- Specify the coordinate of point-5 in command line as : (@-4,0) X=-4 ; Y=0 and click on ENTER
- Specify the coordinate of point-6 in command line as : (@0,4) X=0 ; Y=4 and click on ENTER
- Specify the coordinate of point-7 in command line as : (@-4,0) X=-4 ; Y=0 and click on ENTER
- Then finally type the "close" in command line and click on ENTER
- Again Specify the coordinate of first point in command line as : (3,3) X=3 ; Y=3 and click on ENTER
- Specify the coordinate of first point-2 in command line as : (@2,0) X=2 ; Y=0 and click on ENTER
- Specify the coordinate of next point-3 in command line as : (@0,3) X=0 ; Y=3 and click on ENTER
- Specify the coordinate of next point-4 in command line as : (@-2,0) X=-2 ; Y=0 and click on ENTER
- Then finally type the "close" in command line and click on ENTER
RESULT :
Then finally P-6 is drawn by using Relative Rectangular Coordinate System.
P-7
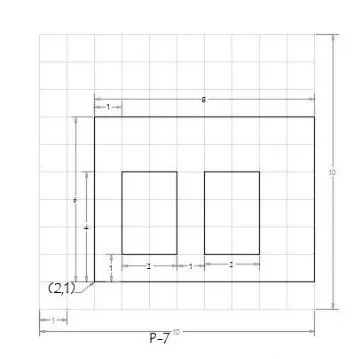
Absolute Coordinate System for P-7 :
- First select the line tool from the ribbon tab or type LINE in command box then it shows "specify the first point"
- Specify the coordinate of first point in command line as : (2,1) it means X=2 ; Y=1 and click on ENTER
- Specify the coordinate of next point-2 in command line as : (10,1) X=10 ; Y=1 and click on ENTER
- Specify the coordinate of next point-3 in command line as : (10,7) X=10 ; Y=7 and click on ENTER
- Specify the coordinate of next point-4 in command line as : (2,7) X=2 ; Y=7 and click on ENTER
- Then type the "close" in command line and click on ENTER
- Again select the line tool from the ribbon tab or type LINE in command box then it shows "specify the first point"
- Specify the coordinate of first point in command line as : (3,2) X=3 ; Y=2 and click on ENTER
- Specify the coordinate of next point-2 in command line as : (5,2) X=5 ; Y=2 and click on ENTER
- Specify the coordinate of next point-3 in command line as : (5,5) X=5 ; Y=5 and click on ENTER
- Specify the coordinate of next point-4 in command line as : (3,5) X=3 ; Y=5 and click on ENTER
- Then type the "close" in command line and click on ENTER
- Again select the line tool from the ribbon tab or type LINE in command box then it shows "specify the first point"
- Specify the coordinate of first point in command line as : (6,2) X=6 ; Y=2 and click on ENTER
- Specify the coordinate of next point-2 in command line as : (8,2) X=8 ; Y=2 and click on ENTER
- Specify the coordinate of next point-3 in command line as : (8,5) X=8 ; Y=5 and click on ENTER
- Specify the coordinate of next point-4 in command line as : (6,5) X=6 ; Y=5 and click on ENTER
- Then finally type the "close" in command line and click on ENTER
RESULT :
Then finally P-7 is drawn by using Absolute Coordinate System.
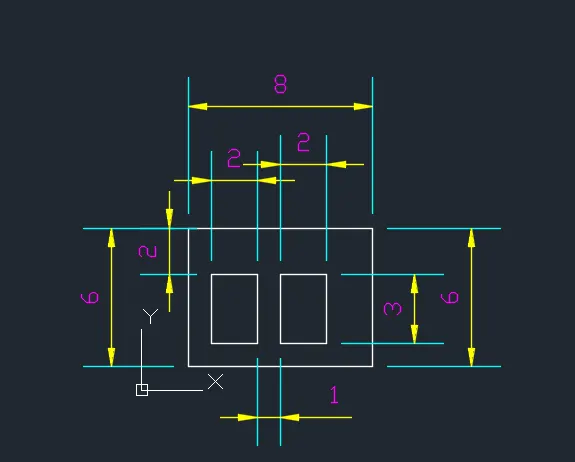
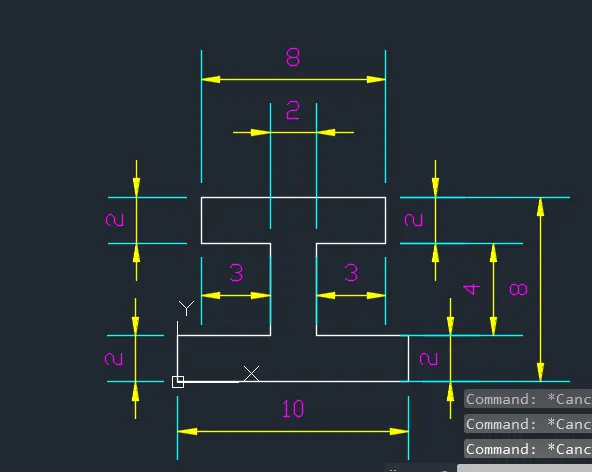
P-8
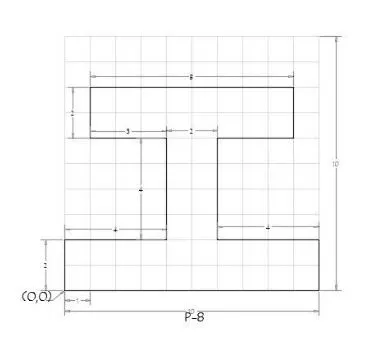
Relative Rectangular Coordinate System for P-8 :
- Select the line tool from the ribbon tab or type LINE in the command box then it shows "specify the first point"
- Specify the coordinate of first point in command line as : (0,0) it means X=0 ; Y=0 and click on ENTER
- Specify the coordinate of next point-2 in command line as : (@10,0) X=10 ; Y=0 and click on ENTER
- Specify the coordinate of next point-3 in command line as : (@0,2) X=0 ; Y=2 and click on ENTER
- Specify the coordinate of next point-4 in command line as : (@-4,0) X=-4 ; Y=0 and click on ENTER
- Specify the coordinate of next point-5 in command line as : (@0,4) X=0 ; Y=4 and click on ENTER
- Specify the coordinate of next point-6 in command line as : (@3,0) X=3 ; Y=0 and click on ENTER
- Specify the coordinate of next point-7 in command line as : (@0,2) X=0 ; Y=2 and click on ENTER
- Specify the coordinate of next point-8 in command line as : (@-8,0) X=-8 ; Y=0 and click on ENTER
- Specify the coordinate of next point-9 in command line as : (@0,-2) X=0 ; Y=-2 and click on ENTER
- Specify the coordinate of next point-10 in command line as : (@3,0) X=3 ; Y=0 and click on ENTER
- Specify the coordinate of next point-11 in command line as : (@0,-4) X=0 ; Y=-4 and click on ENTER
- Specify the coordinate of next point-12 in command line as : (@-4,0) X=-4 ; Y=0 and click on ENTER
- Then finally type the "close" in command line and click on ENTER.
RESULT :
Then finally p-8 is drawn by using Relative Rectangular Coordinate System.
P-9
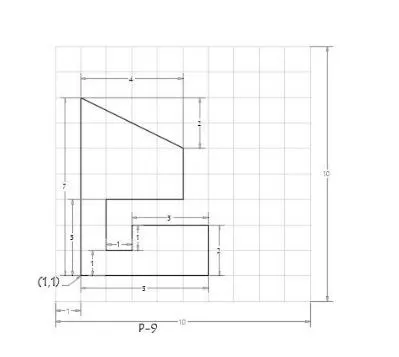
Absolute Coordinate System for P-9 :
- Select the line tool from the ribbon tab or type LINE in the command box then it shows "specify the first point"
- Specify the coordinate of first point in command line as : (1,1) X=1 ; Y=1 and click on ENTER
- Specify the coordinate of next point-2 in command line as : (6,1) X=6 ; Y=1 and click on ENTER
- Specify the coordinate of next point-3 in command line as : (6,3) X=6 ; Y=3 and click on ENTER
- Specify the coordinate of next point-4 in command line as : (3,3) X=3 ; Y=3 and click on ENTER
- Specify the coordinate of next point-5 in command line as : (3,2) X=3 ; Y=2 and click on ENTER
- Specify the coordinate of next point-6 in command line as : (2,2) X=2 ; Y=2 and click on ENTER
- Specify the coordinate of next point-7 in command line as : (2,4) X=2 ; Y=4 and click on ENTER
- Specify the coordinate of next point-8 in command line as : (5,4) X=5 ; Y=4 and click on ENTER
- Specify the coordinate of next point-9 in command line as : (5,6) X=5 ; Y=6 and click on ENTER
- Specify the coordinate of next point-10 in command line as : (1,8) X=1 ; Y=8 and click on ENTER
- Then finally type the "close" in command line and click on ENTER
RESULT :
Then finally P-9 is drawn by using Absolute Coordinate System.
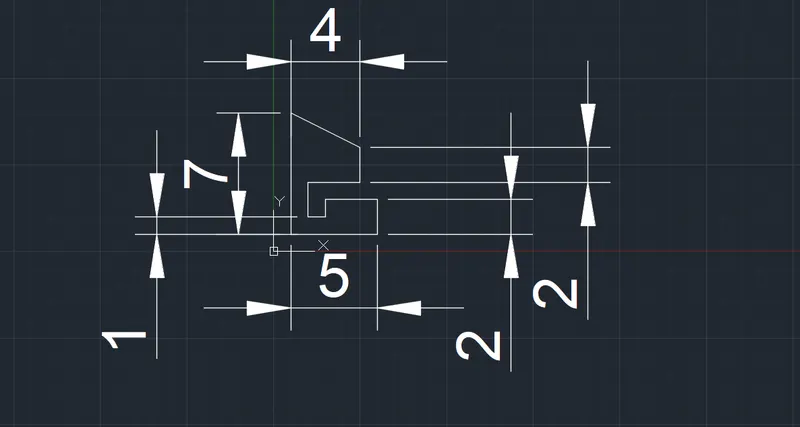
P-10
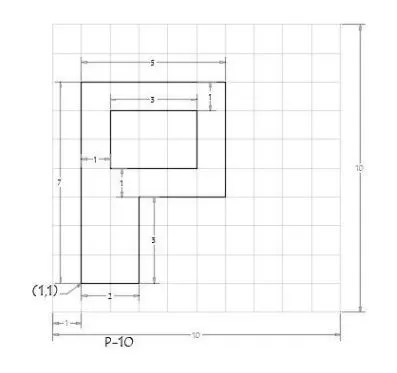
Absolute Coordinate System for P-10 :
- Select the line tool from the ribbon tab or type LINE in the command box then it shows "specify the first point"
- Specify the coordinate of first point in command line as : (1,1) it means X=1 ; Y=1 and click on ENTER
- Specify the coordinate of next point-2 in command line as : (3,1) X=3 ; Y=1 and click on ENTER
- Specify the coordinate of next point-3 in command line as : (3,4) X=3 ; Y=4 and click on ENTER
- Specify the coordinate of next point-4 in command line as : (6,4) X=6 ; Y=4 and click on ENTER
- Specify the coordinate of next point-5 in command line as : (6,8) X=6 ; Y=8 and click on ENTER
- Specify the coordinate of next point-6 in command line as : (1,8) X=1 ; Y=8 and click on ENTER
- Then click on "close" in command line.
- Again select the line tool from ribbon tab or type LINE in the command box then it shows "specify the first point"
- Specify the coordinate of first point in command line as : (2,5) X=2 ; Y=5 and click on ENTER
- Specify the coordinate of next point-2 in command line as : (5,5) X=5 ; Y=5 and click on ENTER
- Specify the coordinate of next point-3 in command line as : (5,7) X=5 ; Y=7 and click on ENTER
- Specify the coordinate of next point-4 in command line as : (2,7) X=2 ; Y=7 and click on ENTER
- Then finally type the "close" in command line and click on ENTER.
RESULT :
Then finally P-10 is drawn by using Absolute Cordinate System.
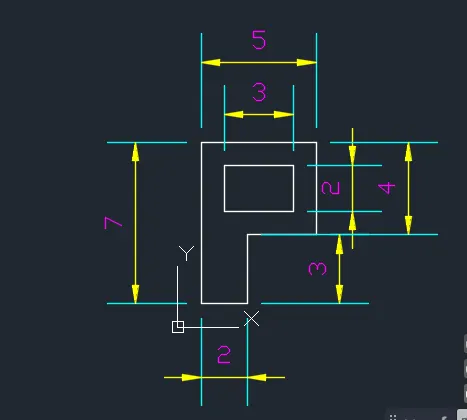
2) To draw the profile and trusses using any coordinate system methods :
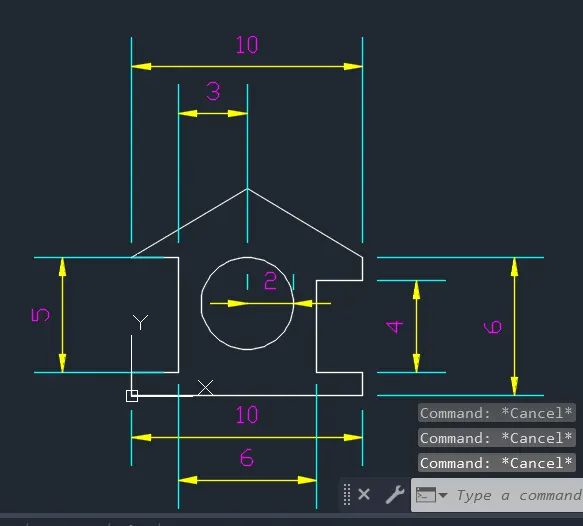
Profile Wood
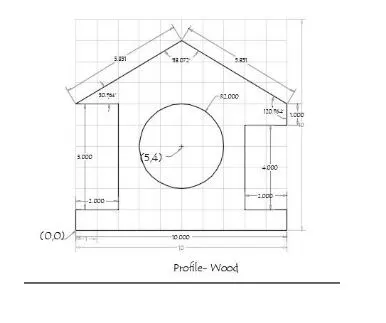
Relative Rectangular Coordinates System for Profile-Wood :
- First select the line tool from the ribbon tab or type LINE in command box then it shows "specify first point"
- Specify the coordinate of first point in command line as : (0,0) it means X=0 ; Y=0 and click on ENTER
- Specify the coordinate of point-2 in command line as : (@10,0) X=10 ; Y=0 and click on ENTER
- Specify the coordinate of point-3 in command line as : (@0,1) X=0 ; Y=1 and click on ENTER
- Specify the coordinate of point-4 in command line as : (@-2,0) X=-2 ; Y=0 and click on ENTER
- Specify the coordinate of point-5 in command line as : (@0,4) X= 0 ;Y=4 and click on ENTER
- Specify the coordinate of point-6 in command line as : (@2,0) X=2 ; Y=0 and click on ENTER
- Specify the coordinate of point-7 in command line as : (@0,1) X=0 ; Y=1 and click on ENTER
- Specify the coordinate of point-8 in command line as : (@-5,3) X=-5 ; Y=3 and click on ENTER
- Specify the coordinate of point-9 in command line as : (@-5,-3) X=-5 ; Y=-3 and click on ENTER
- Specify the coordinate of point-11 in command line as : (@2,0) X=2 ; Y=0 and click on ENTER
- Specify the coordinate of point-12 in command line as : (@0,-5) X=0 ; Y=-5 and click on ENTER
- Specify the coordinate of point-13 in command line as : (@-2,0) X=-2 ; Y=0 and click on ENTER
- Then finally click on the "close" in command line.
- Next type CIRCLE in command line and then it shows "specify center point for circle"
- Specify the center point for circle in command line as : (5,4) and click on ENTER
- Specify the radius of circle in command line as : 2 and click on ENTER
RESULT :
Then finally Profile-Wood is drawn by using Relative Rectangular Coordinate System.
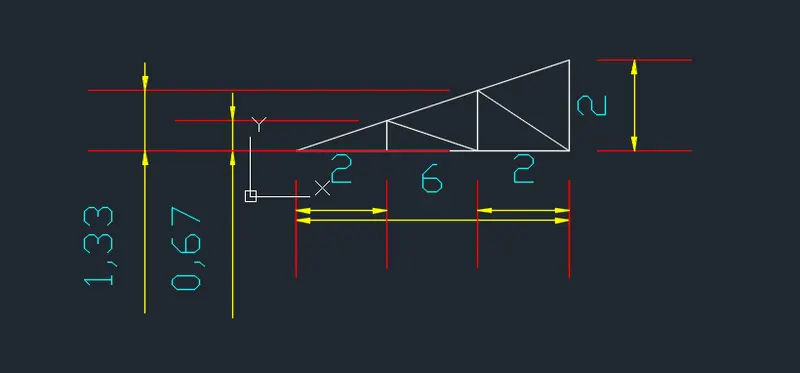
Queen Post Truss
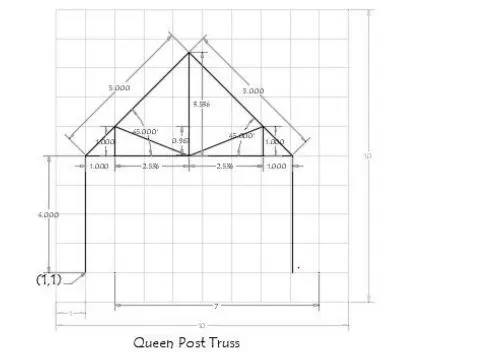
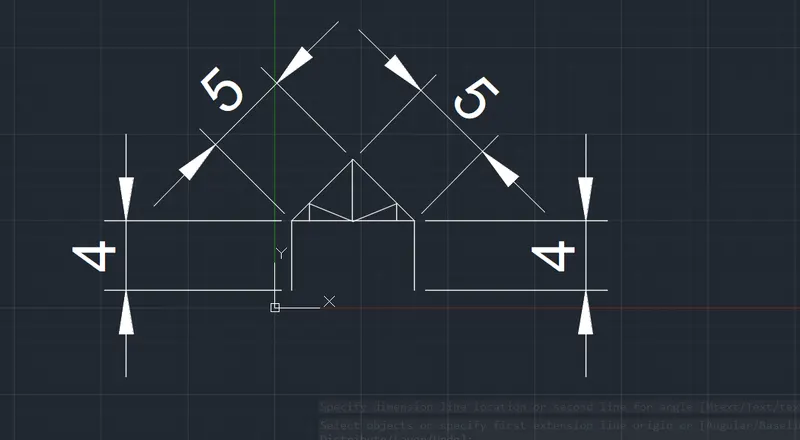
Relative Polar Coordinate System for Queen Post Truss :
- First select the line tool from the ribbon tab or type LINE in command box then it shows "specify first point"
- Specify the coordinate of first point in command line as : (1,1) X=1 ; Y=1 and click on ENTER
- Specify the coordinate of next point-2 in command line as : (@4<90) it means 4 is the distance ; 90 is the angle and click on ENTER
- Specify the coordinate of next point-3 in command line as : (@5<45) 5 is the distance ; 45 is the angle and click on ENTER
- Specify the coordinate of next point-4 in command line as : (@5<315) 5 is the distance ; 315 is the angle and click on ENTER
- Specify the coordinate of next point-5 in command line as : (@4<270) 4 is the distance ; 270 is the angle and click on ENTER
- Then click on "Esc" it means Escape to cancel the line command
- Select the line tool from ribbon tab or type LINE in command box then it shows "specify the first point"
- Specify the coordinate of first point in command line as : (1,5) 1 is the distance ; 5 is the angle and click on ENTER
- Specify the coordinate of next point-2 in command line as : (@1<0) 1 is the distance ; 0 is the angle and click on ENTER
- Specify the coordinate of next point-3 in command line as : (@2.5355<0) 2.5355 is the distance ; 0 is the angle and click on ENTER
- Specify the coordinate of next point-4 in command line as : (@2.5355<0) 2.5355 is the distance ; 0 is the angle and click on ENTER
- Specify the coordinate of next point-5 in command line as : (@1<0) 1 is the distance ; 0 is the angle and click on ENTER
- Then Again click on "Esc" to cancel the line command
- Again select the line tool from the ribbon tab or type LINE in command box then it shows "specify the first point"
- Specify the coordinate of first point in command line as : (4.5,5) X=4.5 ; Y=5 and click on ENTER
- Specify the coordinate of last point in command line as : (@3.53571<90) 3.53571 is the distance ; 90 is the angle and click on ENTER
- Then finally click on"Esc" to cancel the Line command.
RESULT :
Then finally Queen Post Truss is drawn by using Relative Polar Coordinate System
Mono Pitch
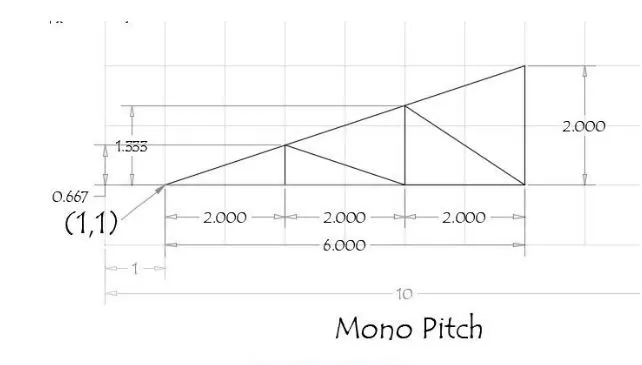
Absolute Coordinate System for Mono Pitch :
- First select the line tool from the ribbon tab or type LINE in command box then it shows "specify first point"
- Specify the coordinate of first point in command line as : (1,1) it means X=1 ; Y=1 and click on ENTER
- Specify the coordinate of next point-2 in command line as : (7,1) X=7 ; Y=1 and click on ENTER
- Specify the coordinate of next point-3 in command line as : (7,3) X=7 ;and click on ENTER
- Then type the "close" in command line and click on ENTER
- Again select the line tool from ribbon tab or type the line in command box it shows "specify the first point"
- Specify the first point in command line as : (3,1) X=3 ; Y=1 and click on ENTER
- Specify the next point-2 in command line as : (3,1.667) X=3 ; Y=1.667 and click on ENTER
- Specify the next point-3 in command line as : (5,1) X=5 ; Y=1 and click on ENTER
- Specify the next point-4 in command line as : (5,2.333) X=5 ; Y=2.333 and click on ENTER
- Specify the next point-5 in command line as : (7,1) X=7 ; Y=1 and click on ENTER
- Then finally click on "Esc" to cancel the line command.
RESULT :
Then finally Mono Pitch is drawn by using Absolute Coordinate System.