Creation of geometries by Coordinate system methods using AutoCad
1.) AIM:
To create the geometries from P1 to P2 using all the coordinates system methods and to use the Line tool to create the geometries.
P-1.)
PROCEDURE:
a) Absolute Coordinate System:
1. Select the line tool by entering the 'Line' command in the command tab.
2. Specify the starting coordinate of point 1 as 2,1
3. Specify the next coordinate of point 2 as 8,1
4. Specify the next coordinate of point 3 as 8,2
5. Specify the next coordinate of point 4 as 3,2
6. Specify the next coordinate of point 5 as 3,6
7. Specify the next coordinate of point 6 as 8,6
8. Specify the next coordinate of point 7 as 8,7
9. Specify the next coordinate of point 8 as 2,7
b) Relative Rectangular Coordinate System:
1. Select the line tool by entering the 'Line' command in the command tab.
2. Specify the starting coordinate of point 1 as 2,1
3. Specify the next coordinate of point 2 as @6,0
4. Specify the next coordinate of point 3 as @0,1
5. Specify the next coordinate of point 4 as @-5,0
6. Specify the next coordinate of point 5 as @0,4
7. Specify the next coordinate of point 6 as @5,0
8. Specify the next coordinate of point 7 as @0,1
9. Specify the next coordinate of point 8 as @-6,0
c) Relative Polar Coordinate System:
1. Select the line tool by entering the 'Line' command in the command tab.
2. Specify the starting coordinate of point 1 as 2,1
3. Specify the next coordinate of point 2 as @6<0
4. Specify the next coordinate of point 3 as @1<90
5. Specify the next coordinate of point 3 as @5<180
6. Specify the next coordinate of point 5 as @4<90
7. Specify the next coordinate of point 6 as @5<0
8. Specify the next coordinate of point 7 as @1<90
9. Specify the next coordinate of point 8 as @6<180
RESULT:
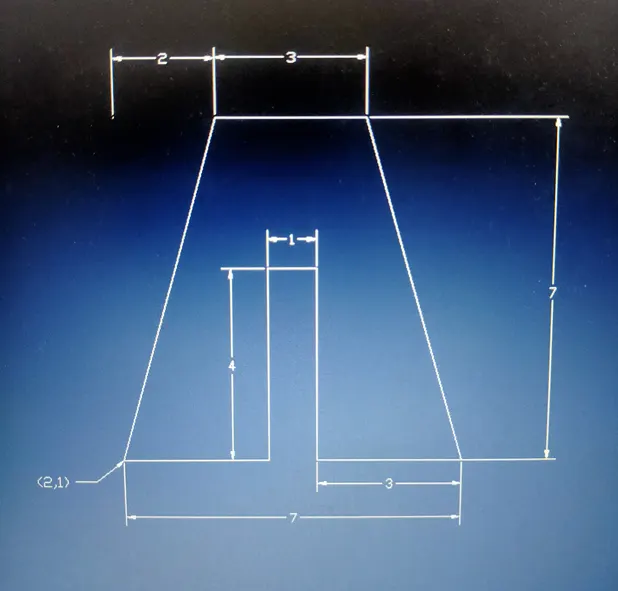
P-2:
PROCEDURE:
a) Absolute Coordinate System:
1. Select the line tool by entering the 'Line' command in the command tab.
2. Specify the starting coordinate of point 1 as 2,1
3. Specify the next coordinate of point 2 as 5,1
4. Specify the next coordinate of point 3 as 5,5
5. Specify the next coordinate of point 4 as 6,5
6. Specify the next coordinate of point 5 as 6,1
7. Specify the next coordinate of point 6 as 9,1
8. Specify the next coordinate of point 7 as 7,8
9. Specify the next coordinate of point 8 as 4,8
b) Relative Rectangular Coordinate System:
1. Select the line tool by entering the 'Line' command in the command tab.
2. Specify the starting coordinate of point 1 as 2,1
3. Specify the next coordinate of point 2 as @3,0
4. Specify the next coordinate of point 3 as @0,4
5. Specify the next coordinate of point 4 as @1,0
6. Specify the next coordinate of point 5 as @0,-4
7. Specify the next coordinate of point 6 as @3,0
8. Specify the next coordinate of point 7 as @-2,7
9. Specify the next coordinate of point 8 as @-3,0
c) Relative Polar Coordinate System:
1. Select the line tool by entering the 'Line' command in the command tab.
2. Specify the starting coordinate of point 1 as 2,1
3. Specify the next coordinate of point 2 as @3<0
4. Specify the next coordinate of point 3 as @4<90
5. Specify the next coordinate of point 4 as @1<90
6. Specify the next coordinate of point 5 as @4<270
7. Specify the next coordinate of point 6 as @3<0
8. Specify the next coordinate of point 7 as @7<106
9. Specify the next coordinate of point 8 as @3<180
RESULT:
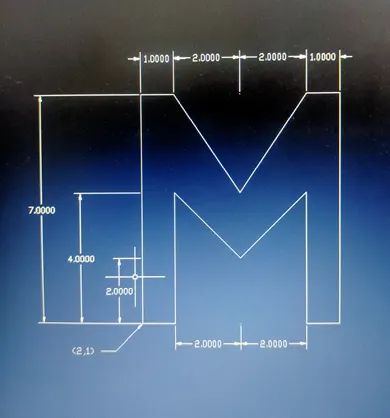
P-4.)
PROCEDURE:
1. Select the line tool by entering the 'Line' command in the command tab.
2. Specify the starting coordinate of point 1 as 2,1
3. Specify the next coordinate of point 2 as 3,1
4. Specify the next coordinate of point 3 as 3,5
5. Specify the next coordinate of point 4 as 5,3
6. Specify the next coordinate of point 5 as 7,5
7. Specify the next coordinate of point 6 as 7,1
8. Specify the next coordinate of point 7 as 8,1
9. Specify the next coordinate of point 8 as 8,8
10. Specify the next coordinate of point 9 as 7,8
11. Specify the next coordinate of point 10 as 5,5
12. Specify the next coordinate of point 11 as 3,8
13. Specify the next coordinate of point 12 as 2,8
RESULT:
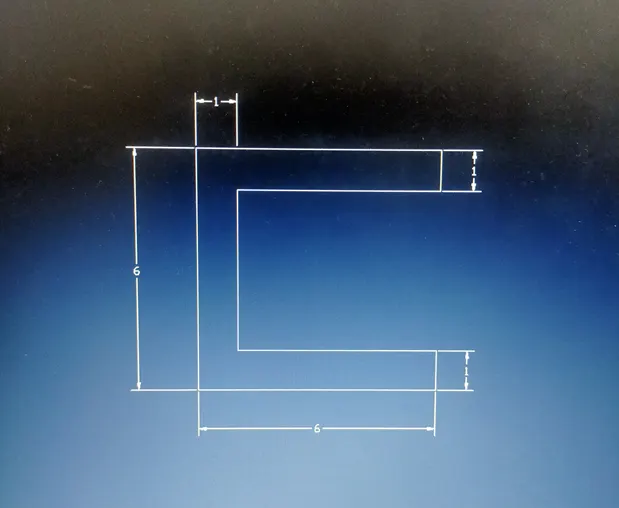
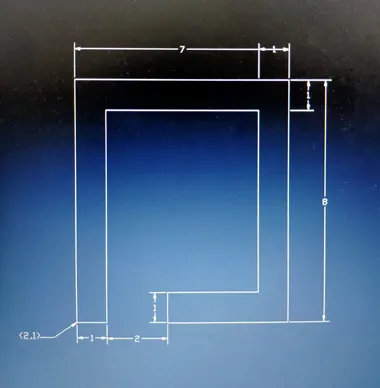
P-5.)
PROCEDURE:
1. Select the line tool by entering the 'Line' command in the command tab.
2. Specify the starting coordinate of point 1 as 2,1
3. Specify the next coordinate of point 2 as @1,0
4. Specify the next coordinate of point 3 as @0,7
5. Specify the next coordinate of point 4 as @5,0
6. Specify the next coordinate of point 5 as @0,-6
7. Specify the next coordinate of point 6 as @-3,0
8. Specify the next coordinate of point 7 as @0,-1
9. Specify the next coordinate of point 8 as @4,0
10. Specify the next coordinate of point 9 as @0,8
11. Specify the next coordinate of point 10 as @-7,0
RESULT:
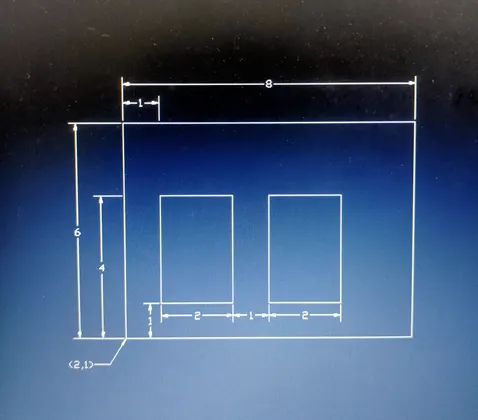
P-7.)
PROCEDURE:
1. Select the line tool by entering the 'Line' command in the command tab.
2. Specify the starting coordinate of point 1 as 2,1
3. Specify the next coordinate of point 2 as 10,1
4. Specify the next coordinate of point 3 as 10,7
5. Specify the next coordinate of point 4 as 2,7
6. Click Close on the command line
7. Select the Line tool by entering the 'Line' command in the command tab
8. Specify the next coordinate of point 5 as 3,2
9. Specify the next coordinate of point 6 as 5,2
10. Specify the next coordinate of point 7 as 5,5
11. Specify the next coordinate of point 8 as 3,5
12. Click Close on the command line
13. Select the Line tool by entering the 'Line' command in the command tab
14. Specify the next coordinate of point 9 as 6,2
15. Specify the next coordinate of point 10 as 8,2
16. Specify the next coordinate of point 11 as 8,5
17. Specify the next coordinate of point 12 as 6,5
RESULT:
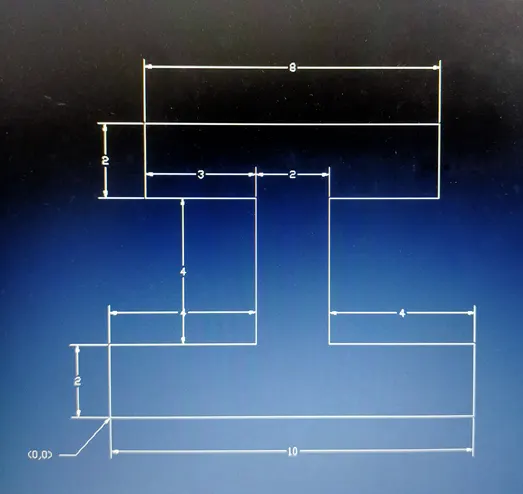
P-8.)
PROCEDURE:
1. Select the line tool by entering the 'Line' command in the command tab.
2. Specify the starting coordinate of point 1 as 0,0
3. Specify the next coordinate of point 2 as @10,0
4. Specify the next coordinate of point 3 as @0,2
5. Specify the next coordinate of point 4 as @-4,0
6. Specify the next coordinate of point 5 as @0,4
7. Specify the next coordinate of point 6 as @3,0
8. Specify the next coordinate of point 7 as @0,2
9. Specify the next coordinate of point 8 as @-8,0
10. Specify the next coordinate of point 9 as @0,-2
11. Specify the next coordinate of point 10 as @3,0
12. Specify the next coordinate of point 11 as @0,-4
13. Specify the next coordinate of point 12 as @-4,0
RESULT:
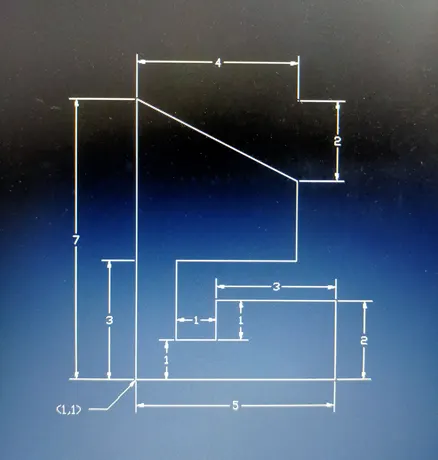
P-9.)
PROCEDURE:
1. Select the line tool by entering the 'Line' command in the command tab.
2. Specify the starting coordinate of point 1 as 1,1
3. Specify the next coordinate of point 2 as 6,1
4. Specify the next coordinate of point 3 as 6,3
5. Specify the next coordinate of point 4 as 3,3
6. Specify the next coordinate of point 5 as 3,2
7. Specify the next coordinate of point 6 as 2,2
8. Specify the next coordinate of point 7 as 2,4
9. Specify the next coordinate of point 8 as 5,4
10. Specify the next coordinate of point 9 as 5,6
11. Specify the next coordinate of point 10 as 1,8
RESULT:
P-10.)
PROCEDURE:
1. Select the line tool by entering the 'Line' command in the command tab.
2. Specify the starting coordinate of point 1 as 1,1
3. Specify the next coordinate of point 2 as @2<0
4. Specify the next coordinate of point 3 as @3<90
5. Specify the next coordinate of point 4 as @3<0
6. Specify the next coordinate of point 5 as @4<90
7. Specify the next coordinate of point 6 as @5<180
8. Click 'Close' on the command line
9. Specify the next coordinate of point 7 as 2,5
10. Specify the next coordinate of point 8 as @3<0
11. Specify the next coordinate of point 9 as @2<90
12. Specify the next coordinate of point 10 as @3<180
RESULT:
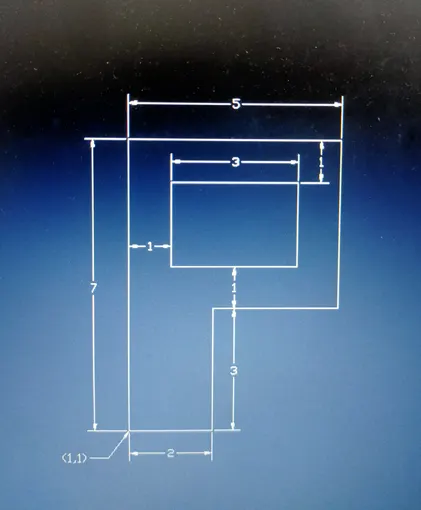
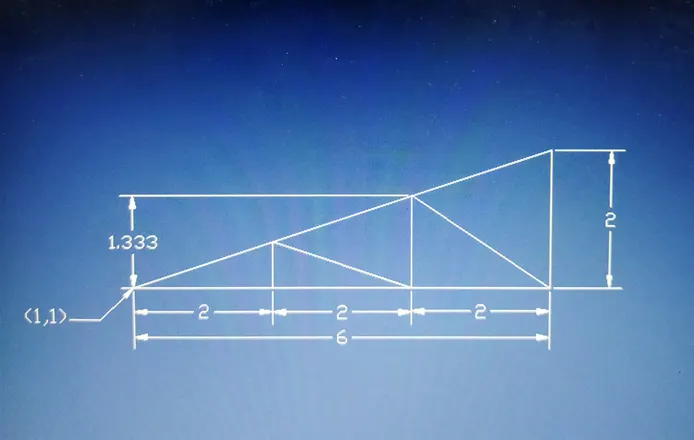
2.) AIM: Draw the profile and the trusses using any coordinate system methods.
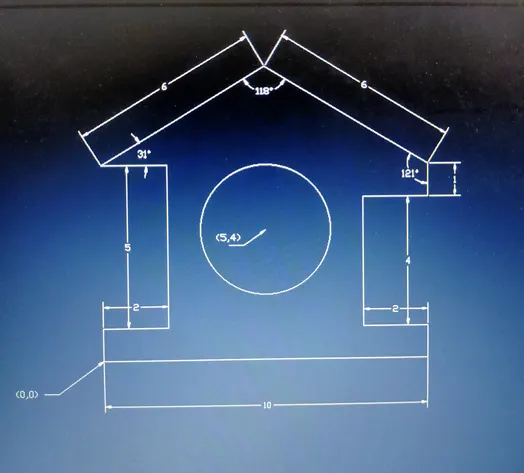
(a) Profile wood:
RESULT:
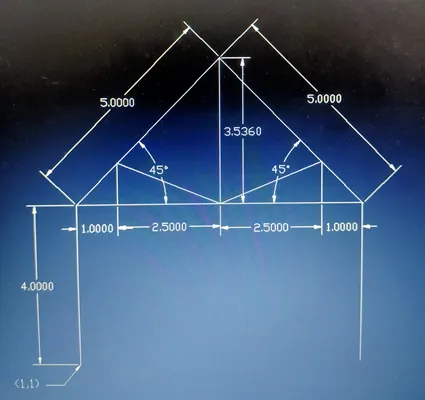
(b) Queen post truss:
RESULT:
(c) Mono pitch: