Creation of geometries by Coordinate system methods using AutoCad
AIM:
To create the geometrics from p1 to p2 using all the coordinates system methods and p3 to p10 by any one coordinate system
To drraw the profile and trusses using any coordinate system methods.The dimensions are there for references.
INTRODUCTION:
Before going to be drawing we should know about the coordinate systems
In auto cad there are two coordinates system ,cartesian and polar to these coordination system the absolute and relative coordinates of autocad are applicable.
COORDINATE SYSTEM:
Coordinate system is a system where numbers are used to detrmine the unique position of points and or other geometrics elements also coordinates in Autocad can be set by mouse, input the values of the coordinate in the command line and enter coordinate using dynamic input.
there are three types of coordinate systems:
They are:
1.Absolute coordinate systems
2.Relative coordinate systems
a)relative rectangular coordinates
b)relative polar coordinates
3.Direct distance entry
COMMANDS USED:
1.Line command
2.Dimlinear command
3.Text command
4.circle command
PROCEDURE:
Starting auto cad software:
.Go to STAER MENU ,select Autocad 2022
.click on START DRAWING
.In command line type in :STARTUP [ENTRE]
.Entre new value of startup:1
.Go to application menu and select new
.in the creat new drawing dialog box, select the imperial system in the start from sracth option.
.Next seelect the decimal unit system from the advannced set up option
.set the limits by entering limits in the command tab.the lower left corner is specified as 0,0 and the upper right corner is specified as 100,100.
(A)TO CREATE THE GEOMETRICS FROM P1 TO P2 USING ALL THE COORDINATES SYSTEM METHODS:
1. Drafting the geometries for p1 by using all coordinates system methods:
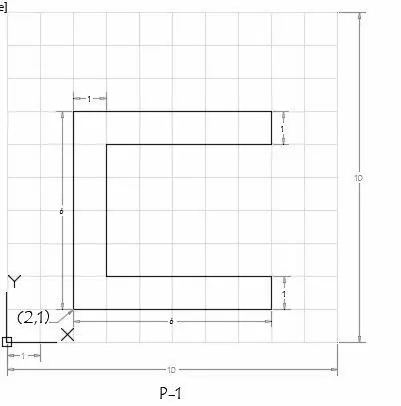
a) Absolute coordinate system :
1.selecct the linee tool from the robbon tab by entering the line command tab.
2.specify the starting coordinate of point 1 as 2,1
3.specify the next coordinates of the point 2 as 8,1
4.speccify the next coordinates of point 3 as 8,2
5.specify the next coordinates of point 4 as 3,2
6.specify the next coordinates of point 5 as3,6
7.specify the next coordintes of point 6 as 8,6
8.specify the next coordinates of point 7 as 8,7
9.specify the next coordinates of point 8 as 2,7
10.Then for the last point click close on thhe command line
b)relative rectangular coordinate system:
1.select the line tool from the ribbon tab or by entering the line command in the command tab.
2.specify the starting coordinate of point 1 as 2,1
3.specify the next coordinate of point 2 as @6,0
4.specify the next coordinate of point 3 as @0,1
5.specify the next coordinate of point 4as @-5,0
6.specify the next coordinate of point 5 as @0,4
7.specify the next coordinates of point 6 as @5,0
8.specify the next coordinates of point 7 as @0,1
9.specify the next coordinates of point 8 as @-6,0
10.Then for the last point click close on the command line
c)Relative polar coordinate system:
1.Select the line tool from the ribbon tab or by entering the line command in the command tab.
2.specify the starting the coordinate of point 1 as 2,1
3.specify the next coordinates of point 2 as @6<0
4.specify the next coordinates of point 3 as @1<90
5.specify thee next coordinates of point 3 as @5<0
6.specify the next coordinates of the point 5 as @4<90
7.specify the next coordinates of point 6 as @5<0
8.specify the next coordinate of point 7 as @1<90
9.specify the next coordinates of point 8 as @ 6 <180
10.Then for the last point click close on the command line
d)Direct distance entry method
1.select the line tool from the ribbon tab or by entering the line command in the command tab
2.specify the starting coordinate of point 1 as 2,1 in the command line
3.enter the length of point 2 as 6 in the command line towards the +ve x-axis
4.entre the length of point 3 as 1 in the command line towards the +ve x-axis
5.entre the length of point 4 as 5 in the command line towards the +ve y-axis
6.Entre the length of point 5 as 4 in the command line towards the +ve y-axis
7.Entre the length of point 6 as 5 in the command line towards the +ve x-axis
8.Entre the length of point 7 as 1 in the command line towards the +ve y axis
9.Entre the length of the point 8 as 6 in the commnd line towards the -ve x-axis
10.Then for the last point ,click close on the command line.
RESULT:
2.DRAFTING THE GEOMETRY FOR P2 BY USING ALL COORDINATES SYSTEM METHODS:
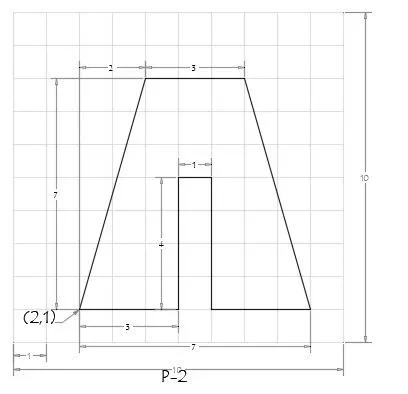
A)ABSOLUTE COORDINATE SYSTEM
B)RELATIVE RECTANGULAR COORDINATE SYSTEM
C)RELATIVE POLAR COORDINATE SYSTEM
D)DIRECT DISTANCE ENTRY METHOD
RESULT:
3.DRAFTING THE GEOMETRY FOR P4 BY USING ABSOLUTE COORDINATE SYSTEM:
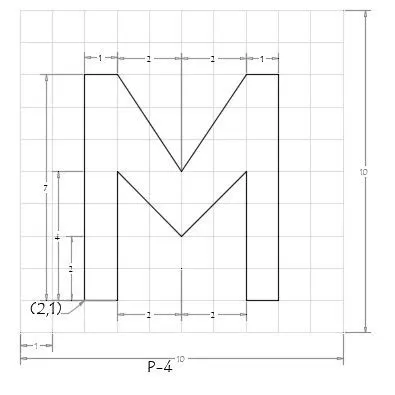
STEPS:
1.Select the line tool from the ribbon tab or by entering the line command in the command tab.
2.specify the starting coordinate of point 1 as 2,1
3.specify the next coordinate of point 2 as 3,1
4.specific the next coordinate of point 3 as 3,5
5.specific the next coordinate of point 4 as 5,3
6.specify the next coordinate of point 5 as 7,5
7.specify the next coordinate of point 6 as 7,1
8.specify thee next coordinate of point 7 as 8,1
9.specify the next coordinate of point 8 as 8,8
10.specify the next coordinate of point 9 as 7,8
11.specify the next coordinate of point 10 as 5,5
12.specify the next coordinate of point 11 as 3,8
13.specify the next coordnate of point 12 as 2,8
14.Then for the last point click close on the command line
RESULT:
4.DRAFTING THE GEOMETRY FOR P5 USING RELATIVE RECTNGULAR COORDINATE SYSTEM: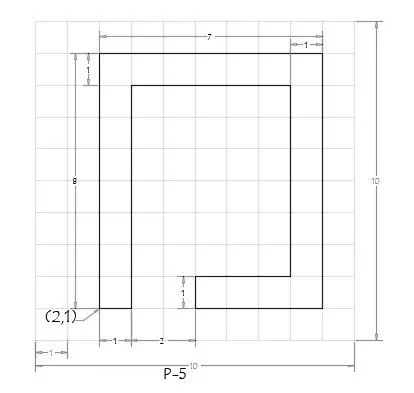
1.Select the line tool from the ribbon tab or by entering the line command tab.
2.specify the starting coordinate of point 1 as 2,1
3.specify the next coordinate of point 2 as @1,0
4.specify the next coordinate of point 3 as @0,7
5.specify the next coordinate of point 4 as @5,0
6.speccify the next coordinate of point 5 as @0,-6
7.specify the next coordinate of point 6 as @ -3,0
8.specify the next coordinate of point 7 as @0,-1
9.specify the next coordinate of point 8 as @4,0
10.specify the next coordinate of point 9 ass @0,8
11.specify the next coordinate of point 10 as @-7,0
12.Then for the last point click close on the command line
RESULT:
5.DRAFTING THE GEOMETRY FOR P7 BY USING ABSOLUTE COORDINATE SYSTEM:
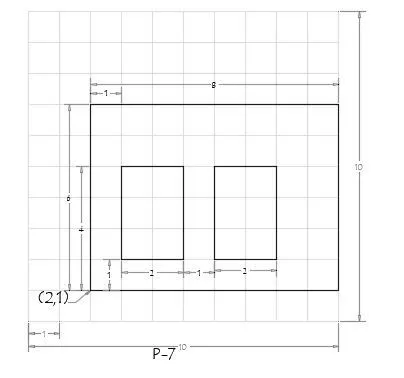
STEPS:
1.Select the line tool from the ribbon tab or by entering the line command in the command tab.
2.specify the starting coordinate of point 1 as 2,1
3.specify the next coordinate of point 2 as 10 ,1
4.specify the next coordinate of point 3 as 10,7
5.specify the next coordinate of command of point 4 as 2,7
6.click close on the command line
RESULT:
6.DRAFTING THE GEOMERTY FOR P8 BY USING RELATIVE RECTANGULAR COORDINATE SYSTEM:
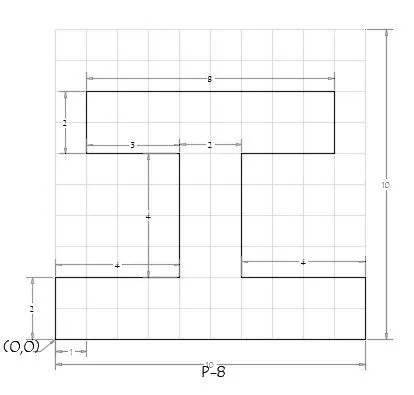
STEPS:
1.select the line tool from the ribbon tab or by entering the line command in the command tab.
2.specify the starting coordinate of point 1 as 0,0
3.specify the next coordinate of point 2 as @10,0
4.specify the next coordinate of point 3 as @0,2
5.specify the next coordinate of point 4 as @-4,0
6.specify the next coordinate of point 5 as @0,4
7.specify the next coordinate of point 6 as @3,0
8.specify the next coordinate of point 7 as @0,2
9.specify th next coordinate of point 8 as @-8,0
10.specify the next coordinate of point 9 as @0,-2
RESULT:
7.DRAFTING THE GEOMETRY FOR P9 BY USING ABSOLUTE COORDINATE SYSTEM:
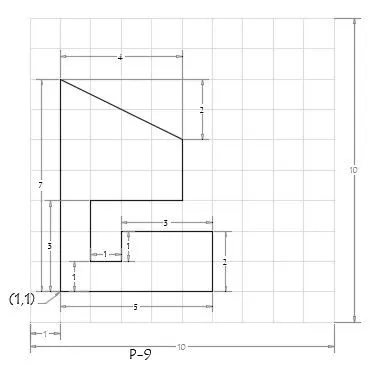
STEPS:
1.select the line tool from the ribbon tab or by entering the line command in the command tab.
2.specify the starting coordinate of point 1 as 1,1
3.specify the next coordinate of point 2 as 6,1
4.specify the next coordinate of point 3 as 6,3
5.specify the next coordinate of point 4 as 3,3
6.specify the next coordinate of point 5 as 3,2
7.specify the next coordinate of point 6 as 2,2
8.specify the next coordinate of point 7 aas 2,4
9. specify the next coordinates of point 8 as 5,4
10.specify the next coordinates of point 9 as 5,6
11.specify the next coordinates of point 10 as 1,8
12.Then for the last point , close on the command line
RESULT:
8.DRAFTING THE GEOMETRY FOR P10 BY USING RELATIVE POLAR COORDINATE SYSTEM:
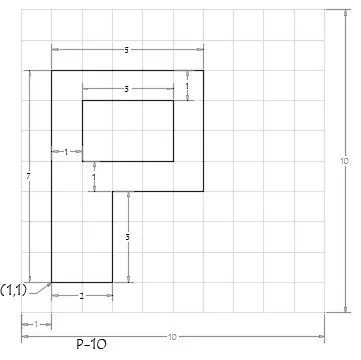
STEPS:
1.select the line tool from the ribbon or by entering the line command in the command tab.
2.specify the starting coordinate of point 1 as 1,1
3.specify the next coordinate of point 2 as 6,1
4.specify the next coordinates of point 3 as 6,3
5.specify the next coordinates of point 4 as 3,3
6.specify the next coordinates of point 5 as 3,2
7.specify the next coordinates of point 6 as 2,2
8.specify the next coordination of point 7 as 2,4
9.specify the next coordination of point 8 as 5,4
10.specify the next coordination of point 9 as 5,6
11.specify the next coordination of the point 10 as 1,8
12.Then the last point , click close on the commond line
RESULT:
(B)TO DRAW THE PROFILE AND THE TRUSSES USING ANY COORDINATES SYSTEM METHODS.THE DIMENSIONS ARE THERE FOR REFERENCE:
1.DRAFTING THE WOOD PROFILE AS SHOWN IN THE GIVEN PICTURE:
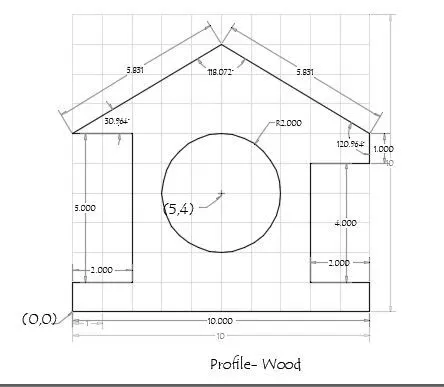
STEPS FOR CREATING THE WOOD PROFILE USING DIRECT DISTANCE ENTRY METHOD:
1.Select the line tool from the ribbon tab or by entering the line command in the command tab
2.specify the starting coordinates coordinate of point 1 as 0,0 in the command line.
3.Entre the length of point 2 as 10 in the command line towards the +ve x-axis
4.Entre the length of point 3 as 1 in the command line towards the +ve y -axis
5.Enter the length of point 4 as 2 in the command line towards the -ve x-axis
6.Entre the length of point 5 as 4 in the command line towards the +ve y-axis
RESULT:
3.DRAFTING THE MONO PITCH USING ABSOLUTE COORDINATE SYSTEM:
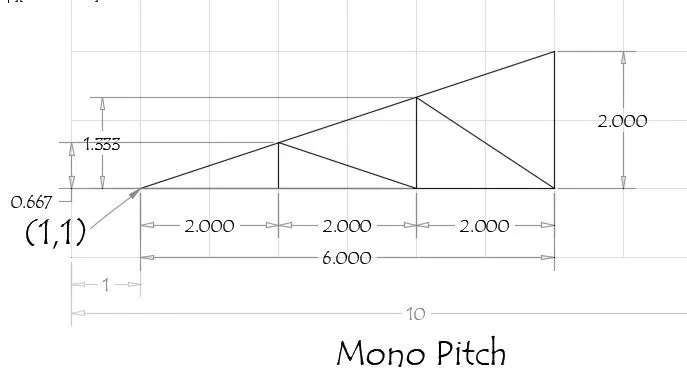
1.Select the line tool from the ribbon tab or by entering the line command in the command tab.
2.specify the starting coordinate of point 1 as 1,1
3.specify the next coordinate of point 2 as 7,1
4.specify the next coordinate of point 3 as 7,3
5.click close on the command line
6.press esc to cancle the line command.