Creating a Residence Layout, Seating plan, Toilet and Utility room plan using AutoCad
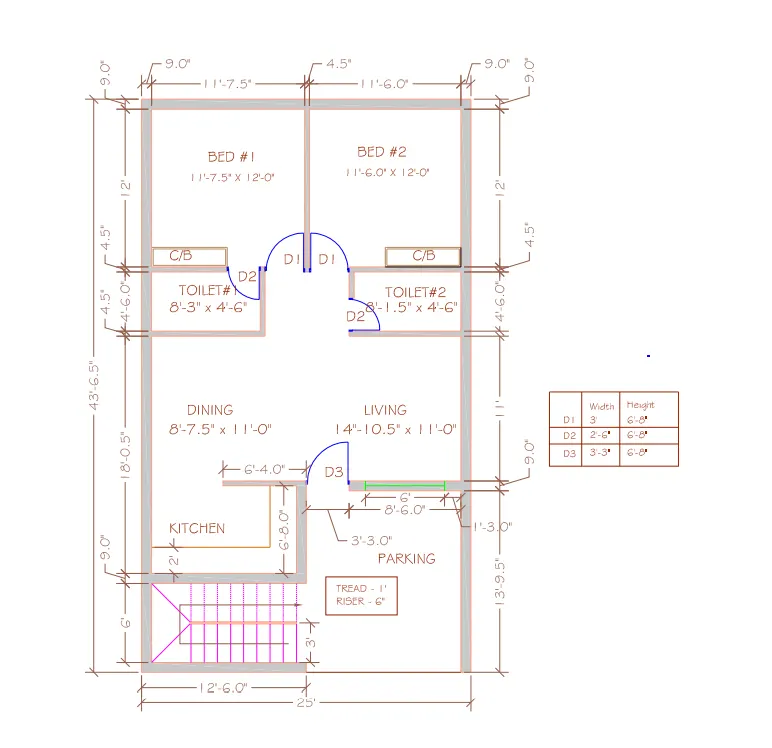
AIM: TO DRAW THE LAYOUT OF RESIDENCE OF PLAN.
COMMANDS USED :
1. XL- V-OR XL-H.
2. OFFEST.
3. FILLET.
4. EXTEND.
5.TRIM
PROCEDURE:
first create a new auto cad fille with imprerial settings.
make sure thet in units the types is "engineering" (as the diamensins is in feet and inches) and also set the precision.
set the limits with command "limits" specify the left corner pointds and right corner points and enter zoom all ("z-a").
draw the contrution lines by command "XL-V", for vertical and "XL-H" FOR horizontal.
drawand ohffset ind bed 1:
take offset of both contruction lines of 9" by using command "O"- give offset distance as 0.9 in the command box.
then take the offsent of 11'7.5" to the +x diretion and offset 12' -y direcitin of that the room is formed.
again, give offset to the both lines with 4.5" so the wall thickness is created.
trim of the unwanted lines.
drawing bed 2:
Giwe offset from the wall thickness of bed 1 towards + x direction of 11'6".
offset the 9" to create wall all right side.
extend the line of 12' form bed 1 towadds the line . command"EX" SELECT the line to where it shoulet be extends
4.5" offset line rest of the lines.
DRAWING TOILET 1
OFFSET 4"5"downwards then also offset 4.5" and the wall
extend the left side wall towareds +x diretin and offset 8,3" towards +x diretion and also 4'5" wall thickness.
trim off the unwanted lines.
DRAWINRG DINING AND LIVING ROOM :
give offfset of 11 form the wall of 9"
extend the left wall towards the 11' line and 9" line.
use fillet to join this line and the wall of toils 2.
give an offset of 8'7.5" to undestand the partion between the diining and living
trim off the wall thickness of dinning and offset it as 4.5".
DRAWING KITCHEN:
GIVE an offset form the dinnig wall of 6"8, and give an offset of the wall thicneess.
give and offset of 11" towareds +x diretin and offset the wall thickness as 9"
DRAWING-PARKING AND STAIRECAE ROOM:
draw offset of 12'6 to draw the parking then giwerds downwards.
give odfeset 13'9.5" from the living wall towards dowared outer this line.
extend outer wall of towareds this line .
DRAWING DOORS:
TRIM ALL THE DOORS opening s with their respective width D1-3',D2-26",-3'3".
for open kicken, trim the line rotaing a distance of 6'4" form right sine of kitchan.
drow the doors creating a hinge of form the midpoint of both the wall then drawing of circle with one point on ther the midpoint of one hinge and other the midpoint of another hinge .
PLACE THE WINDOWS:
FOR LIVILING ,TAKE AN OFFSET OF 1'3", THIS is where the window starts ( as it is given )
using line command draw the a line of 6' form the centre of offeset line the wall thickness.
trim al lines and filling the coreners with filling rading zero.
DRAWING THE KITCHEN SLAB AND CUPBOARDS:
offset a distance of 2 to make the kitchen slab
draw the cupboard by creating a rectangle command "REC" -SPECIFY base points - clicks on dimensinon -give dimension as 5' x 2'.
copy the rectangle to another bedroom also.
PLACING EACH COMPONENT IN LAYER:
form layer property -create new layer create 8 layers each for wall, door , window , stairs kichen
slab dimnstins ,text and cupboard and give different colours, so that it con be identiffied separetrly
select the objects and place in the respective layers
RESULT : the layout of a residence plan is drawin.
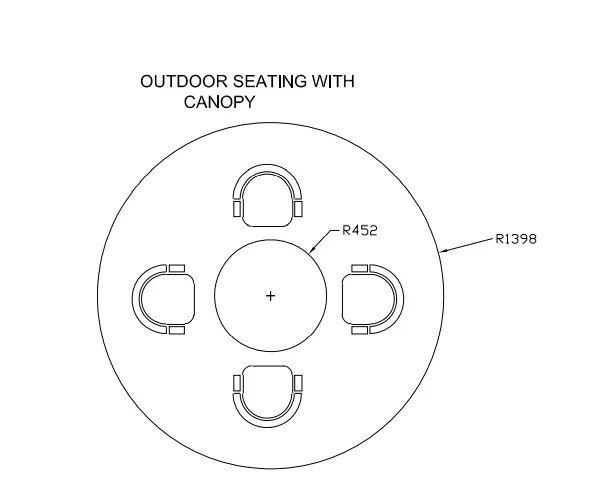
AIM: to draw the seating plan for an outdoor canopy.
COMMANDS USED:
1. CIRCLE
2. OFFSET.
3. FILERT.
4. EXTEND.
5. TRIM.
PROCEDURE:
CREATING CIRCLES:
SELECT METRIC UNITS AS THE DIAMENSIONS IN MM.
draw a circle with same cenre with radius 425 mm.
draw an offset of 200 mm form the inner circle to determine the position of chairs.
draw line along the diameter of the bigger circle.
DRAWING CHAIRS:
DRAW a rectangle with command "REC" giving dimensions as 400 mm and 200 mm.
draw an arc with start-centre and end methed with the side (400mm) of rectangle.
draw another rectangle of 55mm x 100mm.
copy it on ther sids so that both handles are formed.
fillet the corner of rectangle by 50mm command "O"-give the fillet radius as 50mm and select the fillet radiud as trim
off the unwanted line.
move the chair and plase it such a way that it tocheass the ooffset 200mm circle . by using command "MI" - select line
the base point and draw the reference line where we need to mirror.
rotate the chair and move it so that the chair in lift side is create command "RO"-select the base point and rotate to
desired angle.
anain, mirror the chair so as to create chair in right in side.
delete the lines and offset circles.
RESULT. the seating plain for an outdoor canopy is drawing.
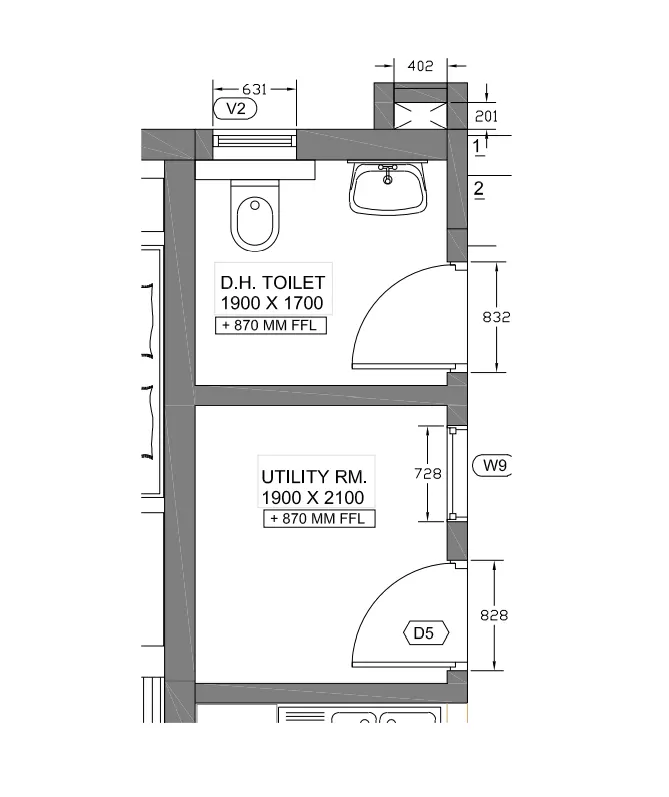
AIM : to draw plan for the toilers and utilities room.
commands used :
1. XL-V OR XL -H.
2. OFFSET.
3. EXTEND.
4. FILLET.
5. TRIM.
6. DESIGN CENTRE.
PROCEDURE :
first create a new auto cad filt with metric units.
set the limits with coommand "LIMITS" SPECITY the left corner points and right corber points and enter zoom all.
draw contortion lines by command "XL-V" for vertical and "XL-H" for horizontal.
trim the sind and bottom position oh the constrution line and an offset of 150mm form the bottom horizontal construction line.
DRAWIING DH TOILE:
DRAW AN offset of 1700mm upwards and wall thickness of 300mm as it is the wxternal wall, and a room is formed.
trim off the rest of the construton lines.
CREATE OPENING FOR DOORS:
FORM toilet , after offset of 10mm , give another offset of 832mm and trim to from the door opening by creating 12.5mm hinge and then draw circle to the midpoinnt of other side of wall . trim off the rest of circle to from an arc.
draw window of 728mm in the utility room and a ventilator of 631 mm in toiles room.
draw the dect showinbehind the toilet rooom by offset at a distance of 201mm and 150mm wall thick ness upwards.
extend the wall of toilet towareds it and offset 420mm,wall offset wall thickness as 150mm.
DRAWING OF UTILITY SYMBOLS:
in the command line enter DSand select en -us - home utility -select the symbols by drawing then into auto cad
screen and place whereever required.
RESULT : the plan for the toilers and utilities room, is drawn.