Creation of geometries by Coordinate system methods using AutoCad
Creation of geometries by Coordinate system methods using AutoCad
Answer:
Aim-To create given gemetries using different coordinate system method with help of line & circle tools.
Geometry of P-1 & P-2 draw using all ordinate system method & each of geometry are drawn using different coordinate system method or direct distance entry method.
Introduction-
Coordinate System: It is a system in which numbers are used to determine unique position of points or other geometric element.
There are various coordinate system
Absolute Coordinate Method: In this system all points are established at some distance in X & Y axis From common origin(0,0).
Relative coordinate System: The location of a relative coordinate is defined by its distance from reference point.In AutoCAD using relative coordinate system first point of geometry is always absolute.It is established with respect to origin(0,0) and then all successive positions are established with respect to their prceding point. This system is further classified as
Relative Rectangular Coordinates: It is a coordinate system that Specific each point by a pairs of numerical coordinates in the x-axis and y-axis. In the system the points succedingthe first point are typed in as @xy inthe command line.
Relative Polar Coordinates: This system specifies the distance(length) and angle of a particular point with respect to its previous point. In relatives plar coordinate system points are established by typing It is '@distance<angle '(enter) in command line.
Direct distance entry method: It is another popular method used for drawing different shapes/geometries in AutoCAD, Direct distance entry method enables the user to drawobject by simply pointing the cursor in the desired direction and entering the required distance in command line.
Procedure
Starting AutoCAD software:
- Go to Start Menu, select AutoCAD 2019
- Click on start drawing
- In the command line type in STARTUP(Enter)
- Enter new value os startup 1
- Go to application Menu and select New
- Create New Drawing dialong box we select Imperial System
- Select Decimal unit system quick setup option
- follow above procedure for all
For P-1 Geometry
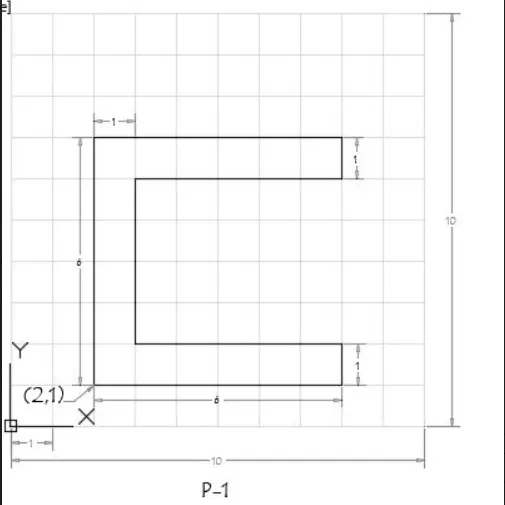
A.Using Absolute Coordinate System
i) Select Line tool by Line command in command tab.
ii) Specify starting coordinate of point 1 as 2,1 in command line
iii) Specify next coordinate of point 2 as 8,1 in command line
iv) Specify next coordinate of point 3 as 8,2 in command line
v) Specify next coordinate of point 4 as 3,2 in command line
vi) Specify next coordinate of point 5 as 3,6 in command line
vii) Specify next coordinate of point 6 as 8,6 in command line
viii) Specify next coordinate of point 7 as 8,7 in command line
ix) Specify next coordinate of point 8 as 2,7 in command line
x) Click Close on command line
Result:
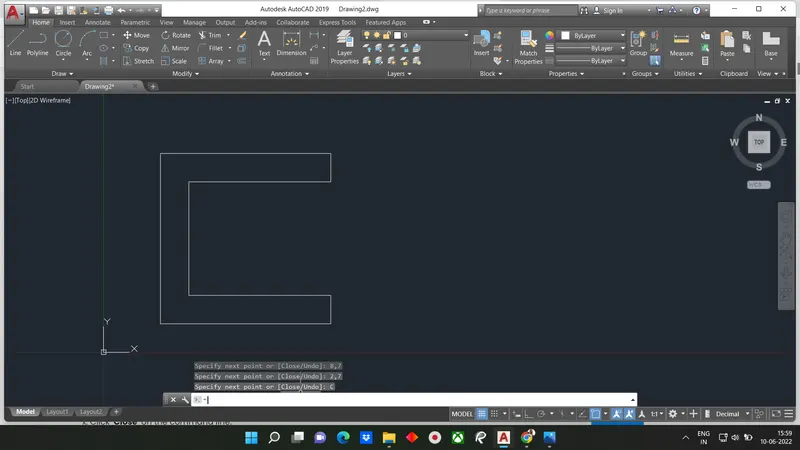
B.Using Relative Rectangular Coordinate System
i) Select line tool by entering LINE command in command tab
ii) Specify starting coordinate of point 1 as 2,1 in command line
iii) Specify next coordinate of point 2 as @6,0 in command line
iv) Specify next coordinate of point 3 as @0,1 in command line
v) Specify next coordinate of point 4 as @-5,0 in command line
vi) Specify next coordinate of point 5 as @0,4 in command line
vii) Specify next coordinate of point 6 as @5,0 in command line
viii) Specify next coordinate of point 7 as @0,1 in command line
ix) Specify next coordinate of point 8 as @-6,0 in command line
x) Click CLOSE on command line
Result:
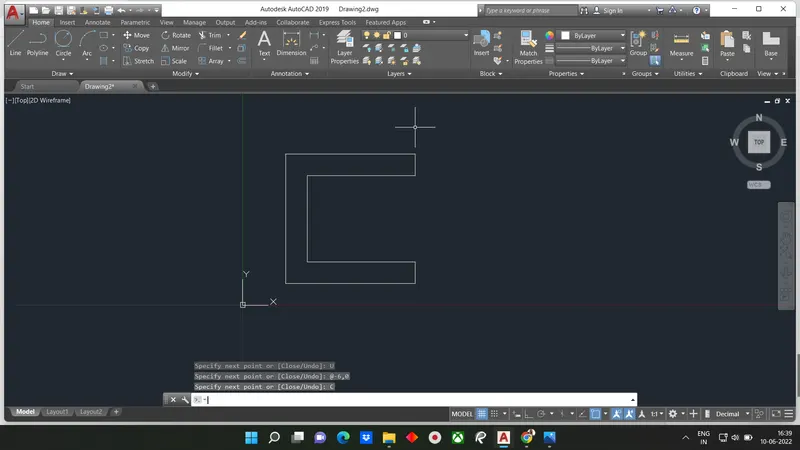
C.Using Relative Polar Coordinate System
i) Select the line tool by entering Line Command in command tab
ii) Specify the starting coordinate of point 1 as 2,1 in command line
iii) Specify the next coordinate of point 2 as @6<0 in command line
iv) Specify next coordinate of point 3 as @1<90 in command line
v) Specify next coordinate of point 4 as @5<180 in command line
vi) specify next coordinate of point 5 as @4<90 in command line
vii) Specify next coordinate of point 6 as @5<0 in command line
viii) Specify next coordinate of point 7 as @1<90 in command line
ix) Specify next coordinate of point 8 as @6<180 in coordinate line
x) Click Close on command line
Result:
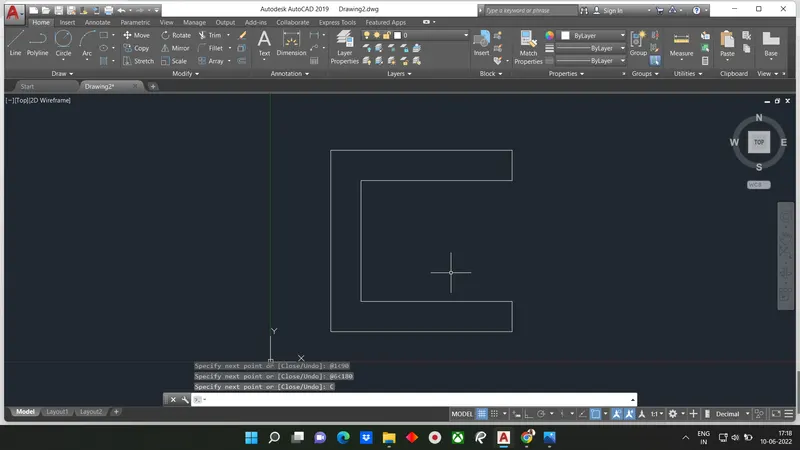
D.Using Direct Distance Entry Method
i) Select line tool by entering Line Command in command tab
ii) Specify starting coordinate of point 1 as 2,1 in command line
iii) Enter length of point 2 as 6 in command line toward +ve x-Axis
iv) Enter length of point 3 as 1 in command line towards +ve y-Axis
v) Enter length of point 4 as 5 in command line towards -ve x-Axis
vi) Enter length of point 5 as 4 in command line towards +ve y-axis
vii) Enter length of point 6 as 5 in command line towards +ve X-axis
viii) Enter length to point 7 as 1 in command line towards +ve y-axis
ix) Enter length to point 8 as 6 in command line towards -ve x-axis
x) Click CLOSE Command in command line
Result:
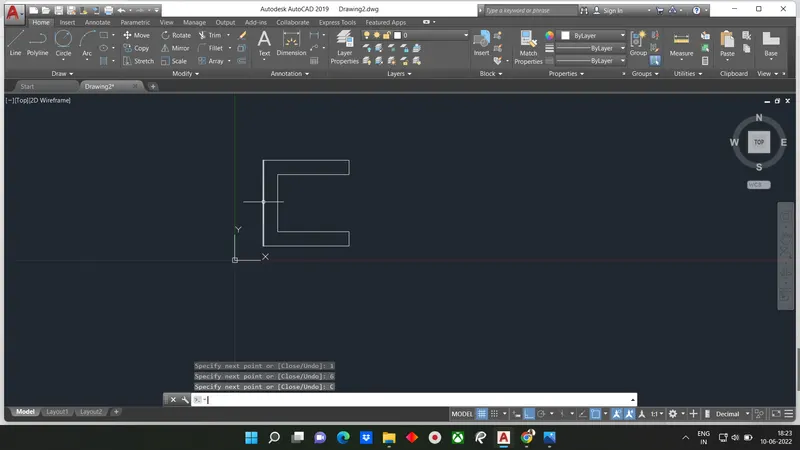
For P-2 Geometry
A. Using Absolute Coordinate System
i) Select line tool by entering LINE command in command tab
ii) Specify starting coordinate point 1 as 2,1 in command line
iii) Specify next coordinate point 2 as 5,1 in command line
iv) Specify next coordinate point 3 as 5,5 in command line
v) Specify next coordinate point 4 as 6,5 in command line
vi) Specify next coordinate point 5 as 6,1 in command line
vii) Specify next coordinate point 6 as 9,1 in command line
viii) Specify next coordinate point 7 as 7,8 in command line
ix) Specify next coordinate point 8 as 4,8 in command line
x) Click CLOSE on command line
RESULT:
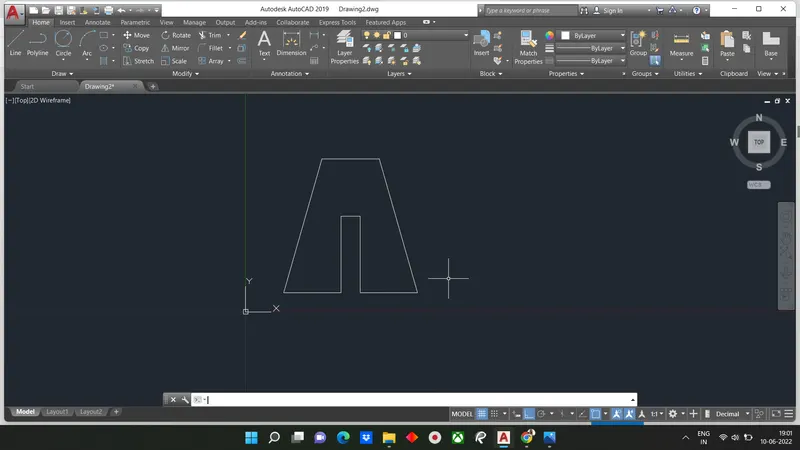
B. Using Relative Rectangular coordinate System
i) Select line tool by entering LINE command in command line
ii) Specify starting coordinate of point 1 as 2,1 in command line
iii) Specify next coordinate of point 2 as @3,0 in command line
iv) Specify next coordinate of point 3 as @0,4 in command line
v) Specify next coordinate of point 4 as @1,0 in command line
vi) Specify next coordinate of point 5 as @0,-4 in command line
vii) Specify next coordinate of point 6 as @3,0 in command line
viii) Specify next coordinate of point 7 as @-2,7 in command line
ix) Specify next coordinate of point 8 as @-3,0 in command line
x) Click CLOSE on command line
Result:
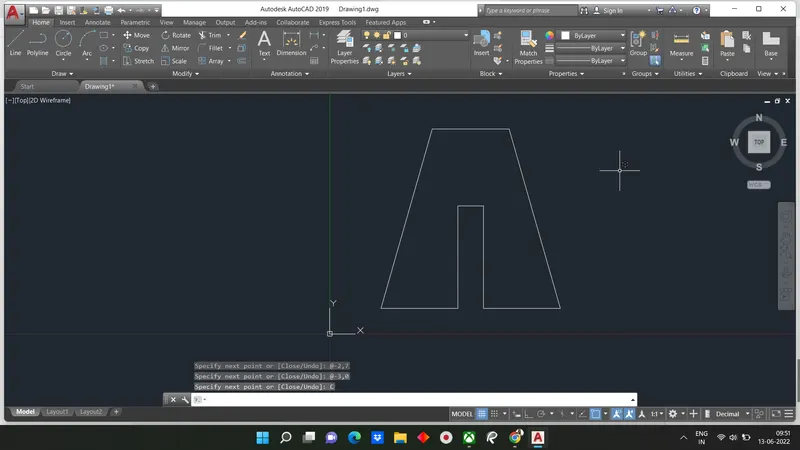
C.Using Relative Polar System
i) Select line tool by entering LINE command in coomand tab
ii) Specify starting coordinate of point 1 as 2,1 in command line
iii) Specify next coordinate of point 2 as @3<0 in command line
iv) Specify next coordinate of point 3 as @4<90 in command line
v) Specify next coordinate of point 4 as @1<0 in command line
vi) Specify next coordinate of point 5 as @4<270 in command line
vii) Specify next coordinate of point 6 as @3<0 in command line
vii) Specify next coordinate of point 7 as @7<106 in command line
ix) Specify next coordinate of point 8 as @3<180 in command line
x) Click CLOSE on command line
Result:
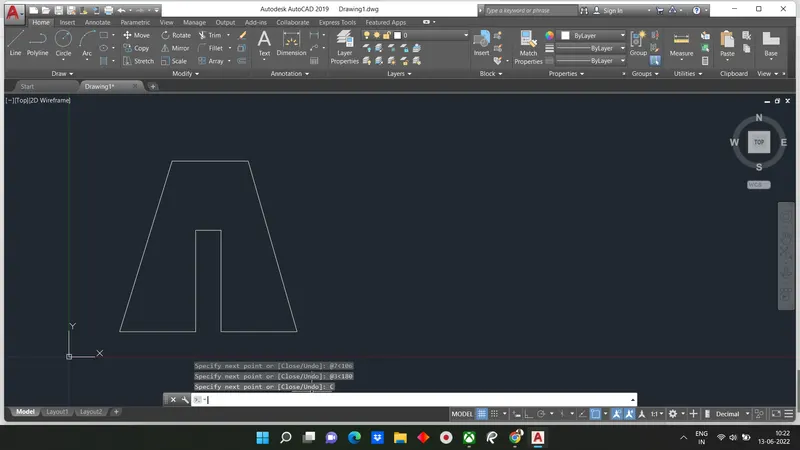
D.Using Direct Distance Entry Method
i) Select line tool by entering LINE command line in command tab
ii) Specify starting coordinate of point 1 as 2,1 in command line
iii) Enter starting coordinate of point 2 as 3 in command line towards +ve X-axis
iv) Enter starting coordinate of point 3 as 4 in command line towards +ve Y-axis
v) Enter starting coordinate of point 4 as 1 in command line towards +ve X-axis
vi) Enter starting coordinate of point 5 as 4 in command line towards -ve Y-axis
vii) Enter starting coordinate of point 6 as 3 in command line toward +ve X-axis
viii) Enter starting coordinate of point7 as 7 in command line at an angle of <106 from +ve X-axis polar tracking on
ix) Enter length of point 8 as 3 in the command line towards -ve X-axis
x) Click CLOSE on command line
Result
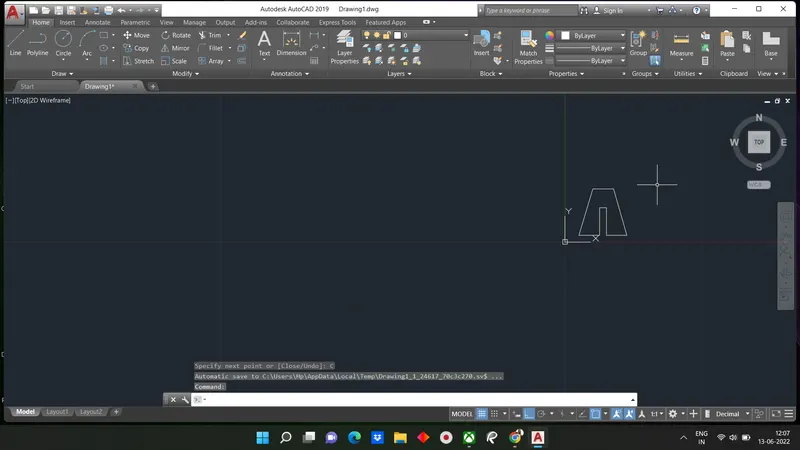
P-4
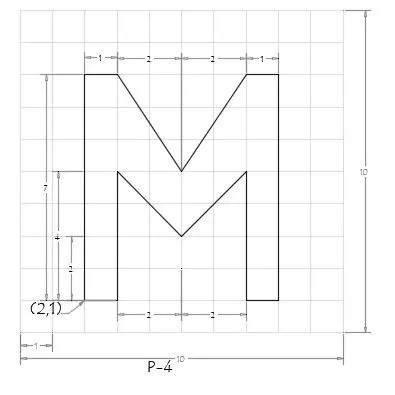
Steps for creating geometry by Absolute Coordinate System
i) Select line tool by entering LINE command in command tab
ii) Specify starting coordinate of point 1 as 2,1 in command tab
iii) Specify next coordinate of point 2 as 3,1 in command tab
iv) Specify next coordinate of point 3 as 3,5 in command tab
v) Specify next coordinate of point 4 as 5,3 in command tab
vi) Specify next coordinate point 5 as 7,5 in command tab
vii) Specify next coordinate point 6 as 7,1 in command tab
viii) Specify next coordinate point 7 as 8,1 in command tab
ix) Specify next coordinate point 8 as 8,8 in command tab
x) Specify next coordinate of point 9 as 7,8 in command tab
xi) Specify next coordinate of point 10 as 5,5 in command tab
xii) Specify next coordinate of point 11 as 3,8 in command tab
xiii) Specify next coordinate of point 12 as 2,8 in command tab
xiv) Click CLOSE on command line
Result:
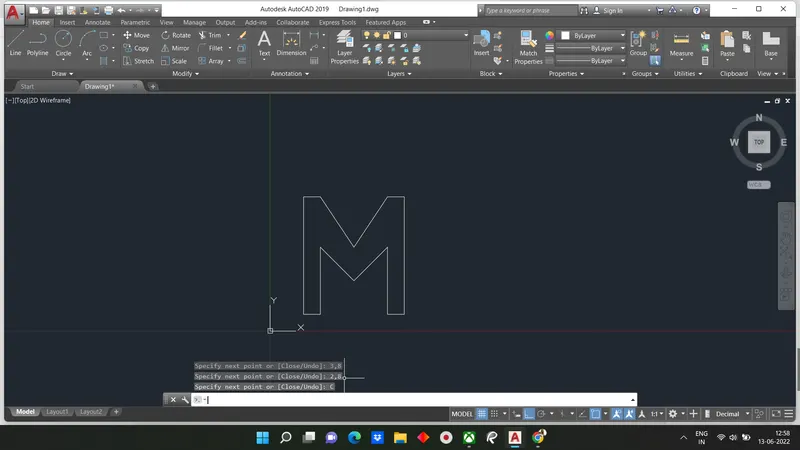
Geometry for P-5
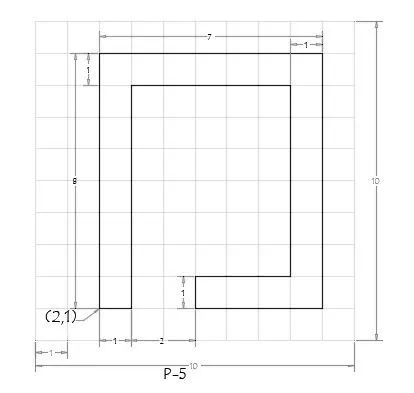
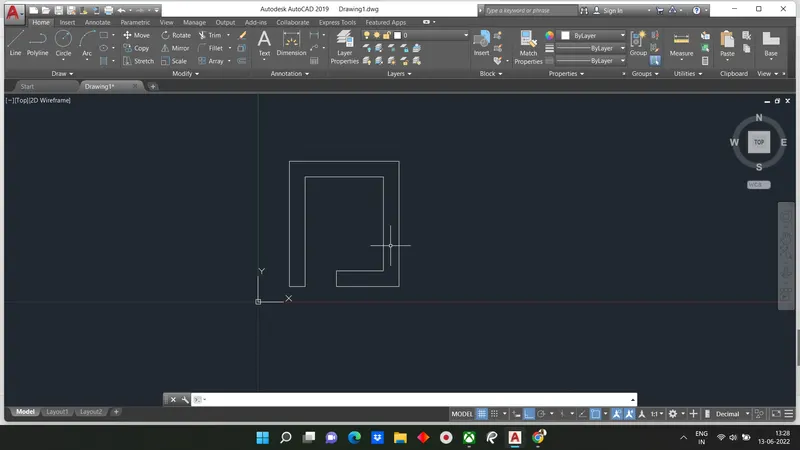
Step creating geometry for P-5 using Relative Rectangular Coordinate System
i) Select line tool by entering LINE command in command tab
ii) Specify starting coordinate of point 1 as 2,1 in command line
iii) Specify next coordinate of point 2 as @1,0 in command line
iv) Specify next coordinate of point 3 as @0,7 in command line
v) Specify next coordinate of point 4 as @5,0 in command line
vi) Specify next coordinate of point 5 as @0,-6 in command line
vii) Specify next coordinate of point 6 as @-3,0 in command line
viii) Specify next coordinate of point 7 as @0,-1 in command line
ix) Specify next coordinate of point 8 as @4,0 in command line
x) Specify next coordinate of point 9 as @0,8 in command line
xi) Specify next coordinate of point 10 as @-7,0 in command line
xii) Click CLOSE on command line
Result:
Geometry P-7
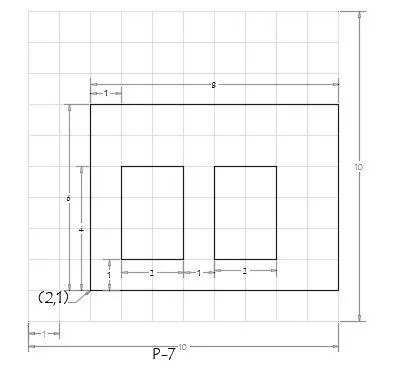
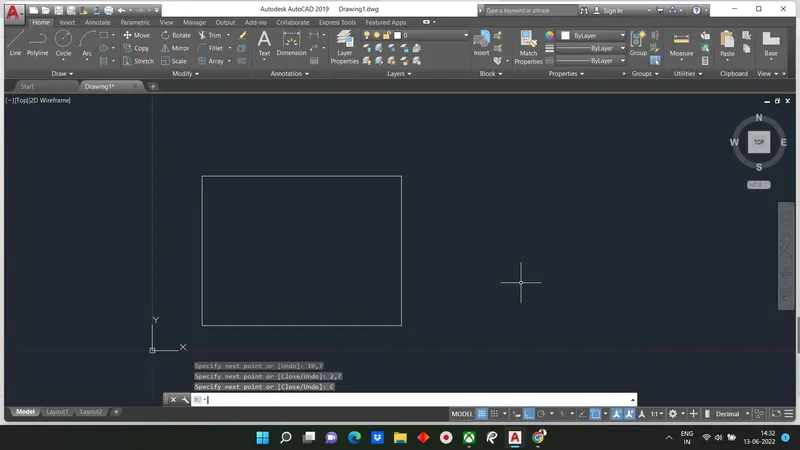
Step for creating geometry in P-7 using Absolute Coordinate System
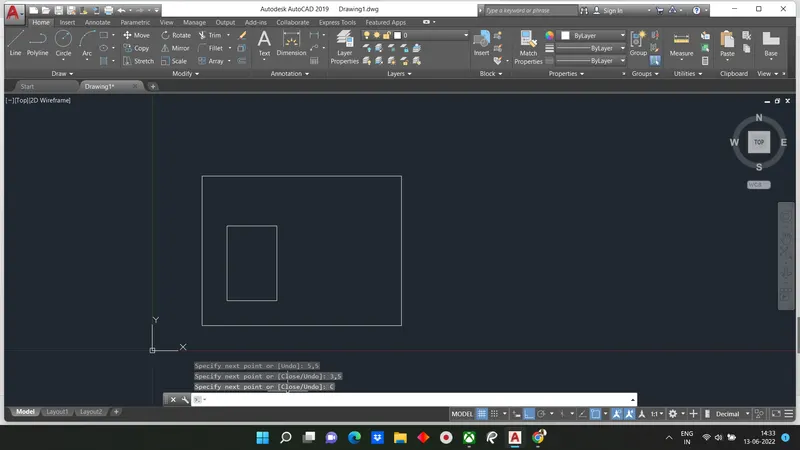
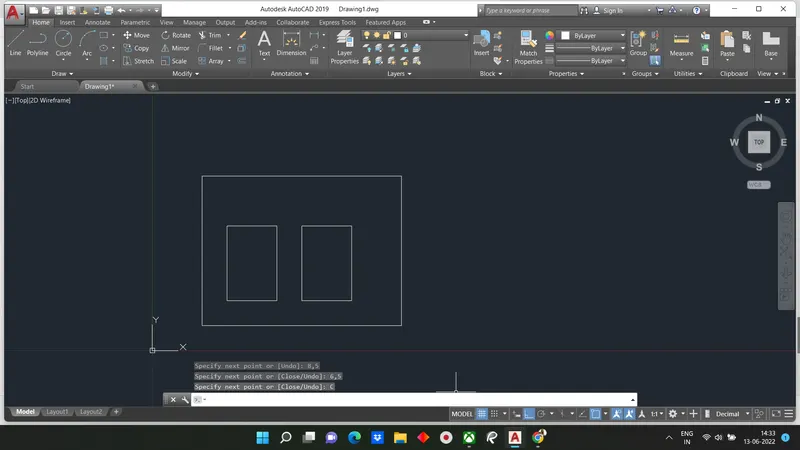
i) Select line tool by entering LINE command in command tab
ii) Specify starting coordinate of point 1 as 2,1 in command line
iii) Specify next coordinate of point 2 as 10,1 in command line
iv) Specify next coordinate of point 3 as 10,7 in command line
v) Specify next coordinate of point 4 as 2,7 in command line
vi) Click CLOSE on command line
vii) Select line tool by entering LINE command in command tab
viii) Specify next coordinate of point 5 as 3,2 in command line
ix) Specify next coordinate of point 6 as 5,2 in command line
x) Specify next coordinate of point 7 as 5,5 in command line
xi) Specify next coordinate of point 8 as 3,5 in command line
xii) Click CLOSE on command line
xiii) Select line toolby entering LINE command line in command tab
xiv) Specify next coordinate of point 9 as 6,2 in command line
xv) Specify next coordinate of point 10 as 8,2 in command line
xvi) Specify next coordinate of point 11 as 8,5 in command line
xvii) Specify next coordinate of point 12 as 6,5 in command line
xviii) Click CLOSE on command line
Result:
Geometry P-8
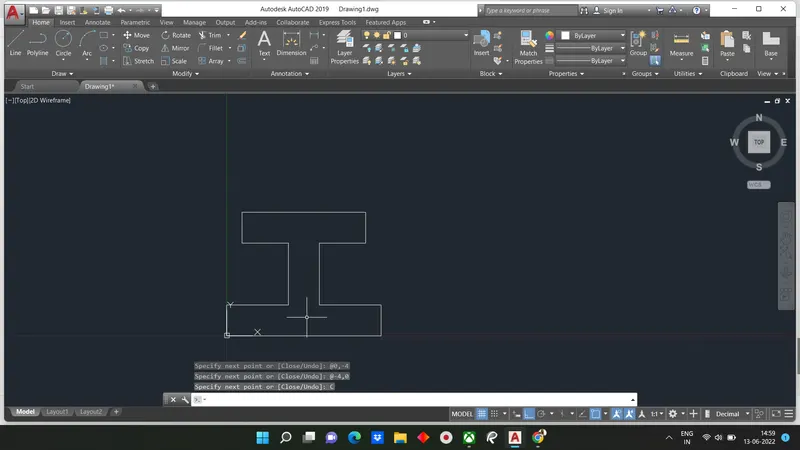
Step for creating geometry P-8 Relative Rectangular Coordinate System
i) Select line tool by entering LINE command in command tab
ii) Specify starting coordinate of point 1 as 0,0 in command line
iii) Specify next coordinate of point 2 as @10,0 in command line
iv) Specify next coordinate of point 3 as @0,2 in command line
v) Specify next coordinate of point 4 as @-4,0 in command line
vi) Specify next coordinate of point 5 as @0,4 in command line
vii) specify next coordinate of point 6 as @3,0 in command line
viii) Specify next coordinate of point 7 as @0,2 in command line
ix) Specify next coordinate of point 8 as @-8,0 in command line
x) Specify next coordinate of point 9 as @0,-2 in command line
xi) Specify next coordinate of point 10 as @3,0 in command line
xii) Specify next coordinate of point 11 as @0,-4 in command line
xiii) Specify next coordinate of point 12 as @-4,0 in command line
xiv) Click CLOSE on command line
Result
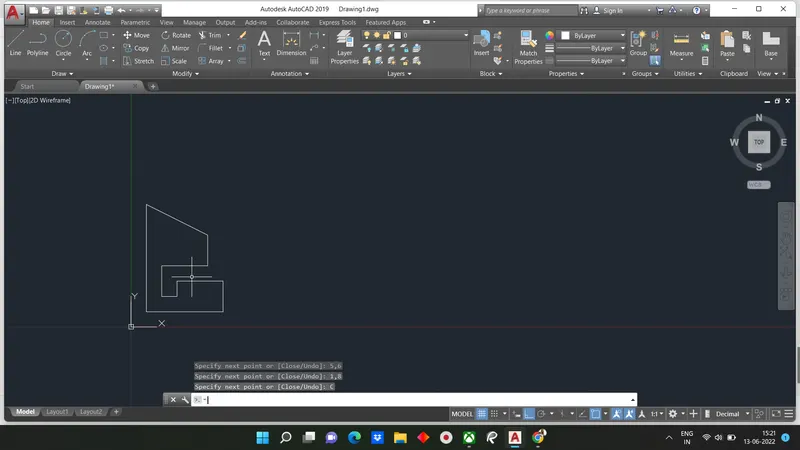
Geometric P-9
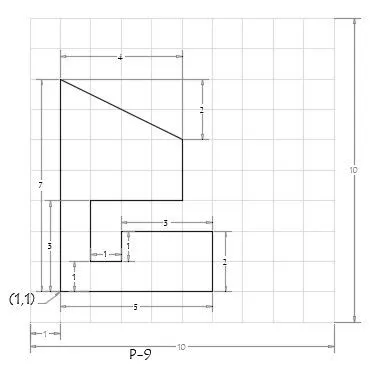
Step for creating geometry in P-9 using Absolute Coordinate System
i) Select line tool by entering LINE command in command tab
ii) Specify starting coordinate of point 1 as 1,1 in command line
iii) Specify next coordinate of point 2 as 6,1 in command line
iv) Specify next coordinate of point 3 as 6,3 in command line
v) Specify next coordinate of point 4 as 3,3 in command line
vi) Specify next coordinate of point 5 as 3,2 in command line
vii) Specify next coordinate of point 6 as 2,2 in command line
viii) Specify next coordinate of point 7 as 2,4 in command line
ix) Specify next coordinate of point 8 as 5,4 in command line
x) Specify next coordinate of point 9 as 5,6 in command line
xi) Specify next coordinate of point 10 as 1,8 in command line
xii) Click CLOSE on command line
Result
Geometry P-10
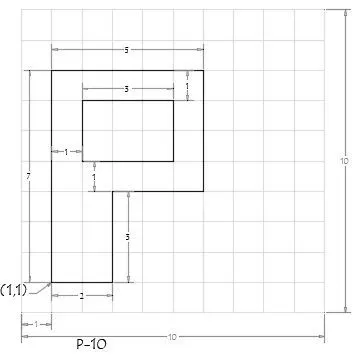
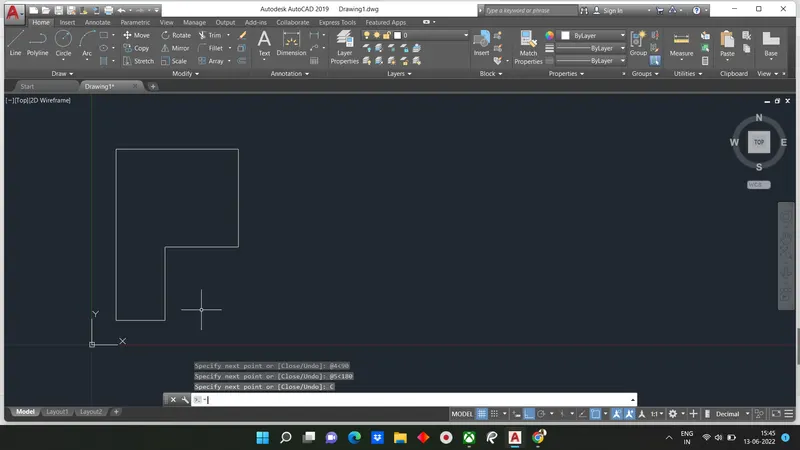
Steps for creating geomtry P-10 using Relative Polar Coordinate System
i) Select line tool by entering LINE command in command tab
ii) Specify starting coordinate of point 1 as1,1 in command line
iii) Specify starting coordinate of point 2 as @2<0 in command line
iv) Specify starting coordinate of point 3 as @3<90 in command line
v) Specify starting coordinate of point 4 as @3<0 in command line
vi) Specify starting coordinate of point 5 as @4<90 in command line
vii) Specify starting coordinate of point 6 as @5<180 in command line
viii) Click CLOSE on command line
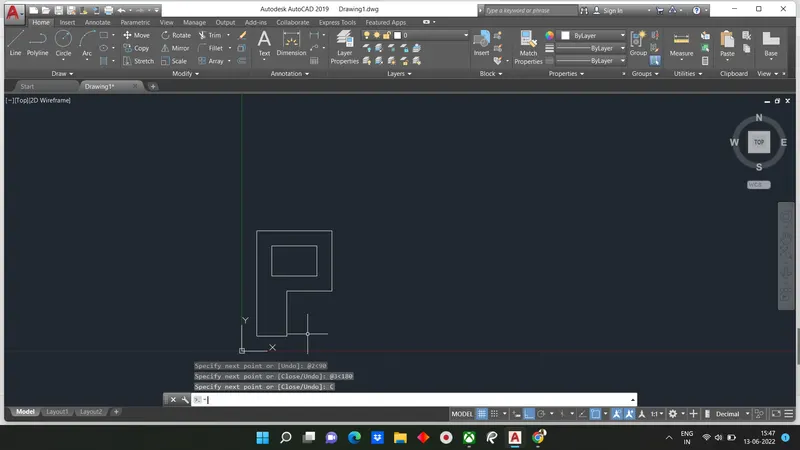
ix) Select line tool by entering LINE command in command tab
x) Specify next coordinate of point 7 as 2,5 in command line
xi) Specify next coordinate of point 8 as @3<0 in command line
xii) Specify next coordinate of point 9 as @2<90 in command line
xiii) Specify next coordinate of point 10 as @5<180 in command line
xiv) Click close on command line
RESULT:
Wood profile
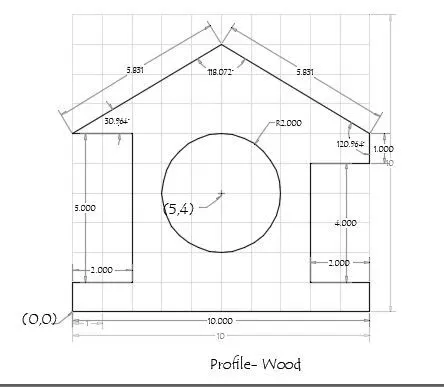
Step for creating geometry profile by DIrect Distance Entry Method
i) Select line tool by entering Line command
ii)Specify starting coordinate point 1 as 0,0
iii) Enter length of point 2 as 10 in command line towards +ve x-axis
iv) Enter length of next point 3 as 1 in command line toawrds +ve y-axis
v) Enter next length of point 4 as 2 in command line towards -ve x-axis
vi) Enter length of point 5 as 4 in command line toawrds +ve y-axis
vii) Enter length of point 6 as 2 in command line towards +ve x-axis
viii) Enter length of point 7 as 1 in command line at an angle of<149.036 from x-direction
ix) Enter length point 8 as 5.831 in command line toward +ve x-axis
x) Enter length point 9 as 2 in command line toward +ve x-axis
xi) Enter length point 10 as 5 in command line towards -ve y-axis
xii) Enter length point 11 as 2 in command line towards+ve x-axis
xiii) Click CLOSE
xiv) Select circle tool by entering CIRCLE command
xv) Specify centre point of circle as 5,4
xvi) Specify radius of circle as 2
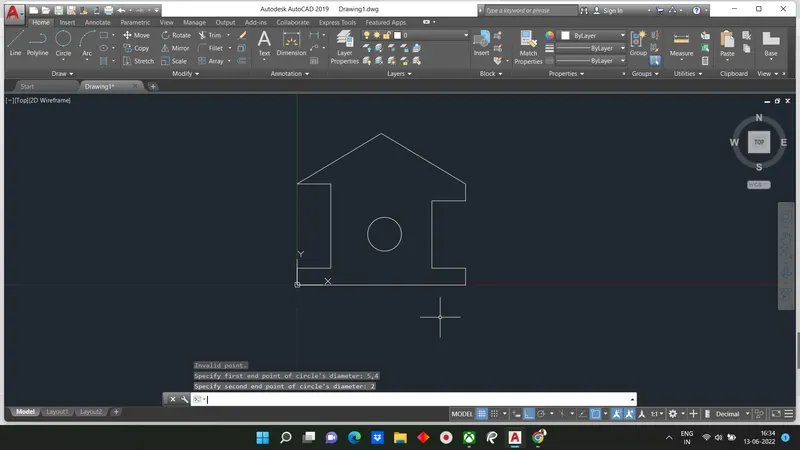
Result:
Queen Post Truss
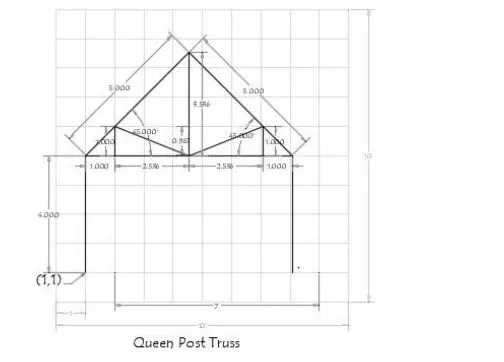
Step for creating tool by entering Line command in command tab
i) Select line tool by entering LINE command in command
ii) Specify next coordinate of point 1 as 1,1 in command line
iii) Specify next coordinate of point 2 as @0,4 in command line
iv) Specify next coordinate of point 3 as @3.536,3.536 in command line
v) Specify next coordinate of point 4 as @3.536, -3.536 in command line
vi) Specify next coordinate of point 5 as @0,-4 in commaand line
vii) Press ESC to cancel LINE command
viii) Select line tool again entering Line command
ix) Join point 2 & 4
x) Press ESC again
xi) Select line tool again by entering LINE command in command tab
xii) Specify next coordinate of point 6 as 4.536,5 in command line
xiii) Specify next coordinate of point 7 as @-2.536,1 in command line
xiv) Specify next coordinate of point 8 as @0,-1 in command line
xv) Press ESC
xvi) Select line tool
xvii) Specify coordinate of point 6 as 4.536, 5 in command line
xviii) Specify next coordinate of point 9 as @2.536,1 in command line
xix) Specify next coordinate of point 10 as @0,1 in command line
xx) press ESC
xxi)Select line tool again
xxii)join 3 & 6
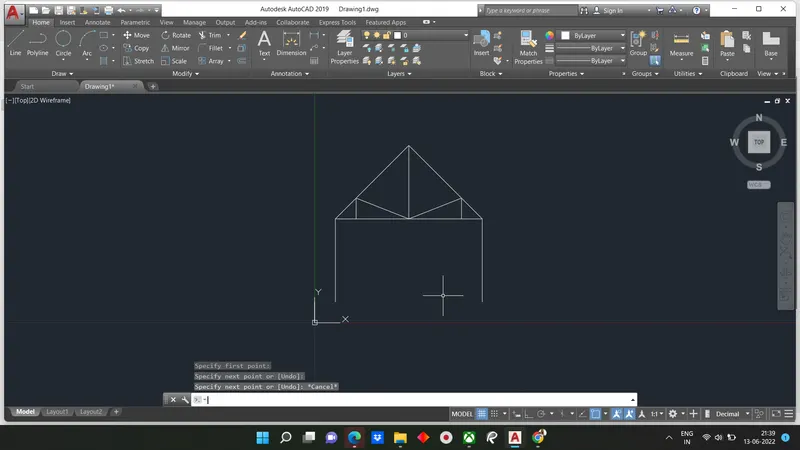
Result:
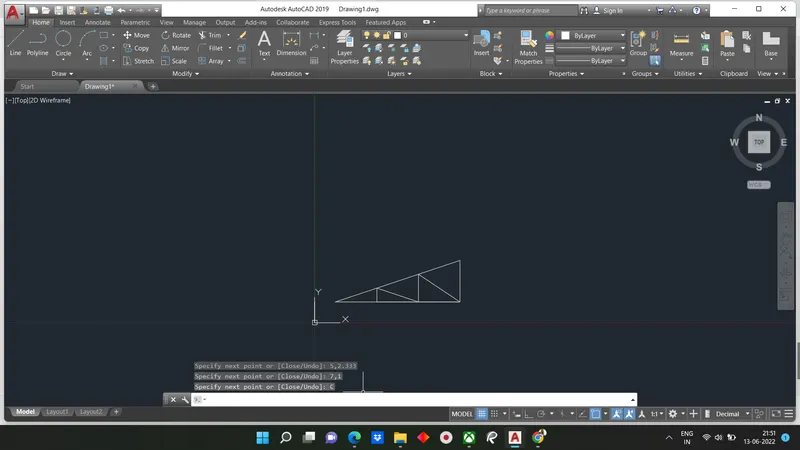
Geometry of Queen Mono Pitch
Steps creating Mono PitchUsing Absolute coordinate System
i) Select line tool entering Line command
ii) Specify starting coordinate point 1 as 1,1 command line
iii) Specify next coordinate point 2 as 7,1 command line
iv) Specify next coordinate point 3 as 7,3 in command line
v) Click CLOSE
vi) Select Line tool by entering LINE command in command tab
vii) Specify next coordinate point 4 as 3,1
viii) Specify next coordinate point 5 as 3,1.667
ix) Specify next coordinate point 6 as 5,1
x) Specofy next coordinate point 7 as 5,2.333
xi) Specify next coordinate point 8 as 7,1 command line
x) Press ESC
Result: