Creation of Column Schedule and Drawing Template using AutoCad
Aim : To create column schedule and drawing template using AutoCad
Introduction and Prerequisite :
- Open autocad application
- Type Qnew and open new drawing
- Set units according to drawing
- Switch on object snap and object snap modes : Endpoint, Midpoint, Center, Nearest, Intersection, Perpendicular and Node
- Ortho mode is ON
Problem 1 :
Aim : To create a column schedule using Autocad
(Some dimensions are assumed)
Procedure :
- Set units to engineering
- Set units in dimstyle to engineering
- Enter style in command and set font name romans.shx and height 8"
- Justify text should be left
- Enter command line L
- Using line command draw a rectangle size of 90'x45'
- Enter offset command and enter offset distance of 10'
- Draw lines at top and bottom of rectangle with 10' distance taken from 90' line (towards inside)
- Draw 11 lines using offset with distance 7.5' each taken from 45' line
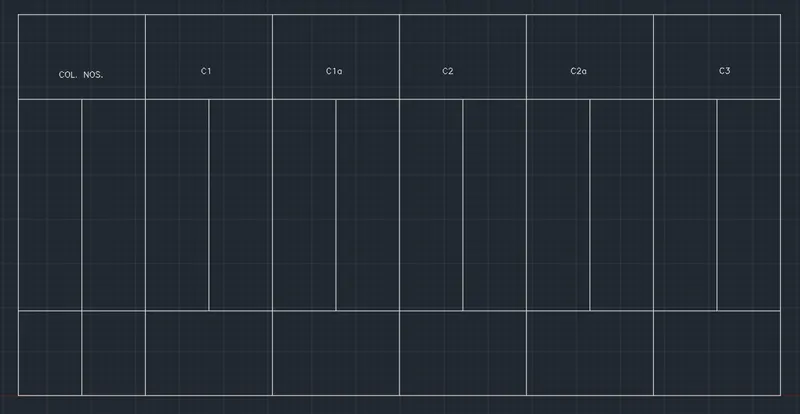
- Trim off lines and name 1st column as COL. NOS., 2nd as C1, 3rd as C1a, 4th as C2, 5th as C2a and 6th as C3 (using Text command and specifying a point with rotation angle as zero) as shown below (take font type as romans.shx and font height 8". Take text justify as left)
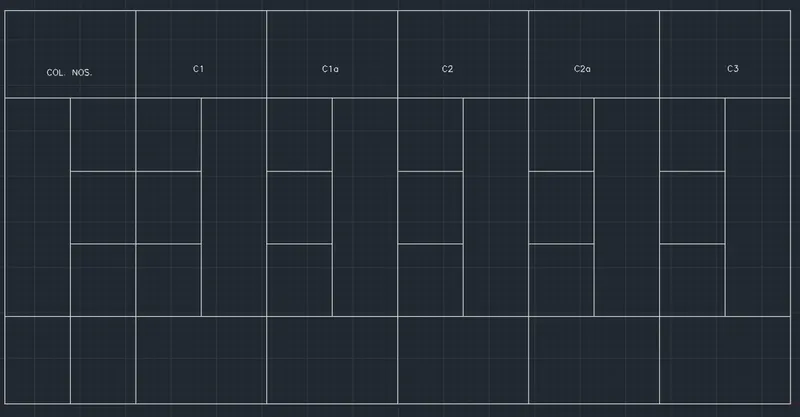
- Divide one sub column into 3 rows in each main column (each row offset distance is 8.3') as shown below
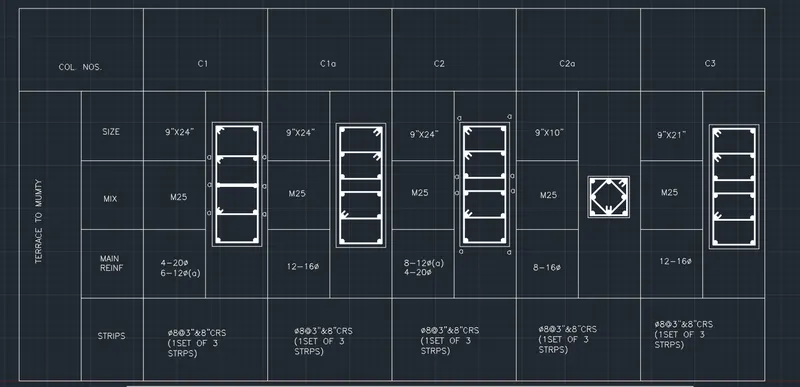
- Now using text command write 1st column of "COL. NOS" as TERRACE TO MUMTY with rotation angle 90 degree
- In 2nd column of "COL. NOS" using text command write 1st row as SIZE, 2nd row as MIX and 3rd row as MAIN REINF. and at bottom write STRPS.
- Similary using text command mention size row of each column such as :
C1 Size = 9" x 24", C1a Size = 9" x 24", C2 Size = 9" x 24", C2a Size = 9" x 10", C3 Size = 9" x 21" - Using text command mention mix of each column as M25
- Using text command mention main reinforcement (in the MAIN REINF row) of each column such as :
`C1 = 4-20phi , 6-12phi (a)`
`C1a = 12-16 phi`
`C2 = 8-20phi (a) , 4-12phi`
`C2a = 8-16phi`
`C3 = 12-16phi` - Using text command mention strips row of each column as `phi8`@3" and 8" CRS ( 1 SET of 3 STRPS)
- Now draw a rectangle of size 6'X15' in 2nd column of C1 and draw another rectangle inside 1st rectangle by taking offset of 6"
- Draw a mid line to the inner rectangle and draw another two lines above and below of midline by taking offset of 1"
- Draw another two lines above and below of mid line by taking offset of 3.5' from it
- Remove midline
- Now draw a circle of 3" at every corner (as per mentioned in the diagram) and hatch it
- Draw lines of 8" tangent (angle of lines varies from 45 degree, 225 degree, 315 degree) to 3 circles as per mentioned in the diagram of column C1
- Mention text letter "a" as per diagram
- Similary in 2nd column of C1a draw a rectangle of size 6'X15' and draw another rectangle inside 1st rectangle by taking offset of 6"
- Draw a mid line to the inner rectangle and draw another two lines above and below of midline by taking offset of 10"
- Draw another two lines above and below of mid line by taking offset of 4' from it
- Remove midline
- Now draw a circle of 3" at every corner (as per mentioned in the diagram) and hatch it
- Draw lines of 8" tangent (angle of lines varies from 45 degree, 225 degree, 315 degree) to 3 circles as per mentioned in the diagram of column C1a
- Similary in 2nd column of C2 draw a rectangle of size 6'X15' and draw another rectangle inside 1st rectangle by taking offset of 6"
- Draw a mid line to the inner rectangle and draw another two lines above and below of midline by taking offset of 10"
- Draw another two lines above and below of mid line by taking offset of 4' from it
- Remove midline
- Now draw a circle of 3" at every corner (as per mentioned in the diagram) and hatch it
- Draw lines of 8" tangent (angle of lines varies from 45 degree, 225 degree, 315 degree) to 3 circles as per mentioned in the diagram of column C2
- Now draw a square of size 5' each side and draw another square inside first rectangle by taking offset of 4"
- Connect midpoints of inner square
- Draw lines of 8" tangent (angle of lines varies from 45 degree, 225 degree, 315 degree) to 2 circles as per mentioned in the diagram of column C2a
- In 2nd column of C3 draw a rectangle of size 6'X15' and draw another rectangle inside 1st rectangle by taking offset of 6"
- Draw a mid line to the inner rectangle and draw another two lines above and below of midline by taking offset of 10"
- Draw another two lines above and below of mid line by taking offset of 4' from it
- Remove midline
- Now draw a circle of 3" at every corner (as per mentioned in the diagram) and hatch it
- Draw lines of 8" tangent (angle of lines varies from 45 degree, 225 degree, 315 degree) to 3 circles as per mentioned in the diagram of column C3
- Change line weight to 0.30mm to the inner sections of all rectangles and square
Result :
Problem 2:
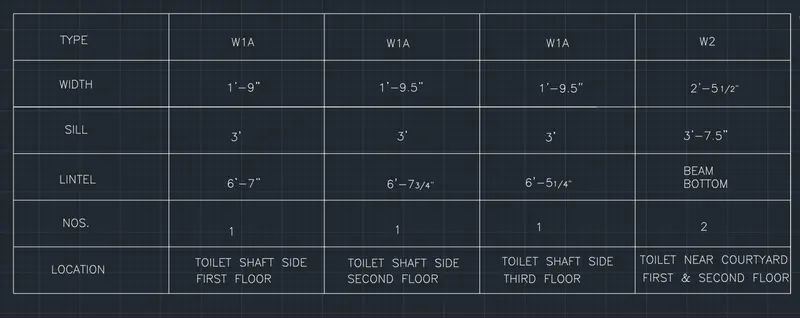
Aim : To create window schedule using AutoCad
(Some dimensions are assumed)
Procedure :
- Set units to engineering
- Set units in dimstyle to engineering
- Draw a rectangle using line command of length of 100' by moving cursor towards right, 36' upwards, 100' left and 36' downwards
- Using offset command with offset distance 20' divide the rectangle into 5 columns
- Again using offset command with offset distance 6' divide the rectangle into 6 rows
- Using text command with height of text as 1' and 8" for fractional number, justify as left and line weight as 0.15mm, mention the text according to columns and rows given below:
1st column 1st row : TYPE
1st column 2nd row : WIDTH
1st column 3rd row : SILL
1st column 4th row : LINTEL
1st column 5th row : NOS.
1st column 6th row : LOCATION
2nd column 1st row : W1A
2nd column 2nd row : 1'9"
2nd column 3rd row : 3'
2nd column 4th row : 6'-7"
2nd column 5th row : 1
2nd column 6th row : TOILET SHAFT SIDE FIRST FLOOR
3rdcolumn 1st row : W1A
3rd column 2nd row : 1'9.5"
3rd column 3rd row : 3'
3rd column 4th row : 6'-7 3/4"
3rd column 5th row : 1
3rd column 6th row : TOILET SHAFT SIDE SECOND FLOOR
4th column 1st row : W1A
4th column 2nd row : 1'9.5"
4th column 3rd row : 3'
4th column 4th row : 6'-5 1/4"
4th column 5th row : 1
4th column 6th row : TOILET SHAFT SIDE THIRD FLOOR
5th column 1st row : W2
5th column 2nd row : 2'-5 1/2"
5th column 3rd row : 3'-7.5"
5th column 4th row : BEAM BOTTOM
5th column 5th row : 2
5th column 6th row : TOILET NEAR COUTYARD FIRST & SECOND FLOOR
- Using text command with height of text as 1' and 8" for fractional number, justify as left and line weight as 0.15mm, mention the text according to columns and rows given below:
Result :
Problem 3 :
Aim : To create drawing template using AutoCad
(Some dimensions are assumed)
Procedure :
- Set units to engineering
- Set units in dimstyle to engineering
- Draw a rectangle of 114'-1" X 13'-2"
- Draw another rectangle inside first rectangle of with offset distance 5"
- Using Multi line text command write a text with text height 8", text style romans.shx and justify as left
- Now create 4 columns inside the rectangle.
1st column of size : 49'-7" X 12'-6"
2nd column of size : 23'-1" X 12'-6"
3rd column of size : 12'-7" X 12'-6"
4th column of size : 26'-9" X 12'-6"
In between 1st & 2nd, 2nd & 3rd, 3rd & 4th columns lines are created with 5" gap - Following notes is the text written in the 1st column
Notes :
1. All levels given are finished floor levels unless mentioned otherwise.
2. Dimensions are not to be scaled.
3. Contractors must verify all dimensions at site before commencement at any work.
4. Contractors must notify the architect/PM of all discrepancies in the drawings.
5. This drawing is the propety of Skill Lync. - In 2nd column two rows are created with 32" offset and in the first row write using text command : Project : Pearl villa and in the second row write using text command : Architects
- Now 3rd, 4th columns are divided into 5 rows with offset distance 32"
- In the 3rd column using text command mention the following text :
1st row : Drawing title
2nd row : Drawing no
3rd row : Issued date
4th row : Rev no ( also draw a vertical line beside text) - In the 4th column using text command mention the following text :
1st row : Drawing list
2nd row : IAS/201802/A/901
(From row 3 to row 5 make 3 sub columns of size 8'-11" x 7'-2")
3rd row is left empty
4th row 1st sub column : Date and 2nd sub column : Issued By
5th row 2nd sub column : Scale and 3rd sub column : 1:75
Result :

Problem 4:
Aim : To create list of drawing schedule
(Some dimensions are assumed)
Procedure :
- Set units to engineering
- Set units in dimstyle to engineering
- Using line command draw a rectangle of size 25' X 33'
- At the top of rectangle draw a offset line of distance 1' and write a text "PROJECT" (Style : Segoe UI Historic and height 5")
- After that draw another with offset distance 2' and write a text "LIST OF ARCHITECTURAL DRAWINGS" (Style : Segoe UI Historic and font height 5")
- Now take a offset distance of 1' and draw 29 lines (downwards)
- Frome here divide it into 3 columns and write the text in the style Times roman and font height of 5"
In the 1st column write text "NO"
In the 2nd column write text "DRAWING NO"
In the 3rd column write text "DESCRIPTION" - Under "NO" column each row mentione with numbers from 1-29
- Under "DRAWING NO" column each row consists of following text
IAS/201802/A/100
IAS/201802/A/101
IAS/201802/A/102
IAS/201802/A/801
IAS/201802/A/802
IAS/201802/A/803
IAS/201802/A/803.D1
IAS/201802/A/804
IAS/201802/A/804.D1
IAS/201802/A/805A
IAS/201802/A/805B
IAS/201802/A/805C
IAS/201802/A/805.D1
IAS/201802/A/806
IAS/201802/A/806.D1
IAS/201802/A/807
IAS/201802/A/807.D1
IAS/201802/A/808A
IAS/201802/A/808B
IAS/201802/A/808(A/B)
IAS/201802/A/809A
IAS/201802/A/809B
IAS/201802/A/809(A/B)
IAS/201802/A/810
IAS/201802/A/810.D1
IAS/201802/A/811
IAS/201802/A/811.D1
IAS/201802/A/900
IAS/201802/A/901 - Under "Description" column each row consists of following text
Ground floor plan
First floor plan
Second floor plan
Foyer entrance wall painting
Living room cupboard
Living room T.V unit
Living room T.V unit details
Guest bedroom dressing wardrobe
Guest bedroom dressing wardrobe details
Kitchen plans
Kitchen elevation
Kitchen section
Kitchen details
Utility storage unit
Utility storage unit details
Bedroom-2 Dressing Wardrobe
Bedroom-2 Dressing Wardrobe details
Bedroom-3 Dressing Wardrobe-A
Bedroom-3 Dressing Wardrobe-B
Bedroom-3 Dressing Wardrobe-A,B Details
Bedroom-4 Dressing Wardrobe-A
Bedroom-4 Dressing Wardrobe-B
Bedroom-4 Dressing Wardrobe-A,B Details
Bedroom-5 Dressing Wardrobe
Bedroom-5 Dressing Wardrobe details
Study room book shelf
Study room book shelf details
Schedule of finishes
Drawing list
Result :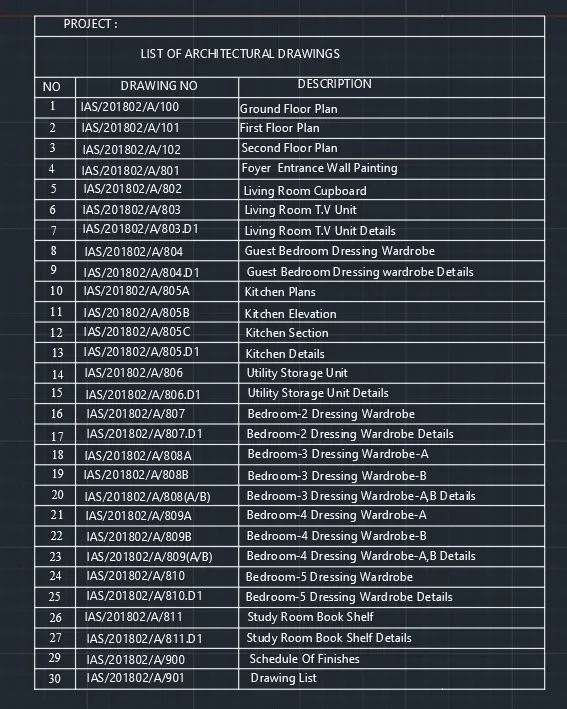
Problem 5:
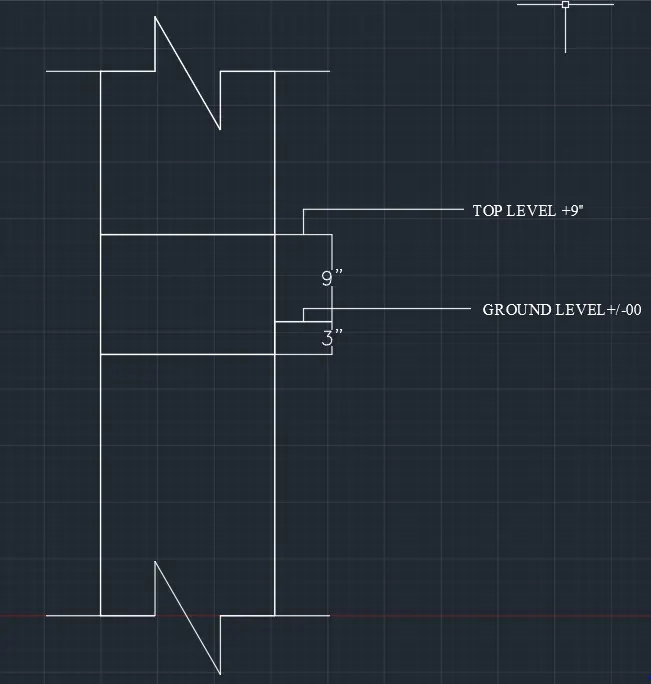
Aim : To create a detailed beam using AutoCad
(Some dimensions are assumed)
Procedure :
- Set units to engineering
- Set units in dimstyle to engineering
- Draw line of 10" towards right then continue the line 5" upwards
- From there a line downwards @12"<300 and then 5" line upwards
- Continue the line 10" towards right
- Now take midpoint first 10" line, from there draw 50" line upwards (point a)
- From point "a" draw one line of 5" towards left and also draw another line 5" towards right
- Continue the previous line of 5" upwards
- From there a line downwards @12"<300 and then 5" line upwards
- Continue the line 10" towards right
- Now from midpoint of last line that is 10" line, draw a line downwards of 50" which closes the diagram
- Draw a line at a distance 25", 28"(line a) , 37" of length 16"
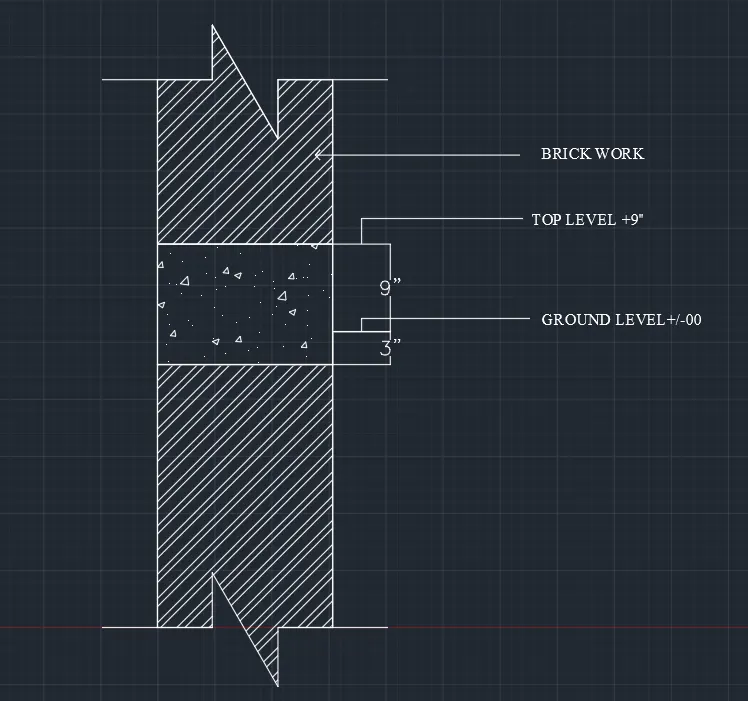
- Using dimlinear mention the dimension 3"(mention the text as GROUND LEVEL +/-00) ,9"(mention the text TOP LEVEL +9") as shown below :
- Using hatch command hatch this area and use hatch pattern AR-CONC with hatch pattern scale 10
- Remaining area is hatched using ANS132 pattern and hatch pattern scale of 50
- Mention this area as BRICK WORK using text command
Result :