Creation of Column Schedule and Drawing Template using AutoCad
CHALLENGE 5
AIM
To draw the following plan using autocad.
INTRODUCTION
This Column schedule is created using autocad and the procedure is explained in detail in each steps and the commands are used in this drawing are.
COMMANDS USED IN THIS DRAWING
- L- LINE
- F8- ORTHO MODE
- GRIDMODE
- F10 - POLAR TRACKING
- ST - STYLE TEXT
- DT-SINGLE TEXT
- T- MULTITEXT
- C- CIRCLE
- CO-COPY
- M-MOVE
- T- TEXT
- TR- TRIM
- O-OFFSET
- F- FILLET
- D-DIMENSION STYLE
- REC-RECTANGLE
PROCEDURE
- open autocad file in windows desktop.
- a dialog box will open it shows startup from scratch.
- click the radio button imperial to start the project.
- in command box type gridmode to show the gridmode by typing 1 in the command box
- type F8 to get ortho on.
- type limmax to set the maximum layout.
- type llmits to set the layout.
- TYPE UN FOR UNITS and set to engineering.
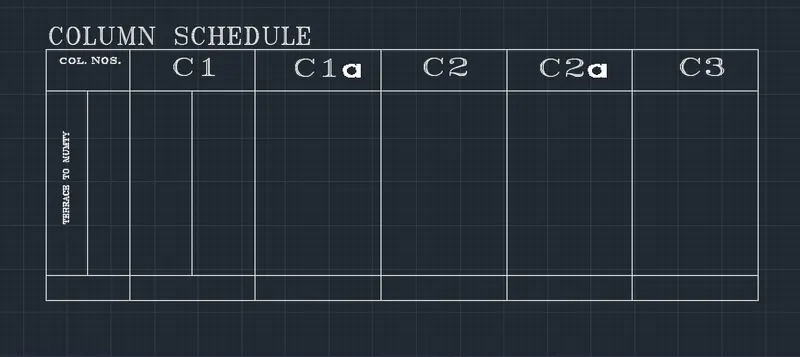
STEP 1
TYPE REC - RECTANGLE
- Specify the first point and draw a rectangle
- specify the next point and close the rectangle and press enter.
TYPE L-LINE
- specify the line to seperate the column to fit the text in.
TYPE O - OFFSET
- Specify the point do the offset at a correct distance.
- draw again to seperate the column at a distance until the schedule coulm is completed.
STEP 2
TYPE DT - SINGLE TEXT
- Specify the first point of the text write the text which is shown in fig.
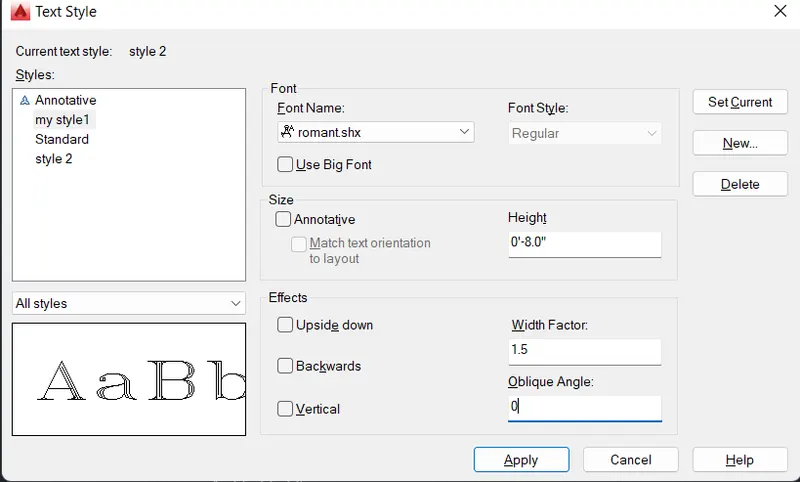
TYPE ST - STYLE TEXT
- Modify the text as it is fit to the schedule
- set a new text style to roaman.shx;and press justify left .
- press the height of the text as 8'' the box as shown.
STEP 3
- Draw the line column as schedule in the box as in schedule.
- type the text which is as in question
- copy the text to next column uopto four times so the column shedule is finished.
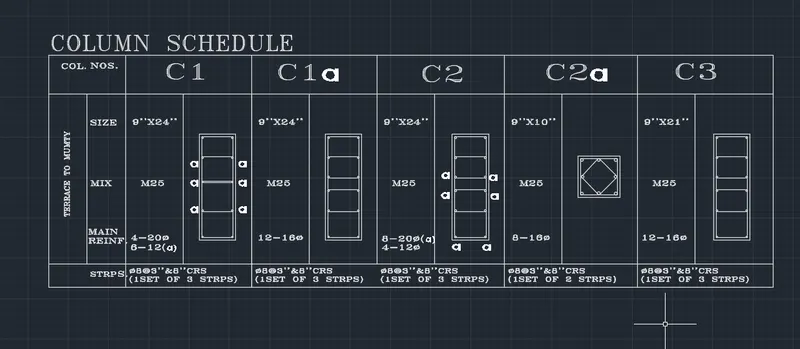
RESULT : The following column schedule is done as per the fig shown is completed.
2)
AIM
To draw the following Window schedule using autocad.
INTRODUCTION
This Window schedule is created using autocad and the procedure is explained in detail in each steps and the commands are used in this drawing are.
COMMANDS USED IN THIS DRAWING
- L- LINE
- F8- ORTHO MODE
- GRIDMODE
- F10 - POLAR TRACKING
- ST - STYLE TEXT
- DT-SINGLE TEXT
- T- MULTITEXT
- ED- EDIT TEXT
- C- CIRCLE
- CO-COPY
- M-MOVE
- T- TEXT
- TR- TRIM
- O-OFFSET
- F- FILLET
- D-DIMENSION STYLE
- REC-RECTANGLE
PROCEDURE
- open autocad file in windows desktop.
- a dialog box will open it shows startup from scratch.
- click the radio button imperial to start the project.
- in command box type gridmode to show the gridmode by typing 1 in the command box
- type F8 to get ortho on.
- type limmax to set the maximum layout.
- type llmits to set the layout.
- TYPE UN FOR UNITS and set to engineering , feet and inches.
STEP 1
TYPE REC - RECTANGLE
- Specify the first point and draw a rectangle
- specify the next point and close the rectangle and press enter.
TYPE ST - STYLE TEXT
- Modify the text as it is fit to the schedule
- set a new text style to roaman.shx;and press justify left .
- press the height of the text as 8'' the box as shown.
STEP 2
TYPE L- LINE
- Create a line for a row in the window schedule.
TYPE O- OFFSET
- Create a offset according to how many rows in the window schedule.
TYPE DT - SINGLE TEXT
- Specify the first point of the text write the text which is shown in question fig.
- type co-copy the text to the aligned to same as in question
- type ed- edit the text so it is easy to change the text as per the following.
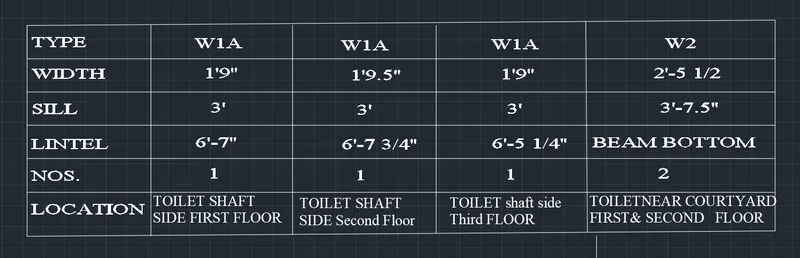
RESULT : The following Window schedule is done as per the fig shown is completed.
3)
AIM
To draw the following Window schedule using autocad.
INTRODUCTION
This Window schedule is created using autocad and the procedure is explained in detail in each steps and the commands are used in this drawing are.
COMMANDS USED IN THIS DRAWING
- L- LINE
- F8- ORTHO MODE
- GRIDMODE
- F10 - POLAR TRACKING
- ST - STYLE TEXT
- DT-SINGLE TEXT
- T- MULTITEXT
- ED- EDIT TEXT
- C- CIRCLE
- CO-COPY
- M-MOVE
- T- TEXT
- TR- TRIM
- O-OFFSET
- F- FILLET
- D-DIMENSION STYLE
- REC-RECTANGLE
PROCEDURE
- open autocad file in windows desktop.
- a dialog box will open it shows startup from scratch.
- click the radio button imperial to start the project.
- in command box type gridmode to show the gridmode by typing 1 in the command box
- type F8 to get ortho on.
- type limmax to set the maximum layout.
- type llmits to set the layout.
- type UN FOR UNITS and set to engineering.
STEP 1
TYPE REC-RECTANGLE
- Specify the first point of the rectangle
- specify the next point until the rectangle shows enough to write in the rectangle.
TYPE T- MULTILINE TEXT
- Specify the first point of the text to be written.
- specify the next point of text to be aligned in the box.
- we can write the text continously in the multiline text.
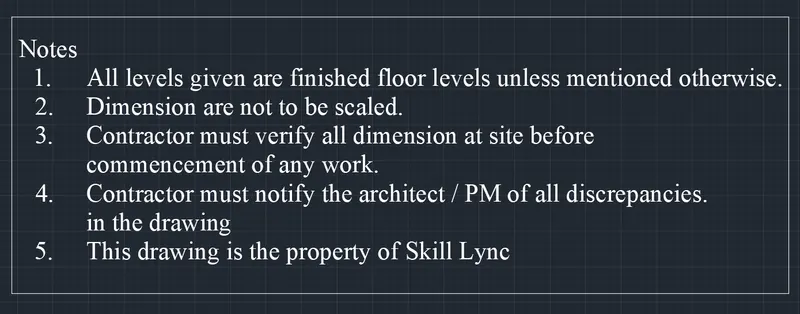
STEP 2
TYPE T - MULTILINE TEXT
TYPE DT - SINGLE TEXT
- Specify the first text point
- Specify the next point the text the multiline text.

RESULT : The following Window schedule is done as per the fig shown is completed.
4)
AIM
To draw the following Window schedule using autocad.
INTRODUCTION
This List of architectural drawing is created using autocad and the procedure is explained in detail in each steps and the commands are used in this drawing are.
COMMANDS USED IN THIS DRAWING
- L- LINE
- F8- ORTHO MODE
- GRIDMODE
- F10 - POLAR TRACKING
- ST - STYLE TEXT
- DT-SINGLE TEXT
- T- MULTITEXT
- ED- EDIT TEXT
- C- CIRCLE
- CO-COPY
- M-MOVE
- T- TEXT
- TR- TRIM
- O-OFFSET
- F- FILLET
- D-DIMENSION STYLE
- REC-RECTANGLE
PROCEDURE
- open autocad file in windows desktop.
- a dialog box will open it shows startup from scratch.
- click the radio button imperial to start the project.
- in command box type gridmode to show the gridmode by typing 1 in the command box
- type F8 to get ortho on.
- type limmax to set the maximum layout.
- type llmits to set the layout.
- type UN FOR UNITS and set to engineering.
STEP 1
TYPE REC-RECTANGLE
- Specify the rectangle of the text in the list of architectural drawing.
TYPE DT- SINGLE TEXT
- Specify the first text in the architectural drawing list.
TYPE CO - COPY
- Copy the text to the offset line according to the shown fig.
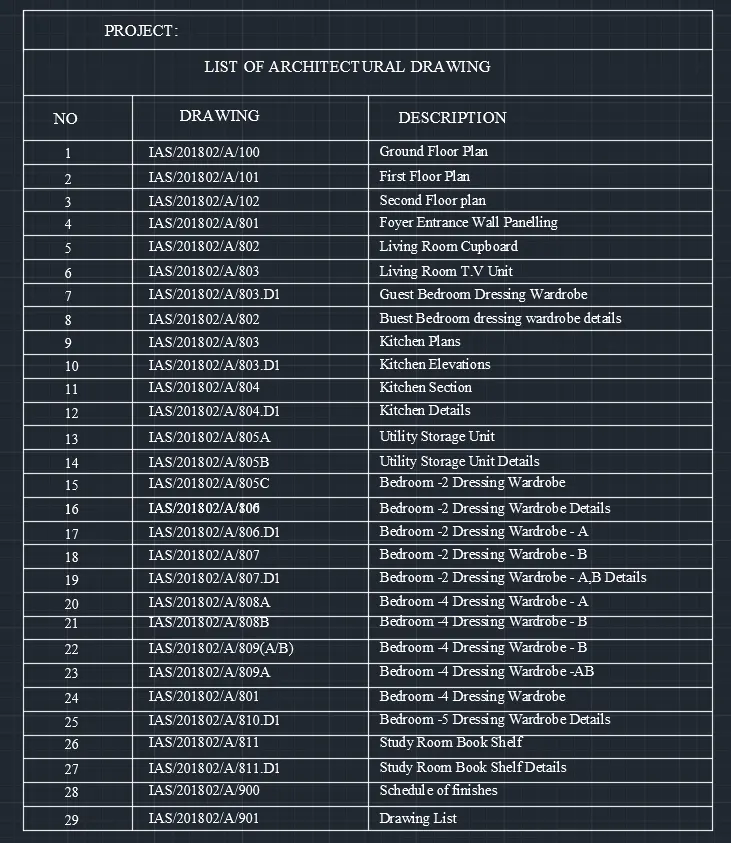
RESULT : The list of drawing is done as per the fig shown is completed.
5)
AIM
To draw the following Window schedule using autocad.
INTRODUCTION
This List of architectural drawing is created using autocad and the procedure is explained in detail in each steps and the commands are used in this drawing are.
COMMANDS USED IN THIS DRAWING
- L- LINE
- F8- ORTHO MODE
- GRIDMODE
- F10 - POLAR TRACKING
- ST - STYLE TEXT
- DT-SINGLE TEXT
- T- MULTITEXT
- ED- EDIT TEXT
- C- CIRCLE
- CO-COPY
- M-MOVE
- T- TEXT
- TR- TRIM
- O-OFFSET
- F- FILLET
- D-DIMENSION STYLE
- REC-RECTANGLE
PROCEDURE
- open autocad file in windows desktop.
- a dialog box will open it shows startup from scratch.
- click the radio button imperial to start the project.
- in command box type gridmode to show the gridmode by typing 1 in the command box
- type F8 to get ortho on.
- type limmax to set the maximum layout.
- type llmits to set the layout.
- type UN FOR UNITS and set to engineering. feet and inches.
STEP 1
TYPE L-LINE
- Specify the first point of the line in the y axis.
- Specify the next point of the line in x axis .
- Specify the length of the 3'9'' in the y axis.
- Specify the next point in the x axis.
TYPE DT- TEXT
- Specify the first point of the text of the dimension.
- type top level in the upper top.
- type DT- single text of the ground level.
- type d for dimension style.
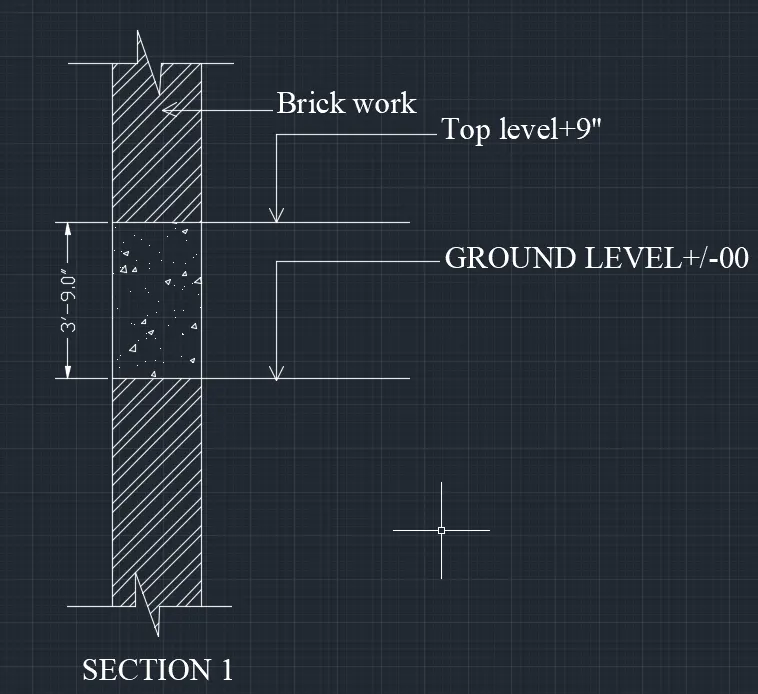
RESULT : The beam details is done as per the fig shown is completed.