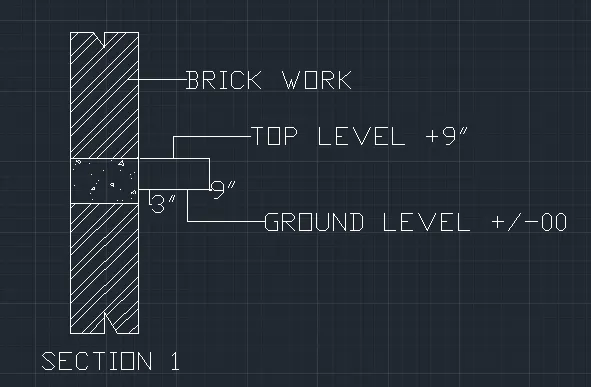
Creation of Column Schedule and Drawing Template using AutoCad
AIM 1:-
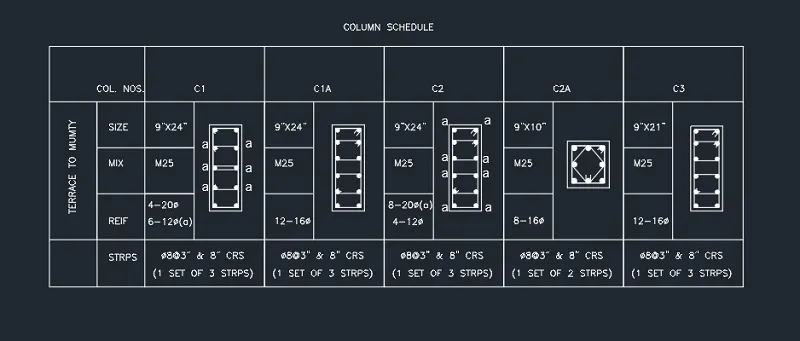
To Create a column sechedule as shown in figure.
Steps:
- Open AutoCAD and enter UN in command box and select enginnering and precision as 0'-0.000"
- Enter the limits in command bar and set the limits as we required
- Then zoom all enter
- Select line command and draw a line of84'in x-direction and a line of 21' in y-direction and complete bigger rectangule
- Then select offset command and enter offset as7' in X-direction. Give offset 11 times in x-direction as7'
- Again ,select the offset command and from top line give offset of 4' in y-directio, and again offset of 3' from the bottem line of the table
- Select text command from the ribbon and select single line text,specify the text height as8'' and angle 0 text as 90 degrees and enter the text as terrace to mumty. The text will appear in the desired angle
- Again select the text command ow select multilinr text drag the cursor each of the row and column .And enter the all text in the table
Steps for drawing columns:-
- The size of column is C1 is 9''x24'',, create a rectangle of size 9''x24'' that is 2'
- Select offset command and enter the valu of offset as 0.5 a smaller rectangule in the original rectangle will be drawn
- Now dividethe line in 4 parts by divide tool by entering DIV in command bar and divide the line
- Draw the lines of division in the inside rectangle
- Now select the circle command and in that select tan tan radius and by selecting both corner lines enter the valu of radius as 0.5
- Draw all the circle in the 4 corners of inner rectangle
- Noe select the fillet command an fillet the edges as radius and enter the radius as 0.5
- Now again select the circle command and select the two-point circle and draw the circle where the geometry is divided in parts
- Select the hatch command from the ribbon and select solid and color white, fill the circle with white color that is the reinforcement bar
- Draw the columns C1a,C2,C2a,C3 in the same manner.
FINAL RESULT:
AIM 2:-
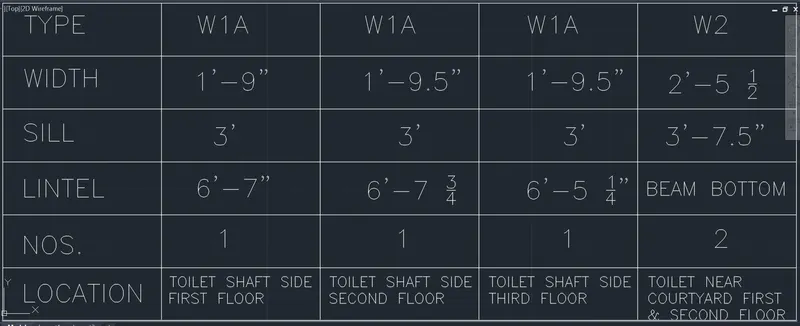
To create a window schedule
Steps foe drawing the schedule
- Open autoCAD and enter the units in command bar and select type as engineering and precision as 0'-0.000''
- Enter the limits in command bar and set the limits as we required
- Then zoom all enter
- select the line command and draw a line of 75'(6'-3'') in X-direction and a line of 24''(2') in Y-direction and complete bigger rectangle
- Then select the offset command and enter offset as15''(1'-3'') in x-direction.Give offset 4 times in the x-direction
- Again select offset command and from line give offset 4' in the y-direction. give such 4 offsets in y-direction
- Now select the text command and in the text command select the option as multiline tex and drag it in each of the row and column and enter the text
- In this way fill the entire table by using multiline tex option
- Keep the size of text in betwwen 1.5'' to 3'' that is the height of the text.
FINAL RESULT:
AIM 3:-
To create the line temolet
- Open autoCAD and enter the units in command bar and select type as engineering and precision as 0'-0.000''
- Enter the limits in command bar and set the limits as we required
- Then zoom all enter
- select the line command and draw a line of150' in x-direction and a line of 20' in y-direction and complete bigger rectangle
- Then select the offset command and enter offset as 50' in x-direction, give 2 mor offsets in the x-direction as 50'
- Again select the offset command and from line give offset of 4' in the y-direction, give such 4 offsetsin y-direction
- Enter the offset command in the right most art of the table enter an offset of12'-6'', give 3 more offsets
- Now select the text command and in te text commam=nd select the multiline text command and drag it to the each of the row and column an enter the text
- Kerp the text height in between 8.5'', to 11.5''
- In this wat fill the text as we required.
FINAL RESULT:
AIM 4:-
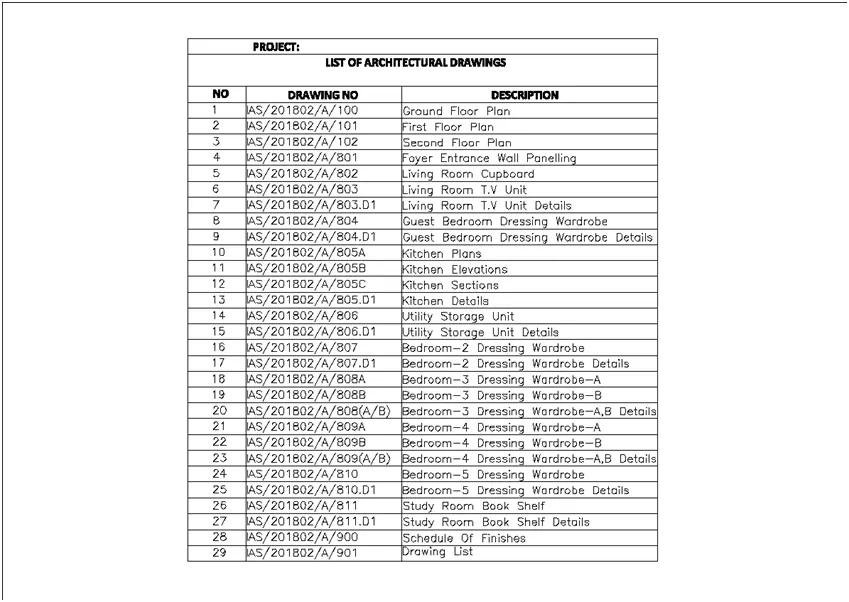
TO create the list of drawing schedule table
- Open autoCAD and enter the units in command bar and select type as engineering and precision as 0'-0.000''
- Enter the limits in command bar and set the limits as we required
- Then zoom all enter
- select the line command and draw a line of135''(11'3'') in x-direction and a line the in y-direction and complete bigger rectangle
- Then select the offset command and enter offset as 10' in x-direction, then 40''(3'4''),then 85''(7'-1'') x-direction
- Again select the offset command and from line give offset of 4'',5'',4'' in the y-direction, give such 28 offsetsin y-direction
- trim the unwanter lines by using trim command
- Now select the text command and in te text commam=nd select the multiline text command and drag it to the each of the row and column an enter the text
- Kerp the text height in between 1.5'', to 2.5''
- In this wat fill the text as we required.
FINAL RESULT:
AIM:5
To create the beam details
- Open autoCAD and enter the units in command bar and select type as engineering and precision as 0'-0.000''
- Enter the limits in command bar and set the limits as we required
- Then zoom all enter
- select the line command and draw a line of 2'-2.4'' in x-direction and a line the in y-direction from the bottem of the beamcross section
- Then select the offset command and enter offset as 10' in x-direction, then 40''(3'4''),then 85''(7'-1'') x-direction
- Again off set the 12'' from he below line in the upward direction
- Enter the hatch command in command box and go to the settings in that select pattern and choose pattern asANSI32
- Choose the scale to hatch as 0.35 and hatch the upper and lower part of beam cross section
- Again by selecting hatch command and choose astype ISO and choose air conc type and hatch the middle part of the beam as concrete
- by using dimentions tool give dimensions to figure
- Now select the text command and in te text commam=nd select the multiline text command and drag it to the each of the row and column an enter the text
- Kerp the text height in between 1.5'', to 2.5''
- In this wat fill the text as we required.
FINAL RESULT: