Creating Kitchen layout, Hatching of Architectural elements and sectional view of an Industrial Building in AutoCad
1.
AIM: Application of autoCAD to Layout of kitchen with including hatching and others detail information.
INTRODUCTION: In this challenge, application of drawing and modifying tools for drawing of layouts, elevation and section is used and in advanced hatching related work is done.
PROCEDURE: Following steps are used for Layout of kitchen.
- Set units and limits as per requirement.
Drawing external and internal wall:
- By using horzontal and vertical xline draw walls.
- Use Trim, Fillet, Offset tools for drawing of walls.
Drawing of Door and Window:
- For drawing of door and window make opening on wall.
- Make door using circle, rectangle and trim tool.
- Make window using pl, rectangle and trim tool.
- Move this to perfect position by using snap tools.
Drawing of furniture, kitchen blocks and bath and wc block:
- For adding this block command ADC.
- Drag the require blocks to autoCAD screen.
Text:
- From rebbon select text object then specify heigth of text then provide rotation angle of text.
For editing text used text edit command or double quick on text.
- According to requirement single and double text is used.
- For setting of text command ST and set diallog box.
Dimension:
- In this drawing, dimension line with dot end is used.
- Do dimensioning using dimlinear command.
- For continuning dimension from last point command dimcontinue.
- We we have to setting of dimension for changing of dimension unit, text and arrow setting command dst and enter.
- Diallog box open.
- After modifying dimension setting dont forget to quick on set current, otherwise before setting exists.
INSERTION OF BLOCK:
- For adding block to drawing,
command block, diallog box opens.
- Select point, select oject, do other setting related exploading and scale.
- Specify the location of block.
- To edit block use blockedit command.
HATCHING:
- Command "H or hatching".
- According to material type choose, hatching pattern.
- There are three types of hatching predefined, user defined and custom usually custom hatching is avoided.
- For solid oject we can you solid pattern with different colours.
- Select hatching type and specify location of hatching.
- We can use option like associative, separatily etc.
- If you have to provide gradient then go to hatching setting and choose gradients.
- Gradient is of single or double colours.
- We can alter the colours and pattern of gradient with changing the settings of hatching and gradient.
- We can do hatching and gradient both also.
- We can do display setting like hatching sent to back, take on front etc.
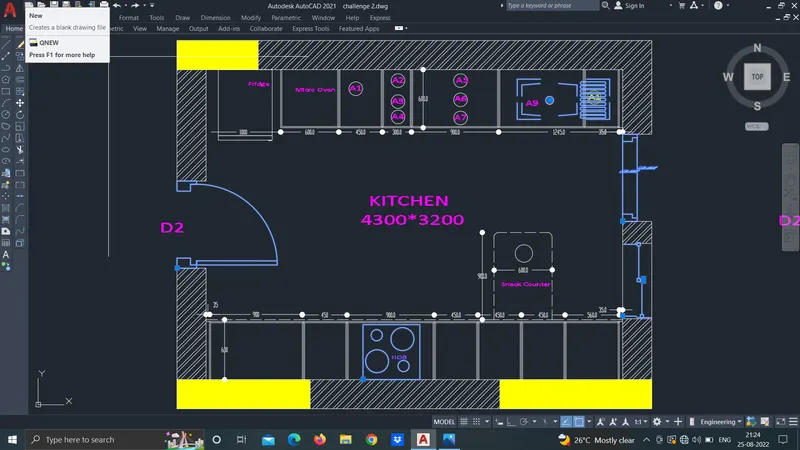
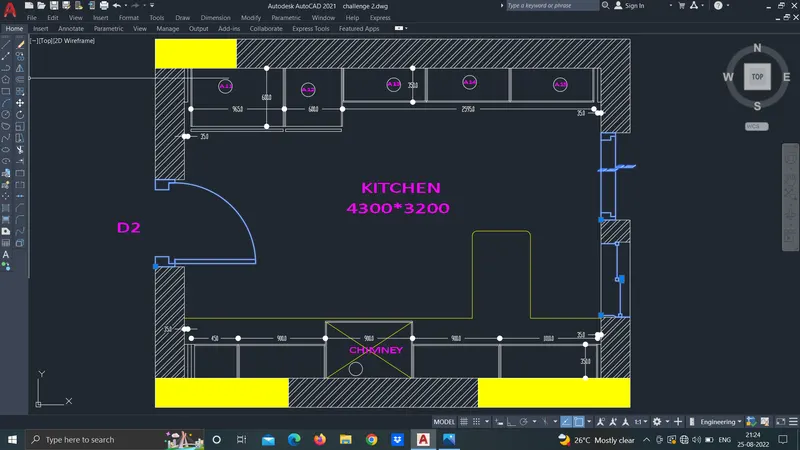
RESULT: I understood how to draw layout of building and use of block and hatching in it.
2.0
AIM: Drawing of elevation using autocad software and hatching and gradient related practices.
INTRODUCTION: In this challenge, application of drawing and modifying tools for drawing of layouts, elevation and section is used and in advanced hatching related work is done.
PROCEDURE:
- Setting limits and units, draw external wall using xline.
- Atfter that mark the different height on elevation like window height, lintel height, slab height and plinth height.
- Take projection from plan of object which will show in elevation.
- Draw door, window, column, slab thickness, plinth details.
- Draw staircase, make sure rise will shown in elevation.
Drawing external and internal wall:
- By using horzontal and vertical xline draw walls.
- Use Trim, Fillet, Offset tools for drawing of walls.
- Use 230 mm thickness for external wall and for internal wall 150 mm.
Drawing of Door and Window:
- For drawing of door and window make opening on wall.
- Make door using circle, rectangle and trim tool.
- Make window using pl, rectangle and trim tool.
- Move this to perfect position by using snap tools.
LAYER:
- After completion of drawing work, specify objects of building to different layer.
- Objects like wall, door, window, staircase, furniture, text, dimension, hatching and projection etc. are make layer with different colour.
- Use layer command, then specify colour, line weight and line type.
Text:
- From rebbon select text object then specify heigth of text then provide rotation angle of text.
For editing text used text edit command or double quick on text.
- According to requirement single and double text is used.
- For setting of text command ST and set diallog box.
Dimension:
- In this drawing, dimension line with dot end is used.
- Do dimensioning using dimlinear command.
- For continuning dimension from last point command dimcontinue.
- We we have to setting of dimension for changing of dimension unit, text and arrow setting command dst and enter.
- Diallog box open.
- After modifying dimension setting dont forget to quick on set current, otherwise before setting exists.
LEADERS:
- When we have to note information about specific object and there is no space near the object then leader is neccesary.
- When we require leader with more than 4 points then command qleader.
- Fill dialbox and enter.
INSERTION OF BLOCK:
- For adding block to drawing,
command block, diallog box opens.
- Select point, select oject, do other setting related exploading and scale.
- Specify the location of block.
- To edit block use blockedit command.
HATCHING:
- Command "H or hatching".
- According to material type choose, hatching pattern.
- There are three types of hatching predefined, user defined and custom usually custom hatching is avoided.
- For solid oject we can you solid pattern with different colours.
- Select hatching type and specify location of hatching.
- We can use option like associative, separatily etc.
- If you have to provide gradient then go to hatching setting and choose gradients.
- Gradient is of single or double colours.
- We can alter the colours and pattern of gradient with changing the settings of hatching and gradient.
- We can do hatching and gradient both also.
- We can do display setting like hatching sent to back, take on front etc.
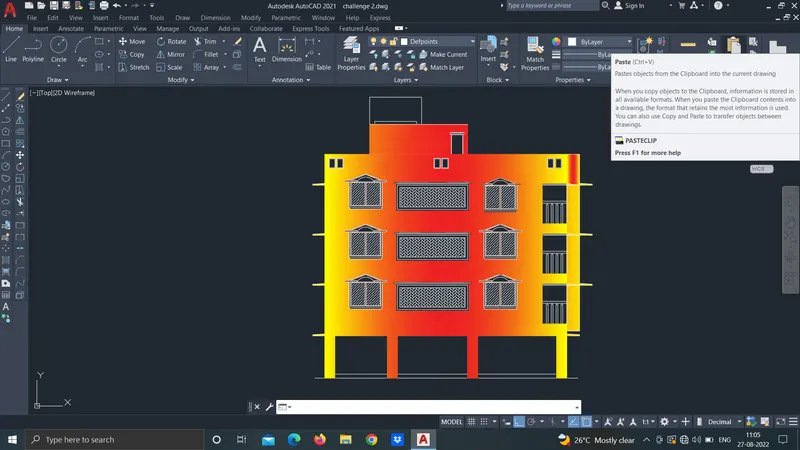
3.0
AIM: Application of autocad to draw section of building and use of hatching for good understanding.
INTRODUCTION: In this challenge, application of drawing and modifying tools for drawing of layouts, elevation and section is used and in advanced hatching related work is done.
PROCEDURE:
- Setting limits and units, draw external wall using xline.
- Atfter that mark the different height on elevation like window height, lintel height, slab height and plinth height.
- Take projection from plan of object which will show in elevation.
- Draw door, window, column, slab thickness, plinth details.
- Draw staircase, make sure rise will shown in elevation.
Drawing external and internal wall:
- By using horzontal and vertical xline draw walls.
- Use Trim, Fillet, Offset tools for drawing of walls.
- Use 230 mm thickness for external wall and for internal wall 150 mm.
Drawing of Door and Window:
- For drawing of door and window make opening on wall.
- Make door using circle, rectangle and trim tool.
- Make window using pl, rectangle and trim tool.
- Move this to perfect position by using snap tools.
LAYER:
- After completion of drawing work, specify objects of building to different layer.
- Objects like wall, door, window, staircase, furniture, text, dimension, hatching and projection etc. are make layer with different colour.
- Use layer command, then specify colour, line weight and line type.
Text:
- From rebbon select text object then specify heigth of text then provide rotation angle of text.
For editing text used text edit command or double quick on text.
- According to requirement single and double text is used.
- For setting of text command ST and set diallog box.
Dimension:
- In this drawing, dimension line with dot end is used.
- Do dimensioning using dimlinear command.
- For continuning dimension from last point command dimcontinue.
- We we have to setting of dimension for changing of dimension unit, text and arrow setting command dst and enter.
- Diallog box open.
- After modifying dimension setting dont forget to quick on set current, otherwise before setting exists.
LEADERS:
- When we have to note information about specific object and there is no space near the object then leader is neccesary.
- When we require leader with more than 4 points then command qleader.
- Fill dialbox and enter.
INSERTION OF BLOCK:
- For adding block to drawing,
command block, diallog box opens.
- Select point, select oject, do other setting related exploading and scale.
- Specify the location of block.
- To edit block use blockedit command.
HATCHING:
- Command "H or hatching".
- According to material type choose, hatching pattern.
- There are three types of hatching predefined, user defined and custom usually custom hatching is avoided.
- For solid oject we can you solid pattern with different colours.
- Select hatching type and specify location of hatching.
- We can use option like associative, separatily etc.
- If you have to provide gradient then go to hatching setting and choose gradients.
- Gradient is of single or double colours.
- We can alter the colours and pattern of gradient with changing the settings of hatching and gradient.
- We can do hatching and gradient both also.
- We can do display setting like hatching sent to back, take on front etc.
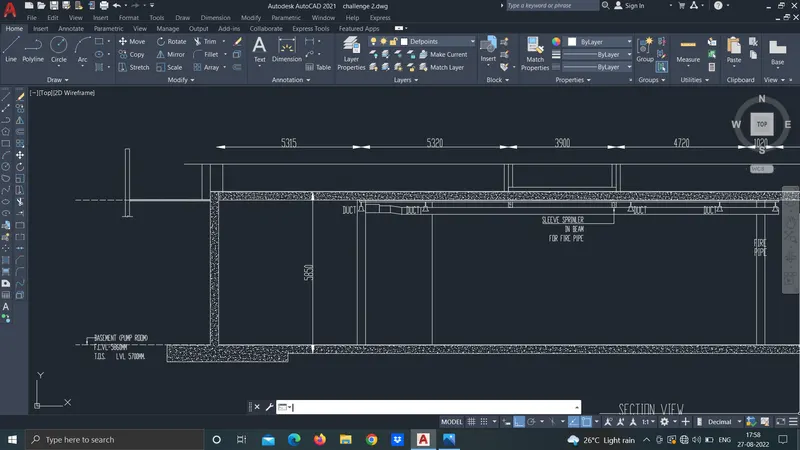
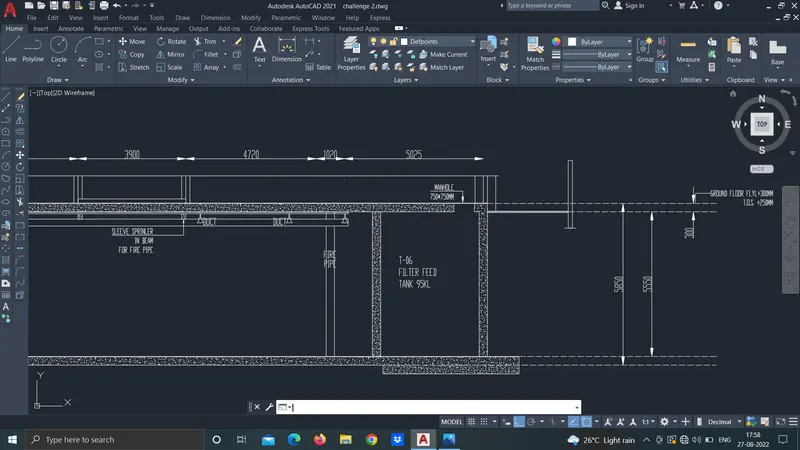
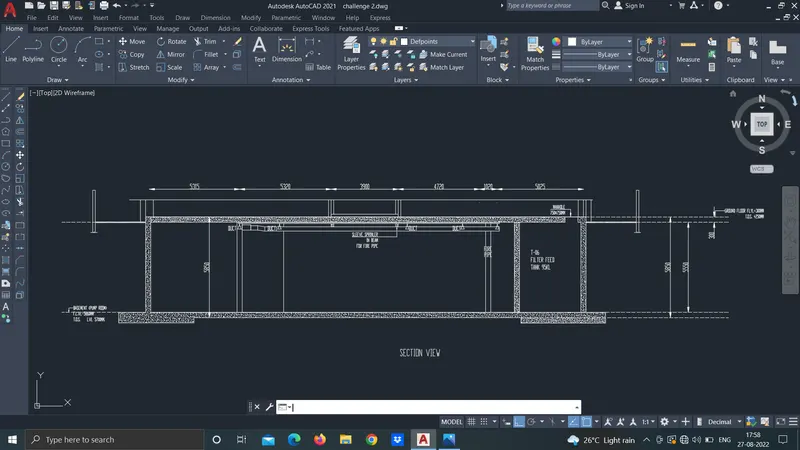
RESULT: I understood how to draw section of different building and providing them hatching in autocad software.